2000 HONDA CIVIC COUPE lock
[x] Cancel search: lockPage 35 of 293
Protectin
g Childre n
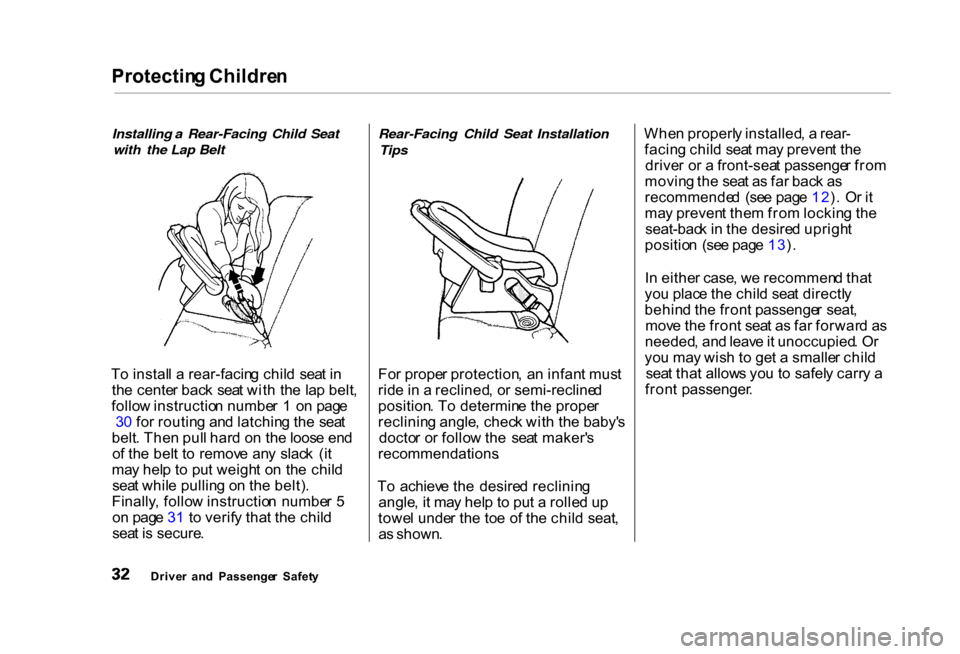
Installing a Rear-Facing Child Seat with the Lap Belt
T o instal l a rear-facin g chil d sea t i n
th e cente r bac k sea t wit h th e la p belt ,
follo w instructio n numbe r 1 o n pag e
3 0 fo r routin g an d latchin g th e sea t
belt . The n pul l har d o n th e loos e en d
o f th e bel t t o remov e an y slac k (i t
ma y hel p t o pu t weigh t o n th e chil d
sea t whil e pullin g o n th e belt) .
Finally , follo w instructio n numbe r 5
o n pag e 3 1 t o verif y tha t th e chil d
sea t i s secure .
Rear-Facing Child Seat Installation
Tips
Fo r prope r protection , a n infan t mus t
rid e in a reclined , o r semi-recline d
position . T o determin e th e prope r
reclinin g angle , chec k wit h th e baby' s
docto r o r follo w th e sea t maker' s
recommendations .
T o achiev e th e desire d reclinin g
angle , i t ma y hel p t o pu t a rolle d u p
towe l unde r th e to e o f th e chil d seat ,
a s shown . Whe
n properl y installed , a rear -
facin g chil d sea t ma y preven t th e
drive r o r a front-sea t passenge r fro m
movin g th e sea t a s fa r bac k a s
recommende d (se e pag e 12 ). O r i t
ma y preven t the m fro m lockin g th e
seat-bac k i n th e desire d uprigh t
positio n (se e pag e 13 ).
I n eithe r case , w e recommen d tha t
yo u plac e th e chil d sea t directl y
behin d th e fron t passenge r seat ,
mov e th e fron t sea t a s fa r forwar d a s
needed , an d leav e it unoccupied . O r
yo u ma y wis h t o ge t a smalle r chil d
sea t tha t allow s yo u t o safel y carr y a
fron t passenger .
Drive r an d Passenge r Safet y
Page 37 of 293
Protectin
g Childre n
I f i t i s necessar y t o pu t a forward -
facin g chil d sea t i n th e front , mov e
th e vehicl e sea t a s fa r t o th e rea r a s
possible , b e sur e th e chil d sea t i s
firml y secure d to th e car , an d th e
chil d is properl y strappe d in th e seat .
Installing a Child Seat with a Lap/
Shoulder Belt
Th e lap/shoulde r belt s i n th e oute r
bac k an d fron t passenge r seatin g
position s hav e a lockin g mechanis m
tha t mus t b e activate d t o secur e a
chil d seat .
Th e followin g page s provid e
instruction s o n ho w to secur e a
forward-facin g chil d sea t wit h thi s
typ e o f sea t belt .
Se e pag e 3 6 fo r ho w to secur e a
forward-facin g chil d sea t i n th e
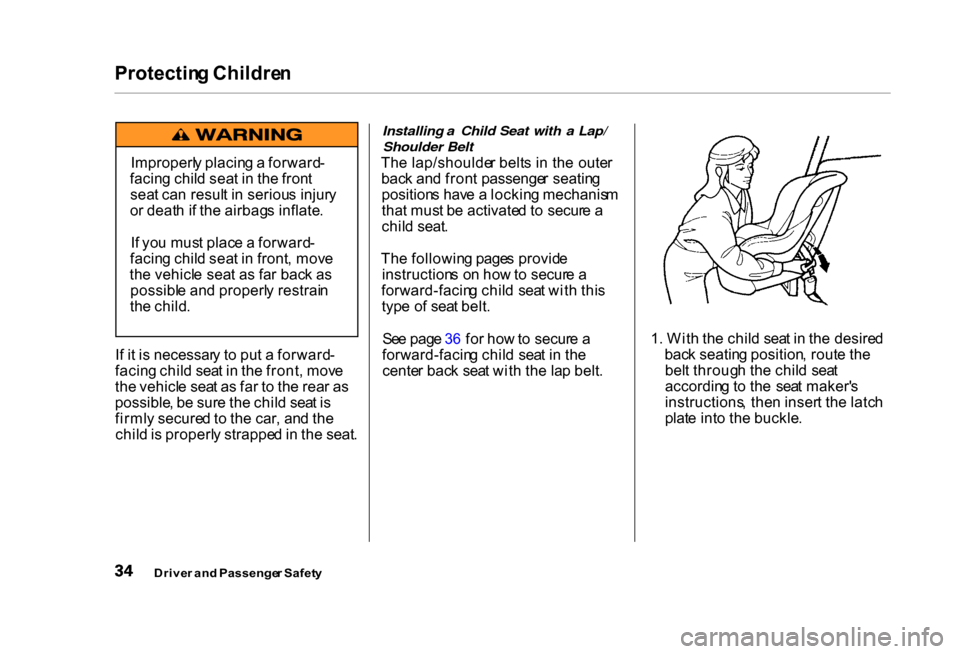
cente r bac k sea t wit h th e la p belt . 1
. Wit h th e chil d sea t i n th e desire d
bac k seatin g position , rout e th e
bel t throug h th e chil d sea t
accordin g t o th e sea t maker' s
instructions , the n inser t th e latc h
plat e int o th e buckle .
Drive r an d Passenge r Safet y
Improperl
y placin g a forward -
facin g chil d sea t i n th e fron t
sea t ca n resul t i n seriou s injur y
o r deat h if th e airbag s inflate .
I f yo u mus t plac e a forward -
facin g chil d sea t i n front , mov e
th e vehicl e sea t a s fa r bac k a s
possibl e an d properl y restrai n
th e child .
Page 38 of 293
Protectin
g Childre n
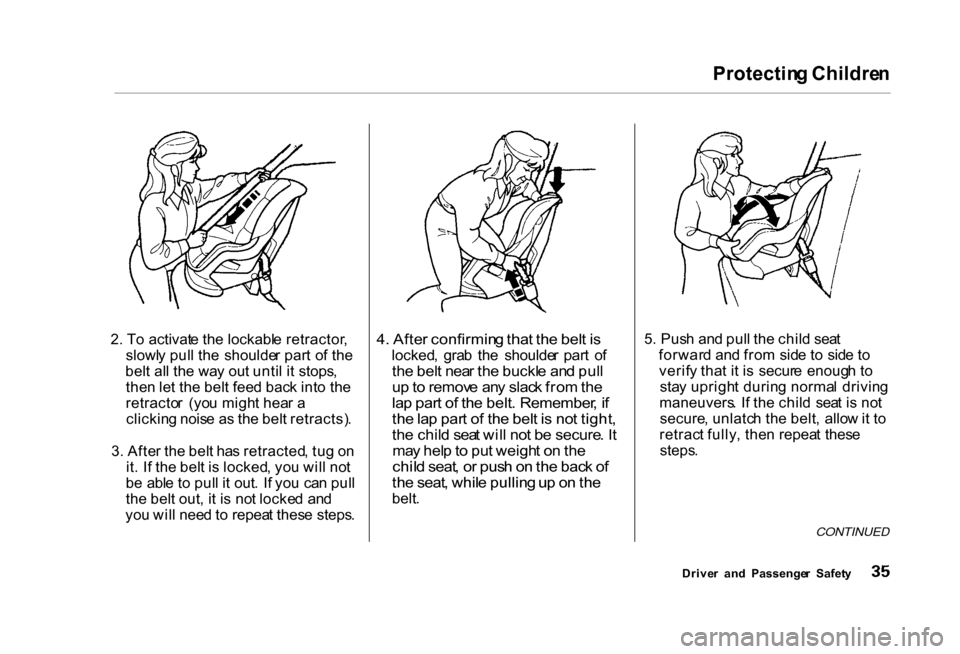
2 . T o activat e th e lockabl e retractor ,
slowl y pul l th e shoulde r par t o f th e
bel t al l th e wa y ou t unti l i t stops ,
the n le t th e bel t fee d bac k int o th e
retracto r (yo u migh t hea r a
clickin g nois e a s th e bel t retracts) .
3 . Afte r th e bel t ha s retracted , tu g o n
it . I f th e bel t i s locked , yo u wil l no t
b e abl e t o pul l i t out . I f yo u ca n pul l
th e bel t out , i t i s no t locke d an d
yo u wil l nee d to repea t thes e steps .
4
. Afte r confirmin g tha t th e bel t i s
locked , gra b th e shoulde r par t o f
th e bel t nea r th e buckl e an d pul l
u p to remov e an y slac k fro m th e
la p par t o f th e belt . Remember , i f
th e la p par t o f th e bel t i s no t tight ,
th e chil d sea t wil l no t b e secure . I t
ma y hel p to pu t weigh t o n th e
chil d seat , o r pus h o n th e bac k o f
th e seat , whil e pullin g u p o n th e
belt . 5
. Pus h an d pul l th e chil d sea t
forwar d an d fro m sid e t o sid e t o
verif y tha t i t i s secur e enoug h t o
sta y uprigh t durin g norma l drivin g
maneuvers . I f th e chil d sea t i s no t
secure , unlatc h th e belt , allo w it t o
retrac t fully , the n repea t thes e
steps .
CONTINUED
Drive r an d Passenge r Safet y
Page 39 of 293
Protectin
g Childre n
T o deactivat e th e lockin g
mechanis m in orde r t o remov e a
chil d seat , unlatc h th e buckle ,
unrout e th e sea t belt , an d le t th e bel t
full y retract .
Installing a Child Seat with the Lap
Belt
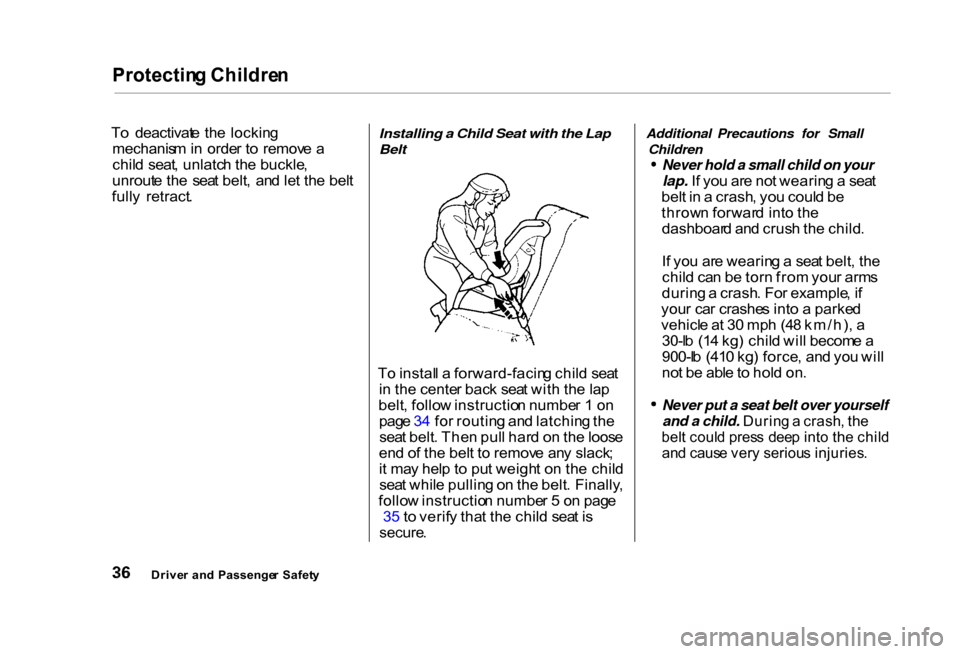
T o instal l a forward-facin g chil d sea t
i n th e cente r bac k sea t wit h th e la p
belt , follo w instructio n numbe r 1 o n
pag e 3 4 fo r routin g an d latchin g th e
sea t belt . The n pul l har d o n th e loos e
en d o f th e bel t t o remov e an y slack ;
i t ma y hel p t o pu t weigh t o n th e chil d
sea t whil e pullin g o n th e belt . Finally ,
follo w instructio n numbe r 5 o n pag e
3 5 to verif y tha t th e chil d sea t i s
secure .
Additional Precautions for Small
Children
Never hold a small child on your
lap. I f yo u ar e no t wearin g a sea t
bel t i n a crash , yo u coul d b e
throw n forwar d int o th e
dashboar d an d crus h th e child .
I f yo u ar e wearin g a sea t belt , th e
chil d ca n b e tor n fro m you r arm s
durin g a crash . Fo r example , i f
you r ca r crashe s int o a parke d
vehicl e a t 3 0 mp h (4 8 km/h) , a
30-l b (1 4 kg ) chil d wil l becom e a
900-l b (41 0 kg ) force , an d yo u wil l
no t b e abl e to hol d on .
Never put a seat belt over yourself
and a child. Durin g a crash , th e
bel t coul d pres s dee p int o th e chil d
an d caus e ver y seriou s injuries .
Drive r an d Passenge r Safet y
Page 45 of 293
Additiona
l Informatio n Abou t You r Sea t Belt s
Sea t Bel t Syste m Component s
You r sea t bel t syste m include s lap /
shoulde r belt s i n th e fron t seat s an d
th e oute r bac k seats , an d a la p bel t i n
th e cente r bac k seat .
Th e sea t bel t syste m als o
include s a ligh t o n th e
instrumen t pane l t o remin d yo u an d
you r passenger s t o faste n you r belts .
I f th e driver' s sea t bel t i s no t
fastene d befor e th e ignitio n is turne d
O N (II) , th e ligh t wil l com e o n an d a
beepe r wil l als o sound . Th e beepe r
wil l sto p afte r a fe w seconds , bu t th e
ligh t wil l sta y o n unti l th e driver' s
sea t bel t i s fastened . Lap/Shoulde
r Bel t
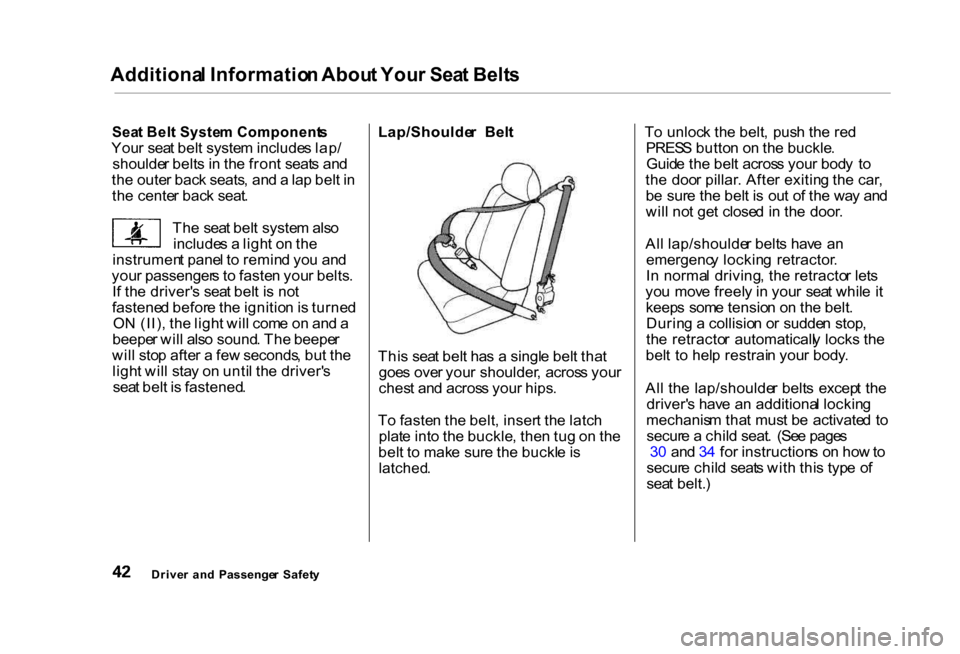
Thi s sea t bel t ha s a singl e bel t tha t
goe s ove r you r shoulder , acros s you r
ches t an d acros s you r hips .
T o faste n th e belt , inser t th e latc h
plat e int o th e buckle , the n tu g o n th e
bel t t o mak e sur e th e buckl e is
latched .
T
o unloc k th e belt , pus h th e re d
PRES S butto n o n th e buckle .
Guid e th e bel t acros s you r bod y t o
th e doo r pillar . Afte r exitin g th e car ,
b e sur e th e bel t i s ou t o f th e wa y an d
wil l no t ge t close d in th e door .
Al l lap/shoulde r belt s hav e a n
emergenc y lockin g retractor .
I n norma l driving , th e retracto r let s
yo u mov e freel y i n you r sea t whil e i t
keep s som e tensio n o n th e belt .
Durin g a collisio n o r sudde n stop ,
th e retracto r automaticall y locks the
bel t t o hel p restrai n you r body .
Al l th e lap/shoulde r belt s excep t th e
driver' s hav e a n additiona l lockin g
mechanis m tha t mus t b e activate d t o
secur e a chil d seat . (Se e page s
3 0 an d 3 4 fo r instruction s o n ho w to
secur e chil d seat s wit h thi s typ e o f
sea t belt. )
Drive r an d Passenge r Safet y
Page 46 of 293
Additiona
l Informatio n Abou t You r Sea t Belt s
I f th e shoulde r par t o f th e bel t i s
pulle d al l th e wa y out , th e lockin g
mechanis m wil l activate . Th e bel t
wil l retract , bu t i t wil l no t allo w th e
passenge r t o mov e freely .
T o deactivat e th e lockin g
mechanism , unlatc h th e buckl e an d
le t th e sea t bel t full y retract . T o
refaste n th e belt , pul l i t ou t onl y a s
fa r a s needed .
Se e pag e 1 5 fo r instruction s o n ho w
t o wea r th e lap/shoulde r bel t
properly . La
p Bel t
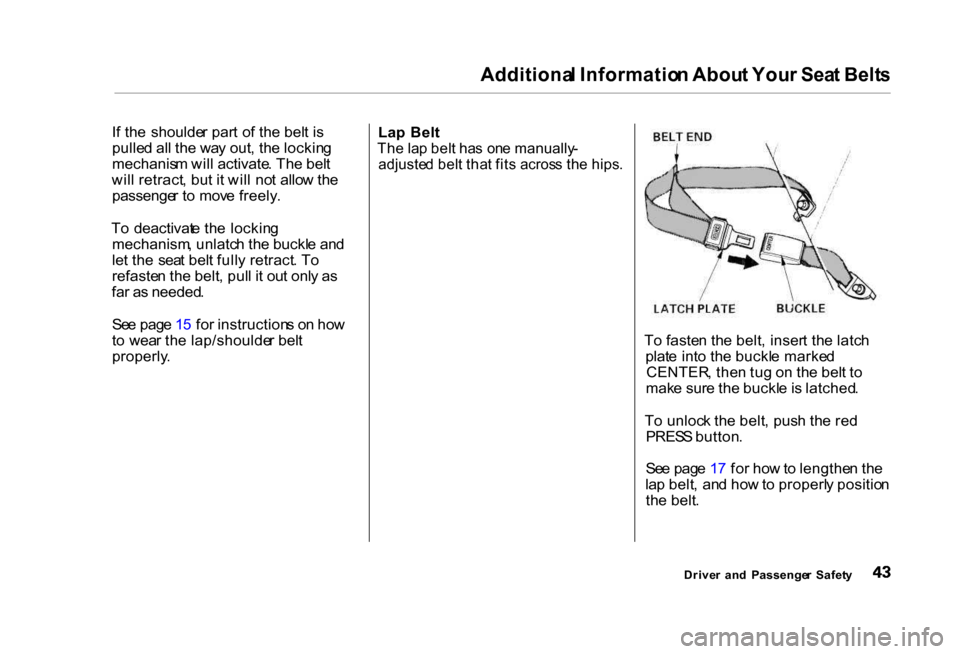
Th e la p bel t ha s on e manually -
adjuste d bel t tha t fit s acros s th e hips .
To faste n th e belt , inser t th e latc h
plat e int o th e buckl e marke d
CENTER , the n tu g o n th e bel t t o
mak e sur e th e buckl e is latched .
T o unloc k th e belt , pus h th e re d
PRES S button .
Se e pag e 1 7 fo r ho w to lengthe n th e
la p belt , an d ho w to properl y positio n
th e belt .
Drive r an d Passenge r Safet y
Page 54 of 293

Instrument
s an d Control s
Thi s sectio n give s informatio n abou t
th e control s an d display s tha t
contribut e t o th e dail y operatio n o f
you r Honda . Al l th e essentia l
control s ar e withi n eas y reach .
Contro
l Locations........................... . 5 2
Indicato r Lights............................... . 5 3
Gauges............................................. . 5 7
Speedometer............................... . 5 7
Tachometer................................. . 5 7
Odometer..................................... . 5 7
Tri p Meter................................... . 5 7
Fue l Gauge.................................. . 5 8
Temperatur e Gauge................... . 5 8
Maintenanc e Require d
Indicator................................... . 5 9
Control s Nea r th e Steerin g
Wheel....................................... . 6 0
Headlights................................... . 6 1
Daytim e Runnin g Lights............ . 6 1
Instrumen t Pane l Brightness.... . 6 2
Tur n Signals................................ . 6 2
Windshiel d Wipers..................... . 6 3
Windshiel d Washers.................. . 6 3
Hazar d Warning.......................... . 6 4
Rea r Windo w Defogger............. . 6 4
Steerin g Whee l Adjustment...... . 6 5
Steerin g Whee l Control s ............... . 6 6
Cruis e Control............................. . 6 6
Key s an d Locks............................... . 6 9
Keys............................................... 69
Ignitio
n Switch............................ . 7 0
Doo r Locks.................................. . 7 1
Powe r Doo r Locks...................... . 7 2
Remot e Transmitter................... . 7 3
Childproo f Doo r Locks.............. . 7 5
Trunk........................................... . 7 6
Sea t Adjustments............................ . 7 7
Fron t Sea t Adjustments............. . 7 7
Driver' s Sea t Heigh t
Adjustment.............................. . 7 8
Hea d Restraints.......................... . 7 9
Foldin g Rea r Seat........................... . 8 0
Powe r Windows.............................. . 8 1
Moonroof......................................... . 8 3
Mirrors............................................. . 8 3
Adjustin g th e Powe r Mirrors.... . 8 4
Parkin g Brake................................. . 8 5
Glov e Box........................................ . 8 6
Beverag e Holder............................. . 8 6
Accessor y Powe r Socket............... . 8 7
Ashtrays........................................... . 8 7
Interio r Lights................................. . 8 8
Ceilin g Light................................ . 8 8
Spotlights..................................... . 8 8
Instrument s an d Control s
Page 58 of 293
Indicato
r Light s
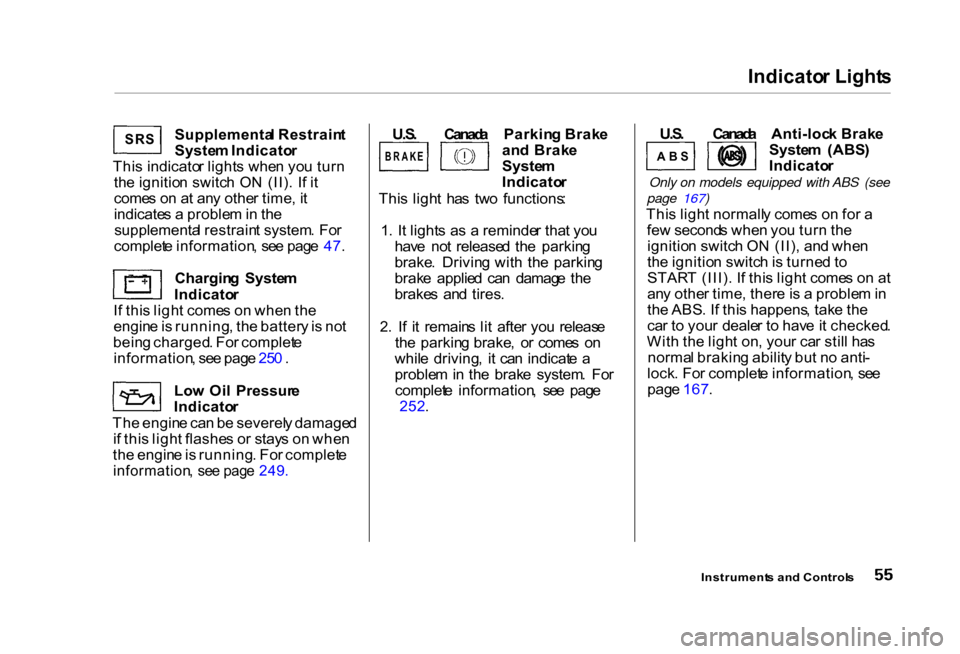
Supplementa l Restrain t
Syste m Indicato r
Thi s indicato r light s whe n yo u tur n
th e ignitio n switc h O N (II) . I f i t
come s o n a t an y othe r time , i t
indicate s a proble m in th e
supplementa l restrain t system . Fo r
complet e information , se e pag e 47 .
Chargin g Syste m
Indicato r
I f thi s ligh t come s o n whe n th e
engin e is running , th e batter y is no t
bein g charged . Fo r complet e
information , se e pag e 25 0 .
Lo w Oi l Pressur e
Indicato r
Th e engin e ca n b e severel y damage d
i f thi s ligh t flashe s o r stay s o n whe n
th e engin e is running . Fo r complet e
information , se e pag e 249 .
U.S
. Canad a Parkin g Brak e
an d Brak e
Syste m
Indicato r
Thi s ligh t ha s tw o functions :
1 . I t light s a s a reminde r tha t yo u
hav e no t release d th e parkin g
brake . Drivin g wit h th e parkin g
brak e applie d ca n damag e th e
brake s an d tires .
2 . I f i t remain s li t afte r yo u releas e
th e parkin g brake , o r come s o n
whil e driving , i t ca n indicat e a
proble m in th e brak e system . Fo r
complet e information , se e pag e
252 . U.S
. Canad a Anti-loc k Brak e
Syste m (ABS )
Indicato r
Only on models equipped with ABS (see
page 167)
Thi s ligh t normall y come s o n fo r a
fe w second s whe n yo u tur n th e
ignitio n switc h O N (II) , an d whe n
th e ignitio n switc h is turne d to
STAR T (III) . I f thi s ligh t come s o n a t
an y othe r time , ther e is a proble m in
th e ABS . I f thi s happens , tak e th e
ca r t o you r deale r t o hav e it checked .
Wit h th e ligh t on , you r ca r stil l ha s
norma l brakin g abilit y bu t n o anti -
lock . Fo r complet e information , se e
pag e 167 .
Instrument s an d Control s
BRAK
E
AB
S
SR
S