2000 HONDA ACCORD COUPE brake
[x] Cancel search: brakePage 54 of 338

Instrument
s an d Control s
Thi s sectio n give s informatio n abou t
th e control s an d display s tha t
contribut e t o th e dail y operatio n o f
you r Honda . Al l th e essentia l
control s ar e withi n eas y reach .
Contro l Locations........................... . 5 2
Indicato r Lights............................... . 5 3
Gauges............................................. . 5 8
Speedometer............................... . 5 8
Tachometer................................. . 5 8
Odometer..................................... . 5 8
Tri p Meter................................... . 5 9
Temperatur e Gauge................... . 5 9
Fue l Gauge.................................. . 5 9
Maintenanc e Require d
Indicator................................... . 6 0
Control s Nea r th e Steerin g
Wheel....................................... . 6 1
Headlights................................... . 6 2
Automati c Lightin g Of f
Feature..................................... . 6 3
Daytim e Runnin g Lights............ . 6 3
Instrumen t Pane l Brightness.... . 6 4
Tur
n Signals................................ . 6 4
Windshiel d Wipers..................... . 6 5
Windshiel d Washers.................. . 6 6
Hazar d Warning.......................... . 6 6
Rea r Windo w Defogger............. . 6 7
Steerin g Whee l Adjustment...... . 6 8
Steerin g Whee l Control s ............... . 6 9
Cruis e Control............................. . 6 9
Remot e Audi o Control s ............. . 7 2
Key s an d Locks............................... . 7 2
Keys.............................................. . 7 2
Immobilize r System.................... . 7 3
Ignitio n Switch............................ . 7 5
Powe r Doo r Locks...................... . 7 6
Lockou t Prevention................ . 7 7
Remot e Transmitter................... . 7 8
Trunk........................................... . 8 1
Glov e Box.................................... . 82
HomeLin k Universa l
Transmitter................................. . 8 3
Sea t Adjustments............................ . 8 7
Fron t Sea t Adjustments............. . 8 7
Driver' s Sea t Manua l Heigh t
Adjustment.............................. . 8 8
Driver' s Sea t Powe r Heigh t
Adjustment.............................. . 8 8
Driver'
s Sea t Powe r
Adjustments............................ . 8 9
Driver' s Lumba r Support........... . 9 0
Rea r Sea t Access........................ . 9 1
Hea d Restraints.......................... . 9 2
Foldin g Rea r Seat....................... . 9 3
Sea t Heaters.................................... . 9 5
Powe r Windows.............................. . 9 6
Moonroof......................................... . 9 8
Mirrors............................................. . 9 9
Adjustin g th e Powe r Mirrors.... . 9 9
Parkin g Brake............................... . 10 0
Digita l Clock.................................. . 10 1
Sunglasse s Holder........................ . 10 1
Beverag e Holder........................... . 10 2
Consol e Compartment................. . 10 3
Su n Visor........................................ . 10 4
Vanit y Mirror................................ . 10 4
Coi n Box........................................ . 10 5
Cente r Pocket............................... . 10 5
Accessor y Powe r Socket............. . 10 5
Interio r Lights............................... . 10 6
Ceilin g Light.............................. . 10 6
Spotlights................................... . 10 6
Courtes y Lights........................ . 10 7
Instrument s an d Control s
Page 57 of 338
Indicato
r Light s
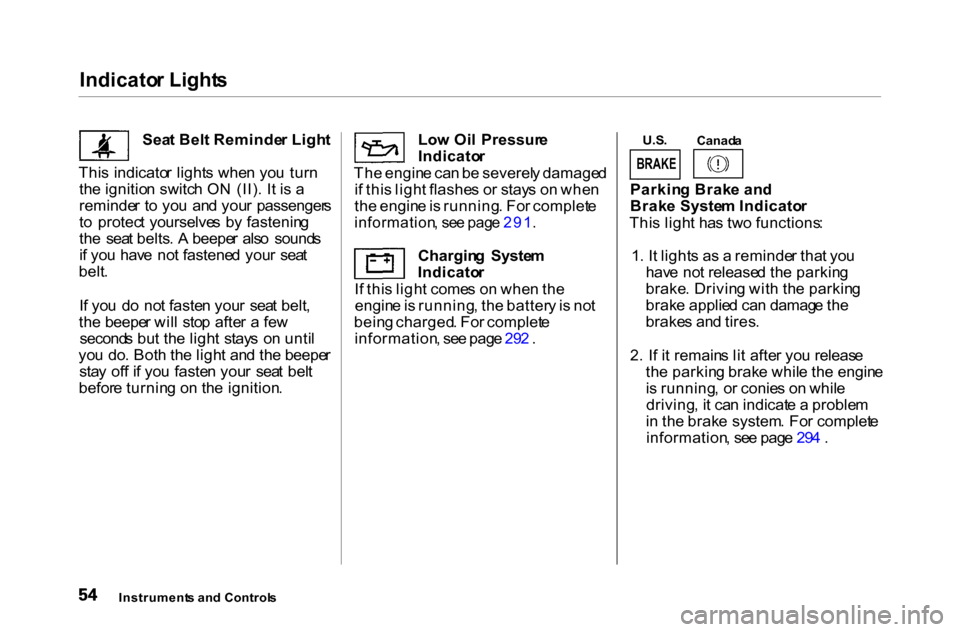
Sea t Bel t Reminde r Ligh t
Thi s indicato r light s whe n yo u tur n
th e ignitio n switc h ON (II) . I t i s a
reminde r t o yo u an d you r passenger s
t o protec t yourselve s b y fastenin g
th e sea t belts . A beepe r als o sound s
i f yo u hav e no t fastene d you r sea t
belt .
I f yo u d o no t faste n you r sea t belt ,
th e beepe r wil l sto p afte r a fe w
second s bu t th e ligh t stay s o n unti l
yo u do . Bot h th e ligh t an d th e beepe r
sta y of f i f yo u faste n you r sea t bel t
befor e turnin g o n th e ignition . Lo
w Oi l Pressur e
Indicato r
Th e engin e ca n b e severel y damage d
i f thi s ligh t flashe s o r stay s o n whe n
th e engin e is running . Fo r complet e
information , se e pag e 291 .
Chargin g Syste m
Indicato r
I f thi s ligh t come s o n whe n th e
engin e is running , th e batter y is no t
bein g charged . Fo r complet e
information , se e pag e 29 2 . U.S
.
Canad a
Parkin g Brak e an d
Brak e Syste m Indicato r
Thi s ligh t ha s tw o functions :
1 . I t light s a s a reminde r tha t yo u
hav e no t release d th e parkin g
brake . Drivin g wit h th e parkin g
brak e applie d ca n damag e th e
brake s an d tires .
2 . I f i t remain s li t afte r yo u releas e
th e parkin g brak e whil e th e engin e
i s running , o r conie s o n whil e
driving , i t ca n indicat e a proble m
i n th e brak e system . Fo r complet e
information , se e pag e 29 4 .
Instrument s an d Control s
BRAKE
Page 59 of 338
Indicato
r Light s
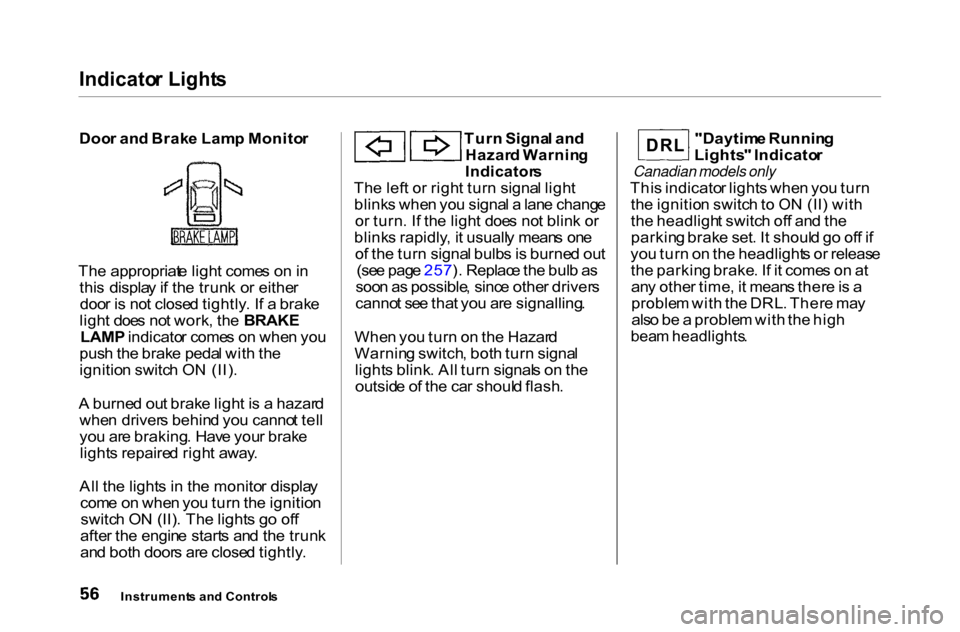
Doo r an d Brak e Lam p Monito r
Th e appropriat e ligh t come s o n in
thi s displa y if th e trun k o r eithe r
doo r i s no t close d tightly . I f a brak e
ligh t doe s no t work , th e BRAKE
LAMP indicato r come s o n whe n yo u
pus h th e brak e peda l wit h th e
ignitio n switc h O N (II) .
A burne d ou t brak e ligh t i s a hazar d
whe n driver s behin d yo u canno t tel l
yo u ar e braking . Hav e you r brak e
light s repaire d righ t away .
Al l th e light s i n th e monito r displa y
com e o n whe n yo u tur n th e ignitio n
switc h O N (II) . Th e light s g o of f
afte r th e engin e start s an d th e trun k
an d bot h door s ar e close d tightly . Tur
n Signa l an d
Hazar d Warnin g
Indicator s
Th e lef t o r righ t tur n signa l ligh t
blink s whe n yo u signa l a lan e chang e
o r turn . I f th e ligh t doe s no t blin k o r
blink s rapidly , i t usuall y mean s on e
o f th e tur n signa l bulb s is burne d ou t
(se e pag e 257 ). Replac e th e bul b a s
soo n a s possible , sinc e othe r driver s
canno t se e tha t yo u ar e signalling .
Whe n yo u tur n o n th e Hazar d
Warnin g switch , bot h tur n signa l
light s blink . Al l tur n signal s o n th e
outsid e o f th e ca r shoul d flash . "Daytim
e Runnin g
Lights " Indicato r
Canadian models only
Thi s indicato r light s whe n yo u tur n
th e ignitio n switc h to O N (II ) wit h
th e headligh t switc h of f an d th e
parkin g brak e set . I t shoul d g o of f i f
yo u tur n o n th e headlight s o r releas e
th e parkin g brake . I f i t come s o n a t
an y othe r time , i t mean s ther e is a
proble m wit h th e DRL . Ther e ma y
als o b e a proble m wit h th e hig h
bea m headlights .
Instrument s an d Control s
D R L
Page 66 of 338
Control
s Nea r th e Steerin g Whee l
Automati c Lightin g Of f Featur e
On EX and EX-V6 models
Th e Automati c Lightin g Of f featur e
turn s of f th e headlights , parkin g
lights , taillights , sid e marke r lights ,
licens e plat e light s an d instrumen t
pane l light s withi n 1 5 second s o f
removin g th e ke y fro m th e ignitio n
switc h an d closin g th e driver' s door .
Thi s featur e activate s i f yo u leav e th
e headligh t switc h in th e o
r position , remov e th e key ,
open , the n clos e th e driver' s door .
I f yo u remov e th e ke y fro m th e
ignitio n switc h wit h th e headligh t
switc h on , bu t d o no t ope n th e doo r
an d ge t out , th e light s wil l tur n of f
afte r te n minutes . Th
e light s wil l tur n o n agai n whe n
yo u unloc k o r ope n th e driver' s door .
I f yo u unloc k th e door , bu t d o no t
ope n it withi n 1 5 seconds , th e light s
wil l g o off. Wit h th e driver' s doo r
open , yo u wil l hea r a lights-o n
reminde r chime . Daytim
e Runnin g Light s
(Canadia n Models )
Wit h th e headligh t switc h off , th e
hig h bea m headlight s com e o n wit h
reduce d brightnes s whe n yo u tur n
th e ignitio n switc h t o O N (II ) an d
releas e th e parkin g brake . The y
remai n o n unti l yo u tur n th e ignitio n
off , eve n if yo u se t th e parkin g brake .
Th e headlight s rever t t o norma l
operatio n whe n yo u tur n the m on
wit h th e switch .
Instrument s an d Control s
Page 73 of 338
Steerin
g Whee l Control s
Th e cruis e contro l ma y no t hol d th e
se t spee d whe n yo u ar e goin g u p an d
dow n hills . I f you r spee d increase s
goin g dow n a hill , us e th e brake s t o
slo w dow n to th e desire d speed . Thi s
wil l cance l th e cruis e control . T o
resum e th e se t speed , pres s th e
RESUME/acce l button . Th e
CRUIS E CONTRO L ligh t o n th e
instrumen t pane l come s on .
Whe n climbin g a stee p hill , th e
automati c transmissio n ma y
downshif t t o hol d th e se t speed .
Changing the Set Speed
Yo u ca n increas e th e se t cruisin g
spee d in an y o f thes e ways : Pres
s an d hol d th e RESUME /
acce l button . Th e ca r wil l acceler -
ate . Whe n yo u reac h th e desire d
cruisin g speed , releas e th e button . T
o increas e you r spee d in ver y
smal l amounts , ta p th e RESUME /
acce l butto n repeatedly . Eac h tim e
yo u d o this , you r ca r wil l spee d u p
abou t 1 mp h (1. 6 km/h) . Pus
h o n th e accelerato r pedal . Ac -
celerat e to th e desire d cruisin g
spee d an d pres s th e SET/dece l
button .
Yo
u ca n decreas e th e se t cruisin g
spee d in an y o f thes e ways : Pres
s an d hol d th e SET/dece l
button . Th e ca r wil l decelerate .
Releas e th e butto n whe n yo u
reac h th e desire d speed . T
o slo w dow n in ver y smal l
amounts , ta p th e SET/dece l
butto n repeatedly . Eac h tim e yo u
d o this , you r ca r wil l slo w dow n
abou t 1 mp h (1.6km/h) . Ta
p th e brak e o r clutc h peda l
lightl y wit h you r foot . Th e
CRUIS E CONTRO L ligh t o n th e
instrumen t pane l wil l g o out .
Whe n th e ca r slow s t o th e desire d
speed , pres s th e SET/dece l button .
Th e ca r wil l the n maintai n th e
desire d speed .
Instrument s an d Control s
Page 103 of 338
Mirrors
, Parkin g Brak e
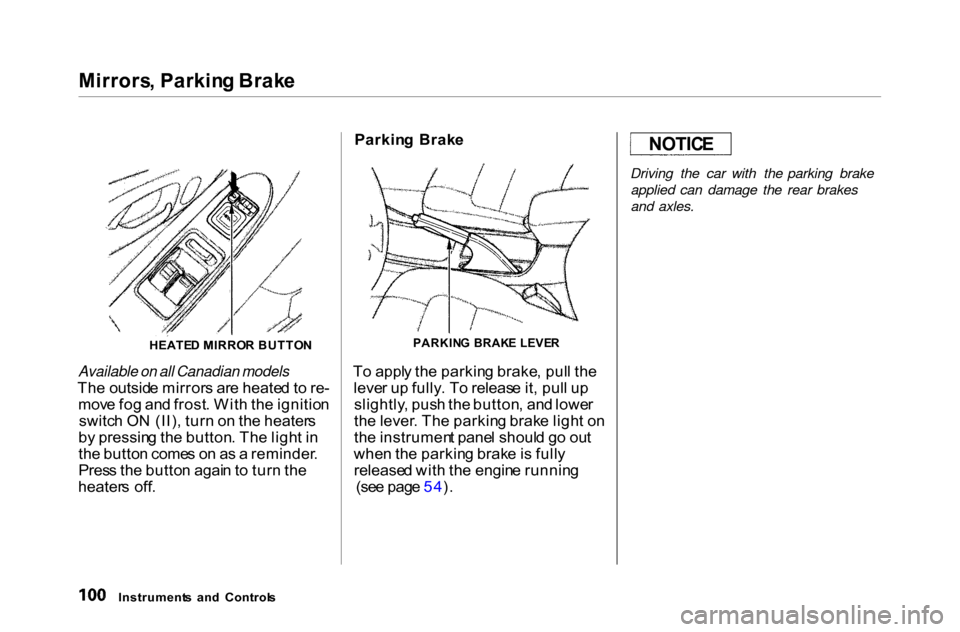
Available on all Canadian models
Th e outsid e mirror s ar e heate d to re -
mov e fo g an d frost . Wit h th e ignitio n
switc h O N (II) , tur n o n th e heater s
b y pressin g th e button . Th e ligh t i n
th e butto n come s o n a s a reminder .
Pres s th e butto n agai n to tur n th e
heater s off . Parkin
g Brak e
PARKIN G BRAK E LEVE R
T o appl y th e parkin g brake , pul l th e
leve r u p fully . T o releas e it , pul l u p
slightly , pus h th e button , an d lowe r
th e lever . Th e parkin g brak e ligh t o n
th e instrumen t pane l shoul d g o ou t
whe n th e parkin g brak e is full y
release d wit h th e engin e runnin g
(se e pag e 54 ). Driving the car with the parking brake
applied can damage the rear brakes
and axles.
Instrument s an d Control s
HEATE
D MIRRO R BUTTO N
NOTIC
E
Page 163 of 338
Break-i
n Period , Gasolin e
Break-i n Perio d
Hel p assur e you r car' s futur e
reliabilit y an d performanc e b y payin g
extr a attentio n to ho w yo u driv e
durin g th e firs t 60 0 mile s (1,00 0 km) .
Durin g thi s period : Avoi
d full-throttl e start s an d rapi d
acceleration .
Avoi
d har d braking . Ne w brake s
nee d to b e broken-i n b y moderat e
us e fo r th e firs t 20 0 mile s (30 0
km) .
Yo u shoul d follo w thes e sam e re -
commendation s wit h a n overhaule d
o r exchange d engine , o r whe n th e
brake s ar e relined .
Gasolin
e
You r Hond a is designe d t o operat e
o n unleade d gasolin e wit h a pum p
octan e numbe r o f 8 6 o r higher . Us e
o f a lowe r octan e gasolin e ca n caus e
a persistent , heav y metalli c rappin g
nois e in th e engin e tha t ca n lea d to
mechanica l damage .
W e recommen d gasoline s containin g
detergen t additive s tha t hel p preven t
fue l syste m an d engin e deposits .
Usin g gasolin e containin g lea d wil l
damag e you r car' s emission s
controls . Thi s contribute s t o ai r
pollution .
I
n Canada , som e gasoline s contai n
a n octane-enhancin g additiv e calle d
MMT . I f yo u us e suc h gasolines ,
you r emissio n contro l syste m
performanc e ma y deteriorat e an d
th e Malfunctio n Indicato r Lam p o n
you r instrumen t pane l ma y tur n on .
I f thi s happens , contac t you r
authorize d Hond a deale r fo r service .
Befor e Drivin g
Page 165 of 338
Servic
e Statio n Procedure s
5 . Scre w th e fue l fil l ca p bac k on ,
tighte n i t unti l i t click s severa l
times . I f yo u d o no t properl y
tighte n th e cap , th e Malfunctio n
Indicato r Lam p ma y com e o n (se e
pag e 293 ).
6 . Pus h th e fue l fil l doo r close d unti l
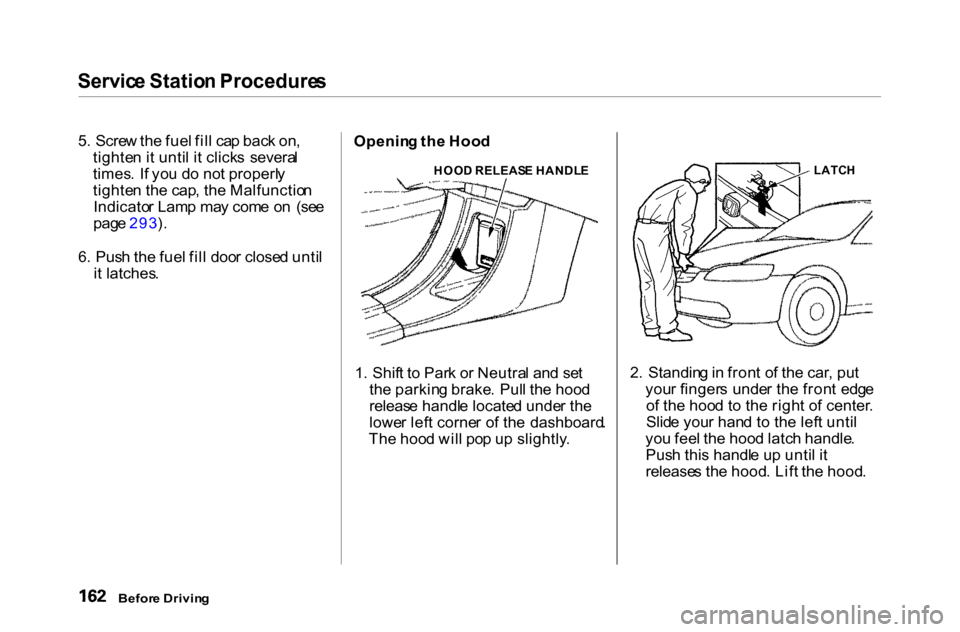
i t latches . Openin
g th e Hoo d
1 . Shif t t o Par k o r Neutra l an d se t
th e parkin g brake . Pul l th e hoo d
releas e handl e locate d unde r th e
lowe r lef t corne r o f th e dashboard .
Th e hoo d wil l po p u p slightly .
LATC
H
2 . Standin g in fron t o f th e car , pu t
you r finger s unde r th e fron t edg e
o f th e hoo d t o th e righ t o f center .
Slid e you r han d t o th e lef t unti l
yo u fee l th e hoo d latc h handle .
Pus h thi s handl e u p unti l i t
release s th e hood . Lif t th e hood .
Befor e Drivin g
HOO
D RELEAS E HANDL E