Page 171 of 280
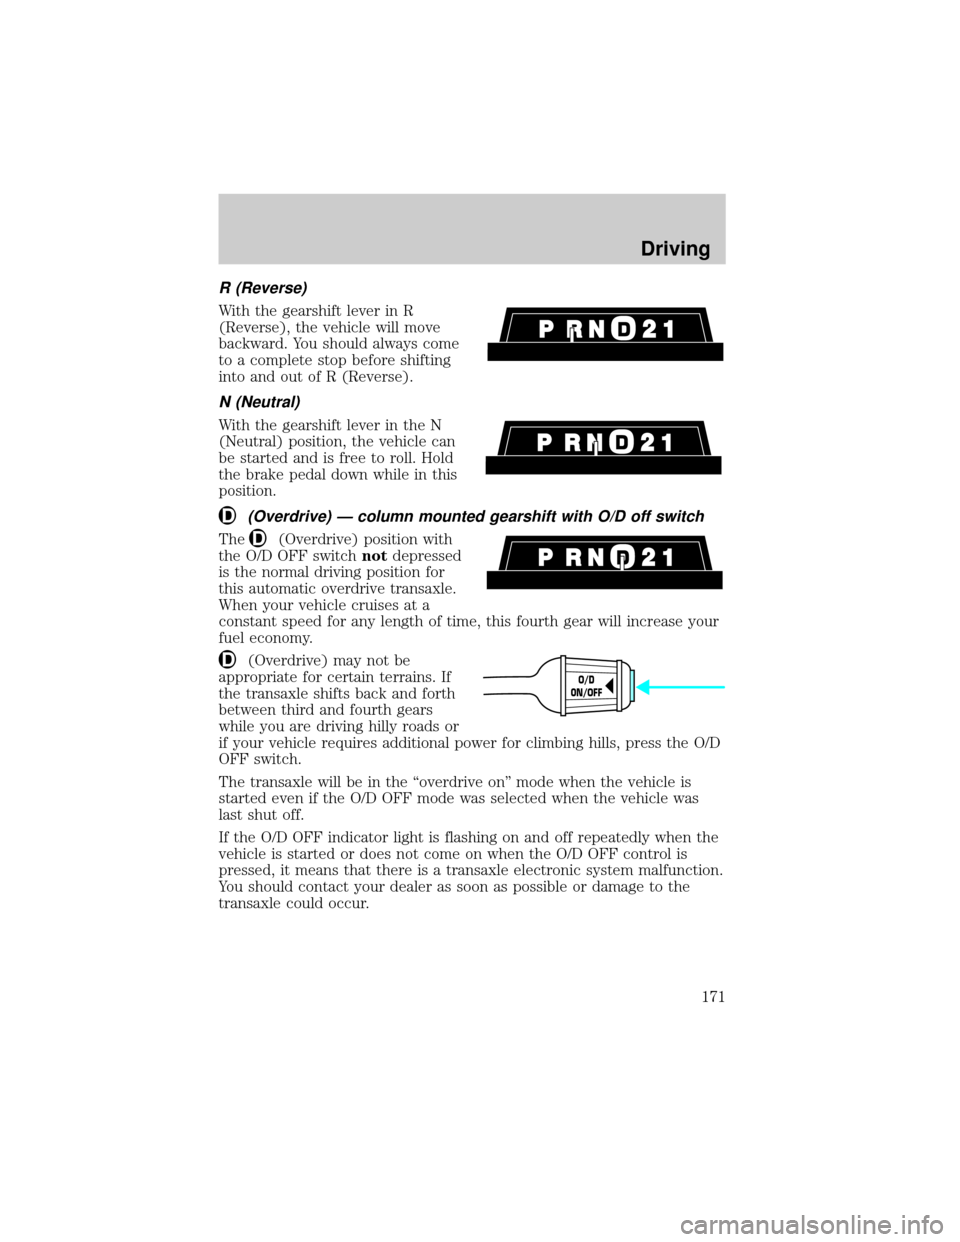
R (Reverse)
With the gearshift lever in R
(Reverse), the vehicle will move
backward. You should always come
to a complete stop before shifting
into and out of R (Reverse).
N (Neutral)
With the gearshift lever in the N
(Neutral) position, the vehicle can
be started and is free to roll. Hold
the brake pedal down while in this
position.
(Overdrive) Ð column mounted gearshift with O/D off switch
The(Overdrive) position with
the O/D OFF switchnotdepressed
is the normal driving position for
this automatic overdrive transaxle.
When your vehicle cruises at a
constant speed for any length of time, this fourth gear will increase your
fuel economy.
(Overdrive) may not be
appropriate for certain terrains. If
the transaxle shifts back and forth
between third and fourth gears
while you are driving hilly roads or
if your vehicle requires additional power for climbing hills, press the O/D
OFF switch.
The transaxle will be in the ªoverdrive onº mode when the vehicle is
started even if the O/D OFF mode was selected when the vehicle was
last shut off.
If the O/D OFF indicator light is flashing on and off repeatedly when the
vehicle is started or does not come on when the O/D OFF control is
pressed, it means that there is a transaxle electronic system malfunction.
You should contact your dealer as soon as possible or damage to the
transaxle could occur.
O/D
ON/OFF
Driving
171
Page 172 of 280
![FORD WINDSTAR 2000 2.G Owners Manual When to use(Overdrive) or press the O/D OFF switch
You will notice that there is only one
drive position (
[Overdrive]) on
your gearshift indicator (instead of
Drive and Overdrive). However, you
will FORD WINDSTAR 2000 2.G Owners Manual When to use(Overdrive) or press the O/D OFF switch
You will notice that there is only one
drive position (
[Overdrive]) on
your gearshift indicator (instead of
Drive and Overdrive). However, you
will](/manual-img/11/5416/w960_5416-171.png)
When to use(Overdrive) or press the O/D OFF switch
You will notice that there is only one
drive position (
[Overdrive]) on
your gearshift indicator (instead of
Drive and Overdrive). However, you
will find a control labeled O/D
located on the gearshift lever. Push in the switch and the O/D OFF light
in the instrument cluster will illuminate. With the O/D OFF light
illuminated, the transaxle will operate in first, second and third gears and
will not shift into fourth gear (
[Overdrive]). Operating in Drive (O/D
OFF) provides more engine braking than
(Overdrive) for descending
hills or city driving.
To return the transaxle to the normal
(Overdrive) operation, press
the O/D OFF control again. Use this control to select between
(Overdrive) or Drive (O/D OFF) whenever you drive your vehicle.
If the O/D OFF indicator light is flashing on and off repeatedly when the
vehicle is started or does not come on when the O/D OFF control is
pressed, it means that there is a transaxle electronic system malfunction.
You should contact your dealer as soon as possible or damage to the
transaxle could occur.
2 (Second)
Use 2 (Second) to accelerate from a
stop on slippery roads, or to give
you more engine braking to slow
your vehicle on downgrades.
1 (First)
Use 1 (First) when added engine
braking is desired while descending
steep hills.
The automatic transaxle will shift to
the proper gear to ascend any grade without any need to shift to 1
(First).
Do not go faster than 61 km/h (38 mph) when in this gear. You can
upshift from 1 (First) to overdrive at any time.
O/D
ON/OFF
Driving
172
Page 173 of 280
When parking, do not use the gearshift in place of the parking
brake. Always set the parking brake fully and make sure that the
gearshift is securely latched in Park (P). Turn off the ignition
whenever you leave your vehicle. Never leave your vehicle unattended
while it is running. If you do not take these precautions, your vehicle
may move unexpectedly and injure someone.
DRIVING THROUGH WATER
Do not drive quickly through standing water, especially if the depth is
unknown. Traction or brake capability may be limited and if the ignition
system gets wet, your engine may stall. Water may also enter your
engine's air intake and severely damage your engine.
If driving through deep or standing water is unavoidable, proceed very
slowly. Never drive through water that is higher than the bottom of the
hubs (for trucks) or the bottom of the wheel rims (for cars).
Once through the water, always try the brakes. Wet brakes do not stop
the vehicle as effectively as dry brakes. Drying can be improved by
moving your vehicle slowly while applying light pressure on the brake
pedal.
Driving through deep water where the transmission vent tube is
submerged may allow water into the transmission and cause
internal transmission damage.
VEHICLE LOADING
Before loading a vehicle, familiarize yourself with the following terms:
²Base Curb Weight:Weight of the vehicle including any standard
equipment, fluids, lubricants, etc. It does not include passengers or
aftermarket equipment.
²Payload:Combined maximum allowable weight of cargo, passengers
and optional equipment. The payload equals the gross vehicle weight
rating minus base curb weight.
²GVW (Gross Vehicle Weight):Base curb weight plus payload
weight. The GVW is not a limit or a specification.
²GVWR (Gross Vehicle Weight Rating):Maximum total weight of
the base vehicle, passengers, optional equipment and cargo. The
GVWR is specific to each vehicle and is listed on the Safety
Compliance Label on the driver's door pillar.
Driving
173
Page 181 of 280
Roadside coverage beyond basic warranty
In the United States, you may purchase additional roadside assistance
coverage beyond this period through the Ford Auto Club by contacting
your Ford or Lincoln Mercury dealer.
HAZARD FLASHER
Use only in an emergency to warn traffic of vehicle breakdown,
approaching danger, etc. The hazard flashers can be operated when the
ignition is off.
²The hazard lights control is
located on top of the steering
column.
²Depress hazard lights control to
activate all hazard flashers
simultaneously.
²Depress control again to turn the
flashers off.
RESETTING THE FUEL PUMP SHUT-OFF SWITCH
The fuel pump shut-off switch is a device intended to stop the electric
fuel pump when your vehicle has been involved in a substantial jolt.
After a collision, if the engine cranks but does not start, the fuel pump
shut-off switch may have been activated.
Roadside emergencies
181
Page 186 of 280
Fuse/Relay
LocationFuse Amp
RatingPassenger Compartment
Fuse Panel Description
6 15A Radio, Compact Disc Changer, Remote
Keyless Entry Module, PSD (Power Sliding
Door) Module RH and LH, Rear Seat Radio
Controller
7 15A Left Rear Turn Lamp, Right Backup Lamp,
Right Stop Lamp, Right Rear Park Lamp,
Right License Lamp, Left License Lamp, LH
Backup Lamp
8 20A Rear Electronic Module, RHF/RH Sliding/LH
Sliding/Liftgate Door Lock Motors, Aux. Air
Blend Door Motor, Aux. Air Mode Door
Motor
9 10A Cluster, PATS Transceiver, Powertrain
Control Module Relay (coil)
10 10A Heated Backlite Relay (coil), Speed Control
Module, ABS Module, Cluster, Front Temp
Blend Door Actuator, Brake Shift Interlock
Solenoid, Powertrain Control Module,
Power Sliding Door Module RH and LH,
Reverse Sensing System, Front A/C Control
Head
11 10A Electric Brake Controller, Brake Shift
Interlock Solenoid, Rear Electronic Module
12 20A Center High-Mount Stop Lamp, Trailer Tow
Module
13 10A Right Rear Turn Lamp, Left Stop Lamp,
Left Rear Park Lamp
14 10A Autolamp Sensor, Transmission Overdrive
Cancel Switch, Front Electronic Module,
Compass Module, Electrochromatic Mirror,
Power Sliding Door Overhead Console
Switch
15 Ð Not Used
16 10A Cluster, Rear Electronic Module
17 20A Cigar Lighter/Powerpoint, Datalink
Connector
Roadside emergencies
186
Page 187 of 280
Fuse/Relay
LocationFuse Amp
RatingPassenger Compartment
Fuse Panel Description
18 10A LH Quarter Window Motor, RH Quarter
Window Motor, RH Window Switch
Backlighting, RH Lock Switch Backlighting,
Master Control Switch (LH) Backlighting,
Radio
19 10A Starter Interrupt Relay (coil)
20 Ð Not Used
21 Ð Not Used
22 10A LH Heated Mirror, RH Heated Mirror
23 20A Body Powerpoint, Auxiliary Blower Relay
#1 and #2
24 Ð Not Used
25 10A Radio
26 10A Airbag Module
27 15A Power Adjustable Foot Pedals
28 10A Cluster
29 Ð Not Used
Relay 1 Ð Switched System Power Relay #4
Relay 2 Ð Accessory Delay Relay
Relay 3 Ð Front Blower Motor Relay
Relay 4 Ð Switched System Power Relay #3
Relay 5 Ð Rear Defrost Relay
Relay 6 Ð Auxiliary Blower Motor Relay
Power distribution box
The power distribution box is located in the engine compartment. The
power distribution box contains high-current fuses that protect your
vehicle's main electrical systems from overloads.
Always disconnect the battery before servicing high current
fuses.
Roadside emergencies
187
Page 190 of 280
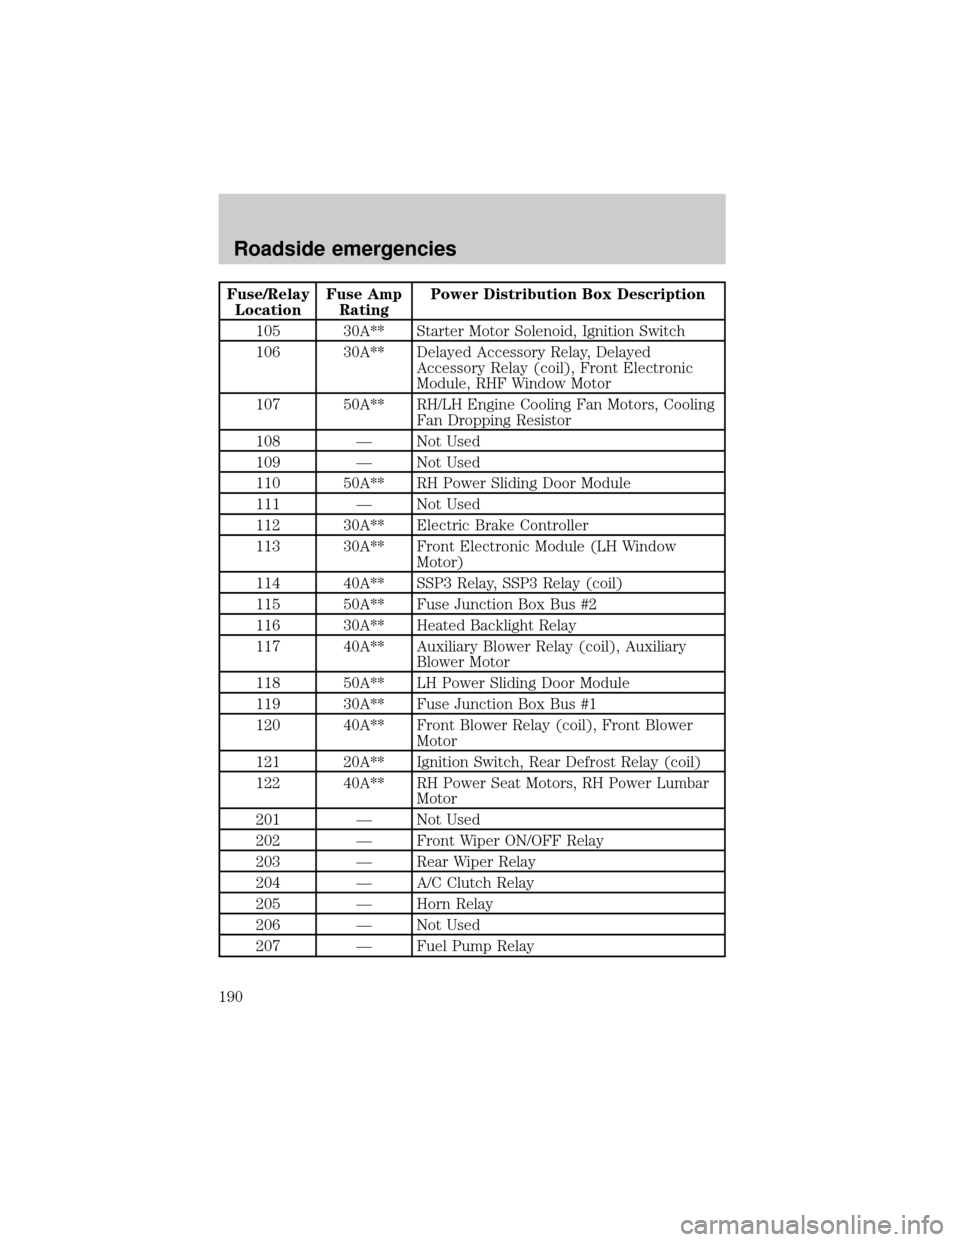
Fuse/Relay
LocationFuse Amp
RatingPower Distribution Box Description
105 30A** Starter Motor Solenoid, Ignition Switch
106 30A** Delayed Accessory Relay, Delayed
Accessory Relay (coil), Front Electronic
Module, RHF Window Motor
107 50A** RH/LH Engine Cooling Fan Motors, Cooling
Fan Dropping Resistor
108 Ð Not Used
109 Ð Not Used
110 50A** RH Power Sliding Door Module
111 Ð Not Used
112 30A** Electric Brake Controller
113 30A** Front Electronic Module (LH Window
Motor)
114 40A** SSP3 Relay, SSP3 Relay (coil)
115 50A** Fuse Junction Box Bus #2
116 30A** Heated Backlight Relay
117 40A** Auxiliary Blower Relay (coil), Auxiliary
Blower Motor
118 50A** LH Power Sliding Door Module
119 30A** Fuse Junction Box Bus #1
120 40A** Front Blower Relay (coil), Front Blower
Motor
121 20A** Ignition Switch, Rear Defrost Relay (coil)
122 40A** RH Power Seat Motors, RH Power Lumbar
Motor
201 Ð Not Used
202 Ð Front Wiper ON/OFF Relay
203 Ð Rear Wiper Relay
204 Ð A/C Clutch Relay
205 Ð Horn Relay
206 Ð Not Used
207 Ð Fuel Pump Relay
Roadside emergencies
190
Page 193 of 280
Removing the spare tire
1. Open the liftgate and open the plastic cover from the carpeting on
cargo floor to expose the hex nut. On cargo van model, lift flap in mat to
expose hex nut.
2. Insert the lug nut wrench on the
hex nut in cargo floor.
3. Turn the wrench
counterclockwise until tire is
lowered to the ground and the cable
is slightly slack.
4. Remove the retainer from the
spare tire.
Roadside emergencies
193