Page 113 of 280

Reprogramming transmitters
To reprogram the transmitters yourself, place the key in the ignition and
turn from OFF to ON eight times in rapid succession (within 10 seconds)
ending in the ON position. After doors lock/unlock, press any control on
all transmitters (up to four). With each control press of the transmitters,
the door should cycle (lock/unlock) to confirm programming. When
completed, turn the ignition to OFF. The door locks should cycle
(lock/unlock) one last time to confirm completion of programming.
Autolock
This feature automatically locks all doors when:
²all vehicle doors are closed
²the ignition is in the ON/START position
²you shift into or through R (Reverse)
Relock
The autolock feature repeats when:
²the ignition is in the ON/START position
²the vehicle speed is below 5 km/h (3 mph) and any door is opened
then closed
²the vehicle speed exceeds 5 km/h (3 mph)
Deactivating/activating the autolock feature
The autolock/relock feature can be turned off by your dealer.
Deactivating/activating the illuminated exit feature
The illuminated exit feature can be turned off by your dealer.
PERIMETER ALARM SYSTEM (IF EQUIPPED)
The perimeter anti-theft system will help prevent your vehicle from
unauthorized entry.
If there is any potential perimeter anti-theft problem with your vehicle,
ensureALL key fobs(remote entry transmitters) are brought to the
dealership, to aid in troubleshooting.
Arming the system
When armed, this system will help protect your vehicle from
unauthorized entry. When unauthorized entry occurs, the system will
flash the turn signal lamps and side repeaters and honk the horn.
Controls and features
113
Page 114 of 280

The system is ready to arm whenever the key is removed from the
ignition. Any of the following actions will prearm the alarm system:
²Press the remote entry lock control
²Press the interior power door lock control while the door is open
Twenty seconds after one of the above events occurs, any door/hood that
is closed is armed.
Any door/hood that still open is prearmed and waiting for the door/hood
to be closed.
Once that input is closed, the input will arm in 20 seconds and the
exterior lamps may flash.
Disarming the system
You can disarm the system by any of the following actions:
²Press the transmitter unlock control.
²Unlock the doors with a key.
²Turn a programmed SecuriLock key to RUN /START.
SECURILOCKYPASSIVE ANTI-THEFT SYSTEM
Your vehicle is equipped with a coded-key anti-theft system. Only the
correct keywill be able to start your vehicle. If your keys are lost or
stolen, you must take your vehicle to your dealership for key
reprogramming.
This system provides an advanced level of vehicle theft protection. Your
vehicle's engine can only be started with the two coded keys provided
with your vehicle. Each time you start your vehicle, the coded key is
read by the anti-theft system. If the key identification code matches the
code stored in the anti-theft system, the vehicle's engine is allowed to
start. If the key identification code does not match the code stored in
the system or if a coded key is not detected (vehicle theft situation), the
vehicle's engine will not operate.
If there is any anti-theft problem with your vehicle, ensureALL coded
keysfor that vehicle are brought to the dealership, to aid in
troubleshooting.
The SecuriLockypassive anti-theft system is not compatible with
aftermarket remote start systems. Use of these systems may result in
vehicle starting problems and a loss of security protection. Large metallic
objects, electronic devices on the key chain that can be used to purchase
Controls and features
114
Page 117 of 280
LIFTGATE
To unlock the liftgate, insert door
key into the lock and turn
clockwise. You can also unlock the
latch (but not release it) with the
power door lock system and remote
entry key fob.
To open the liftgate, squeeze the
liftgate handle.
²Do not open the liftgate in a
garage or other enclosed area
with a low ceiling. If the liftgate is opened, the liftgate could be
damaged against a low ceiling.
²Do not leave the liftgate open while driving. Doing so could cause
serious damage to the liftgate and its components as well as allowing
carbon monoxide to enter the vehicle.
Make sure that the liftgate door is closed to prevent exhaust
fumes from being drawn into the vehicle. This will also prevent
passengers and cargo from falling out. If you must drive with the
liftgate door open, keep the vents open so outside air comes into the
vehicle.
Controls and features
117
Page 133 of 280

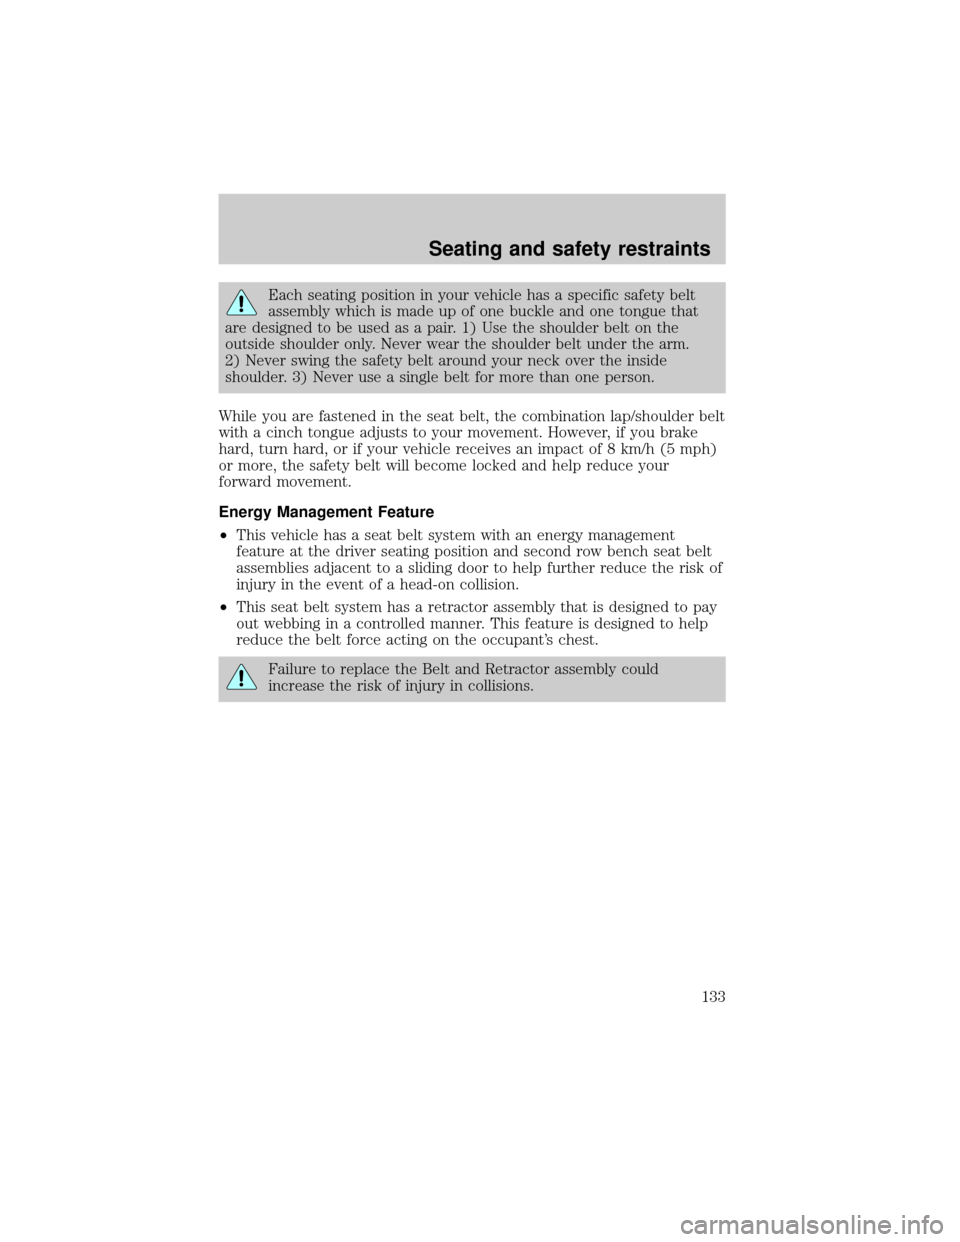
Each seating position in your vehicle has a specific safety belt
assembly which is made up of one buckle and one tongue that
are designed to be used as a pair. 1) Use the shoulder belt on the
outside shoulder only. Never wear the shoulder belt under the arm.
2) Never swing the safety belt around your neck over the inside
shoulder. 3) Never use a single belt for more than one person.
While you are fastened in the seat belt, the combination lap/shoulder belt
with a cinch tongue adjusts to your movement. However, if you brake
hard, turn hard, or if your vehicle receives an impact of 8 km/h (5 mph)
or more, the safety belt will become locked and help reduce your
forward movement.
Energy Management Feature
²This vehicle has a seat belt system with an energy management
feature at the driver seating position and second row bench seat belt
assemblies adjacent to a sliding door to help further reduce the risk of
injury in the event of a head-on collision.
²This seat belt system has a retractor assembly that is designed to pay
out webbing in a controlled manner. This feature is designed to help
reduce the belt force acting on the occupant's chest.
Failure to replace the Belt and Retractor assembly could
increase the risk of injury in collisions.
Seating and safety restraints
133
Page 186 of 280

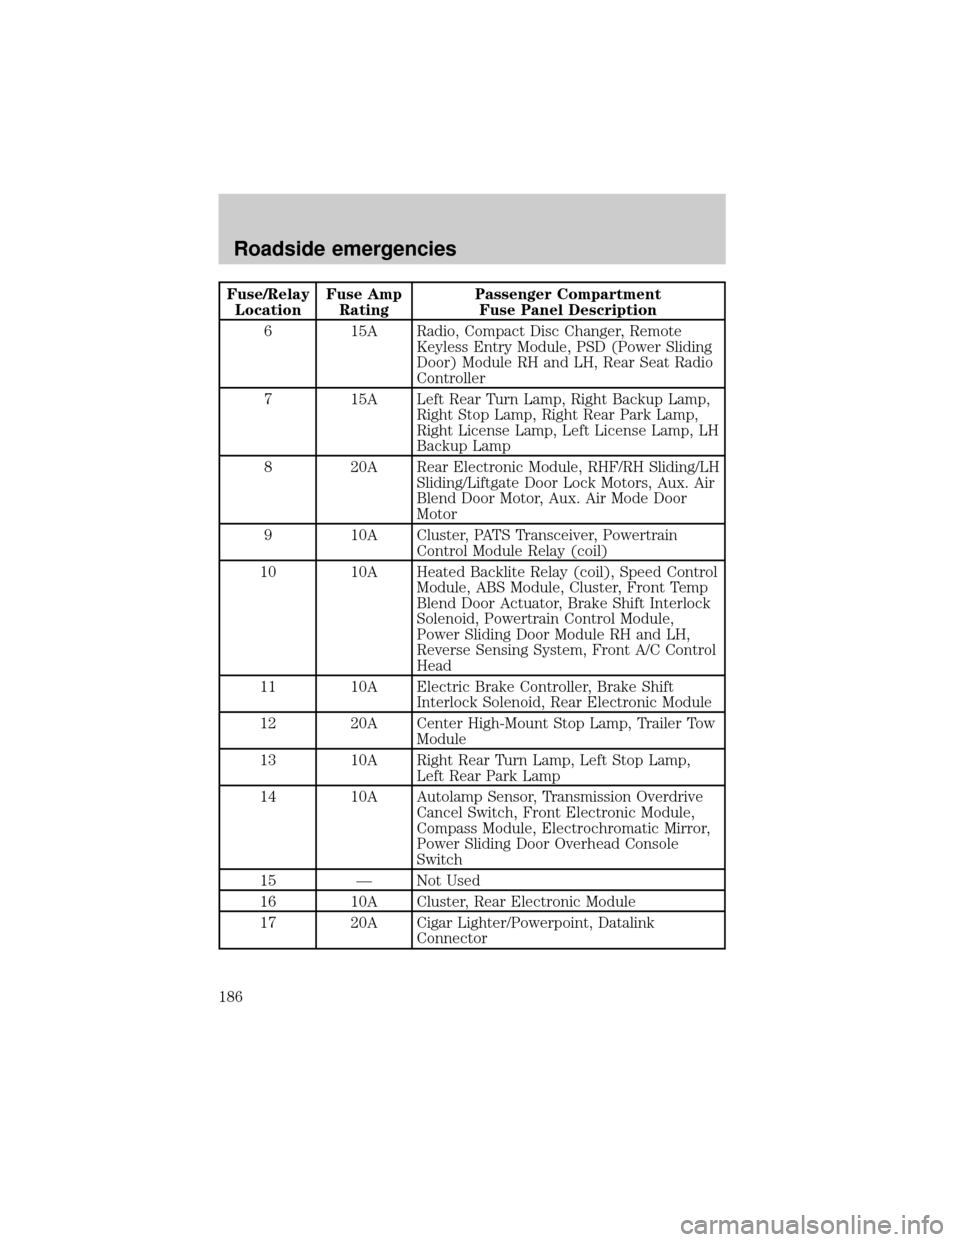
Fuse/Relay
LocationFuse Amp
RatingPassenger Compartment
Fuse Panel Description
6 15A Radio, Compact Disc Changer, Remote
Keyless Entry Module, PSD (Power Sliding
Door) Module RH and LH, Rear Seat Radio
Controller
7 15A Left Rear Turn Lamp, Right Backup Lamp,
Right Stop Lamp, Right Rear Park Lamp,
Right License Lamp, Left License Lamp, LH
Backup Lamp
8 20A Rear Electronic Module, RHF/RH Sliding/LH
Sliding/Liftgate Door Lock Motors, Aux. Air
Blend Door Motor, Aux. Air Mode Door
Motor
9 10A Cluster, PATS Transceiver, Powertrain
Control Module Relay (coil)
10 10A Heated Backlite Relay (coil), Speed Control
Module, ABS Module, Cluster, Front Temp
Blend Door Actuator, Brake Shift Interlock
Solenoid, Powertrain Control Module,
Power Sliding Door Module RH and LH,
Reverse Sensing System, Front A/C Control
Head
11 10A Electric Brake Controller, Brake Shift
Interlock Solenoid, Rear Electronic Module
12 20A Center High-Mount Stop Lamp, Trailer Tow
Module
13 10A Right Rear Turn Lamp, Left Stop Lamp,
Left Rear Park Lamp
14 10A Autolamp Sensor, Transmission Overdrive
Cancel Switch, Front Electronic Module,
Compass Module, Electrochromatic Mirror,
Power Sliding Door Overhead Console
Switch
15 Ð Not Used
16 10A Cluster, Rear Electronic Module
17 20A Cigar Lighter/Powerpoint, Datalink
Connector
Roadside emergencies
186
Page 189 of 280

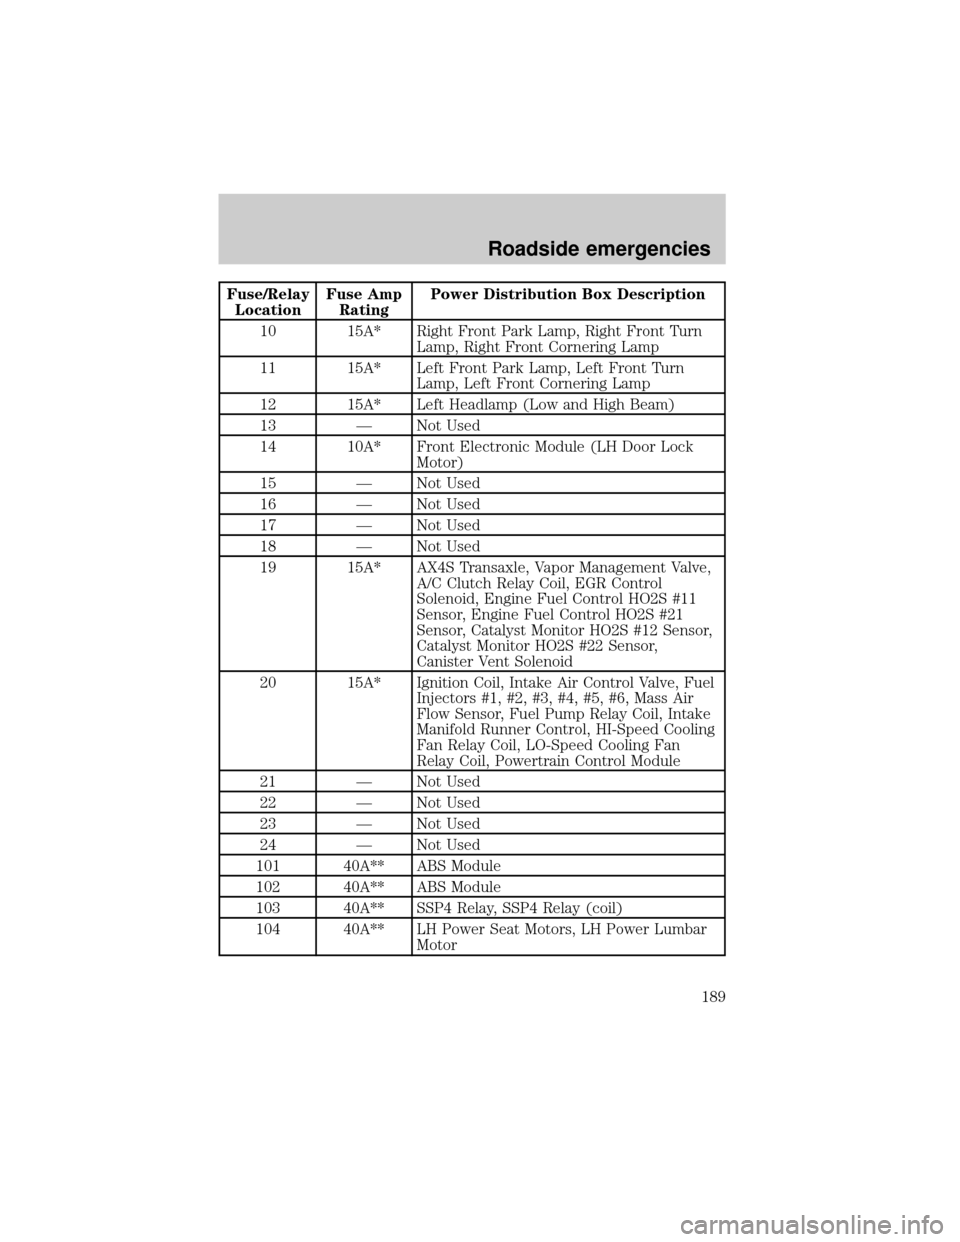
Fuse/Relay
LocationFuse Amp
RatingPower Distribution Box Description
10 15A* Right Front Park Lamp, Right Front Turn
Lamp, Right Front Cornering Lamp
11 15A* Left Front Park Lamp, Left Front Turn
Lamp, Left Front Cornering Lamp
12 15A* Left Headlamp (Low and High Beam)
13 Ð Not Used
14 10A* Front Electronic Module (LH Door Lock
Motor)
15 Ð Not Used
16 Ð Not Used
17 Ð Not Used
18 Ð Not Used
19 15A* AX4S Transaxle, Vapor Management Valve,
A/C Clutch Relay Coil, EGR Control
Solenoid, Engine Fuel Control HO2S #11
Sensor, Engine Fuel Control HO2S #21
Sensor, Catalyst Monitor HO2S #12 Sensor,
Catalyst Monitor HO2S #22 Sensor,
Canister Vent Solenoid
20 15A* Ignition Coil, Intake Air Control Valve, Fuel
Injectors #1, #2, #3, #4, #5, #6, Mass Air
Flow Sensor, Fuel Pump Relay Coil, Intake
Manifold Runner Control, HI-Speed Cooling
Fan Relay Coil, LO-Speed Cooling Fan
Relay Coil, Powertrain Control Module
21 Ð Not Used
22 Ð Not Used
23 Ð Not Used
24 Ð Not Used
101 40A** ABS Module
102 40A** ABS Module
103 40A** SSP4 Relay, SSP4 Relay (coil)
104 40A** LH Power Seat Motors, LH Power Lumbar
Motor
Roadside emergencies
189
Page 195 of 280
1. Park on a level surface, activate
hazard flashers and set parking
brake.
2. Place gearshift lever in P (Park),
turn engine OFF, and block the
diagonally opposite wheel.
3. Remove the spare tire, jack and
lug wrench.
4. Remove the center ornament or wheel cover from the wheel with the
tapered end of the wheel nut wrench. Insert and twist the handle, then
pry against the wheel.
5. Loosen each wheel lug nut
one-half turn counterclockwise but
do not remove them until the wheel
is raised off the ground.
If Ford Accessory Running Boards
have been installed, use the jack
adapters supplied with the running
boards as described on the inside of
the jack storage area.
6. Locate the jack notch next to the
door closest to the tire you are
changing, then place the jack on the
frame rail directly behind the notch.
Roadside emergencies
195
Page 225 of 280

4. Allow the engine to idle for at least one minute.
5. Turn the A/C on and allow the engine to idle for at least one minute.
6. With your foot on the brake pedal and with the A/C on, put the
vehicle in D (Drive) and allow the engine to idle for at least one minute.
7. Drive the vehicle to complete the relearning process.
²The vehicle may need to be driven 16 km (10 miles) or more to
relearn the idle and fuel trim strategy.
²If you do not allow the engine to relearn its idle trim, the idle
quality of your vehicle may be adversely affected until the idle
trim is eventually relearned.
If the battery has been disconnected or a new battery has been installed,
the clock and the preset radio stations must be reset once the battery is
reconnected.
If the battery has been discharged, disconnected or a new battery has
been installed, the power sliding door may need to be reset. Refer to
Power Sliding Door-Resetting the PSDin theControls and Features
chapter.
²Always dispose of automotive
batteries in a responsible manner.
Follow your local authorized
standards for disposal. Call your
local authorized recycling center
to find out more about recycling
automotive batteries.
WINDSHIELD WIPER BLADES
Check the wiper blades at least twice a year or when they seem less
effective. Substances such as tree sap and some hot wax treatments used
by commercial car washes reduce the effectiveness of wiper blades.
Checking the wiper blades
If the wiper blades do not wipe properly, clean both the windshield and
wiper blades using undiluted windshield wiper solution or a mild
detergent. Rinse thoroughly with clean water. To avoid damaging the
blades, do not use fuel, kerosene, paint thinner or other solvents.
LEAD
RETURN
RECYCLE
Maintenance and care
225