2000 FORD SUPER DUTY tire pressure
[x] Cancel search: tire pressurePage 130 of 256
Drive cautiously to avoid vehicle damage from concealed objects such as
rocks and stumps.
You should either know the terrain or examine maps of the area before
driving. Map out your route before driving in the area. For more
information on driving off-road, read the ªFour Wheelingº supplement in
your owner's portfolio.
If your vehicle gets stuck
If the vehicle is stuck it may be rocked out by shifting from forward and
reverse gears, stopping between shifts, in a steady pattern. Press lightly
on the accelerator in each gear.
Do not rock the vehicle if the engine is not at normal operating
temperature or damage to the transmission may occur.
Do not rock the vehicle for more than a few minutes or damage
to the transmission and tires may occur or the engine may
overheat.
Do not spin the wheels at over 56 km/h (35 mph). The tires may
fail and injure a passenger or bystander.
Sand
When driving over sand, try to keep all four wheels on the most solid
area of the trail. Do not reduce the tire pressures but shift to a lower
gear and drive steadily through the terrain. Apply the accelerator slowly
and avoid spinning the wheels.
Mud and water
If you must drive through high water, drive slowly. Traction or brake
capability may be limited.
When driving through water, determine the depth; avoid water higher
than the bottom of the hubs (if possible) and proceed slowly. If the
ignition system gets wet, the vehicle may stall.
Once through water, always try the brakes. Wet brakes do not stop the
vehicle as effectively as dry brakes. Drying can be improved by moving
your vehicle slowly while applying light pressure on the brake pedal.
After driving through mud, clean off residue stuck to rotating driveshafts
and tires. Excess mud stuck on tires and rotating driveshafts causes an
imbalance that could damage drive components.
Driving
130
Page 142 of 256
²The Front Axle Accessory Reserve Capacity and the Total Accessory
Reserve Capacity listed on the bottom right of the Safety Compliance
Certification Label will determine whether or not the addition of a
snowplow will overload your vehicle.
²The weight of the snowplow and supporting components distributed to
the front axle must not exceed the front accessory reserve capacity.
²The total weight of the snowplow and aftermarket equipment must
not exceed the Total Accessory Reserve Capacity.
²The weight of the installed snowplow and aftermarket equipment must
not load the vehicle beyond the GAWR (front/rear) and GVWR listed
on the Safety Compliance Certification Label.
²The total weight of the snowplow and aftermarket equipment must be
considered part of the payload and must not exceed the Gross
Combined Weight Rating (GCWR) for towing.
²Federal and most local regulations require additional exterior lamps
for snowplow-equipped vehicles. Consult your dealer for additional
information.
²After installing a snowplow to the vehicle, ensure the vehicle's front
toe alignment and front ride height are within specification (reset if
required). These specifications are located in the vehicle's Workshop
Manual. Adherence to the toe, tire pressures and ride height
specification is important for proper tire wear, ride, handling and
headlight aim. Also, maintain the engine oil and transmission fluid
change intervals following the severe duty schedule.
Do not exceed the GVWR or the GAWR specified on the
certification label.
Removing snowplow
Read the following instructions before removing a snowplow:
²After removing a snowplow from the vehicle, ensure the vehicle's front
toe alignment and front ride height are within specification (reset if
required). These specifications are located in the vehicle's Workshop
Manual. Adherence to the toe and ride height specification is
important for proper tire wear, ride, handling and headlight aim.
Driving
142
Page 165 of 256
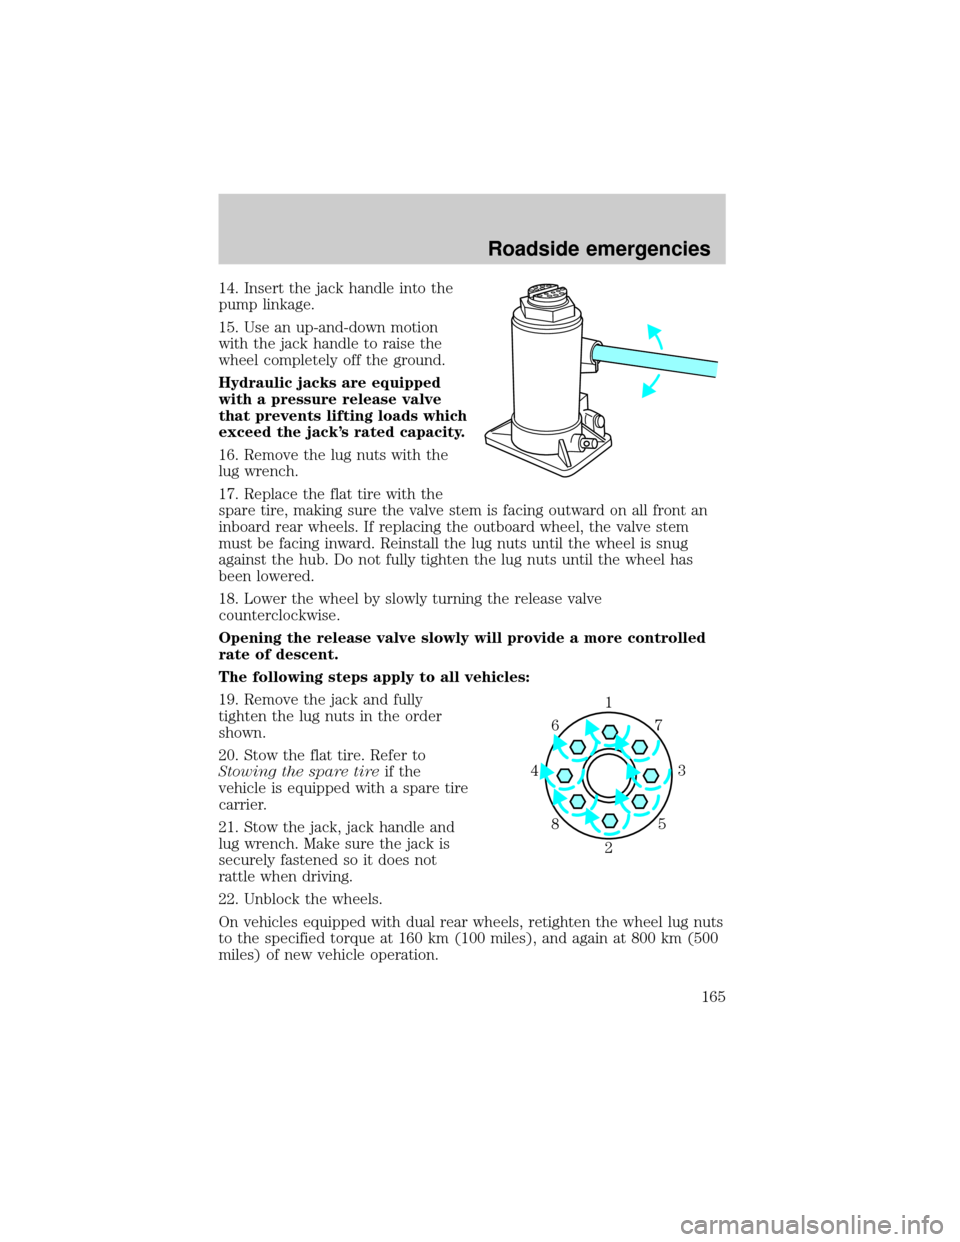
14. Insert the jack handle into the
pump linkage.
15. Use an up-and-down motion
with the jack handle to raise the
wheel completely off the ground.
Hydraulic jacks are equipped
with a pressure release valve
that prevents lifting loads which
exceed the jack's rated capacity.
16. Remove the lug nuts with the
lug wrench.
17. Replace the flat tire with the
spare tire, making sure the valve stem is facing outward on all front an
inboard rear wheels. If replacing the outboard wheel, the valve stem
must be facing inward. Reinstall the lug nuts until the wheel is snug
against the hub. Do not fully tighten the lug nuts until the wheel has
been lowered.
18. Lower the wheel by slowly turning the release valve
counterclockwise.
Opening the release valve slowly will provide a more controlled
rate of descent.
The following steps apply to all vehicles:
19. Remove the jack and fully
tighten the lug nuts in the order
shown.
20. Stow the flat tire. Refer to
Stowing the spare tireif the
vehicle is equipped with a spare tire
carrier.
21. Stow the jack, jack handle and
lug wrench. Make sure the jack is
securely fastened so it does not
rattle when driving.
22. Unblock the wheels.
On vehicles equipped with dual rear wheels, retighten the wheel lug nuts
to the specified torque at 160 km (100 miles), and again at 800 km (500
miles) of new vehicle operation.
1
3 4
27 6
5 8
Roadside emergencies
165
Page 199 of 256
The temperature grade for this tire is established for a tire that
is properly inflated and not overloaded. Excessive speed,
underinflation, or excessive loading, either separately or in
combination, can cause heat buildup and possible tire failure.
SERVICING YOUR TIRES
Checking the tire pressure
²Use an accurate tire pressure gauge.
²Check the tire pressure when tires are cold, after the vehicle has been
parked for at least one hour or has been driven less than 5 km (3
miles).
²Adjust tire pressure to recommended specifications found on the
Certification Label.
Improperly inflated tires can affect vehicle handling and can fail
suddenly, possibly resulting in loss of vehicle control.
Tire rotation
Because your vehicle's tires perform different jobs, they often wear
differently. To make sure your tires wear evenly and last longer, rotate
them as indicated in the Scheduled Maintenance Guide. If you notice
that the tires wear unevenly, have them checked.
The following procedure applies to vehicles equipped with single rear
wheels, if your vehicle is equipped with dual rear wheels it is
recommended that only the front wheels be rotated (side to side).
Maintenance and care
199
Page 202 of 256
The tires on your vehicle have all weather treads to provide traction in
rain and snow. However, in some climates, you may need to use snow
tires and chains. If you need to use chains, it is recommended that steel
wheels (of the same size and specifications) be used as chains may chip
aluminum wheels.
Follow these guidelines when using snow tires and chains:
²Use only SAE Class S chains.
²Install chains securely, verifying that the chains do not touch any
wiring, brake lines or fuel lines.
²Drive cautiously. If you hear the chains rub or bang against your
vehicle, stop and re-tighten the chains. If this does not work, remove
the chains to prevent damage to your vehicle.
²If possible, avoid fully loading your vehicle.
²Remove the tire chains when they are no longer needed. Do not use
tire chains on dry roads.
²The suspension insulation and bumpers will help prevent vehicle
damage. Do not remove these components from your vehicle when
using snow tires and chains.
WHAT YOU SHOULD KNOW ABOUT AUTOMOTIVE FUELS
Important safety precautions
Do not overfill the fuel tank. The pressure in an overfilled tank
may cause leakage and lead to fuel spray and fire.
The fuel system may be under pressure. If the fuel filler cap is
venting vapor or if you hear a hissing sound, wait until it stops
before completely removing the fuel filler cap. Otherwise, fuel may
spray out and injure you or others.
If you do not use the proper fuel filler cap, excessive pressure or
vacuum in the fuel tank may damage the fuel system or cause
the fuel system to work improperly in a collision, which may result in
possible personal injury.
Maintenance and care
202
Page 209 of 256

²Using the air conditioner or defroster may reduce fuel economy.
²You may want to turn off the speed control in hilly terrain if
unnecessary shifting between third and fourth gear occurs.
Unnecessary shifting of this type could result in reduced fuel
economy.
²Warming up a vehicle on cold mornings is not required and may
reduce fuel economy.
²Resting your foot on the brake pedal while driving may reduce fuel
economy.
²Combine errands and minimize stop-and-go driving.
Maintenance
²Keep tires properly inflated and use only recommended size.
²Operating a vehicle with the wheels out of alignment will reduce fuel
economy.
²Use recommended engine oil. Refer toLubricant Specifications.
²Perform all regularly scheduled maintenance items. Follow the
recommended maintenance schedule and owner maintenance checks
found in your vehicle Scheduled Maintenance Guide.
Conditions
²Heavily loading a vehicle or towing a trailer may reduce fuel economy
at any speed.
²Carrying unnecessary weight may reduce fuel economy (approximately
0.4 km/L [1 mpg] is lost for every 180 kg [400 lb] of weight carried).
²Adding certain accessories to your vehicle (for example bug
deflectors, rollbars/light bars, running boards, ski/luggage racks) may
reduce fuel economy.
²Using fuel blended with alcohol may lower fuel economy.
²Fuel economy may decrease with lower temperatures during the first
12±16 km (8±10 miles) of driving.
²Driving on flat terrain offers improved fuel economy as compared to
driving on hilly terrain.
²Transmissions give their best fuel economy when operated in the top
cruise gear and with steady pressure on the gas pedal.
Maintenance and care
209
Page 232 of 256
IDENTIFYING YOUR VEHICLE
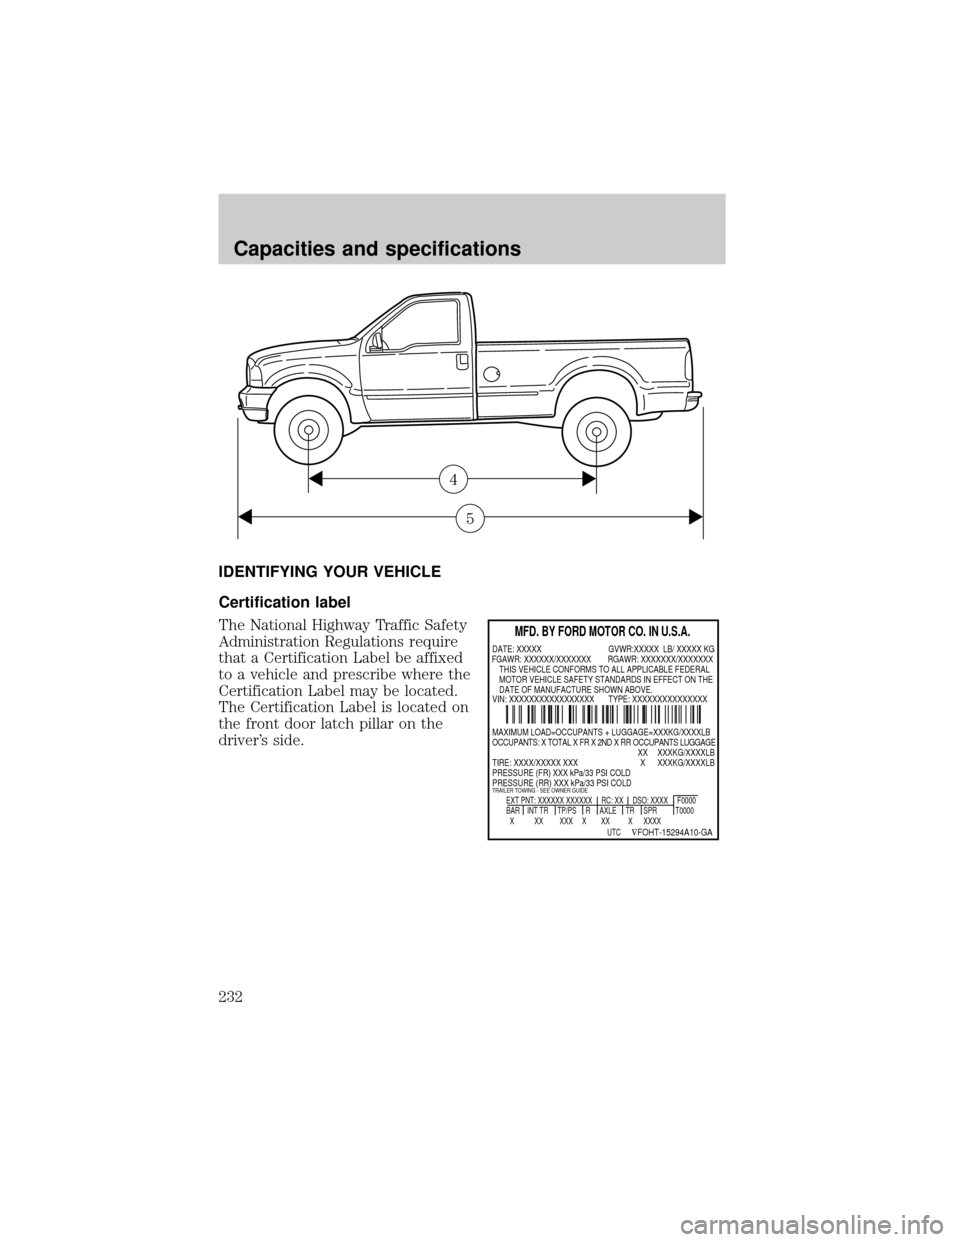
Certification label
The National Highway Traffic Safety
Administration Regulations require
that a Certification Label be affixed
to a vehicle and prescribe where the
Certification Label may be located.
The Certification Label is located on
the front door latch pillar on the
driver's side.
5
4
MFD. BY FORD MOTOR CO. IN U.S.A.
EXT PNT: XXXXXX XXXXXX RC: XX DSO: XXXX F0000
BAR INT TR TP/PS R AXLE TR SPR T0000
X XX XXX X XX X XXXX
UTC
ÑFOHT-15294A10-GA
MAXIMUM LOAD=OCCUPANTS + LUGGAGE=XXXKG/XXXXLB
OCCUPANTS: X TOTAL X FR X 2ND X RR OCCUPANTS LUGGAGE
XX XXXKG/XXXXLB
TIRE: XXXX/XXXXX XXX X XXXKG/XXXXLB
PRESSURE (FR) XXX kPa/33 PSI COLD
PRESSURE (RR) XXX kPa/33 PSI COLD
TRAILER TOWING - SEE OWNER GUIDE
DATE: XXXXX GVWR:XXXXX LB/ XXXXX KG
VIN: XXXXXXXXXXXXXXXXX TYPE: XXXXXXXXXXXXXXX FGAWR: XXXXXX/XXXXXXX RGAWR: XXXXXXX/XXXXXXX
THIS VEHICLE CONFORMS TO ALL APPLICABLE FEDERAL
MOTOR VEHICLE SAFETY STANDARDS IN EFFECT ON THE
DATE OF MANUFACTURE SHOWN ABOVE.
Capacities and specifications
232
Page 251 of 256

Snowplowing ............4,141,142,143
Spark plugs,
specifications ...............222,227,228
Special notice .............................3,5
ambulance conversions ..............4
diesel-powered vehicles .............3
four-wheel
drive vehicles ...................143,144
utility-type vehicles ....................3
Specification chart,
lubricants ............................225,227
Speed control ..............................56
Speedometer ...............................17
Starting your vehicle .........104,106
jump starting ..........................166
Steering wheel
tilting .........................................60
Tachometer .................................19
Tailgate ........................................71
Tires ......................155,197,198,199
changing ...........................155,158
checking the pressure ............199
replacing ..................................201
rotating ....................................199
snow tires and chains ............201
tire grades ...............................198
treadwear ................................198
Towing .......................................199
wrecker ....................................171
Traction-lok rear axle ...............112
Transfer case
fluid checking .........................192Transmission .............................114
fluid, checking and adding
(automatic) .............................189
fluid, checking and adding
(manual) .................................191
fluid, refill capacities ..............222
lubricant specifications ...225,227
manual operation ....................117
Transmission
control indicator light .................13
Trip odometer .............................18
Turn signal .............................14,56
Vehicle dimensions ...................228
Vehicle Identification
Number (VIN) ...........................233
Vehicle loading ..........................132
Ventilating your vehicle ...........108
Warning chimes ...........................16
Warning lights (see Lights) .......10
Washer fluid ..............................182
Water, Driving through .............134
Windows
power .........................................62
Windshield washer fluid
and wipers
checking and adding fluid .....182
checking and cleaning .....196,197
operation ...................................61
replacing wiper blades ...........197
Wrecker towing .........................171
Index
251