Page 134 of 256
Special loading instructions for owners of pickup trucks and
utility-type vehicles
For important information regarding safe operation of this type
of vehicle, see thePreparing to drive your vehiclesection in
theDrivingchapter of this owner guide.
Loaded vehicles, with a higher center of gravity, may handle
differently than unloaded vehicles. Extra precautions, such as
slower speeds and increased stopping distance, should be taken when
driving a heavily loaded vehicle.
Your vehicle has the capability to haul more cargo and people than most
passenger cars. Depending upon the type and placement of the load,
hauling cargo and people may raise the center of gravity of the vehicle.
Calculating the load your vehicle can carry/tow
1. Use the appropriate maximum gross combined weight rating (GCWR)
chart to find the maximum GCWR for your type engine and rear axle
ratio.
2. Weigh your vehicle as you customarily operate the vehicle without
cargo. To obtain correct weights, try taking your vehicle to a shipping
company or an inspection station for trucks.
3. Subtract your loaded vehicle weight from the maximum GCWR on the
following charts. This is the maximum trailer weight your vehicle can tow
and must fall below the maximum shown under maximum trailer weight
on the chart.
DRIVING THROUGH WATER
Do not drive quickly through standing water, especially if the depth is
unknown. Traction or brake capability may be limited and if the ignition
system gets wet, your engine may stall. Water may also enter your
engine's air intake and severely damage your engine.
If driving through deep or standing water is unavoidable, proceed very
slowly. Never drive through water that is higher than the bottom of the
hubs (for trucks) or the bottom of the wheel rims (for cars).
Once through the water, always try the brakes. Wet brakes do not stop the
vehicle as effectively as dry brakes. Drying can be improved by moving
your vehicle slowly while applying light pressure on the brake pedal.
Driving
134
Page 138 of 256
Preparing to tow
Use the proper equipment for towing a trailer, and make sure it is
properly attached to your vehicle. See your dealer or a reliable trailer
dealer if you require assistance.
Hitches
Do not use hitches that clamp onto the vehicle's bumper or attach to the
axle. You must distribute the load in your trailer so that 10% of the total
weight of the trailer is on the tongue.
Load equalizing hitch
When hooking up a trailer using a load equalizing hitch, always use the
following procedure:
1. Park the unloaded vehicle on a level surface. With the ignition on and
all doors closed, allow the vehicle to stand for several minutes so that it
can level.
2. Measure the height of a reference point on the front and rear bumpers
at the center of the vehicle.
3. Attach the trailer to the vehicle and adjust the hitch equalizers so that
the front bumper height is within 0±13 mm (1/2 inch) of the reference
point. After proper adjustment, the rear bumper should be no higher
than in Step 3.
Adjusting an equalizing hitch so the rear bumper of the vehicle
is lower or higher than it was unloaded will defeat the function
of the load equalizing hitch and may cause unpredictable handling.
Safety chains
Always connect the trailer's safety chains to the frame or hook retainers
of the vehicle. To connect the trailer's safety chains, cross the chains
under the trailer tongue and allow slack for turning corners.
If you use a rental trailer, follow the instructions that the rental agency
gives to you.
Do not attach safety chains to the bumper.
Driving
138
Page 146 of 256
Roadside coverage beyond basic warranty
In the United States, you may purchase additional roadside assistance
coverage beyond this period through the Ford Auto Club by contacting
your Ford or Lincoln Mercury dealer.
Similarly in Canada, you may purchase additional coverage beyond the
basic coverage period by consulting the Ford Roadside Assistance Club
brochure or by calling 1±877±294±CLUB (1±877±894±2582).
HAZARD FLASHER
Use only in an emergency to warn traffic of vehicle breakdown,
approaching danger, etc. The hazard flashers can be operated when the
ignition is off.
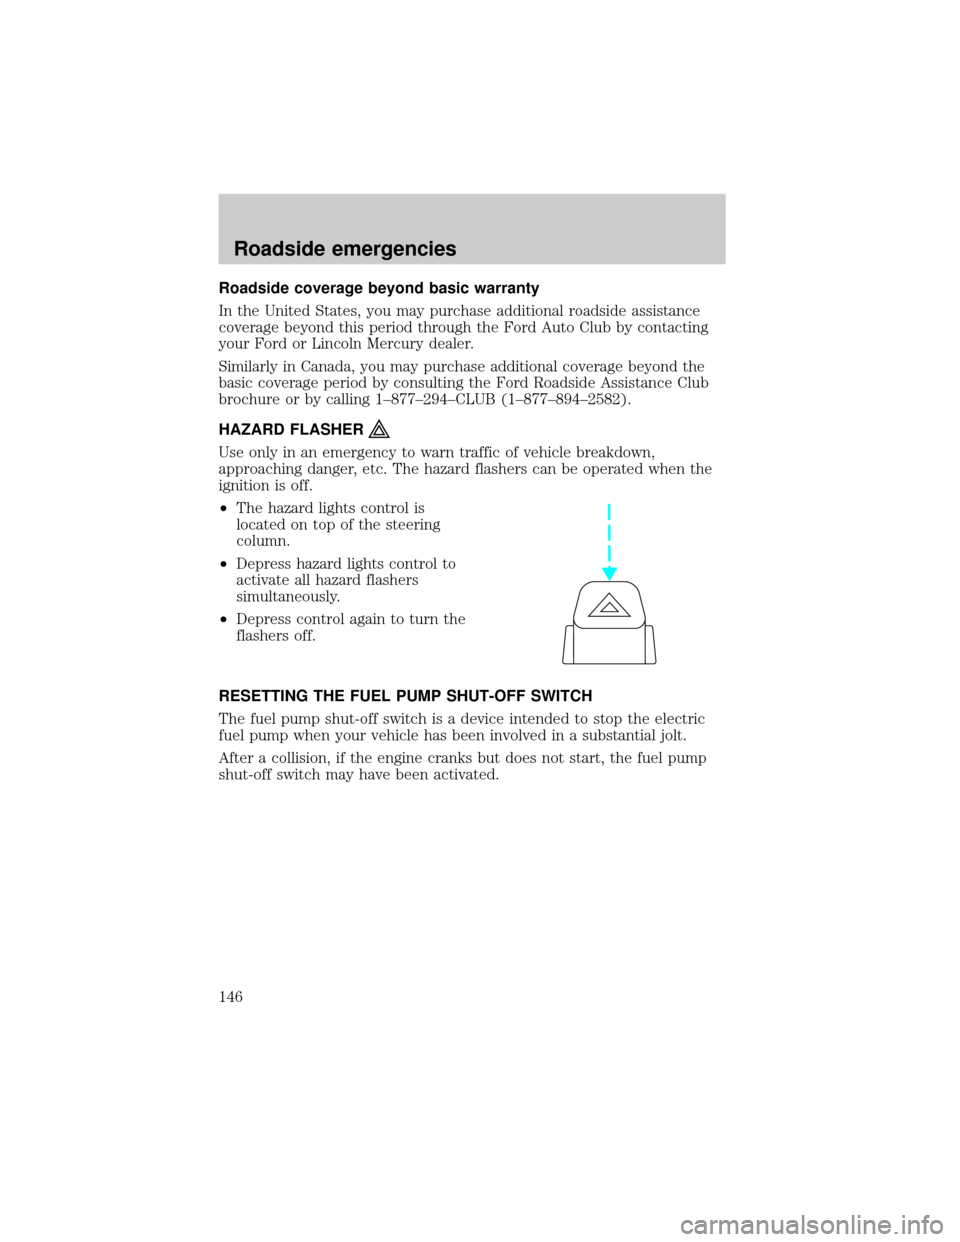
²The hazard lights control is
located on top of the steering
column.
²Depress hazard lights control to
activate all hazard flashers
simultaneously.
²Depress control again to turn the
flashers off.
RESETTING THE FUEL PUMP SHUT-OFF SWITCH
The fuel pump shut-off switch is a device intended to stop the electric
fuel pump when your vehicle has been involved in a substantial jolt.
After a collision, if the engine cranks but does not start, the fuel pump
shut-off switch may have been activated.
Roadside emergencies
146
Page 147 of 256
The fuel pump shut-off switch is
located in the passenger's foot well,
by the kick panel.
Use the following procedure to reset the fuel pump shut-off switch.
1. Turn the ignition to the OFF position.
2. Check the fuel system for leaks.
3. If no fuel leak is apparent, reset the fuel pump shut-off switch by
pushing in on the reset button.
4. Turn the ignition to the ON position. Pause for a few seconds and
return the key to the OFF position.
5. Make a further check for leaks in the fuel system.
FUSES AND RELAYS
Fuses
If electrical components in the
vehicle are not working, a fuse may
have blown. Blown fuses are
identified by a broken wire within
the fuse. Check the appropriate
fuses before replacing any electrical
components.
15
Roadside emergencies
147
Page 151 of 256
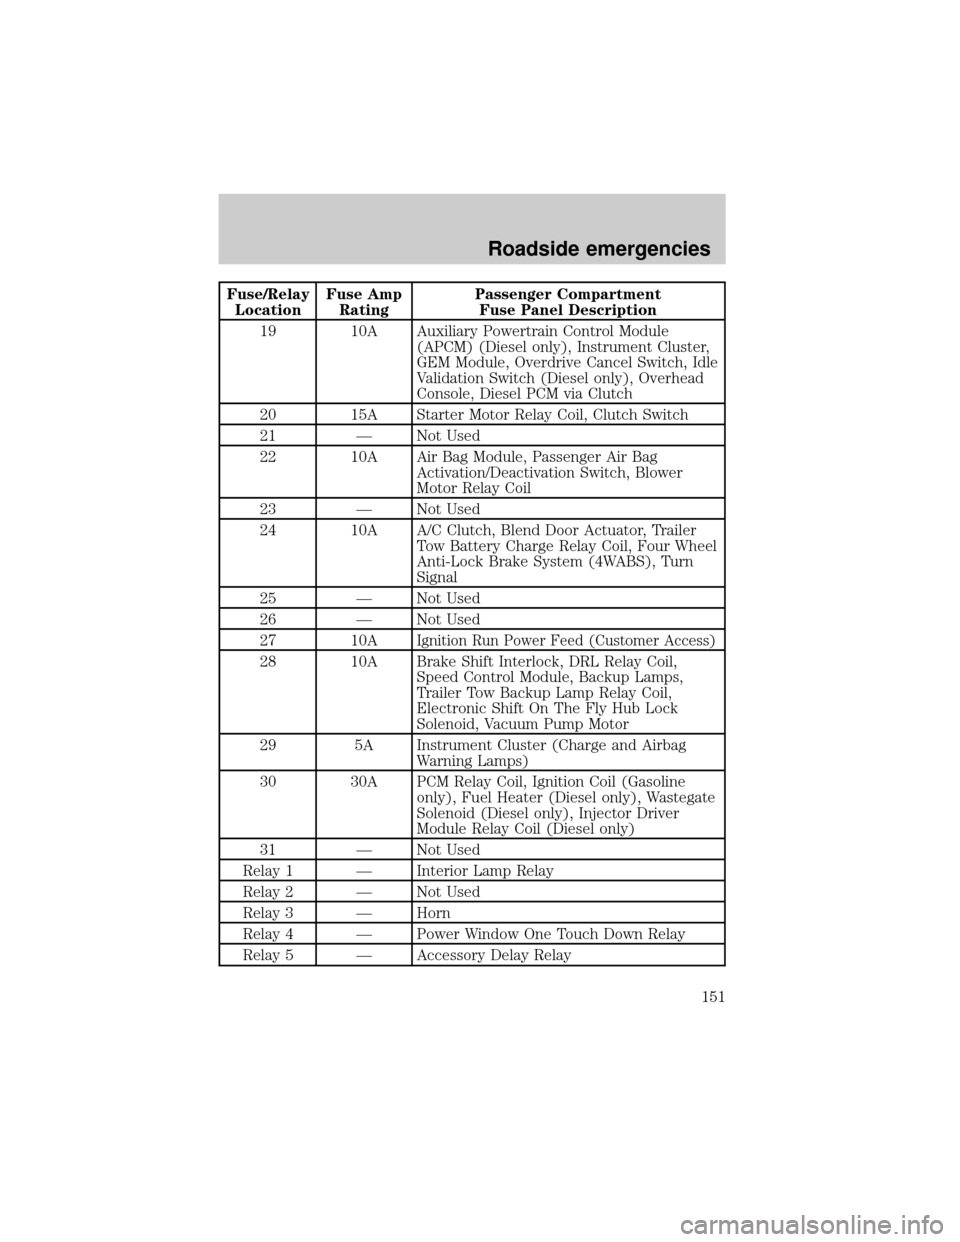
Fuse/Relay
LocationFuse Amp
RatingPassenger Compartment
Fuse Panel Description
19 10A Auxiliary Powertrain Control Module
(APCM) (Diesel only), Instrument Cluster,
GEM Module, Overdrive Cancel Switch, Idle
Validation Switch (Diesel only), Overhead
Console, Diesel PCM via Clutch
20 15A Starter Motor Relay Coil, Clutch Switch
21 Ð Not Used
22 10A Air Bag Module, Passenger Air Bag
Activation/Deactivation Switch, Blower
Motor Relay Coil
23 Ð Not Used
24 10A A/C Clutch, Blend Door Actuator, Trailer
Tow Battery Charge Relay Coil, Four Wheel
Anti-Lock Brake System (4WABS), Turn
Signal
25 Ð Not Used
26 Ð Not Used
27 10A
Ignition Run Power Feed (Customer Access)
28 10A Brake Shift Interlock, DRL Relay Coil,
Speed Control Module, Backup Lamps,
Trailer Tow Backup Lamp Relay Coil,
Electronic Shift On The Fly Hub Lock
Solenoid, Vacuum Pump Motor
29 5A Instrument Cluster (Charge and Airbag
Warning Lamps)
30 30A PCM Relay Coil, Ignition Coil (Gasoline
only), Fuel Heater (Diesel only), Wastegate
Solenoid (Diesel only), Injector Driver
Module Relay Coil (Diesel only)
31 Ð Not Used
Relay 1 Ð Interior Lamp Relay
Relay 2 Ð Not Used
Relay 3 Ð Horn
Relay 4 Ð Power Window One Touch Down Relay
Relay 5 Ð Accessory Delay Relay
Roadside emergencies
151
Page 153 of 256
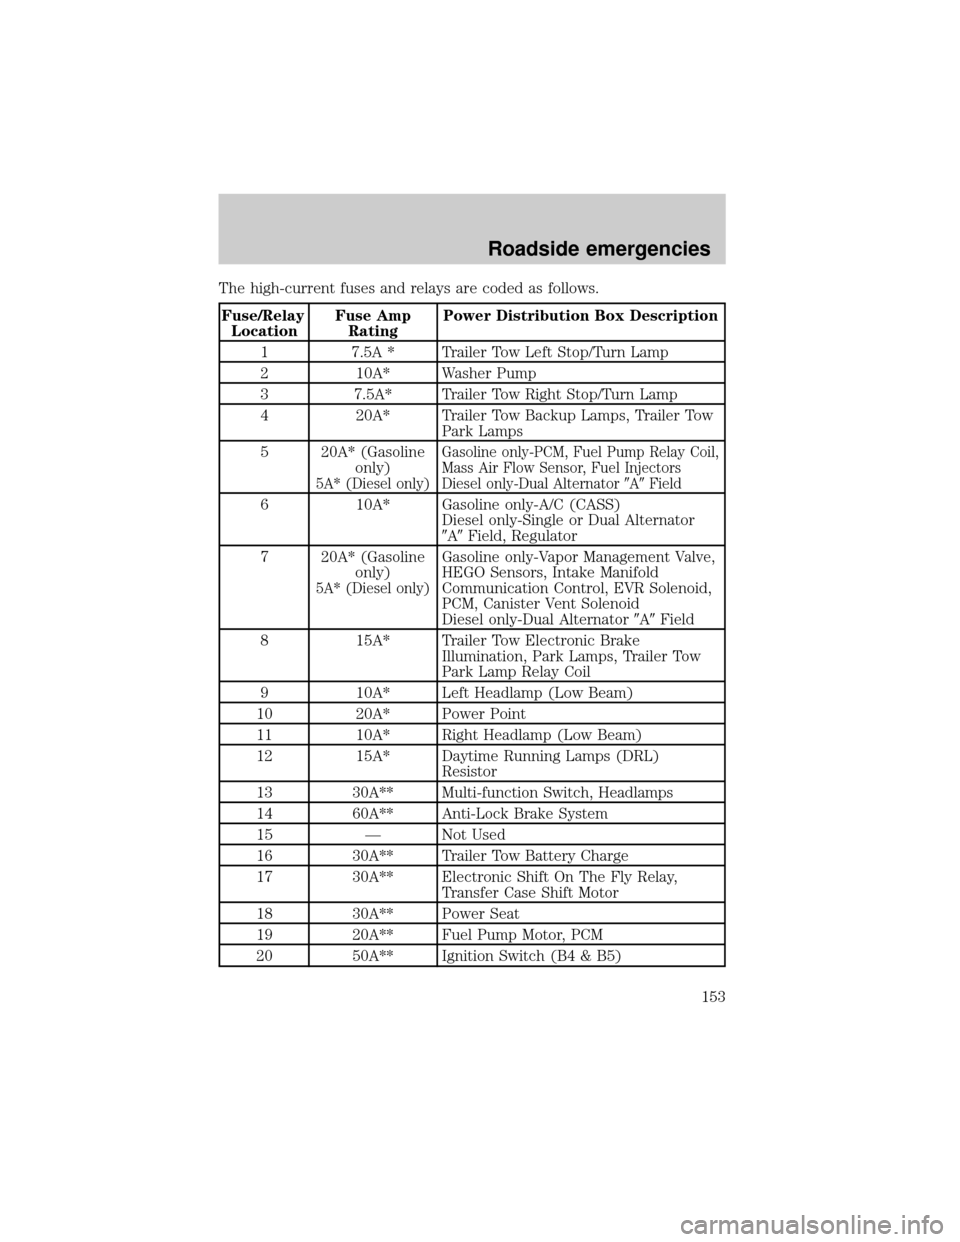
The high-current fuses and relays are coded as follows.
Fuse/Relay
LocationFuse Amp
RatingPower Distribution Box Description
1 7.5A * Trailer Tow Left Stop/Turn Lamp
2 10A* Washer Pump
3 7.5A* Trailer Tow Right Stop/Turn Lamp
4 20A* Trailer Tow Backup Lamps, Trailer Tow
Park Lamps
5 20A* (Gasoline
only)
5A* (Diesel only)Gasoline only-PCM, Fuel Pump Relay Coil,
Mass Air Flow Sensor, Fuel Injectors
Diesel only-Dual Alternator9A9Field
6 10A* Gasoline only-A/C (CASS)
Diesel only-Single or Dual Alternator
9A9Field, Regulator
7 20A* (Gasoline
only)
5A* (Diesel only)
Gasoline only-Vapor Management Valve,
HEGO Sensors, Intake Manifold
Communication Control, EVR Solenoid,
PCM, Canister Vent Solenoid
Diesel only-Dual Alternator9A9Field
8 15A* Trailer Tow Electronic Brake
Illumination, Park Lamps, Trailer Tow
Park Lamp Relay Coil
9 10A* Left Headlamp (Low Beam)
10 20A* Power Point
11 10A* Right Headlamp (Low Beam)
12 15A* Daytime Running Lamps (DRL)
Resistor
13 30A** Multi-function Switch, Headlamps
14 60A** Anti-Lock Brake System
15 Ð Not Used
16 30A** Trailer Tow Battery Charge
17 30A** Electronic Shift On The Fly Relay,
Transfer Case Shift Motor
18 30A** Power Seat
19 20A** Fuel Pump Motor, PCM
20 50A** Ignition Switch (B4 & B5)
Roadside emergencies
153
Page 154 of 256
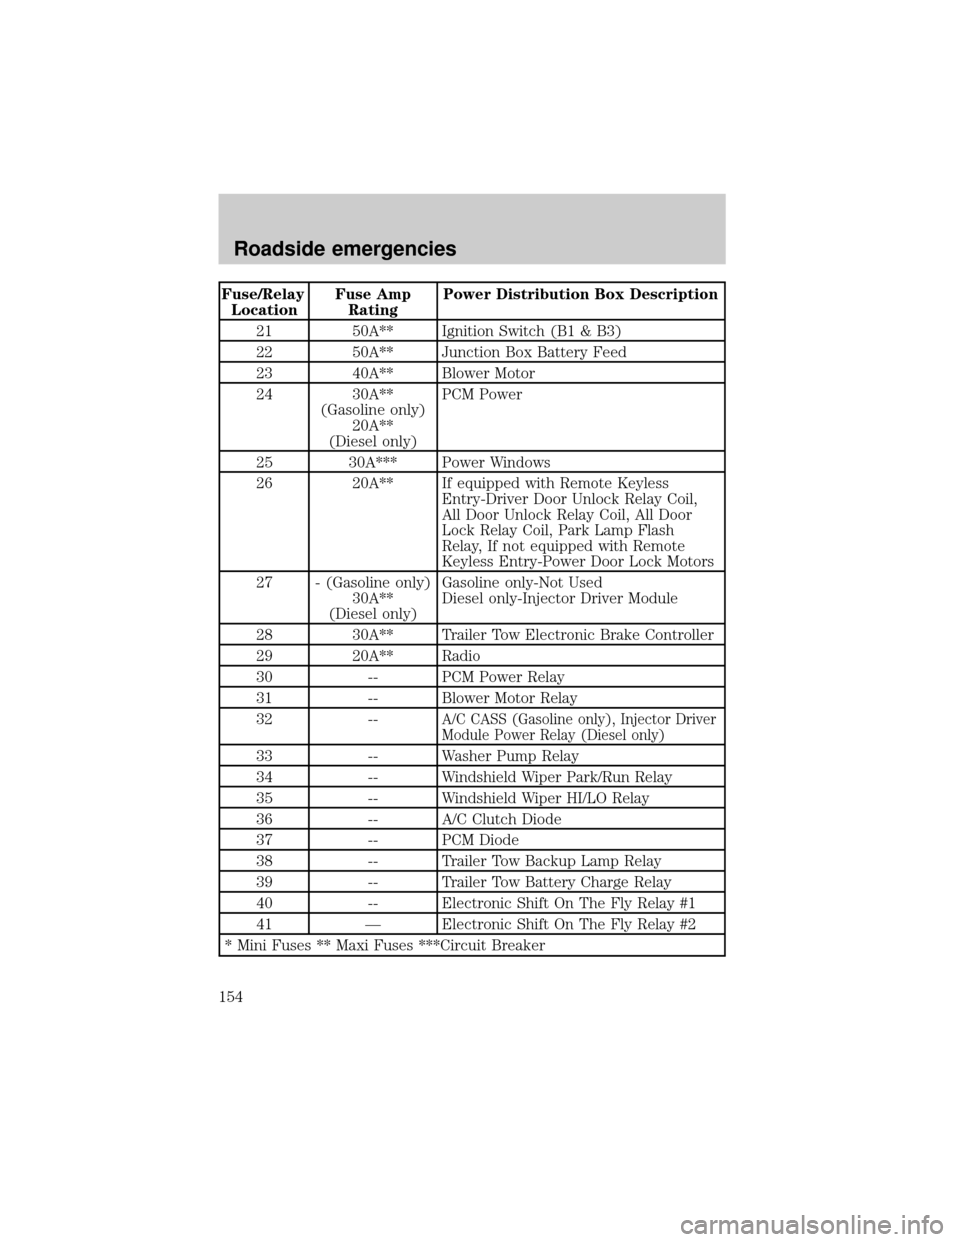
Fuse/Relay
LocationFuse Amp
RatingPower Distribution Box Description
21 50A** Ignition Switch (B1 & B3)
22 50A** Junction Box Battery Feed
23 40A** Blower Motor
24 30A**
(Gasoline only)
20A**
(Diesel only)PCM Power
25 30A*** Power Windows
26 20A** If equipped with Remote Keyless
Entry-Driver Door Unlock Relay Coil,
All Door Unlock Relay Coil, All Door
Lock Relay Coil, Park Lamp Flash
Relay, If not equipped with Remote
Keyless Entry-Power Door Lock Motors
27 - (Gasoline only)
30A**
(Diesel only)Gasoline only-Not Used
Diesel only-Injector Driver Module
28 30A** Trailer Tow Electronic Brake Controller
29 20A** Radio
30 -- PCM Power Relay
31 -- Blower Motor Relay
32 --
A/C CASS (Gasoline only), Injector Driver
Module Power Relay (Diesel only)
33 -- Washer Pump Relay
34 -- Windshield Wiper Park/Run Relay
35 -- Windshield Wiper HI/LO Relay
36 -- A/C Clutch Diode
37 -- PCM Diode
38 -- Trailer Tow Backup Lamp Relay
39 -- Trailer Tow Battery Charge Relay
40 -- Electronic Shift On The Fly Relay #1
41 Ð Electronic Shift On The Fly Relay #2
* Mini Fuses ** Maxi Fuses ***Circuit Breaker
Roadside emergencies
154
Page 205 of 256
with the recommended octane rating, see your dealer or a qualified
service technician to prevent any engine damage.
Fuel quality
If you are experiencing starting, rough idle or hesitation driveability
problems during a cold start, try a different brand of ªRegularº unleaded
gasoline. ªPremiumº unleaded gasoline is not recommended (particularly
in the United States) because it may cause these problems to become
more pronounced. If the problems persist, see your dealer or a qualified
service technician.
It should not be necessary to add any aftermarket products to your fuel
tank if you continue to use high quality fuel of the recommended octane
rating. Aftermarket products could cause damage to the fuel system.
Repairs to correct the effects of using an aftermarket product in your
fuel may not be covered by your warranty.
Many of the world's automakers issued the World-wide Fuel Charter that
recommends gasoline specifications to provide improved performance
and emission control system protection for your vehicle. Gasolines that
meet the World-wide Fuel Charter should be used when available. Ask
your fuel supplier about gasolines that meet the World-wide Fuel
Charter.
Cleaner air
Ford approves the use of reformulated ªcleaner-burningº gasolines to
improve air quality. These gasolines may contain oxygenates up to 10%
ethanol or 15% MTBE.
Running out of fuel
Avoid running out of fuel because this situation may have an adverse
affect on powertrain components.
If you have run out of fuel:
²You may need to cycle the ignition from OFF to ON several times after
refueling, to allow the fuel system to pump the fuel from the tank to
the engine.
²Your ªService Engine Soonº indicator may come on. For more
information on the ªService Engine Soonº indicator, refer to the
Instrumentationchapter.
Maintenance and care
205