Page 115 of 256

Driving with a 4±speed automatic transmission
Understanding gearshift positions
To put your vehicle in gear, start the engine, depress the brake pedal,
then move gearshift lever out of P (Park).
Hold the brake pedal down while you move the gearshift lever
from P (Park) to another position. If you do not hold the brake
pedal down, your vehicle may move unexpectedly and injure someone.
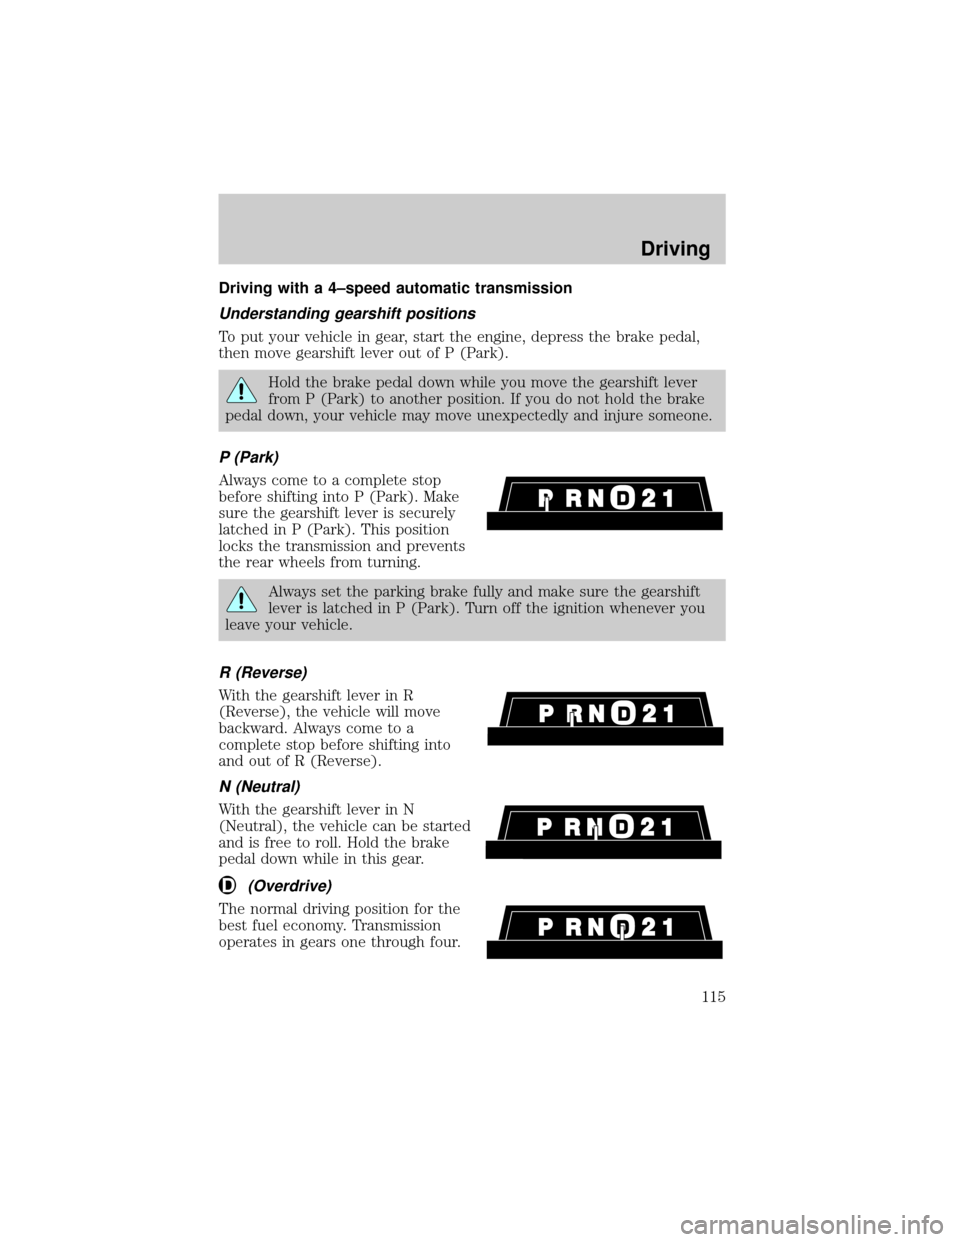
P (Park)
Always come to a complete stop
before shifting into P (Park). Make
sure the gearshift lever is securely
latched in P (Park). This position
locks the transmission and prevents
the rear wheels from turning.
Always set the parking brake fully and make sure the gearshift
lever is latched in P (Park). Turn off the ignition whenever you
leave your vehicle.
R (Reverse)
With the gearshift lever in R
(Reverse), the vehicle will move
backward. Always come to a
complete stop before shifting into
and out of R (Reverse).
N (Neutral)
With the gearshift lever in N
(Neutral), the vehicle can be started
and is free to roll. Hold the brake
pedal down while in this gear.
(Overdrive)
The normal driving position for the
best fuel economy. Transmission
operates in gears one through four.
Driving
115
Page 157 of 256

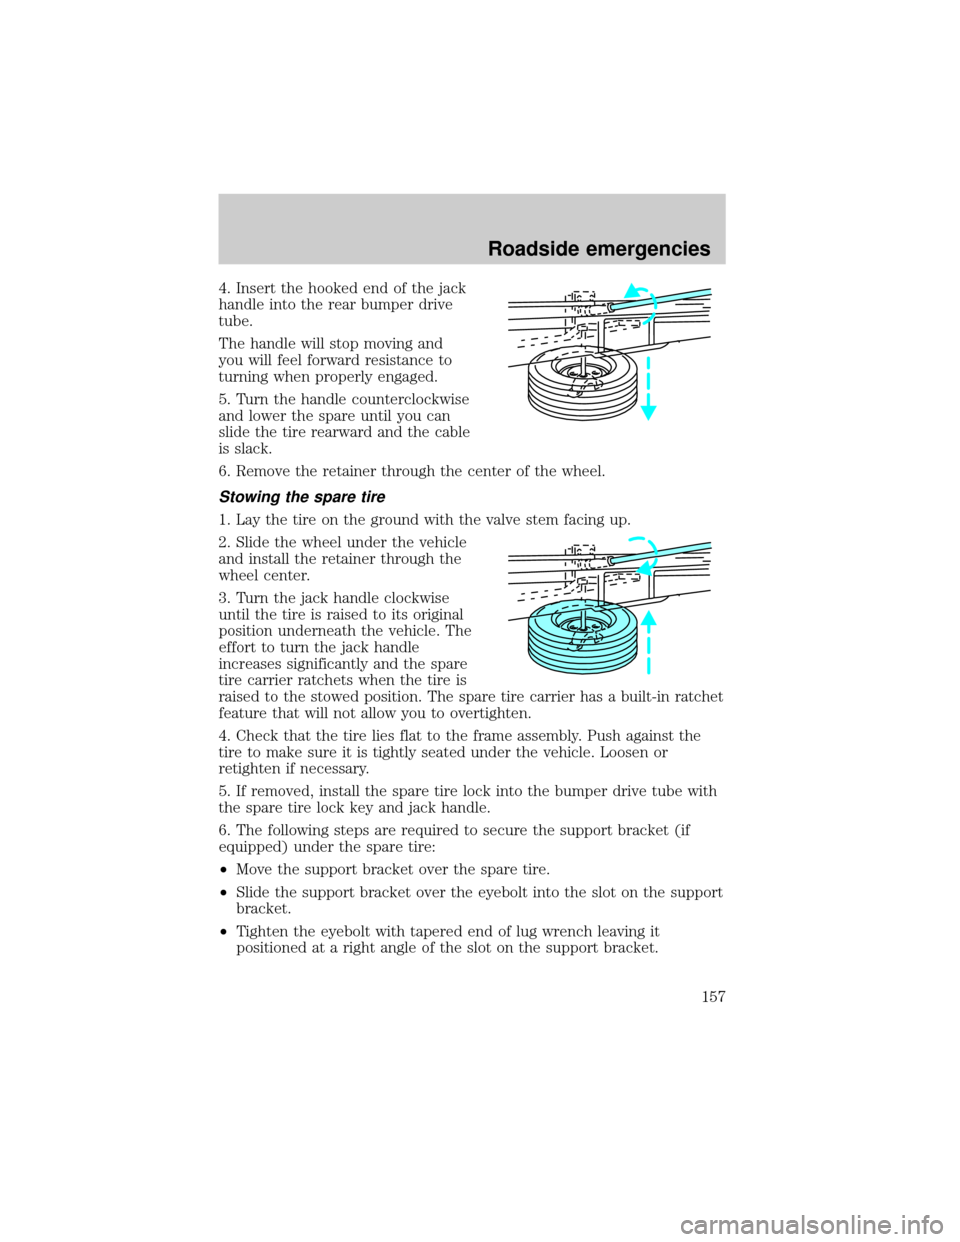
4. Insert the hooked end of the jack
handle into the rear bumper drive
tube.
The handle will stop moving and
you will feel forward resistance to
turning when properly engaged.
5. Turn the handle counterclockwise
and lower the spare until you can
slide the tire rearward and the cable
is slack.
6. Remove the retainer through the center of the wheel.
Stowing the spare tire
1. Lay the tire on the ground with the valve stem facing up.
2. Slide the wheel under the vehicle
and install the retainer through the
wheel center.
3. Turn the jack handle clockwise
until the tire is raised to its original
position underneath the vehicle. The
effort to turn the jack handle
increases significantly and the spare
tire carrier ratchets when the tire is
raised to the stowed position. The spare tire carrier has a built-in ratchet
feature that will not allow you to overtighten.
4. Check that the tire lies flat to the frame assembly. Push against the
tire to make sure it is tightly seated under the vehicle. Loosen or
retighten if necessary.
5. If removed, install the spare tire lock into the bumper drive tube with
the spare tire lock key and jack handle.
6. The following steps are required to secure the support bracket (if
equipped) under the spare tire:
²Move the support bracket over the spare tire.
²Slide the support bracket over the eyebolt into the slot on the support
bracket.
²Tighten the eyebolt with tapered end of lug wrench leaving it
positioned at a right angle of the slot on the support bracket.
Roadside emergencies
157
Page 165 of 256

14. Insert the jack handle into the
pump linkage.
15. Use an up-and-down motion
with the jack handle to raise the
wheel completely off the ground.
Hydraulic jacks are equipped
with a pressure release valve
that prevents lifting loads which
exceed the jack's rated capacity.
16. Remove the lug nuts with the
lug wrench.
17. Replace the flat tire with the
spare tire, making sure the valve stem is facing outward on all front an
inboard rear wheels. If replacing the outboard wheel, the valve stem
must be facing inward. Reinstall the lug nuts until the wheel is snug
against the hub. Do not fully tighten the lug nuts until the wheel has
been lowered.
18. Lower the wheel by slowly turning the release valve
counterclockwise.
Opening the release valve slowly will provide a more controlled
rate of descent.
The following steps apply to all vehicles:
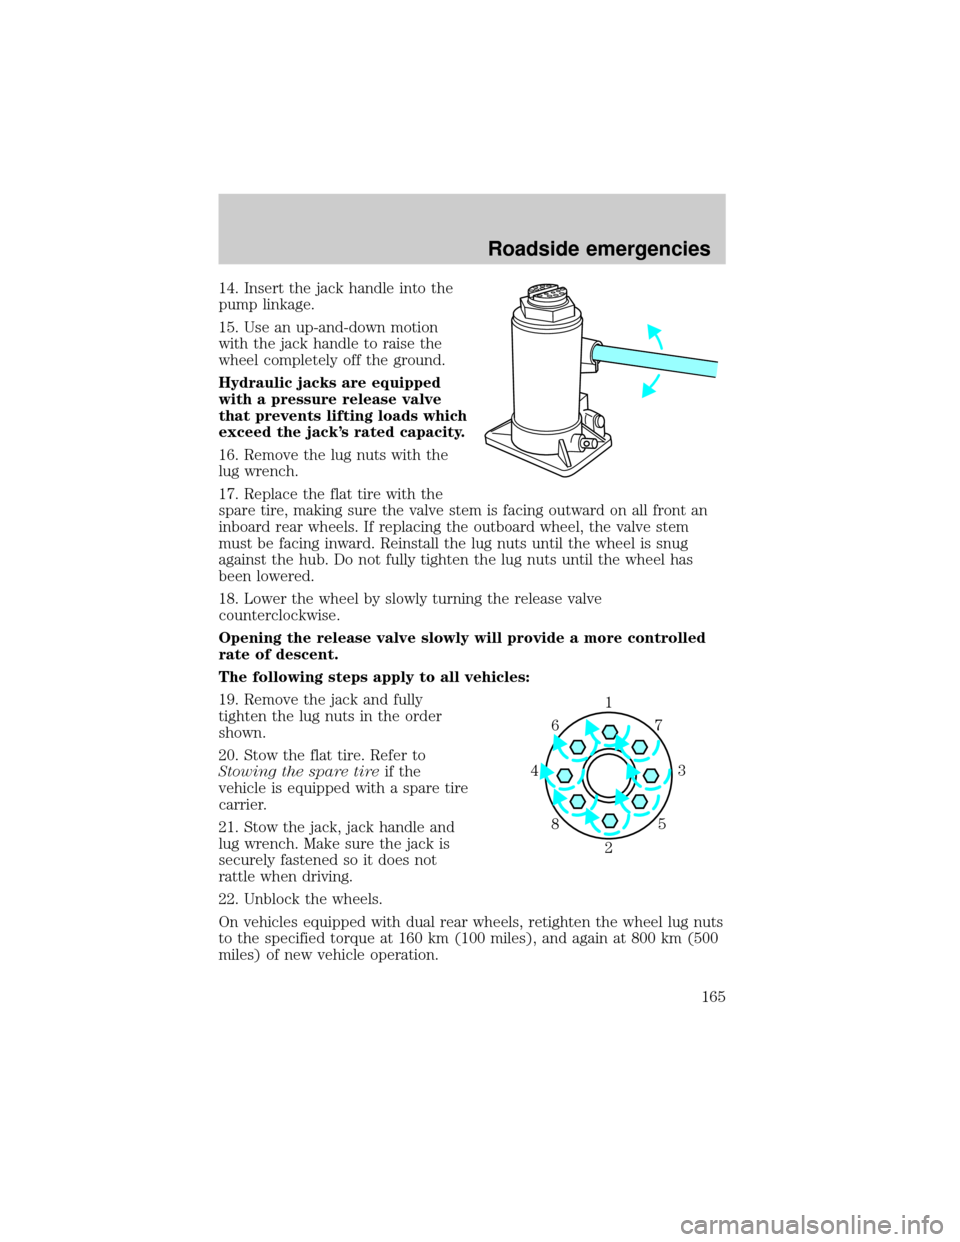
19. Remove the jack and fully
tighten the lug nuts in the order
shown.
20. Stow the flat tire. Refer to
Stowing the spare tireif the
vehicle is equipped with a spare tire
carrier.
21. Stow the jack, jack handle and
lug wrench. Make sure the jack is
securely fastened so it does not
rattle when driving.
22. Unblock the wheels.
On vehicles equipped with dual rear wheels, retighten the wheel lug nuts
to the specified torque at 160 km (100 miles), and again at 800 km (500
miles) of new vehicle operation.
1
3 4
27 6
5 8
Roadside emergencies
165
Page 172 of 256

SERVICE RECOMMENDATIONS
To help you service your vehicle:
²We highlight do-it-yourself items in the engine compartment for easy
location.
²We provide a Scheduled Maintenance Guide which makes tracking
routine service easy.
If your vehicle requires professional service, your dealership can provide
necessary parts and service. Check your ªWarranty Guideº to find out
which parts and services are covered.
Use only recommended fuels, lubricants, fluids and service parts
conforming to specifications. Motorcraft parts are designed and built to
provide the best performance in your vehicle.
PRECAUTIONS WHEN SERVICING YOUR VEHICLE
Be especially careful when inspecting or servicing your vehicle.
²Do not work on a hot engine.
²When the engine is running, keep loose clothing, jewelry or long hair
away from moving parts.
²Do not work on a vehicle with the engine running in an enclosed
space, unless you are sure you have enough ventilation.
²Keep all lit cigarettes, open flames and other lit material away from
the battery and all fuel related parts.
If you disconnect the battery, the engine must ªrelearnº its idle
conditions before your vehicle will drive properly, as explained in the
Batterysection in this chapter.
Working with the engine off
²Automatic transmission:
1. Set the parking brake and ensure the gearshift is securely latched in P
(Park).
2. Turn off the engine and remove the key.
3. Block the wheels to prevent the vehicle from moving unexpectedly.
²Manual transmission:
1. Set the parking brake.
2. Depress the clutch and place the gearshift in 1 (First).
Maintenance and care
172
Page 173 of 256
3. Turn off the engine and remove the key.
4. Block the wheels to prevent the vehicle from moving unexpectedly.
Working with the engine on
²Automatic transmission:
1. Set the parking brake and ensure the gearshift is securely latched in P
(Park).
2. Block the wheels to prevent the vehicle from moving unexpectedly.
Do not start your engine with the air cleaner removed and do
not remove it while the engine is running.
²Manual transmission:
1. Set the parking brake, depress the clutch and place the gearshift in N
(Neutral).
2. Block the wheels to prevent the vehicle from moving unexpectedly.
Do not start your engine with the air cleaner removed and do
not remove it while the engine is running.
Maintenance and care
173
Page 176 of 256
ENGINE OIL
Checking the engine oil
Refer to the Scheduled Maintenance Guide for the appropriate intervals
for checking the engine oil.
1. Make sure the vehicle is on level ground.
2. Turn the engine off and wait a few minutes for the oil to drain into the
oil pan.
3. Set the parking brake and ensure the gearshift is securely latched in P
(Park) (automatic transmission) or 1 (First) (manual transmission).
4. Open the hood. Protect yourself from engine heat.
5. Locate and carefully remove the
engine oil level indicator (dipstick).
6. Wipe the indicator clean. Insert the indicator fully, then remove it
again.
²If the oil level isbetween the MIN and MAX marks,the oil level is
acceptable.DO NOT ADD OIL.
MIN MAX
Maintenance and care
176
Page 192 of 256
3. Fluid level should be at bottom of
the opening.
4. Add enough fluid through the
filler opening so that the fluid level
is at the bottom of the opening.
5. Install and tighten the fill plug
securely.
Use only fluid that meets Ford specifications. Refer to theCapacities
and specificationschapter.
Checking and adding transfer case fluid (if equipped)
1. Clean the filler plug.
2. Remove the filler plug and
inspect the fluid level.
3. Add only enough fluid through
the filler opening so that the fluid
level is at the bottom of the
opening.
Maintenance and care
192
Page 193 of 256
Use only fluid that meets Ford specifications. Refer to theCapacities
and specificationschapter.
AIR FILTER MAINTENANCE
Refer to the Scheduled Maintenance Guide for the appropriate intervals
for changing the air filter element.
When changing the air filter element, use only the Motorcraft air filter
element listed. Refer toMotorcraft Part Numbersin theCapacities and
specificationschapter.
Do not start your engine with the air cleaner removed and do
not remove it while the engine is running.
Changing the air filter element
1. Loosen the clamp that secures
the air filter element in place.
Maintenance and care
193