2000 FORD F SERIES MOTORHOME AND COMMERCIAL CHASSIS tow
[x] Cancel search: towPage 37 of 104
The towing vehicle braking system is rated for operation at the GVWR,
not the GCWR.
Separate functioning brake systems are required for safe control of
towed vehicles and trailers weighing more than 680 kg (1 500 lbs) when
loaded.
Trailer lamps
Trailer lamps are required on most towed vehicles. Make sure your
trailer lamps conform to local and Federal regulations. See your dealer or
trailer rental agency for proper instructions and equipment for hooking
up trailer lamps.
Driving while you tow
Do not drive faster than 88 km/h (55 mph) when towing a trailer.
Speed control may shut off if you are towing on long, steep grades.
When towing a trailer:
•Use a lower gear when towing up or down steep hills. This will
eliminate excessive downshifting and upshifting for optimum fuel
economy and transmission cooling.
•Anticipate stops and brake gradually.
Servicing after towing
If you tow a trailer for long distances, your vehicle will require more
frequent service intervals. Refer to your Scheduled Maintenance Guide
for more information.
Trailer towing tips
•Practice turning, stopping and backing up in an area before starting on
a trip to get the feel of the vehicle trailer combination. When turning,
make wider turns so the trailer wheels will clear curbs and other
obstacles.
•Allow more distance for stopping with a trailer attached.
•The trailer tongue weight should be 10% of the loaded trailer weight.
•After you have traveled 80 km (50 miles), thoroughly check your
hitch, electrical connections and trailer wheel lug nuts.
•When stopped in traffic for long periods of time in hot weather, place
the gearshift in P (Park) and increase idle speed. This aids engine
cooling and air conditioner efficiency.
Driving
37
Page 43 of 104
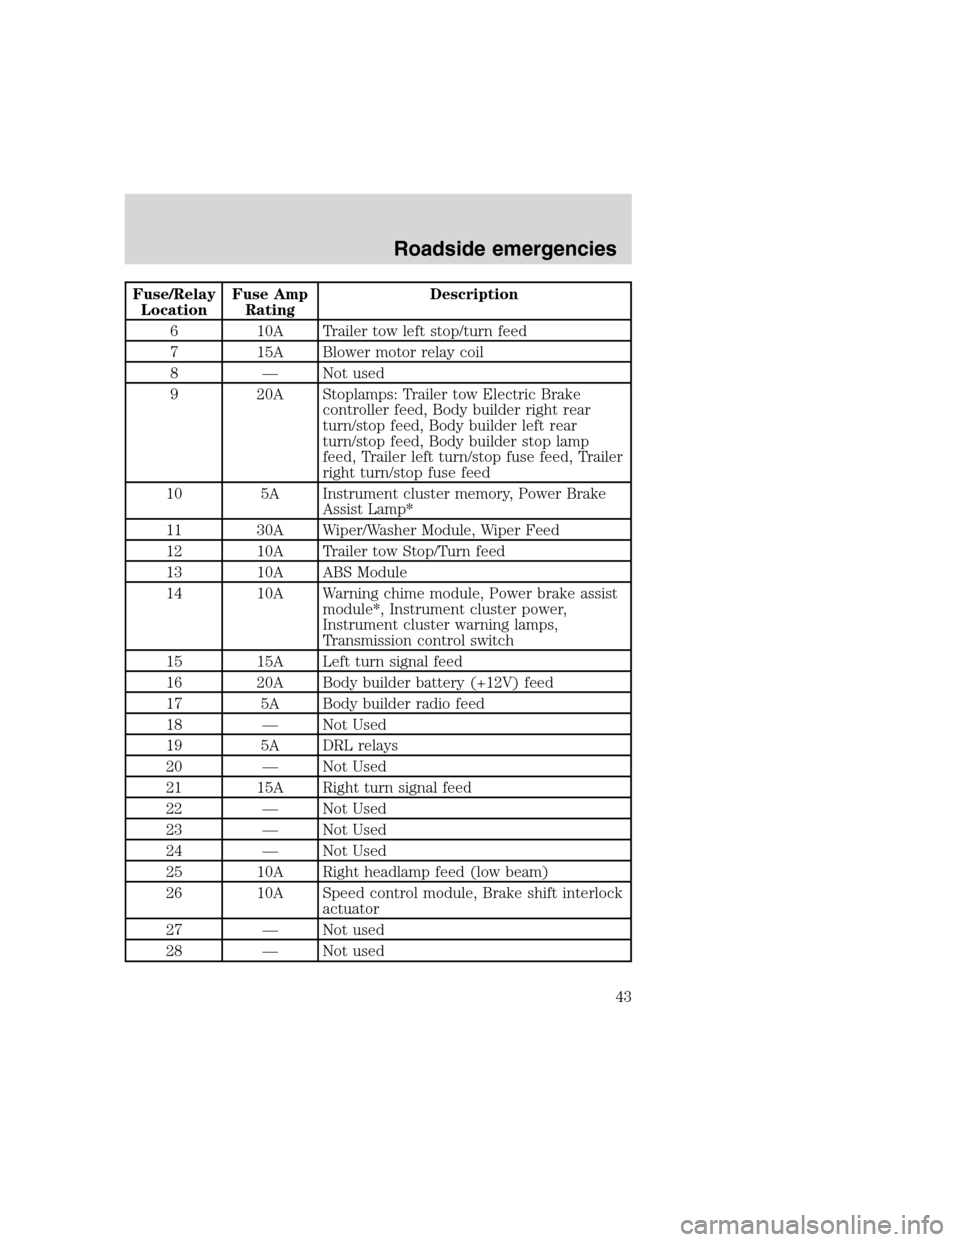
Fuse/Relay
LocationFuse Amp
RatingDescription
6 10A Trailer tow left stop/turn feed
7 15A Blower motor relay coil
8 — Not used
9 20A Stoplamps: Trailer tow Electric Brake
controller feed, Body builder right rear
turn/stop feed, Body builder left rear
turn/stop feed, Body builder stop lamp
feed, Trailer left turn/stop fuse feed, Trailer
right turn/stop fuse feed
10 5A Instrument cluster memory, Power Brake
Assist Lamp*
11 30A Wiper/Washer Module, Wiper Feed
12 10A Trailer tow Stop/Turn feed
13 10A ABS Module
14 10A Warning chime module, Power brake assist
module*, Instrument cluster power,
Instrument cluster warning lamps,
Transmission control switch
15 15A Left turn signal feed
16 20A Body builder battery (+12V) feed
17 5A Body builder radio feed
18 — Not Used
19 5A DRL relays
20 — Not Used
21 15A Right turn signal feed
22 — Not Used
23 — Not Used
24 — Not Used
25 10A Right headlamp feed (low beam)
26 10A Speed control module, Brake shift interlock
actuator
27 — Not used
28 — Not used
Roadside emergencies
43
Page 46 of 104
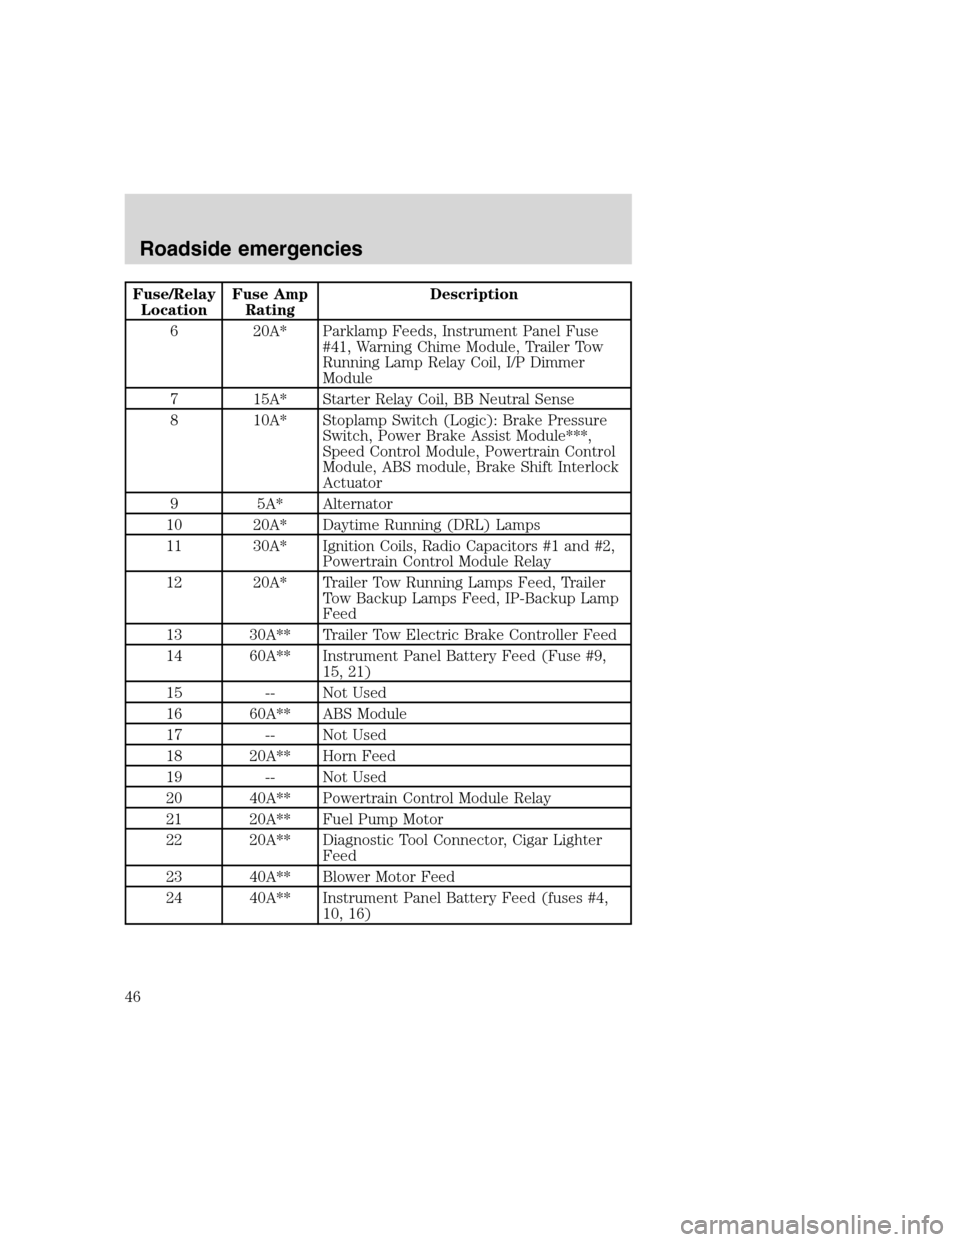
Fuse/Relay
LocationFuse Amp
RatingDescription
6 20A* Parklamp Feeds, Instrument Panel Fuse
#41, Warning Chime Module, Trailer Tow
Running Lamp Relay Coil, I/P Dimmer
Module
7 15A* Starter Relay Coil, BB Neutral Sense
8 10A* Stoplamp Switch (Logic): Brake Pressure
Switch, Power Brake Assist Module***,
Speed Control Module, Powertrain Control
Module, ABS module, Brake Shift Interlock
Actuator
9 5A* Alternator
10 20A* Daytime Running (DRL) Lamps
11 30A* Ignition Coils, Radio Capacitors #1 and #2,
Powertrain Control Module Relay
12 20A* Trailer Tow Running Lamps Feed, Trailer
Tow Backup Lamps Feed, IP-Backup Lamp
Feed
13 30A** Trailer Tow Electric Brake Controller Feed
14 60A** Instrument Panel Battery Feed (Fuse #9,
15, 21)
15 -- Not Used
16 60A** ABS Module
17 -- Not Used
18 20A** Horn Feed
19 -- Not Used
20 40A** Powertrain Control Module Relay
21 20A** Fuel Pump Motor
22 20A** Diagnostic Tool Connector, Cigar Lighter
Feed
23 40A** Blower Motor Feed
24 40A** Instrument Panel Battery Feed (fuses #4,
10, 16)
Roadside emergencies
46
Page 51 of 104
12.Use the lug nut wrench to screw
the lug nut snugly against the wheel.
13. Lower the vehicle.
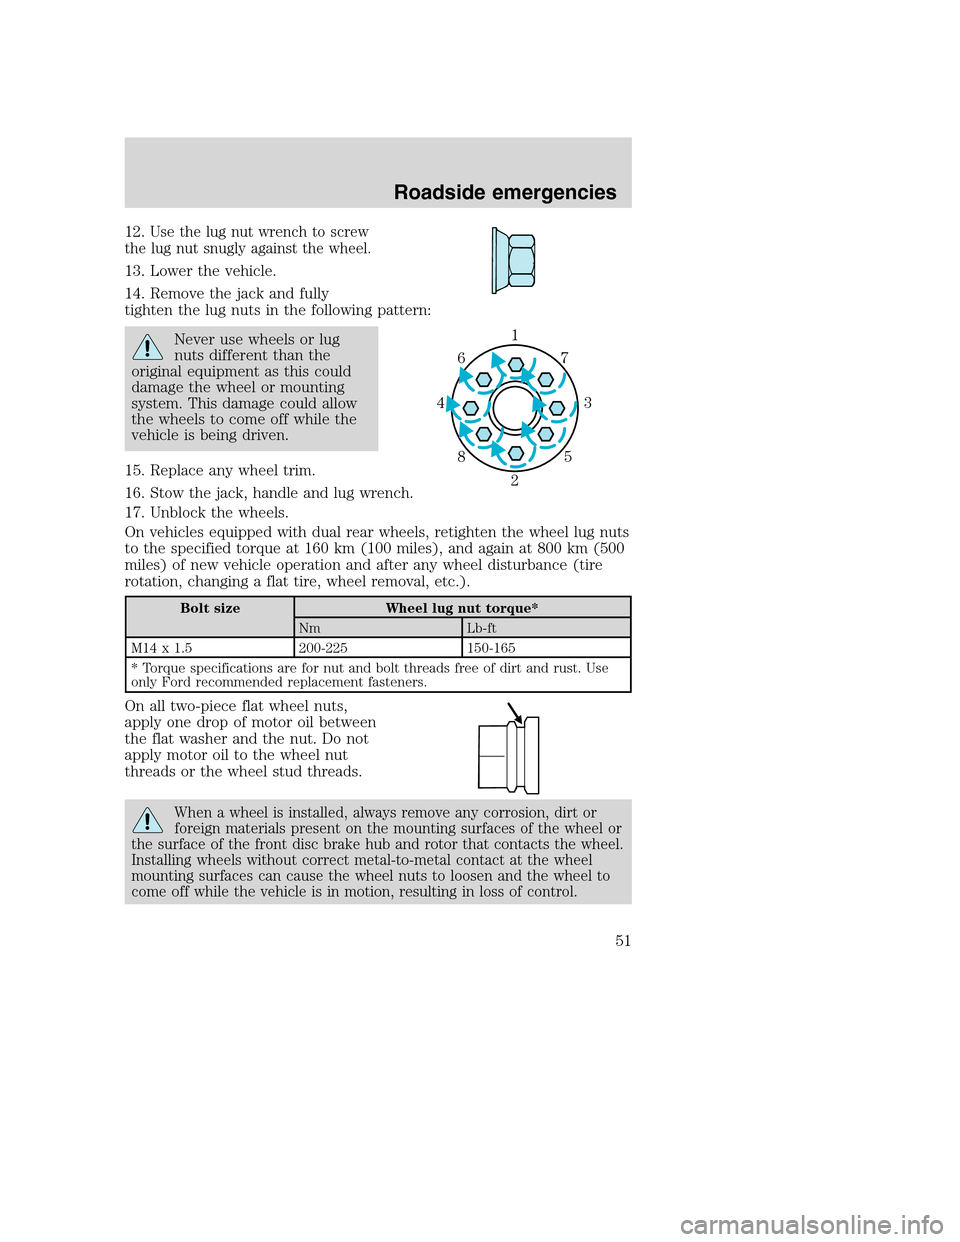
14. Remove the jack and fully
tighten the lug nuts in the following pattern:
Never use wheels or lug
nuts different than the
original equipment as this could
damage the wheel or mounting
system. This damage could allow
the wheels to come off while the
vehicle is being driven.
15. Replace any wheel trim.
16. Stow the jack, handle and lug wrench.
17. Unblock the wheels.
On vehicles equipped with dual rear wheels, retighten the wheel lug nuts
to the specified torque at 160 km (100 miles), and again at 800 km (500
miles) of new vehicle operation and after any wheel disturbance (tire
rotation, changing a flat tire, wheel removal, etc.).
Bolt size Wheel lug nut torque*
Nm Lb-ft
M14 x 1.5 200-225 150-165
* Torque specifications are for nut and bolt threads free of dirt and rust. Use
only Ford recommended replacement fasteners.
On all two-piece flat wheel nuts,
apply one drop of motor oil between
the flat washer and the nut. Do not
apply motor oil to the wheel nut
threads or the wheel stud threads.
When a wheel is installed, always remove any corrosion, dirt or
foreign materials present on the mounting surfaces of the wheel or
the surface of the front disc brake hub and rotor that contacts the wheel.
Installing wheels without correct metal-to-metal contact at the wheel
mounting surfaces can cause the wheel nuts to loosen and the wheel to
come off while the vehicle is in motion, resulting in loss of control.
1
3 4
27 6
5 8
Roadside emergencies
51
Page 56 of 104
After the disabled vehicle has been started and the jumper cables
removed, allow it to idle for several minutes so the engine computer can
relearnits idle conditions.
WRECKER TOWING
If you need to have your vehicle towed, contact a professional towing
service or, if you are a member, your roadside assistance center.
It is recommended that your vehicle be towed with a wheel lift or flatbed
equipment.
If the vehicle is towed by other means or incorrectly, vehicle
damage may occur.
When calling for a tow truck, tell the operator what kind of vehicle you
have.
Roadside emergencies
56
Page 63 of 104
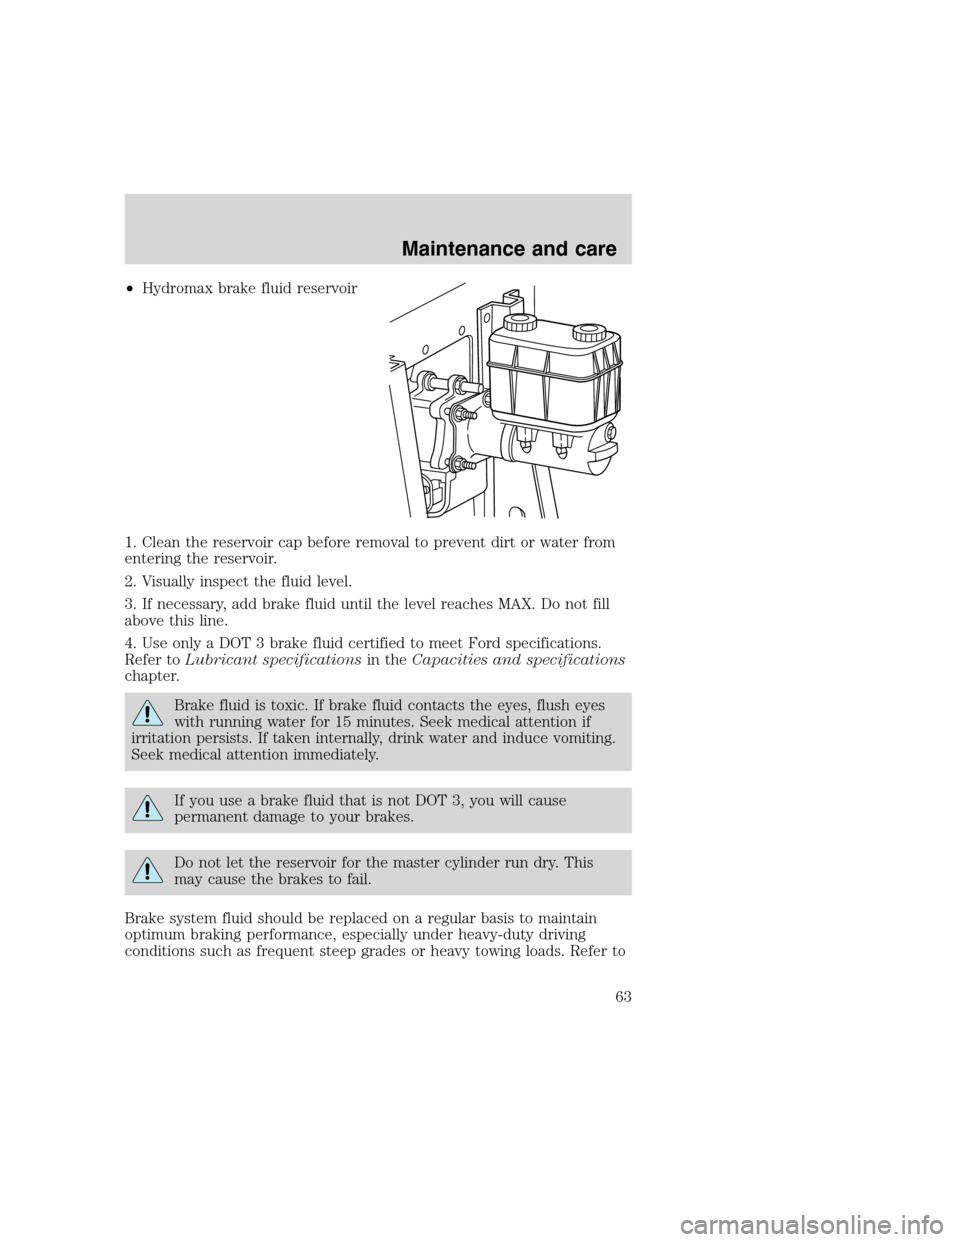
•Hydromax brake fluid reservoir
1. Clean the reservoir cap before removal to prevent dirt or water from
entering the reservoir.
2. Visually inspect the fluid level.
3. If necessary, add brake fluid until the level reaches MAX. Do not fill
above this line.
4. Use only a DOT 3 brake fluid certified to meet Ford specifications.
Refer toLubricant specificationsin theCapacities and specifications
chapter.
Brake fluid is toxic. If brake fluid contacts the eyes, flush eyes
with running water for 15 minutes. Seek medical attention if
irritation persists. If taken internally, drink water and induce vomiting.
Seek medical attention immediately.
If you use a brake fluid that is not DOT 3, you will cause
permanent damage to your brakes.
Do not let the reservoir for the master cylinder run dry. This
may cause the brakes to fail.
Brake system fluid should be replaced on a regular basis to maintain
optimum braking performance, especially under heavy-duty driving
conditions such as frequent steep grades or heavy towing loads. Refer to
Maintenance and care
63
Page 85 of 104
![FORD F SERIES MOTORHOME AND COMMERCIAL CHASSIS 2000 10.G Owners Manual Conditions
•Heavily loading a vehicle or towing a trailer may reduce fuel economy
at any speed.
•Carrying unnecessary weight may reduce fuel economy (approximately
0.4 km/L [1 mpg] is lost for eve FORD F SERIES MOTORHOME AND COMMERCIAL CHASSIS 2000 10.G Owners Manual Conditions
•Heavily loading a vehicle or towing a trailer may reduce fuel economy
at any speed.
•Carrying unnecessary weight may reduce fuel economy (approximately
0.4 km/L [1 mpg] is lost for eve](/manual-img/11/4998/w960_4998-84.png)
Conditions
•Heavily loading a vehicle or towing a trailer may reduce fuel economy
at any speed.
•Carrying unnecessary weight may reduce fuel economy (approximately
0.4 km/L [1 mpg] is lost for every 180 kg [400 lb] of weight carried).
•Adding certain accessories to your vehicle (for example bug
deflectors, rollover/light bars, running boards, ski/luggage racks) may
reduce fuel economy.
•Using fuel blended with alcohol may lower fuel economy.
•Fuel economy may decrease with lower temperatures during the first
12–16 km (8–10 miles) of driving.
•Driving on flat terrain offers improved fuel economy as compared to
driving on hilly terrain.
•Transmissions give their best fuel economy when operated in the top
cruise gear and with steady pressure on the gas pedal.
•Close windows for high speed driving.
EPA window sticker
Every new vehicle should have the EPA window sticker. Contact your
dealer if the window sticker is not supplied with your vehicle. The EPA
window sticker should be your guide for the fuel economy comparisons
with other vehicles.
It is important to note the box in the lower left corner of the window
sticker. These numbers represent the Range of L/100 km (MPG)
expected on the vehicle under optimum conditions. Your fuel economy
may vary depending upon the method of operation and conditions.
FUEL FILTER REPLACEMENT
The fuel filter assembly is located inside the driver side frame rail, near
the transmission.
The fuel filter should be replaced every 24 000 km (15 000 miles).
Maintenance and care
85
Page 99 of 104
filter, specifications .............85,92
gauge .........................................12
improving fuel economy ..........82
low fuel warning light ................6
octane rating ........................81,95
quality ........................................81
running out of fuel ...................82
safety information relating to
automotive fuels .......................79
Fuses .......................................41,42
Gas mileage
(see Fuel economy) ...................82
Gauges .........................................12
battery voltage gauge ...............13
engine coolant
temperature gauge ...................13
engine oil pressure gauge ........12
fuel gauge ..................................12
odometer ...................................14
speedometer .............................14
tachometer ................................15
trip odometer ............................14
GAWR
(Gross Axle Weight Rating) .......33
calculating .................................35
definition ...................................33
driving with a heavy load ........33
location ......................................33
GVWR (Gross Vehicle
Weight Rating) ............................33
calculating ............................33,35
definition ...................................33
driving with a heavy load ........33
location ......................................33
Hazard flashers ...........................39
Headlamps ...................................16
daytime running lights .............16
flash to pass ..............................17
high beam ............................11,16
turning on and off ....................16
warning chime ..........................11
Ignition .........................................95positions of the ignition ...........17
Inspection/maintenance
(I/M) testing ................................89
Instrument panel
cluster ..........................................6
lighting up
panel and interior .....................17
Jump-starting your vehicle ........52
Keys
key in ignition chime ...............11
positions of the ignition ...........17
Lamps
cargo lamps ...............................17
daytime running light ...............16
headlamps .................................16
headlamps, flash to pass ..........17
instrument panel, dimming .....17
replacing bulbs .........................90
Lights, warning and indicator ......6
anti-lock brakes (ABS) .......10,28
brake ............................................7
charging system ..........................7
check coolant ..............................6
door ajar ....................................10
engine oil pressure .....................6
fuel reset ...................................11
high beam .................................11
low fuel ........................................6
safety belt ...................................7
service engine soon .................8,9
turn signal indicator .................11
Load limits ...................................33
GAWR ........................................33
GVWR ........................................33
trailer towing ............................33
Lubricant specifications ........94,95
Motorcraft parts .....................85,92
Octane rating ..............................81
Odometer .....................................14
Overdrive .....................................22
Parking brake ..............................29
Parts (see Motorcraft parts) ......92
Index
99