Page 11 of 296

Turn signal
Illuminates when the left or right
turn signal or the hazard lights are
turned on. If one or both of the
indicators stay on continuously or
flash faster, check for a burned-out
turn signal bulb. Refer toBulbsin theMaintenance and carechapter.
High beams
Illuminates when the high beam
headlamps are turned on.
Anti-theft system (if equipped)
Refer toSecuriLockypassive
anti-theft systemin theControls
and featureschapter.
Charging system
Illuminates when the ignition is
turned to the ON position and the
engine is off. The light also
illuminates when the battery is not
charging properly, requiring
electrical system service.
Check gage
Illuminates when the engine coolant
temperature is high, the engine oil
pressure is low or the fuel gauge is
at or near empty. The ignition must
be in the ON position for this lamp to illuminate. The lamp will also stay
illuminated after the ignition is turned to the ON position. Refer to
Engine coolant temperature gauge, Engine oil pressure gaugeor
Fuel gaugein this chapter for more information.
THEFT
CHECK
GAGE
Instrumentation
11
Page 253 of 296

Please consult your ªWarranty Guideº for complete emission warranty
information.
Readiness for Inspection/Maintenance (I/M) testing
In some localities, it may be a legal requirement to pass an I/M test of
the on-board diagnostics system. If your ªCheck Engine/Service Engine
Soonº light is on, refer to the description in theWarning Lights and
Chimessection of theInstrumentationchapter. Your vehicle may not
pass the I/M test with the ªCheck Engine/Service Engine Soonº light on.
If the vehicle's powertrain system or its battery has just been serviced,
the on-board diagnostics system is reset to a ªnot ready for I/M testº
condition. To ready the on-board diagnostics system for I/M testing, a
minimum of 30 minutes of city and highway driving is necessary as
described below:
²First, at least 10 minutes of driving on an expressway or highway.
²Next, at least 20 minutes driving in stop-and-go, city-type traffic with
at least four idle periods.
Allow the vehicle to sit for at least eight hours without starting the
engine. Then, start the engine and complete the above driving cycle. The
engine must warm up to its normal operating temperature. Once started,
do not turn off the engine until the above driving cycle is complete.
BULBS
Replacing exterior bulbs
Check the operation of the following lamps frequently:
²Headlamps
²Foglamps
²High-mount brakelamp
²Brakelamps
²Turn signals
²License plate lamp
²Tail lamps
²Back-up lamps
Do not remove lamp bulbs unless they can be replaced immediately with
new ones. If a bulb is removed for an extended period of time,
contaminants may enter the lamp housings and affect lamp performance.
Maintenance and care
253
Page 255 of 296

If the bulb is accidentally touched, it should be cleaned with rubbing
alcohol before being used.
1. With the flat side of the new bulb's plastic base facing upward, insert
the glass end of the bulb into the lamp assembly. You may need to turn
the bulb left or right to align the grooves in the plastic base with the
tabs in the lamp assembly. When the grooves are aligned, push the bulb
into the lamp assembly until the plastic base contacts the rear of the
lamp assembly.
2. Install the bulb retaining ring over the plastic base until it contacts the
rear of the socket by rotating clockwise until you feel a ªstop.º
3. Install the electrical connector into the rear of the plastic base until it
snaps, locking it into position.
4. Turn the headlamps on and make sure they work properly. If the
headlamp was correctly aligned before you changed the bulb, you should
not need to align it again.
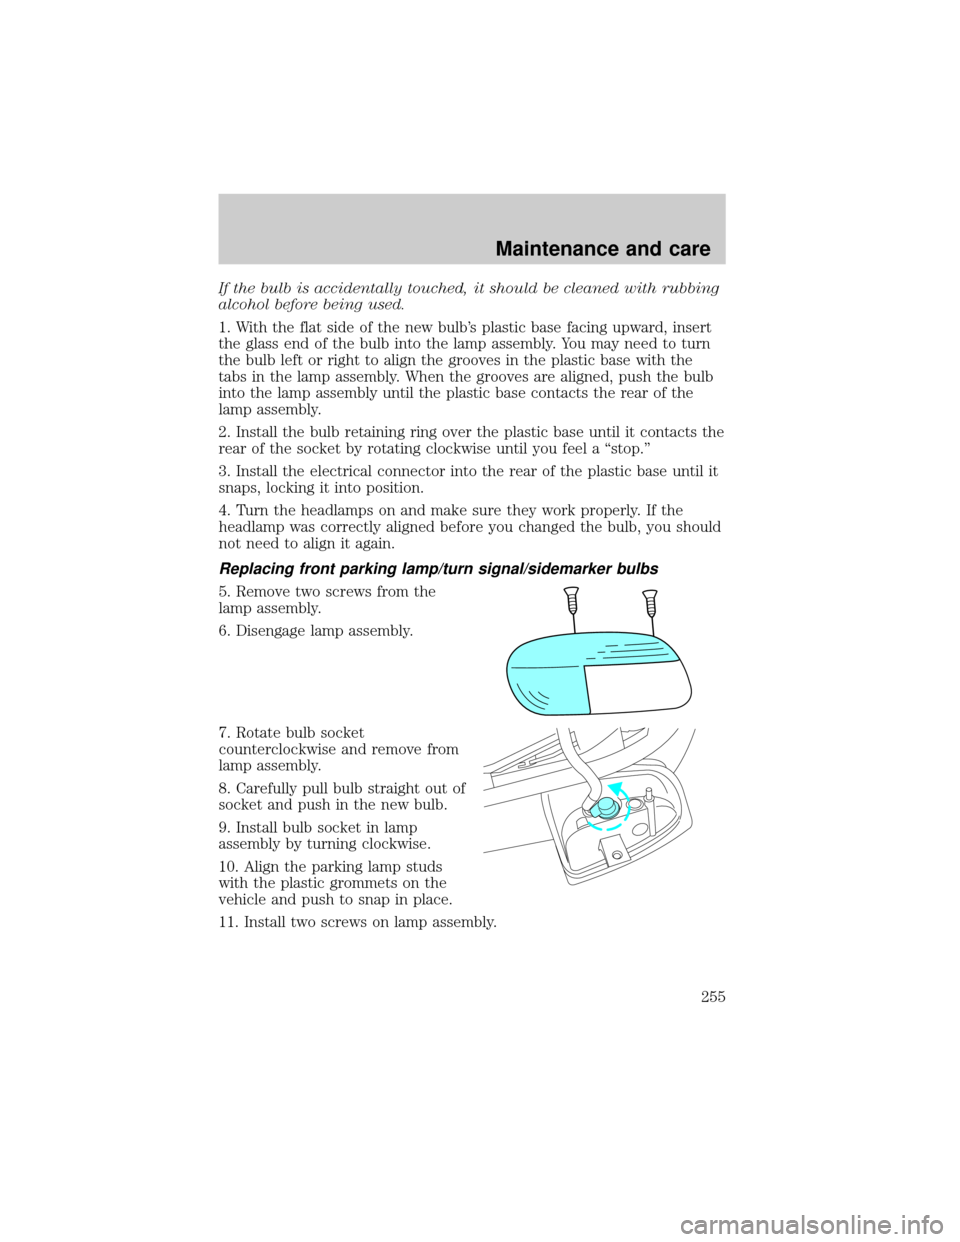
Replacing front parking lamp/turn signal/sidemarker bulbs
5. Remove two screws from the
lamp assembly.
6. Disengage lamp assembly.
7. Rotate bulb socket
counterclockwise and remove from
lamp assembly.
8. Carefully pull bulb straight out of
socket and push in the new bulb.
9. Install bulb socket in lamp
assembly by turning clockwise.
10. Align the parking lamp studs
with the plastic grommets on the
vehicle and push to snap in place.
11. Install two screws on lamp assembly.
Maintenance and care
255
Page 292 of 296

fog lamps ...................................21
headlamps .................................21
headlamps, flash to pass ..........22
instrument panel, dimming .....22
replacing bulbs ...............253±257
Lane change indicator
(see Turn signal) ........................81
Liftgate ......................................105
Lights, warning and indicator ......8
air bag ........................................10
anti-lock brakes (ABS) ....10, 156
anti-theft ...................................11
brake ..........................................10
charging system ........................11
check coolant ............................11
check engine ...............................8
cruise indicator .........................13
door ajar ....................................12
fuel cap light ...............................9
high beam .................................11
overdrive off ..............................12
safety belt .................................10
speed control ............................86
turn signal indicator .................11
Load limits .................................176
GAWR ......................................176
GVWR ......................................176
trailer towing ..........................176
Loading instructions .................178
Locks
autolock ...................................114
childproof ................................102
Lubricant specifications ...269, 272
Lumbar support, seats .....122±123
M
Manual transmission .................166
fluid capacities ........................266lubricant specifications ..........272
reverse .....................................168
Message center ...........................17
english/metric button ...............17
reset button ..............................18
system check button ................19
Mirrors
automatic dimming
rearview mirror .......................100
cleaning ...................................265
fold away .................................103
heated ......................................103
side view mirrors (power) .....102
Moon roof ....................................91
Motorcraft parts ................248, 266
O
Octane rating ............................246
Odometer .....................................15
Off-Road Driving .......................174
Oil (see Engine oil) ..................217
P
Panic alarm feature, remote
entry system ..............................108
Parking brake ............................156
Parts (see Motorcraft parts) ....266
Power distribution box
(see Fuses) ...............................196
Power door locks ......................101
Power steering ..........................157
fluid, checking and adding ....228
fluid, refill capacity ................266
fluid, specifications .........269, 272
Index
292