2000 FORD EXPLORER brake
[x] Cancel search: brakePage 222 of 296
CLUTCH FLUID (IF EQUIPPED)
Check the clutch fluid level. Refer to the scheduled maintenance guide
for the service interval schedules.
During normal operation, the fluid level in the clutch reservoir should
remain constant. If the fluid level drops, refill the fluid level to the step
in the reservoir.
Use only a DOT 3 brake fluid designed to meet Ford specifications. Refer
toCapacities and specifications.
Brake fluid is toxic. If brake fluid contacts the eyes, flush eyes
with running water for 15 minutes. Seek medical if irritation
persists. If taken internally, drink water and induce vomiting. Seek
medical attention immediately.
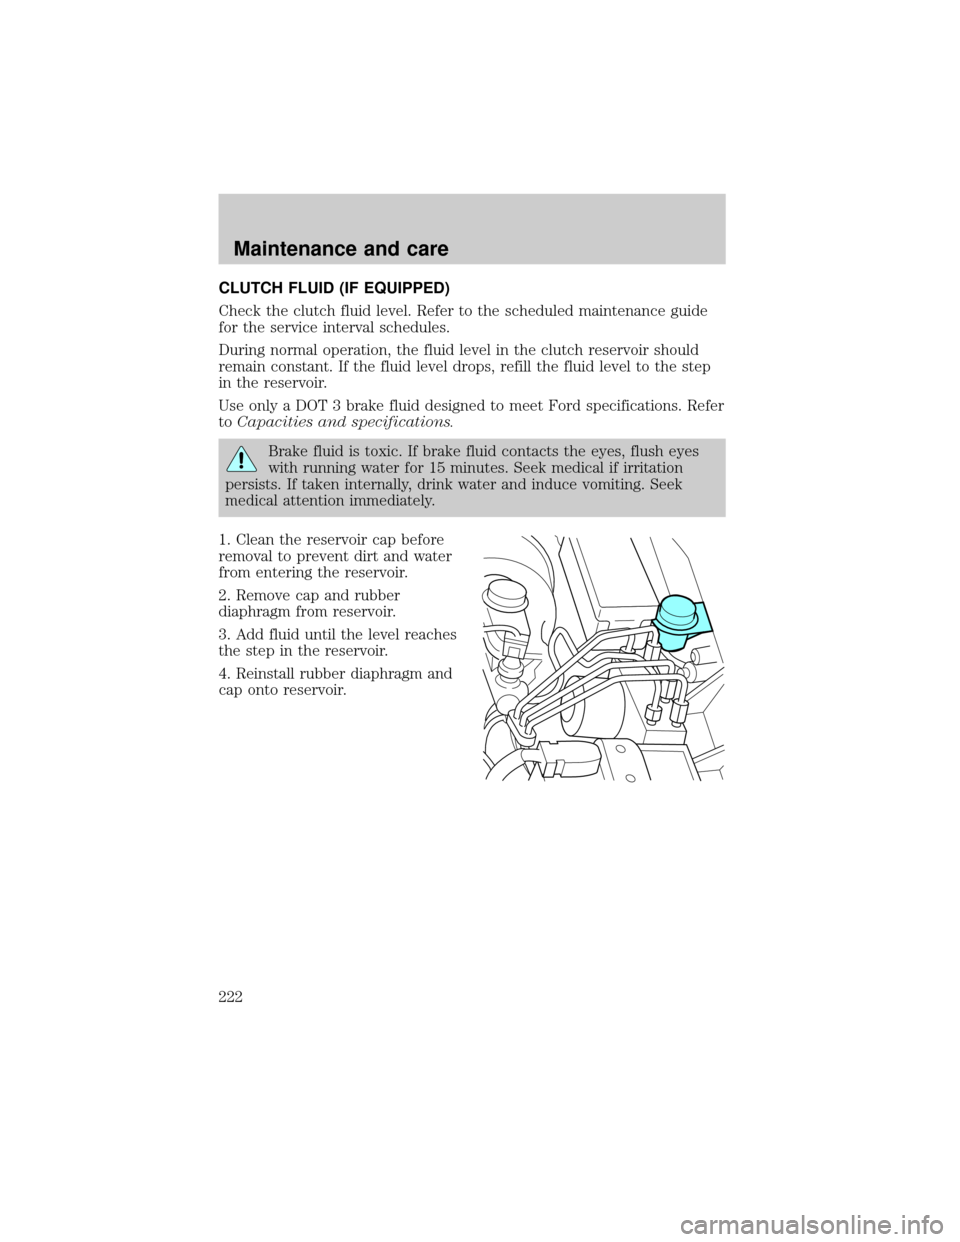
1. Clean the reservoir cap before
removal to prevent dirt and water
from entering the reservoir.
2. Remove cap and rubber
diaphragm from reservoir.
3. Add fluid until the level reaches
the step in the reservoir.
4. Reinstall rubber diaphragm and
cap onto reservoir.
Maintenance and care
222
Page 230 of 296
pulling a trailer, the vehicle should be turned off for about 30 minutes to
allow fluid to cool before checking.
1. Drive the vehicle 30 km (20 miles) or until it reaches normal operating
temperature.
2. Park the vehicle on a level surface and engage the parking brake.
3. With the parking brake engaged and your foot on the brake pedal,
start the engine and move the gearshift lever through all of the gear
ranges. Allow sufficient time for each gear to engage.
4. Latch the gearshift lever in P (Park) and leave the engine running.
5. Remove the dipstick, wiping it clean with a clean, dry lint free rag. If
necessary, refer toIdentifying components in the engine compartment
in this chapter for the location of the dipstick.
6. Install the dipstick making sure it is fully seated in the filler tube.
7. Remove the dipstick and inspect the fluid level. The fluid should be in
the designated area for normal operating temperature or ambient
temperature.
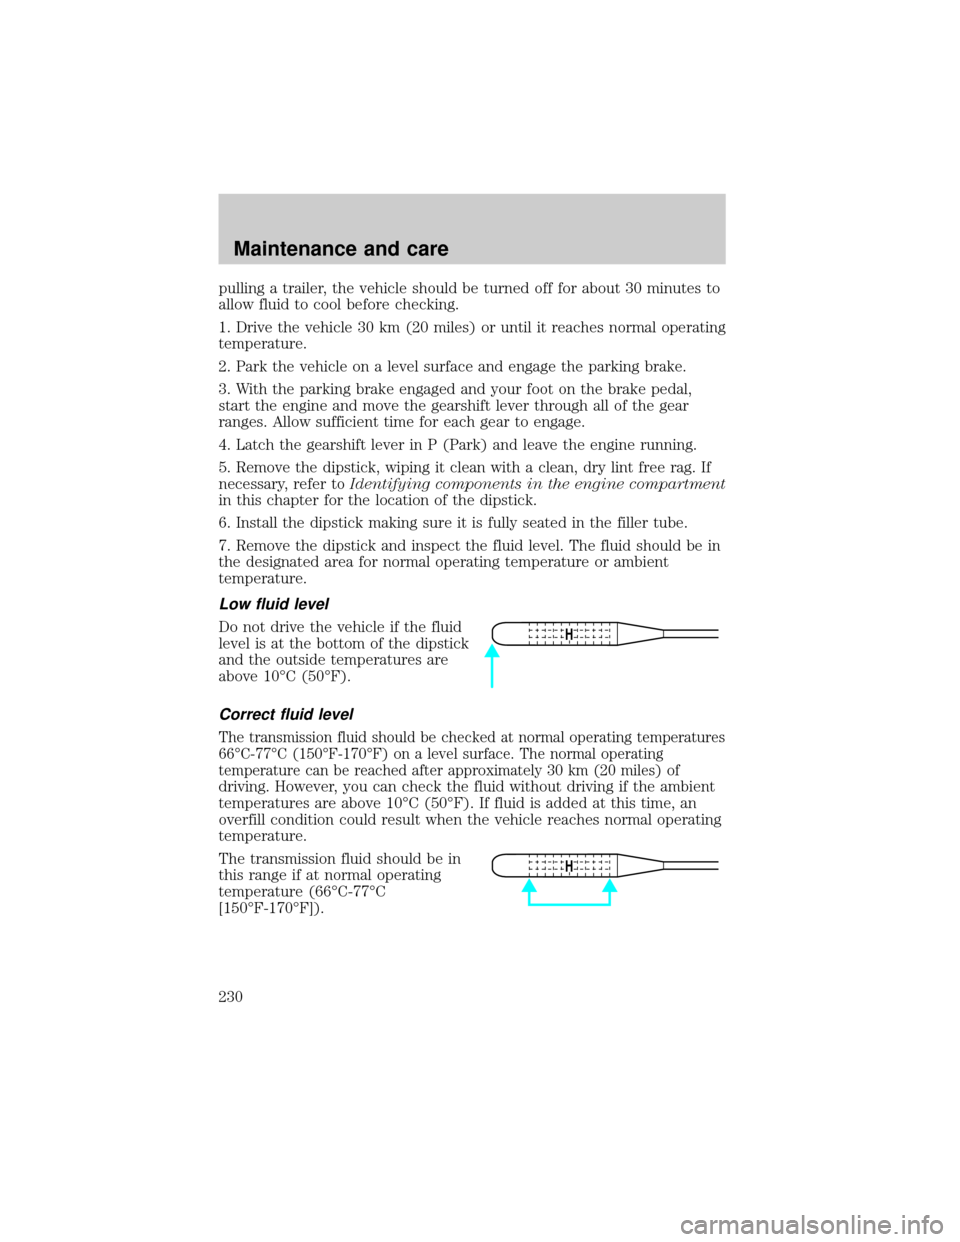
Low fluid level
Do not drive the vehicle if the fluid
level is at the bottom of the dipstick
and the outside temperatures are
above 10ÉC (50ÉF).
Correct fluid level
The transmission fluid should be checked at normal operating temperatures
66ÉC-77ÉC (150ÉF-170ÉF) on a level surface. The normal operating
temperature can be reached after approximately 30 km (20 miles) of
driving. However, you can check the fluid without driving if the ambient
temperatures are above 10ÉC (50ÉF). If fluid is added at this time, an
overfill condition could result when the vehicle reaches normal operating
temperature.
The transmission fluid should be in
this range if at normal operating
temperature (66ÉC-77ÉC
[150ÉF-170ÉF]).
H
H
Maintenance and care
230
Page 232 of 296
2. Park the vehicle on a level surface and engage the parking brake.
3. With the parking brake engaged and your foot on the brake pedal,
start the engine and move the gearshift lever through all of the gear
ranges. Allow sufficient time for each gear to engage.
4. Latch the gearshift lever in P (Park) and leave the engine running.
5. Remove the dipstick, wiping it clean with a clean, dry lint free rag. If
necessary, refer toIdentifying components in the engine compartment
in this chapter for the location of the dipstick.
6. Install the dipstick making sure it is fully seated in the filler tube.
7. Remove the dipstick and inspect the fluid level. The fluid should be in
the designated area for normal operating temperature or ambient
temperature.
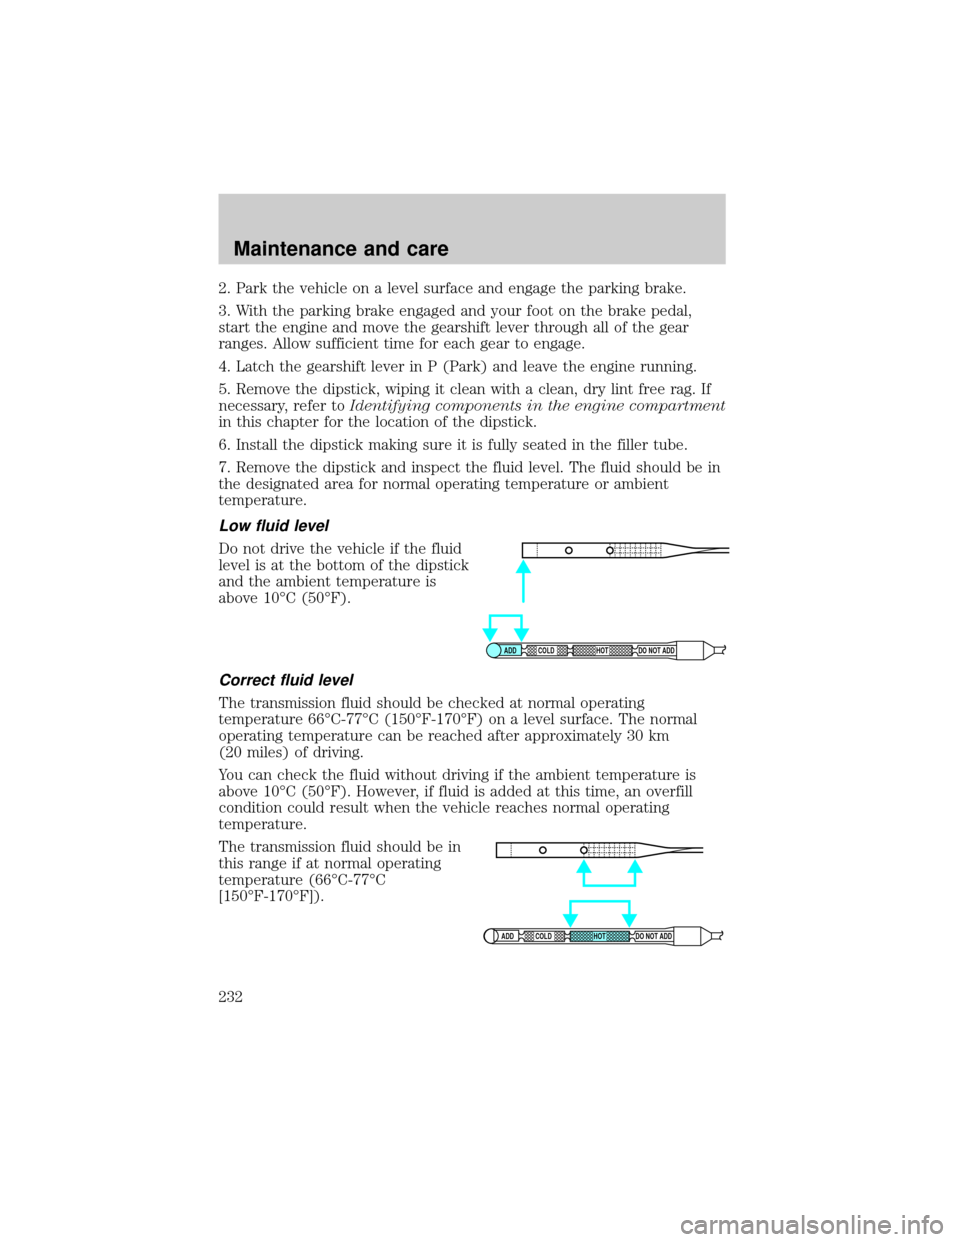
Low fluid level
Do not drive the vehicle if the fluid
level is at the bottom of the dipstick
and the ambient temperature is
above 10ÉC (50ÉF).
Correct fluid level
The transmission fluid should be checked at normal operating
temperature 66ÉC-77ÉC (150ÉF-170ÉF) on a level surface. The normal
operating temperature can be reached after approximately 30 km
(20 miles) of driving.
You can check the fluid without driving if the ambient temperature is
above 10ÉC (50ÉF). However, if fluid is added at this time, an overfill
condition could result when the vehicle reaches normal operating
temperature.
The transmission fluid should be in
this range if at normal operating
temperature (66ÉC-77ÉC
[150ÉF-170ÉF]).
ADD COLD HOT DO NOT ADD
ADD COLD HOT DO NOT ADD
Maintenance and care
232
Page 237 of 296
Batteries normally produce explosive gases which can cause
personal injury. Therefore, do not allow flames, sparks or lighted
substances to come near the battery. When working near the battery,
always shield your face and protect your eyes. Always provide proper
ventilation.
When lifting a plastic-cased battery, excessive pressure on the
end walls could cause acid to flow through the vent caps,
resulting in personal injury and/or damage to the vehicle or battery.
Lift the battery with a battery carrier or with your hands on opposite
corners.
Keep batteries out of reach of children. Batteries contain sulfuric
acid. Avoid contact with skin, eyes or clothing. Shield your eyes
when working near the battery to protect against possible splashing of
acid solution. In case of acid contact with skin or eyes, flush
immediately with water for a minimum of 15 minutes and get prompt
medical attention. If acid is swallowed, call a physician immediately.
Battery posts, terminals and related accessories contain lead and
lead compunds.Wash hands after handling.
Because your vehicle's engine is electronically controlled by a computer,
some control conditions are maintained by power from the battery. When
the battery is disconnected or a new battery is installed, the engine must
relearn its idle and fuel trim strategy for optimum driveability and
performance. To begin this process:
1. With the vehicle at a complete stop, set the parking brake.
2. Put the gearshift in P (Park) (automatic transmission) or the neutral
position (manual transmission), turn off all accessories and start the
engine.
3. Run the engine until it reaches normal operating temperature.
4. Allow the engine to idle for at least one minute.
5. Turn the A/C on and allow the engine to idle for at least one minute.
6. Drive the vehicle to complete the relearning process.
Maintenance and care
237
Page 243 of 296
Do not replace your tires with ªhigh performanceº tires or larger
size tires.
Failure to follow these precautions may adversely affect the
handling of the vehicle and make it easier for the driver to lose
control and roll over.
Tires that are larger or smaller than your vehicle's original tires may also
affect the accuracy of your speedometer.
USING SNOW TIRES AND TRACTION DEVICES
Snow tires must be the same size and grade as the tires you
currently have on your vehicle.
The tires on your vehicle have all-weather treads to provide traction in
rain and snow. However, in some climates, using snow tires and traction
devices may be necessary. Ford offers tire cables as a Ford approved
accessory and recommends use of these or their equivalents. See your
dealer or qualified service technician for more information on tire cables
for your vehicle.
Follow these guidelines when using snow tires and traction devices:
²Install cables securely, verifying that the cables do not touch any
wiring, brake lines or fuel lines.
²Drive cautiously. If you hear the cables rub or bang against the
vehicle, stop and retighten them. If this does not work, remove the
cables to prevent vehicle damage.
²Avoid overloading your vehicle.
²Remove the tire cables when they are no longer needed.
²Do not use cables on dry roads.
²The suspension insulation and bumpers will help prevent vehicle
damage. Do not remove these components from the vehicle when
using snow tires and traction devices.
²Do not exceed 48 km/h (30 mph) with tire cables on your vehicle.
Consult your dealer for information on other Ford approved methods of
traction control.
Maintenance and care
243
Page 250 of 296

5. Follow one of the simple calculations in order to determine fuel
economy:
Multiply liters used by 100, then divide by total kilometers
traveled.
Divide total miles traveled by total gallons used.
Keep a record for at least one month and record the type of driving (city
or highway). This will provide an accurate estimate of the vehicle's fuel
economy under current driving conditions. Additionally, keeping records
during summer and winter will show how temperature impacts fuel
economy. In general, lower temperatures give lower fuel economy.
Driving style Ð good driving and fuel economy habits
Give consideration to the lists that follow and you may be able to change
a number of variables and improve your fuel economy.
Habits
²Smooth, moderate operation can yield up to 10% savings in fuel.
²Steady speeds without stopping will usually give the best fuel
economy.
²
Idling for long periods of time (greater than one minute) may waste fuel.
²Anticipate stopping; slowing down may eliminate the need to stop.
²Sudden or hard accelerations may reduce fuel economy.
²Slow down gradually.
²Driving at reasonable speeds (traveling at 88 km/h [55 mph] uses 15%
less fuel than traveling at 105 km/h [65 mph]).
²Revving the engine before turning it off may reduce fuel economy.
²Using the air conditioner or defroster may reduce fuel economy.
²You may want to turn off the speed control in hilly terrain if
unnecessary shifting between third and fourth gear occurs.
Unnecessary shifting of this type could result in reduced fuel
economy.
²Warming up a vehicle on cold mornings is not required and may
reduce fuel economy.
²Resting your foot on the brake pedal while driving may reduce fuel
economy.
²Combine errands and minimize stop-and-go driving.
Maintenance and care
250
Page 253 of 296

Please consult your ªWarranty Guideº for complete emission warranty
information.
Readiness for Inspection/Maintenance (I/M) testing
In some localities, it may be a legal requirement to pass an I/M test of
the on-board diagnostics system. If your ªCheck Engine/Service Engine
Soonº light is on, refer to the description in theWarning Lights and
Chimessection of theInstrumentationchapter. Your vehicle may not
pass the I/M test with the ªCheck Engine/Service Engine Soonº light on.
If the vehicle's powertrain system or its battery has just been serviced,
the on-board diagnostics system is reset to a ªnot ready for I/M testº
condition. To ready the on-board diagnostics system for I/M testing, a
minimum of 30 minutes of city and highway driving is necessary as
described below:
²First, at least 10 minutes of driving on an expressway or highway.
²Next, at least 20 minutes driving in stop-and-go, city-type traffic with
at least four idle periods.
Allow the vehicle to sit for at least eight hours without starting the
engine. Then, start the engine and complete the above driving cycle. The
engine must warm up to its normal operating temperature. Once started,
do not turn off the engine until the above driving cycle is complete.
BULBS
Replacing exterior bulbs
Check the operation of the following lamps frequently:
²Headlamps
²Foglamps
²High-mount brakelamp
²Brakelamps
²Turn signals
²License plate lamp
²Tail lamps
²Back-up lamps
Do not remove lamp bulbs unless they can be replaced immediately with
new ones. If a bulb is removed for an extended period of time,
contaminants may enter the lamp housings and affect lamp performance.
Maintenance and care
253
Page 257 of 296

Replacing license plate lamp bulbs
1. Remove two screws and the
license plate lamp assembly from
the liftgate.
2. Pull the bulb out from lamp
assembly and push in the new bulb.
3. Install the lamp assembly on
liftgate with two screws.
Replacing high-mount brake lamp bulbs
1. Remove the two screws and move
the lamp assembly away from the
liftgate.
2. Disconnect the washer hose.
3. Remove the bulb holder from the
lamp assembly by depressing the
snaps.
Maintenance and care
257