2000 FORD EXPEDITION wheel
[x] Cancel search: wheelPage 147 of 256

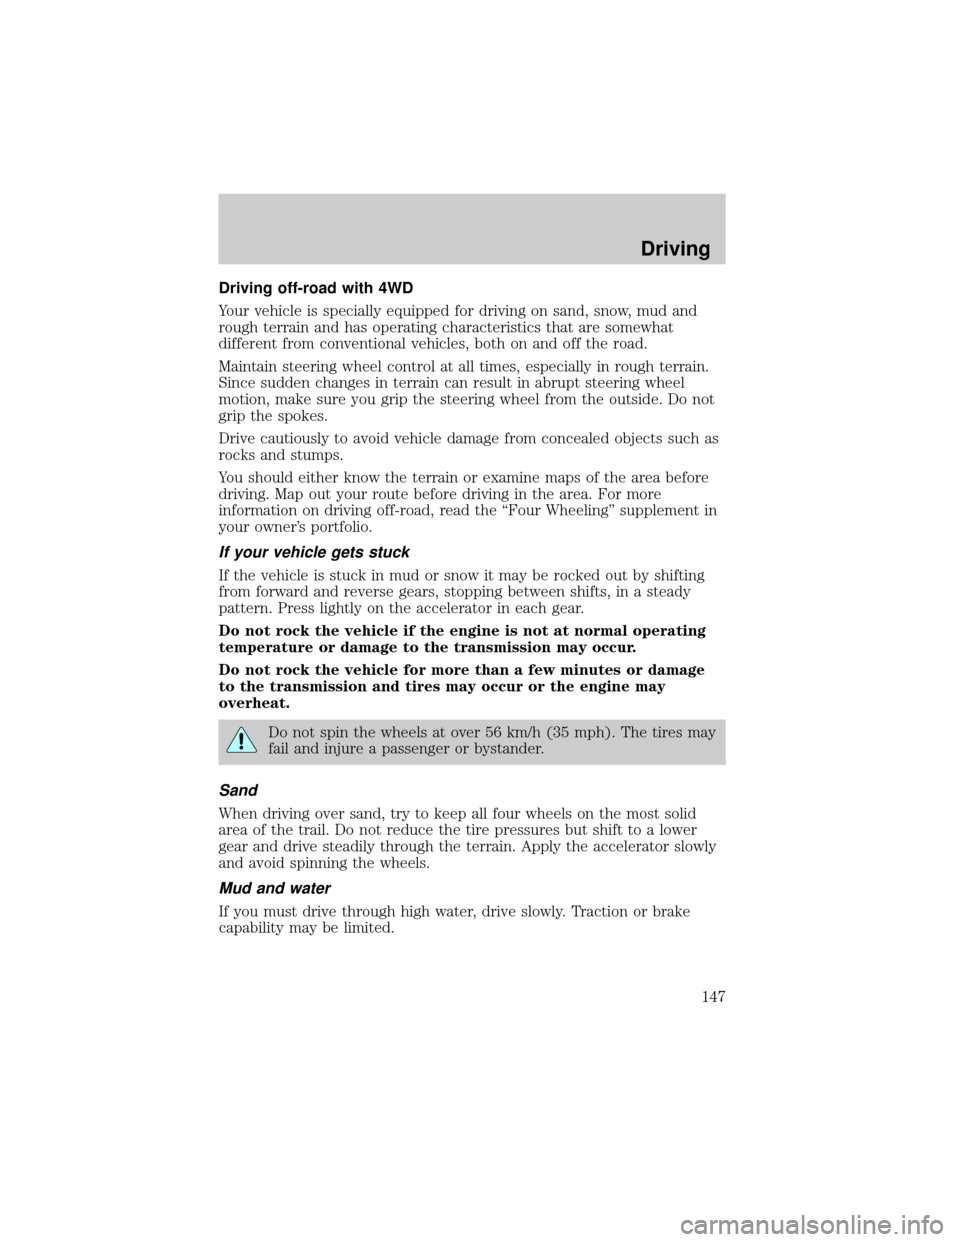
Driving off-road with 4WD
Your vehicle is specially equipped for driving on sand, snow, mud and
rough terrain and has operating characteristics that are somewhat
different from conventional vehicles, both on and off the road.
Maintain steering wheel control at all times, especially in rough terrain.
Since sudden changes in terrain can result in abrupt steering wheel
motion, make sure you grip the steering wheel from the outside. Do not
grip the spokes.
Drive cautiously to avoid vehicle damage from concealed objects such as
rocks and stumps.
You should either know the terrain or examine maps of the area before
driving. Map out your route before driving in the area. For more
information on driving off-road, read the ªFour Wheelingº supplement in
your owner's portfolio.
If your vehicle gets stuck
If the vehicle is stuck in mud or snow it may be rocked out by shifting
from forward and reverse gears, stopping between shifts, in a steady
pattern. Press lightly on the accelerator in each gear.
Do not rock the vehicle if the engine is not at normal operating
temperature or damage to the transmission may occur.
Do not rock the vehicle for more than a few minutes or damage
to the transmission and tires may occur or the engine may
overheat.
Do not spin the wheels at over 56 km/h (35 mph). The tires may
fail and injure a passenger or bystander.
Sand
When driving over sand, try to keep all four wheels on the most solid
area of the trail. Do not reduce the tire pressures but shift to a lower
gear and drive steadily through the terrain. Apply the accelerator slowly
and avoid spinning the wheels.
Mud and water
If you must drive through high water, drive slowly. Traction or brake
capability may be limited.
Driving
147
Page 149 of 256

Automatic transmission may shift frequently while driving up steep
grades. Eliminate frequent shifting by shifting out of
(Overdrive) into
D (Drive).
Driving on snow and ice
A 4WD vehicle has advantages over 2WD vehicles in snow and ice but
can skid like any other vehicle.
Avoid sudden applications of power and quick changes of direction on
snow and ice. Apply the accelerator slowly and steadily when starting
from a full stop.
When braking, apply the brakes as you normally would. In order to allow
the anti-lock brake system (ABS) to operate properly, keep steady
pressure on the brake pedal.
Allow more stopping distance and drive slower than usual. Consider
using one of the lower gears.
DRIVING THROUGH WATER
Do not drive quickly through standing water, especially if the depth is
unknown. Traction or brake capability may be limited and if the ignition
system gets wet, your engine may stall. Water may also enter your
engine's air intake and severely damage your engine.
If driving through deep or standing water is unavoidable, proceed very
slowly. Never drive through water that is higher than the bottom of the
hubs (for trucks) or the bottom of the wheel rims (for cars).
Once through the water, always try the brakes. Wet brakes do not stop
the vehicle as effectively as dry brakes. Drying can be improved by
moving your vehicle slowly while applying light pressure on the brake
pedal.
Driving through deep water where the transmission vent tube is
submerged may allow water into the transmission and cause
internal transmission damage.
VEHICLE LOADING
Before loading a vehicle, familiarize yourself with the following terms:
²Base Curb Weight:Weight of the vehicle including any standard
equipment, fluids, lubricants, etc. It does not include passengers or
aftermarket equipment.
Driving
149
Page 156 of 256

1 814 kg (4 000 lb.) trailer weight and 181 kg (400 lb.) tongue weight
capability.
Use a frame-mounted weight distributing hitch for trailers over 1814 kg
(4 000 lb).
Driving while you tow
When towing a trailer:
²Ensure that you turn off your speed control. The speed control may
shut off automatically when you are towing on long, steep grades.
²Consult your local motor vehicle speed regulations for towing a trailer.
²Use a lower gear when towing up or down steep hills. This will
eliminate excessive downshifting and upshifting for optimum fuel
economy and transmission cooling.
²Anticipate stops and brake gradually.
Exceeding the GCWR rating may cause internal transmission
damage and void your warranty coverage.
Servicing after towing
If you tow a trailer for long distances, your vehicle will require more
frequent service intervals. Refer to your Scheduled Maintenance guide
for more information.
Recreational towing (all wheels on the ground)
An example of recreational towing would be towing your vehicle behind
a Motorhome. Follow these guidelines if you have the need for
recreational towing your vehicle with all four wheels on the ground.
These guidelines are designed to ensure that your transmission is not
damaged.
2WD vehicles (with automatic transmissions)
²Place the transmission in N (Neutral)
²Maximum speed is 56 km (35 mph)
²Maximum distance is 80 km (50 miles)
If a distance of 80 km (50 miles) or a speed of 56 km (35 mph) must be
exceeded, the drive shaft will have to be removed until the vehicle is
being towed.
Ford recommends the driveshaft be removed/installed only by a qualified
technician. See your local dealer for driveshaft removal/installation.
Driving
156
Page 157 of 256

Improper removal/installation of the driveshaft can cause
transmission fluid loss, damage to the driveshaft and internal
transmission components.
4WD vehicles electronic shift transfer case (with automatic
transmissions)
4x4 vehicles with electronic shift on the fly cannot be towed with any
wheels on the ground.
Trailer towing tips
²Practice turning, stopping and backing up in an area before starting on
a trip to get the feel of the vehicle trailer combination. When turning,
make wider turns so the trailer wheels will clear curbs and other
obstacles.
²Allow more distance for stopping with a trailer attached.
²The trailer tongue weight should be 10% of the loaded trailer weight.
²After you have traveled 80 km (50 miles), thoroughly check your
hitch, electrical connections and trailer wheel lug nuts.
²When stopped in traffic for long periods of time in hot weather, place
the gearshift in P (Park) and increase idle speed. This aids engine
cooling and air conditioner efficiency.
²Vehicles with trailers should not be parked on a grade. If you must
park on a grade, place wheel chocks under the trailer's wheels.
Launching or retrieving a boat
When backing down a ramp during boat launching or retrieval,
²Do not allow the static water level to rise above the bottom edge of
the rear bumper and
²Do not allow waves to break higher than 15 cm (6 inches) above the
bottom edge of the rear bumper.
Exceeding these limits may allow water to enter critical vehicle
components, adversely affecting driveability, emissions, reliability and
causing internal transmission damage.
Replace the rear axle lubricant anytime the axle has been submerged in
water. Rear axle lubricant quantities are not to be checked or changed
unless a leak is suspected or repair required.
Driving
157
Page 162 of 256

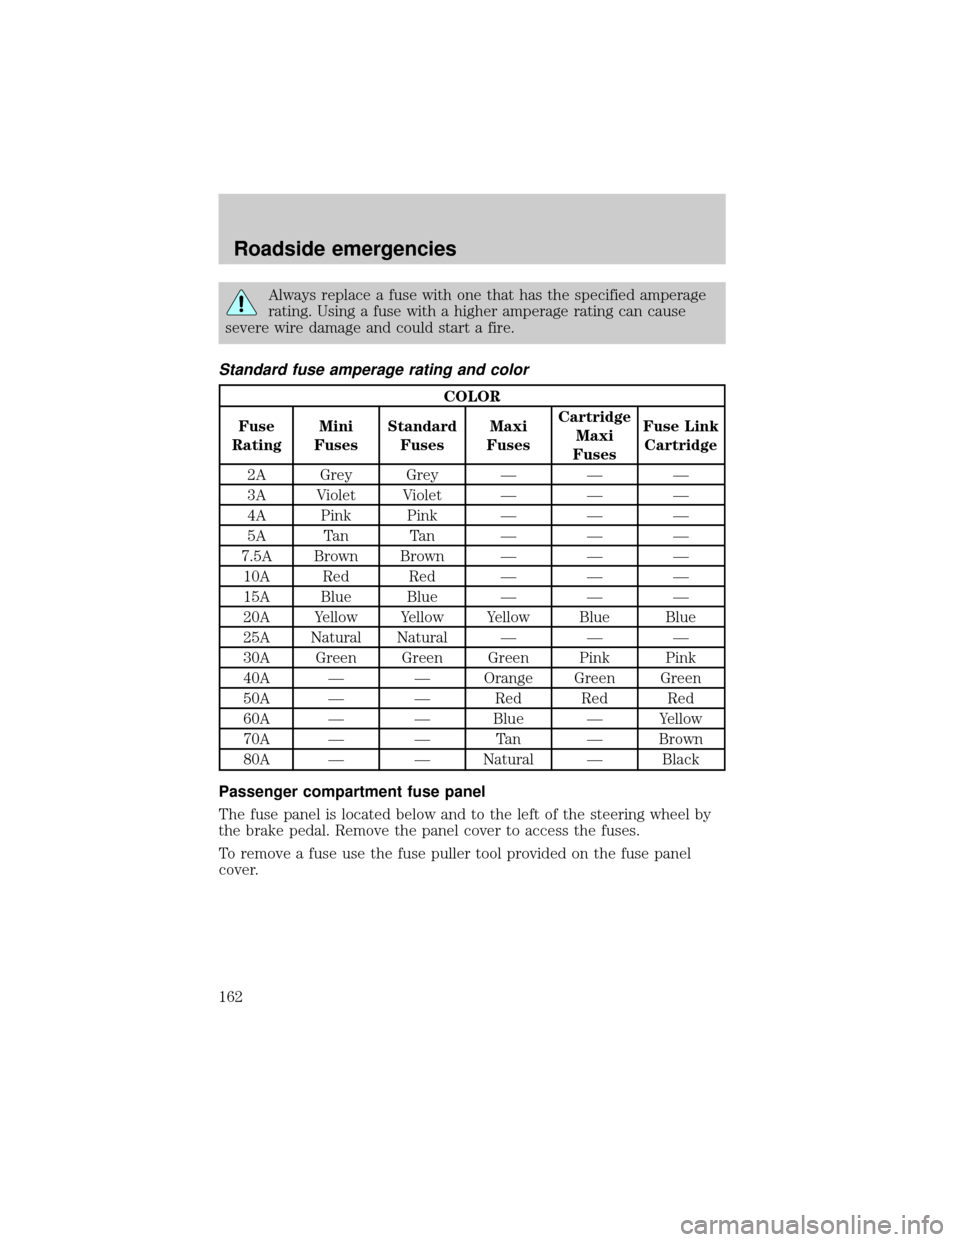
Always replace a fuse with one that has the specified amperage
rating. Using a fuse with a higher amperage rating can cause
severe wire damage and could start a fire.
Standard fuse amperage rating and color
COLOR
Fuse
RatingMini
FusesStandard
FusesMaxi
FusesCartridge
Maxi
FusesFuse Link
Cartridge
2A Grey Grey Ð Ð Ð
3A Violet Violet Ð Ð Ð
4A Pink Pink Ð Ð Ð
5A Tan Tan Ð Ð Ð
7.5A Brown Brown Ð Ð Ð
10A Red Red Ð Ð Ð
15A Blue Blue Ð Ð Ð
20A Yellow Yellow Yellow Blue Blue
25A Natural Natural Ð Ð Ð
30A Green Green Green Pink Pink
40A Ð Ð Orange Green Green
50A Ð Ð Red Red Red
60A Ð Ð Blue Ð Yellow
70A Ð Ð Tan Ð Brown
80A Ð Ð Natural Ð Black
Passenger compartment fuse panel
The fuse panel is located below and to the left of the steering wheel by
the brake pedal. Remove the panel cover to access the fuses.
To remove a fuse use the fuse puller tool provided on the fuse panel
cover.
Roadside emergencies
162
Page 165 of 256

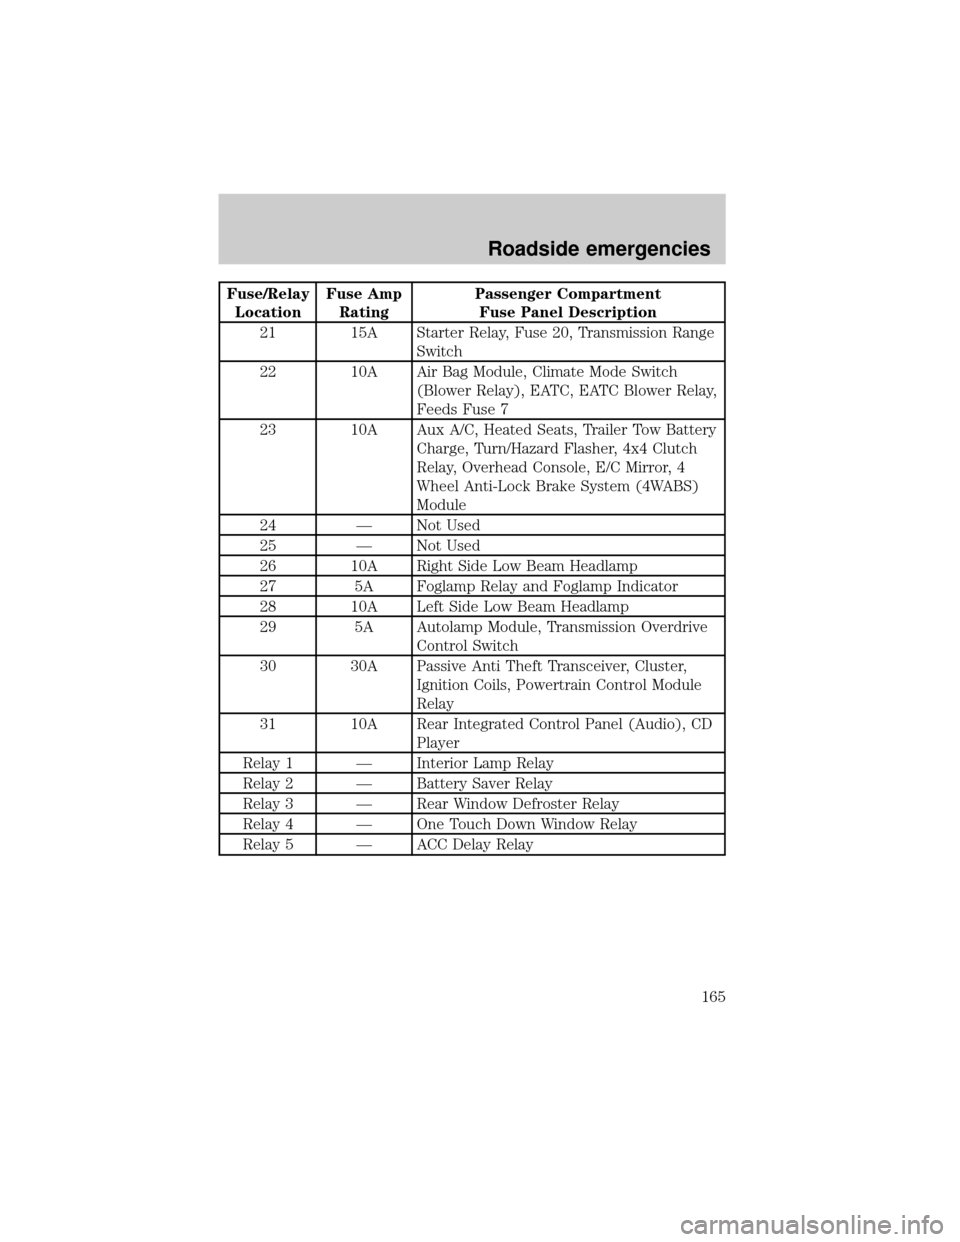
Fuse/Relay
LocationFuse Amp
RatingPassenger Compartment
Fuse Panel Description
21 15A Starter Relay, Fuse 20, Transmission Range
Switch
22 10A Air Bag Module, Climate Mode Switch
(Blower Relay), EATC, EATC Blower Relay,
Feeds Fuse 7
23 10A Aux A/C, Heated Seats, Trailer Tow Battery
Charge, Turn/Hazard Flasher, 4x4 Clutch
Relay, Overhead Console, E/C Mirror, 4
Wheel Anti-Lock Brake System (4WABS)
Module
24 Ð Not Used
25 Ð Not Used
26 10A Right Side Low Beam Headlamp
27 5A Foglamp Relay and Foglamp Indicator
28 10A Left Side Low Beam Headlamp
29 5A Autolamp Module, Transmission Overdrive
Control Switch
30 30A Passive Anti Theft Transceiver, Cluster,
Ignition Coils, Powertrain Control Module
Relay
31 10A Rear Integrated Control Panel (Audio), CD
Player
Relay 1 Ð Interior Lamp Relay
Relay 2 Ð Battery Saver Relay
Relay 3 Ð Rear Window Defroster Relay
Relay 4 Ð One Touch Down Window Relay
Relay 5 Ð ACC Delay Relay
Roadside emergencies
165
Page 167 of 256

The high-current fuses are coded as follows.
Fuse/Relay
LocationFuse Amp
RatingPower Distribution Box Description
1 20A * Power Point
2 30A* Powertrain Control Module
3 30A* Headlamps/Autolamps
4 20A* Console Powerpoint
5 20A* Trailer Tow Backup/Park Lamps
6 15A* Parklamps/Autolamps, Feeds Passenger
Compartment Fuse 18
7 20A* Horn
8 30A* Power Door Locks
9 15A* Daytime Running Lamps (DRL), Fog Lamps
10 20A* Fuel Pump
11 20A* Alternator Field
12 10A* Rear Wipers
13 15A* A/C Clutch
14 Ð Not Used
15 10A* Running Board Lamps
16 Ð Not Used
17 10A* Flip Windows
18 15A* Powertrain Control Module, Fuel Injectors,
Fuel Pump, Mass Air Flow Sensor
19 10A* Trailer Tow Stop and Right Turn Lamp
20 10A* Trailer Tow Stop and Left Turn Lamp
21 Ð Not Used
22 Ð Not Used
23 15A* HEGO Sensors, Canister Vent, Automatic
Transmission, CMS Sensor
24 Ð Not Used
101 30A** Trailer Tow Battery Charge
102 50A** Four Wheel Antilock Brake Module
103 50A** Junction Block Battery Feed
Roadside emergencies
167
Page 169 of 256

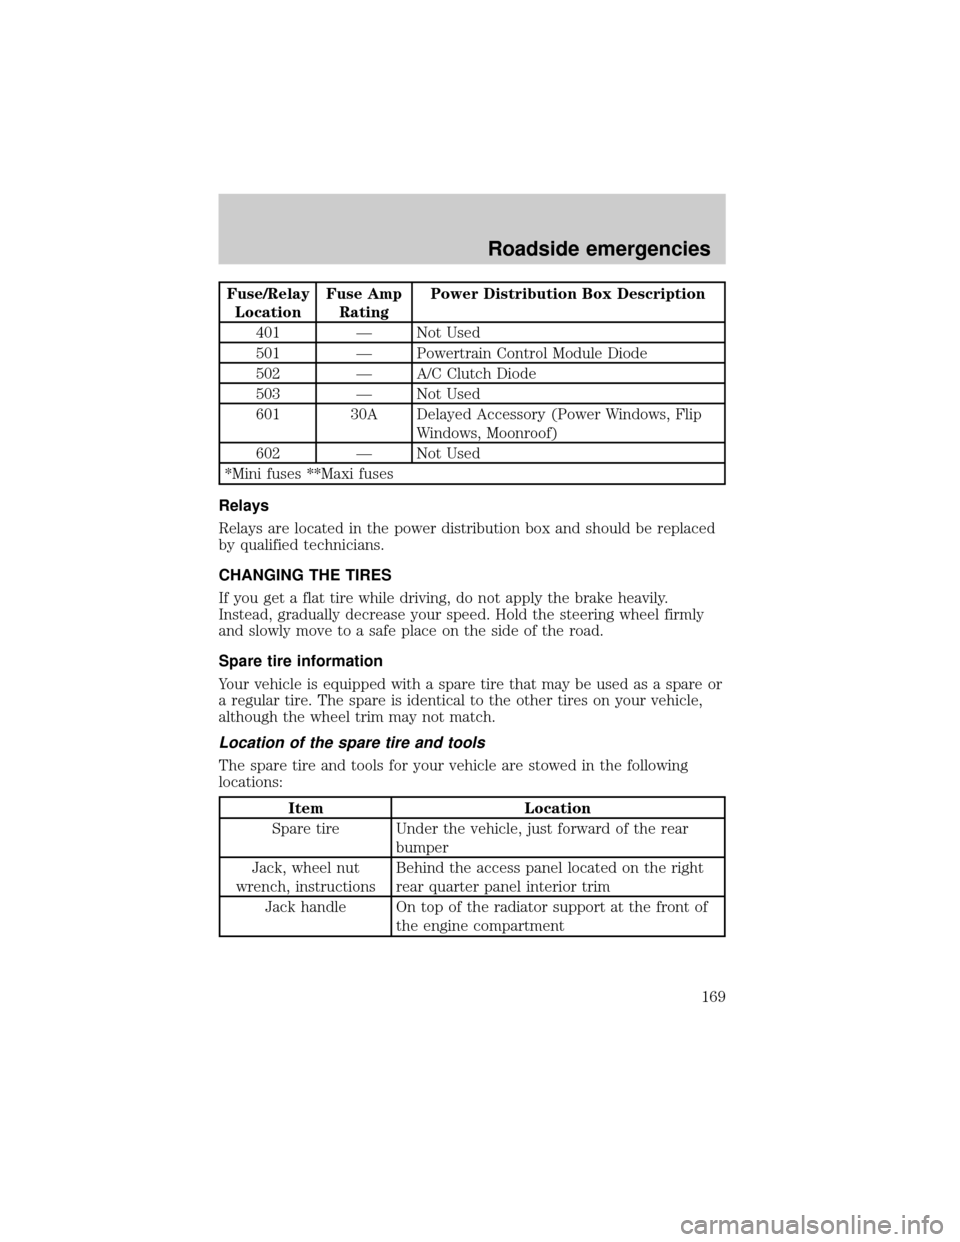
Fuse/Relay
LocationFuse Amp
RatingPower Distribution Box Description
401 Ð Not Used
501 Ð Powertrain Control Module Diode
502 Ð A/C Clutch Diode
503 Ð Not Used
601 30A Delayed Accessory (Power Windows, Flip
Windows, Moonroof)
602 Ð Not Used
*Mini fuses **Maxi fuses
Relays
Relays are located in the power distribution box and should be replaced
by qualified technicians.
CHANGING THE TIRES
If you get a flat tire while driving, do not apply the brake heavily.
Instead, gradually decrease your speed. Hold the steering wheel firmly
and slowly move to a safe place on the side of the road.
Spare tire information
Your vehicle is equipped with a spare tire that may be used as a spare or
a regular tire. The spare is identical to the other tires on your vehicle,
although the wheel trim may not match.
Location of the spare tire and tools
The spare tire and tools for your vehicle are stowed in the following
locations:
Item Location
Spare tire Under the vehicle, just forward of the rear
bumper
Jack, wheel nut
wrench, instructionsBehind the access panel located on the right
rear quarter panel interior trim
Jack handle On top of the radiator support at the front of
the engine compartment
Roadside emergencies
169