2000 FORD E-450 fuel pressure
[x] Cancel search: fuel pressurePage 15 of 232

the gauge first indicates empty, there is a small amount of reserve fuel in
the tank. When refueling the vehicle from an empty indication, the
amount of fuel that can be added will be less than the advertised
capacity due to the reserve fuel.
Engine coolant temperature gauge
Indicates the temperature of the
engine coolant. At normal operating
temperature, the needle remains
within the normal area (the area
between the ªHº and ªCº). If it
enters the red section, the engine is
overheating. Stop the vehicle as
soon as safely possible, switch off
the engine immediately and let the
engine cool. Refer toEngine coolantin theMaintenance and care
chapter.
Never remove the coolant reservoir cap while the engine is
running or hot.
This gauge indicates the temperature of the engine coolant, not the
coolant level. If the coolant is not at its proper level the gauge indication
will not be accurate. If the gauge enters the red section, the oil
pressure/engine coolant andCheck Engine/Service Engine Soon
indicators illuminate, refer toWhat you should know about fail-safe
coolingin theMaintenance and care chapter.
Engine oil pressure gauge
This shows the engine oil pressure
in the system. Sufficient pressure
exists as long as the needle remains
in the normal range (the area
between the ªLº and ªHº).
If the gauge indicates low pressure,
stop the vehicle as soon as safely
possible and switch off the engine
immediately. Check the oil level. Add oil if needed (refer toEngine oil
in theMaintenance and carechapter). If the oil level is correct, have
your vehicle checked at your dealership or by a qualified technician.
H
C
H
L
Instrumentation
15
ProCarManuals.com
Page 133 of 232

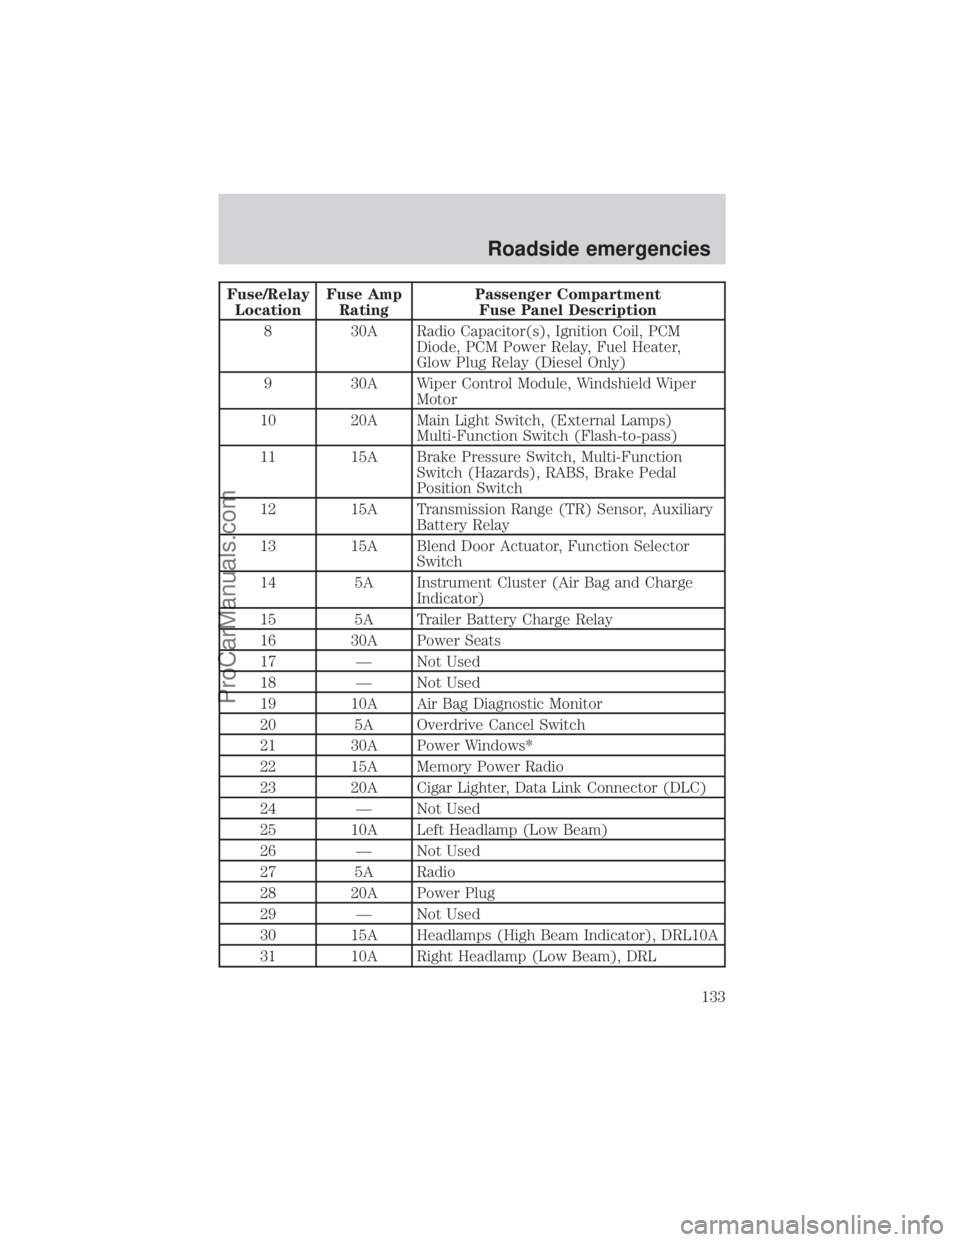
Fuse/Relay
LocationFuse Amp
RatingPassenger Compartment
Fuse Panel Description
8 30A Radio Capacitor(s), Ignition Coil, PCM
Diode, PCM Power Relay, Fuel Heater,
Glow Plug Relay (Diesel Only)
9 30A Wiper Control Module, Windshield Wiper
Motor
10 20A Main Light Switch, (External Lamps)
Multi-Function Switch (Flash-to-pass)
11 15A Brake Pressure Switch, Multi-Function
Switch (Hazards), RABS, Brake Pedal
Position Switch
12 15A Transmission Range (TR) Sensor, Auxiliary
Battery Relay
13 15A Blend Door Actuator, Function Selector
Switch
14 5A Instrument Cluster (Air Bag and Charge
Indicator)
15 5A Trailer Battery Charge Relay
16 30A Power Seats
17 Ð Not Used
18 Ð Not Used
19 10A Air Bag Diagnostic Monitor
20 5A Overdrive Cancel Switch
21 30A Power Windows*
22 15A Memory Power Radio
23 20A Cigar Lighter, Data Link Connector (DLC)
24 Ð Not Used
25 10A Left Headlamp (Low Beam)
26 Ð Not Used
27 5A Radio
28 20A Power Plug
29 Ð Not Used
30 15A Headlamps (High Beam Indicator), DRL10A
31 10A Right Headlamp (Low Beam), DRL
Roadside emergencies
133
ProCarManuals.com
Page 168 of 232

cells with distilled water. If the battery needs water often, have the
charging system checked.
If your battery has a cover/shield, make sure it is reinstalled
after the battery has been cleaned or replaced.
For longer, trouble-free operation, keep the top of the battery clean and
dry. Also, make certain the battery cables are always tightly fastened to
the battery terminals.
If you see any corrosion on the battery or terminals, remove the cables
from the terminals and clean with a wire brush. You can neutralize the
acid with a solution of baking soda and water.
Batteries normally produce explosive gases which can cause
personal injury. Therefore, do not allow flames, sparks or lighted
substances to come near the battery. When working near the battery,
always shield your face and protect your eyes. Always provide proper
ventilation.
When lifting a plastic-cased battery, excessive pressure on the
end walls could cause acid to flow through the vent caps,
resulting in personal injury and/or damage to the vehicle or battery.
Lift the battery with a battery carrier or with your hands on opposite
corners.
Keep batteries out of reach of children. Batteries contain sulfuric
acid. Avoid contact with skin, eyes or clothing. Shield your eyes
when working near the battery to protect against possible splashing of
acid solution. In case of acid contact with skin or eyes, flush
immediately with water for a minimum of 15 minutes and get prompt
medical attention. If acid is swallowed, call a physician immediately.
Because your vehicle's engine is electronically controlled by a computer,
some control conditions are maintained by power from the battery. When
the battery is disconnected or a new battery is installed, the engine must
relearn its idle and fuel trim strategy for optimum driveability and
performance. To begin this process:
1. With the vehicle at a complete stop, set the parking brake.
2. Put the gearshift in P (Park), turn off all accessories and start the
engine.
Maintenance and care
168
ProCarManuals.com
Page 179 of 232

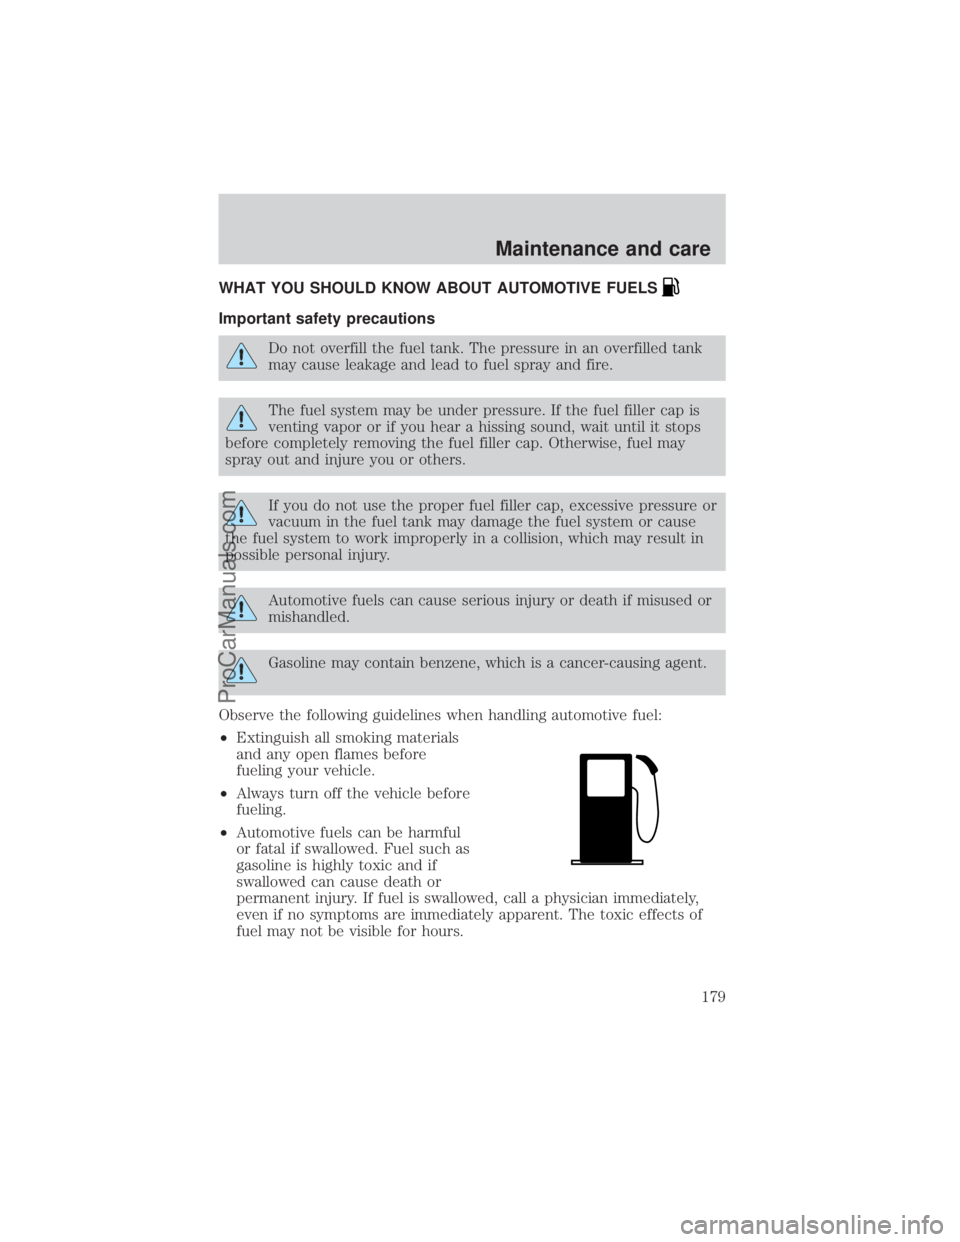
WHAT YOU SHOULD KNOW ABOUT AUTOMOTIVE FUELS
Important safety precautions
Do not overfill the fuel tank. The pressure in an overfilled tank
may cause leakage and lead to fuel spray and fire.
The fuel system may be under pressure. If the fuel filler cap is
venting vapor or if you hear a hissing sound, wait until it stops
before completely removing the fuel filler cap. Otherwise, fuel may
spray out and injure you or others.
If you do not use the proper fuel filler cap, excessive pressure or
vacuum in the fuel tank may damage the fuel system or cause
the fuel system to work improperly in a collision, which may result in
possible personal injury.
Automotive fuels can cause serious injury or death if misused or
mishandled.
Gasoline may contain benzene, which is a cancer-causing agent.
Observe the following guidelines when handling automotive fuel:
²Extinguish all smoking materials
and any open flames before
fueling your vehicle.
²Always turn off the vehicle before
fueling.
²Automotive fuels can be harmful
or fatal if swallowed. Fuel such as
gasoline is highly toxic and if
swallowed can cause death or
permanent injury. If fuel is swallowed, call a physician immediately,
even if no symptoms are immediately apparent. The toxic effects of
fuel may not be visible for hours.
Maintenance and care
179
ProCarManuals.com
Page 183 of 232

The fuel system may be under pressure. If the fuel filler cap is
venting vapor or if you hear a hissing sound, wait until it stops
before completely removing the fuel filler cap. Otherwise, fuel may
spray out and injure you or others.
If you do not use the proper fuel filler cap, excessive pressure or
vacuum in the fuel tank may damage the fuel system or cause
the fuel system to work improperly in a collision, which may result in
possible personal injury.
Fuel Filter
For fuel filter replacement, see your dealer or a qualified service
technician. Refer to the Scheduled Maintenance Guide for the
appropriate intervals for changing the fuel filter.
Replace the fuel filter with an authorized Motorcraft part. The
customer warranty may be void for any damage to the fuel system
if an authorized Motorcraft fuel filter is not used.
ESSENTIALS OF GOOD FUEL ECONOMY
Measuring techniques
Your best source of information about actual fuel economy is you, the
driver. You must gather information as accurately and consistently as
possible. Fuel expense, frequency of fillups or fuel gauge readings are
NOT accurate as a measure of fuel economy. We do not recommend
taking fuel economy measurements during the first 1 600 km (1 000
miles) of driving (engine break-in period). You will get a more accurate
measurement after 3 000 km±5 000 km (2 000 miles-3 000 miles).
Filling the tank
The advertised fuel capacity of the fuel tank on your vehicle is equal to
the rated refill capacity of the fuel tank as listed in theRefill Capacities
section of theCapacities and specificationschapter.
The advertised capacity is the amount of the indicated capacity and the
empty reserve combined. Indicated capacity is the difference in the
amount of fuel in a full tank and a tank when the fuel gauge indicates
empty. Empty reserve is the small amount of usable fuel remaining in the
fuel tank after the fuel gauge indicates empty.
Maintenance and care
183
ProCarManuals.com
Page 186 of 232
![FORD E-450 2000 Owners Manual Conditions
²Heavily loading a vehicle or towing a trailer may reduce fuel economy
at any speed.
²Carrying unnecessary weight may reduce fuel economy (approximately
0.4 km/L [1 mpg] is lost for every FORD E-450 2000 Owners Manual Conditions
²Heavily loading a vehicle or towing a trailer may reduce fuel economy
at any speed.
²Carrying unnecessary weight may reduce fuel economy (approximately
0.4 km/L [1 mpg] is lost for every](/manual-img/11/57784/w960_57784-185.png)
Conditions
²Heavily loading a vehicle or towing a trailer may reduce fuel economy
at any speed.
²Carrying unnecessary weight may reduce fuel economy (approximately
0.4 km/L [1 mpg] is lost for every 180 kg [400 lb] of weight carried).
²Adding certain accessories to your vehicle (for example bug
deflectors, rollbars/light bars, running boards, ski/luggage racks) may
reduce fuel economy.
²Using fuel blended with alcohol may lower fuel economy.
²Fuel economy may decrease with lower temperatures during the first
12±16 km (8±10 miles) of driving.
²Driving on flat terrain offers improved fuel economy as compared to
driving on hilly terrain.
²Transmissions give their best fuel economy when operated in the top
cruise gear and with steady pressure on the gas pedal.
²Close windows for high speed driving.
EPA window sticker
Every new vehicle should have the EPA window sticker. Contact your
dealer if the window sticker is not supplied with your vehicle. The EPA
window sticker should be your guide for the fuel economy comparisons
with other vehicles.
It is important to note the box in the lower left corner of the window
sticker. These numbers represent the Range of L/100 km (MPG)
expected on the vehicle under optimum conditions. Your fuel economy
may vary depending upon the method of operation and conditions.
EMISSION CONTROL SYSTEM
Your vehicle is equipped with various emission control components and a
catalytic converter which will enable your vehicle to comply with
applicable exhaust emission standards. To make sure that the catalytic
converter and other emission control components continue to work
properly:
²Use only the specified fuel listed.
²Avoid running out of fuel.
²Do not turn off the ignition while your vehicle is moving, especially at
high speeds.
Maintenance and care
186
ProCarManuals.com
Page 195 of 232

Repairing paint chips
Minor scratches or paint damage from road debris may be repaired with
the Ultra Touch Prep and Finishing Kit (#F7AZ-19K507±BA), Lacquer
Touch-up Paint (#ALBZ-19500±XXXXA), or Exterior Acrylic Spray
Lacquer (#ALAZ-19500±XXXXA) from the Ford Car Care Chemicals line.
Please note that the part numbers (shown as XXXX above) will vary with
your vehicle's specific coloring. Observe the application instructions on
the products.
Remove particles such as bird droppings, tree sap, insect remains, tar
spots, road salt and industrial fallout immediately.
Cleaning the wheels
Wash with the same detergent as the body of your vehicle. Do not use
acid-based or alcohol-based wheel cleaners, steel wool, fuel or strong
detergents. Never use abrasives that will damage the finish of special
wheel surfaces. Use a tar remover to remove grease and tar.
The brushes used in some automatic car washes may damage the finish
on your wheels. Before going to a car wash, find out if the brushes are
abrasive.
Cleaning the engine
Engines are more efficient when they are clean because grease and dirt
buildup keep the engine warmer than normal. When washing:
²Take care when using a power washer to clean the engine. The high
pressure fluid could penetrate the sealed parts and cause damage.
²Do not spray with cold water to avoid cracking the engine block or
other engine components.
²Never apply anything to the drive belt (including belt dressing).
Maintenance and care
195
ProCarManuals.com
Page 225 of 232

engine coolant
temperature gauge ...................15
engine oil pressure gauge ........15
fuel gauge ..................................14
odometer ...................................16
speedometer .............................14
trip odometer ............................16
GAWR
(Gross Axle Weight Rating) .....118
calculating ...............................120
definition .................................118
driving with a heavy load ......118
location ....................................118
GVWR (Gross
Vehicle Weight Rating) .............118
calculating ........................118,120
definition .................................118
driving with a heavy load ......118
location ....................................118
Hazard flashers .........................128
Headlamps ...................................17
aiming ......................................193
bulb specifications ..................193
daytime running lights .............17
flash to pass ..............................18
high beam ............................13,17
replacing bulbs ................188,190
turning on and off ....................17
warning chime ..........................14
Heating ........................................18
auxiliary heater and air
conditioner ................................23
heater only system ...................18
heating and
air conditioning system ............20
Hood ..........................................151
Ignition .......................................206
positions of the ignition ...........58
Infant seats (see Safety seats) ..95
Inspection/maintenance
(I/M) testing ..............................187Instrument panel
cleaning ...................................197
cluster .................................10,197
lighting up
panel and interior .....................18
location of components ............10
Jump-starting your vehicle ......144
Keys
key in ignition chime ...............14
positions of the ignition ...........58
Lamps
bulb replacement
specifications chart ................193
cargo lamps ...............................18
daytime running light ...............17
headlamps .................................17
headlamps, flash to pass ..........18
instrument panel, dimming .....18
interior lamps ...........................65
replacing bulbs ..188,190,191,192
Lane change indicator
(see Turn signal) ........................59
Lights, warning and indicator ....10
air bag ........................................12
anti-lock brakes (ABS) .....10,110
brake ..........................................10
charging system ........................12
check coolant ............................13
engine oil pressure ...................13
high beam .................................13
safety belt .................................12
service engine soon ..................10
turn signal indicator .................13
Load limits .................................118
GAWR ......................................118
GVWR ......................................118
trailer towing ..........................118
Loading instructions .................119
Lubricant specifications ....203,206
Lumbar support, seats ...............73
Mirrors
side view mirrors (power) .......67
Index
225
ProCarManuals.com