Page 38 of 224
Speaker fade adjust (if equipped)
Speaker sound can be adjusted
between the front and rear
speakers.
Press the TONE control four times,
then use the volume knob to adjust
the desired level.
Setting the clock
Your vehicle is equipped with a separate instrument panel mounted
clock. Please refer toClockin this chapter for instructions on setting the
clock.
AM/FM stereo cassette
TONE
CLK
VOL
PUSH
ON
SCAN
BASS TREB BAL FADE
SIDE
EJ
REW FF1 - 2TAPE
AMS
VOL - PUSH ON
SEEK
TUNE
AM
FMCLK
12 3456
FM1ST
Controls and features
38
Page 44 of 224
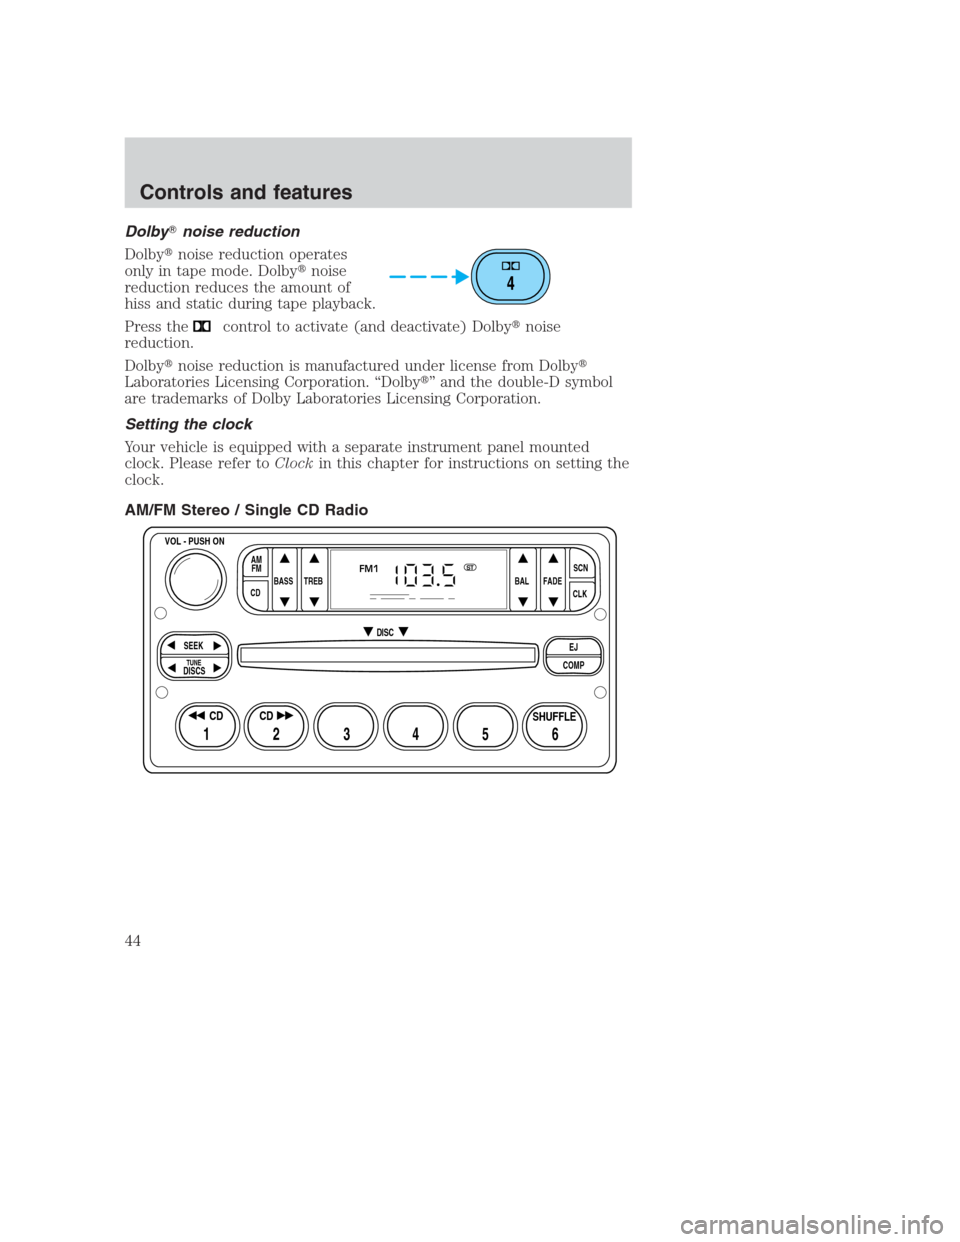
Dolby�noise reduction
Dolby�noise reduction operates
only in tape mode. Dolby�noise
reduction reduces the amount of
hiss and static during tape playback.
Press the
control to activate (and deactivate) Dolby�noise
reduction.
Dolby�noise reduction is manufactured under license from Dolby�
Laboratories Licensing Corporation. “Dolby�” and the double-D symbol
are trademarks of Dolby Laboratories Licensing Corporation.
Setting the clock
Your vehicle is equipped with a separate instrument panel mounted
clock. Please refer toClockin this chapter for instructions on setting the
clock.
AM/FM Stereo / Single CD Radio
4
BASS
CDTREB BAL FADESCN
CLK AM
FM
VOL - PUSH ON
SEEK
EJ
COMP DISC
DISCS
TUNE
12 3456
FM1ST
SHUFFLE CD CD
Controls and features
44
Page 59 of 224
Show
•With RDS activated, press the
RDS control until SHOW is
displayed.
•Use the SEL control to select
TYPE (the display shows the
program type), NAME (the
display shows the call letters of
the station) or NONE.
RDS clock feature
Refer toSetting the clockfor information.
Setting the clock
Your vehicle is equipped with a separate instrument panel mounted
clock. Please refer toClockin this chapter for instructions on setting the
clock.
CD changer (if equipped)
The CD changer is located in one of the following locations:
•in the trunk
•in the center console
•under the driver’s seat
1. Slide the door to access the CD
changer magazine.
RDS
SEL
Controls and features
59
Page 61 of 224

5. Line up the CD with the groove
of the disc holder. Ensure that the
label on the CD faces downwards.
6. Press in on the disc holder until it
locks securely into the magazine. If
the disc holders are not fully locked
into the magazine, the unit will not
operate.
Ensure that the disc holder is
evenly inserted and at the same
level as the magazine (A). The unit
will not operate if the disc holder is
not inserted at the same level (B).
Radio power must be turned on to play the CDs in the changer. The
magazine may be stored in the glove box when not being used.
The CD magazine may be inserted or ejected with the radio power off.
ONLY use the magazine supplied with the CD changer, other types will
damage the unit.
Keep the CD changer door closed. Coins and foreign objects will damage
the CD player and void your audio system warranty.
Do not insert any promotional (odd shaped or sized) discs, or
discs with removable labels into the CD changer as that jamming
may occur.
Troubleshooting the CD changer (if equipped)
The laser beam used in the compact disc player is harmful to the
eyes. Do not attempt to disassemble the case.
If sound skips:
•You may be traveling on a rough road, playing badly scratched discs or
the disc may be dirty. Skipping will not scratch the discs or damage
the player.
A
B
Controls and features
61
Page 65 of 224
POSITIONS OF THE IGNITION
1. ACCESSORY, allows the electrical
accessories such as the radio to
operate while the engine is not
running.
2. LOCK, locks the steering wheel,
automatic transmission gearshift
lever and allows key removal.
3. OFF, shuts off the engine and all
accessories without locking the
steering wheel.
4. ON, all electrical circuits operational. Warning lights illuminated. Key
position when driving.
5. START, cranks the engine. Release the key as soon as the engine
starts.
TILT STEERING
Pull the tilt steering control toward
you to move the steering wheel up
or down. Hold the control while
adjusting the wheel to the desired
position, then release the control.
Never adjust the steering wheel when the vehicle is moving.
3
1
2
5
4
Controls and features
65
Page 70 of 224
.
Indicator light (if equipped)
This light comes on wh")
To return to a previously set speed
•Press RES/RSM/RESUME. For
RES/RSM/RESUME to operate,
the vehicle speed must be faster
than 48 km/h (30 mph).
Indicator light (if equipped)
This light comes on when either the
SET ACC/SET ACCEL or RES/
RSM/RESUME controls are pressed.
It turns off when the speed control OFF control is pressed, the brake is
applied or the ignition is turned to the OFF position.
HOMELINK�UNIVERSAL TRANSCEIVER (IF EQUIPPED)
The HomeLink�Universal Transceiver, located on the driver’s visor,
provides a convenient way to replace up to three hand-held transmitters
with a single built-in device. This feature will learn the radio frequency
codes of most current transmitters to operate garage doors, entry gates,
security systems, entry door locks, and home or office lighting.
When programming your HomeLink�Universal Transceiver, to a
garage door or gate be sure that people and objects are out of
the way to prevent potential harm or damage.
Do not use the HomeLink�Universal Transceiver with any garage door
opener that lacks safety stop and reverse features as required by U.S.
federal safety standards (this includes any garage door opener model
manufactured before April 1, 1982). A garage door which cannot detect
an object, signaling the door to stop and reverse, does not meet current
U.S. federal safety standards. For more information on this matter, call
toll-free: 1–800–355–3515 or on the Internet atHomeLink.jci.com.
COAST
RESUME
SET
ACCEL
SPEED CONTROL
Controls and features
70
Page 74 of 224

Your vehicle is equipped with an inside rear view mirror which has an
auto-dimming function. The electronic day/night mirror will change from
th")
AUTOMATIC DIMMING INSIDE REAR VIEW MIRROR (IF EQUIPPED)
Your vehicle is equipped with an inside rear view mirror which has an
auto-dimming function. The electronic day/night mirror will change from
the normal state to the non-glare state when bright lights (glare) reach
the mirror. When the mirror detects bright light from front or behind, it
will automatically adjust (darken) to minimize glare.
Do not block the sensor on the backside of the mirror since this may
impair proper mirror performance.
Press the control to turn the mirror
on or off.
The mirror will automatically return
to the normal state whenever the
vehicle is placed in R
(Reverse)(when the mirror is on) to
ensure a bright clear view when
backing up.
ELECTRONIC COMPASS (IF EQUIPPED)
The compass reading will remain accurate during most driving
conditions. Unknown to the driver, the compass is continuously
recalibrating due to magnetic fields and subtle, slow changes in vehicle
magnetics which can occur over the life of the vehicle.
The compass reading will remain fixed when significant levels are
experienced (such as steel bridges). The compass will return to normal
operation upon leaving the magnetized area.
If highly magnetized items (such as magnetic mount antennas) are
placed very near the compass the display will change to “C” for 15
seconds, then display all segments until the magnetized item is removed.
If a “C” is displayed, refer toCompass calibration adjustment.
Most geographic areas (zones) have a magnetic north compass point that
varies slightly from the northerly direction on maps. This variation is four
degrees between adjacent zones and will become noticeable as the
vehicle crosses multiple zones. A correct zone setting will eliminate this
error. Refer toCompass zone adjustment.
COMP MIRROR
Controls and features
74
Page 77 of 224
•Press the bottom portion of the
rocker switch to open.
Express down
•Press AUTO and release quickly.
The window will open fully.
Depress again to stop window
operation.
Window lock
The window lock feature allows only
the driver to operate the power
windows.
To lock out all the window controls
except for the driver’s press the left
side of the control. Press the right side to restore the window controls.
AUTO
AUTO
WINDOW LOCK
Controls and features
77

Speaker sound can be adjusted
between the front and rear
speakers.
Press the TONE control four times,
then use the volume knob to adjust
the desired level.
Setting th")
, NAME (the
display shows the call letters of
the s")

