2000 CHRYSLER VOYAGER engine vacuum
[x] Cancel search: engine vacuumPage 142 of 364

Symptom:
P-0420 1/1 CATALYTIC CONVERTER EFFICIENCY
When Monitored and Set Condition:
P-0420 1/1 CATALYTIC CONVERTER EFFICIENCY
When Monitored: After engine warm up to 63 degrees C (147 degrees F), 180 seconds of
open throttle operation, at a speed greater than 30 Km/h (20 mph), with the engine at
1200-1700 rpm and MAP vacuum between 15.0 and 21.0 inches of mercury (Hg).
Set Condition: As catalyst efficiency deteriorates, the switch rate of the downstream O2
sensor approaches that of the upstream O2 sensor. If at any point during the test the
switch ratio reaches a predetermined value a counter is incremented by one.
POSSIBLE CAUSES
EXHAUST LEAK
ENGINE MECHANICAL PROBLEM
CATALYTIC CONVERTER DEFECTIVE
UPSTREAM O2 SENSOR OLDER THAN DOWNSTREAM O2 SENSOR
CATALYST EFFICIENCY FAILURE DOES NOT REOCCUR
TEST ACTION APPLICABILITY
1 With the DRB, read the DTCs.
Is the GLOBAL GOOD TRIPS counter displayed and equal to zero?All
Ye s®Go To 3
No®Go To 2
2 At this time the Catalyst Efficiency Failure does not exist or is an intermittent
problem.
With the DRB, read the FREEZE FRAME DATA.
With this screen, attempt to duplicate the condition that has set this fault.
While using FREEZE FRAME DATA pay particular attention to the fault setting
conditions, such as speed, temp, load, and map vacuum.
Does the Catalyst Efficiency Failure Reoccur?All
Ye s®Go To 3
No®The Catalytic Conveter Efficiency Failure no longer exists.
Perform VERIFICATION TEST VER-5A3.
3 Start Engine and let idle.
Check for exhaust leaks between the Engine and the appropriate Downstream O2
Sensor.
Are there any exhaust leaks?All
Ye s®Repair or replace leaking exhaust parts as necessary.
Perform VERIFICATION TEST VER-5A3.
No®Go To 4
136
DRIVEABILITY
ProCarManuals.com
Page 144 of 364

Symptom:
P-0441 EVAP PURGE FLOW MONITOR FAILURE
When Monitored and Set Condition:
P-0441 EVAP PURGE FLOW MONITOR FAILURE
When Monitored: With engine temperature greater than 170ÉF, engine in closed loop,
engine idling for 2 minutes, no low fuel, MAP less than 15.7 inches mercury, and
barometric altitude less than 8,000 feet.
Set Condition: Note: with LDP: must pass stricter evap system test first. No air flow
through the evaporative system is detected by the evap monitor.
POSSIBLE CAUSES
PURGE CANISTER LINE DAMAGED
PURGE SOLENOID AND CANISTER DEFECTIVE
PURGE SOLENOID DEFECTIVE
VACUUM HOSES DAMAGED OR PLUGGED
EVAP PURGE MONITOR FAILURE DOES NOT REOCCUR
TEST ACTION APPLICABILITY
1 With the DRB, read the DTCs.
Is the GLOBAL GOOD TRIP counter displayed and equal to zero?All
Ye s®Go To 3
No®Go To 2
2 At this time the Evap Purge Flow Monitor Failure does not exist or is an intermittent
problem.
With the DRB, read the FREEZE FRAME DATA.
With these screens, attempt to duplicate the condition that has set this fault.
While using FREEZE FRAME pay particular attention to the fault setting condi-
tions, such as speed, temp, load, and map vacuum.
Does the Evap Purge Flow Monitor Failure reoccur?All
Ye s®Go To 3
No®The Evap Purge Flow Monitor failure no longer exists.
Perform VERIFICATION TEST VER-5A3.
3NOTE: Carefully inspect all vacuum hoses for proper routing and for
pinched or plugged hoses from the engine to the solenoid to the gas tank.
Are all vacuum hoses OK?All
Ye s®Go To 4
No®Repair the vacuum hoses as necessary.
Perform VERIFICATION TEST VER-5A3.
138
DRIVEABILITY
ProCarManuals.com
Page 147 of 364

TEST ACTION APPLICABILITY
3Note: Leaving the Gas Cap loose could cause this trouble code to set.
To continue testing you will need Miller Tool Kit #6872A and #8382.
NOTE: The Fuel Tank must have 1/2 tank of fuel to perform this test.
Perform Evaporative System Pressure Pump Self Test that is specified on the tester
cover.
Warning: Verify the vehicle fuel tank contains at least 3 gallons of fuel.
Attach the DRB III to the vehicle.
Turn the Key On.
At: ENGINE SYSTEM TESTS select: LEAK DETECTION PUMP TEST.
Read instructions and then press ENTER.
At: LEAK DETECTION PUMP TEST select #3 HOLD PSI.
At the vacuum hose going to the LDP, attach and apply a continuous vacuum (i.e. 209
Hg).
Remove Gas Cap.
Install 8382 on the Gas Cap and on the vehicle.
Attach the supply hose from 6872A to 8382.
Attach the power source from the 6872A, clip to Battery(+) and ground clip to
Battery(-).
On the 6872A set the Pressure/Hold Valve to Open and set the Vent Valve to Closed.
Turn the timer on and watch the gauge.
When the gauge pressure reaches 14 in. H2O, turn the Pressure/Hold Valve to
Closed.
Turn the timer off. Note the time and pressure.
Did pressure drop more than 6 in. H2O (to 8 inches H2O on the gauge) in two
minutes?All
Ye s®Go To 4
No®Go To 5
141
DRIVEABILITY
P-0442 EVAP LEAK MONITOR SMALL LEAK DETECTED ÐContinued
ProCarManuals.com
Page 148 of 364

TEST ACTION APPLICABILITY
4 To continue testing you will need Miller Tool Kit #6872A, #8382 and #6904 Ultrasonic
Leak Detector.
NOTE: The Fuel Tank must have 1/2 tank of fuel to perform this test.
Perform Evaporative System Pressure Pump Self Test that is specified on the tester
cover.
Warning: Verify the vehicle fuel tank contains at least 3 gallons of fuel.
Attach the DRB III to the vehicle.
Turn the Key On.
At: ENGINE SYSTEM TESTS select: LEAK DETECTION PUMP TEST.
Read instructions and then press ENTER.
At: LEAK DETECTION PUMP TEST select #3 HOLD PSI.
At the vacuum hose going to the LDP, attach and apply a continuous vacuum (i.e. 209
Hg).
Remove Gas Cap.
Install 8382 on the Gas Cap and on the vehicle.
Attach the supply hose from 6872A to 8382.
Attach the power source from the 6872A, clip to Battery(+) and ground clip to
Battery(-).
Set Pressure Hold to Open and set Vent to Open.
Turn Pump Timer On.
To prevent noise from interfering with test, move tool #6872 away from vehicle.
Using the Ultrasonic Leak Detector, start listening for leaks at Gas Cap then proceed
to Rollover Valve, Canister, Leak Detection Pump, and Evap Purge Solenoid.
Were any leaks heard with the Ultrasonic Leak Detector?All
Ye s®Repair or replace leaking component.
Perform VERIFICATION TEST VER-6A.
No®Replace Leak Detection Pump.
Perform VERIFICATION TEST VER-6A.
5 At this time, the condition required to set the code is not present.
Using the schematic as a guide, inspect the wiring, connectors and hoses.
Were any problems found?All
Ye s®Repair as necessary.
Perform VERIFICATION TEST VER-6A.
No®Test Complete.
142
DRIVEABILITY
P-0442 EVAP LEAK MONITOR SMALL LEAK DETECTED ÐContinued
ProCarManuals.com
Page 186 of 364

Symptom:
P-1294 TARGET IDLE NOT REACHED
When Monitored and Set Condition:
P-1294 TARGET IDLE NOT REACHED
When Monitored: Engine idling more than 2.8 seconds and coolant temp greater than 70
degrees C (160 degrees F). For an automatic transmission, in drive mode. There must not
be a MAP Sensor or TP Sensor or speed sensor trouble code.
Set Condition: Engine idle is > 200 RPM above target idle speed or less than 100 RPM
below target idle speed for 20 seconds. Two consecutive failures in a row will store this
trouble code.
POSSIBLE CAUSES
ENG VACUUM HOSES AND COMPONENTS LEAKS
THROTTLE BODY DEFECTIVE
THROTTLE PLATE/LINKAGE NOT IN CORRECT POS
IAC WIRING HARNESS INTERMITTENT DEFECT
IAC WIRING HARNESS OBSERVABLE DEFECTIVE
TEST ACTION APPLICABILITY
1 Ignition Off
Does the engine exhibit a start and stall condition?All
Ye s®Go To 2
No®Go To 4
2 Ignition Off
Perform minimum air flow test that is described in the service information.
Is the idle RPM within the range shown in the chart?All
Ye s®Test Complete.
No®Go To 3
180
DRIVEABILITY
ProCarManuals.com
Page 188 of 364

TEST ACTION APPLICABILITY
8 Ignition Off
Start engine, allow engine idle to stabilize for 60 seconds.
With the engine running at idle, the DRB in Systems Test, perform the IAC wiggle
test.
The idle speed should raise and lower with the display.
Does the RPM raise and lower correctly?All
Ye s®Go To 9
No®Refer to symptom P-0505 IDLE AIR CONTROL MOTOR CIR-
CUITS in the DRIVEABILITY category.
9 Ignition Off
Start engine, allow engine idle to stabilize for 60 seconds.
Check engine Vacuum Hoses and Components for vacuum leaks.
Ensure PCV Valve is the correct part and is operating correctly.
Were any problems found?All
Ye s®Repair as necessary.
Perform Powertrain Verification Test VER-5A.
No®Go To 10
10 Ignition Off
Remove the IAC Motor from the housing.
Turn Ignition on with Engine Not Running.
With the DRB, actuate the IAC Stepper Motor.
Wiggle the Wiring Harness from the IAC Motor to the PCM.
Did the IAC stop operating at any time?All
Ye s®Repair the Harness or Connectors as necessary.
Perform Powertrain Verification Test VER-5A.
No®Go To 11
11 Ignition On, Engine Not Running
Check Throttle Plate and Linkage for a binding condition.
The Throttle Linkage must be free and the Throttle Plate at the idle
position.
Ensure Throttle Plate is fully closed and against its stop.
Is the Throttle Plate and Linkage okay?All
Ye s®Go To 12
No®Repair as necessary.
Perform Powertrain Verification Test VER-5A.
12 Ignition Off
Using the schematic as a guide, inspect the Wiring and Connectors.
Were any problems found?All
Ye s®Repair as necessary.
Perform Powertrain Verification Test VER-5A.
No®Test Complete.
182
DRIVEABILITY
P-1294 TARGET IDLE NOT REACHED ÐContinued
ProCarManuals.com
Page 189 of 364

Symptom:
P-1297 NO CHANGE IN MAP FROM START TO RUN
When Monitored and Set Condition:
P-1297 NO CHANGE IN MAP FROM START TO RUN
When Monitored: Engine is idling with a stable RPM (RPM fluctuation < 64 RPM) and
the vehicle is not moving.
Set Condition: Too small a difference is seen between barometric pressure at ignition on
and manifold vacuum.
POSSIBLE CAUSES
MAP SENSOR 5-VOLT SUPPLY CIRCUIT OPEN
MAP SENSOR WIRING HARNESS INTERMITTENT DEF
VACUUM PORTS RESTRICTED OR DEFECTIVE
MANIFOLD ABSOLUTE PRESSURE SENSOR RESTRICTED
MAP SENSOR DEFECTIVE (A)
MAP SENSOR DEFECTIVE (B)
TEST ACTION APPLICABILITY
1 Ignition On, Engine Not Running
With the DRB, read codes
Is9MAP Sensor voltage too low9code set?All
Ye s®Refer to symptom P-0107 MAP SENSOR VOLTAGE TOO LOW in
the DRIVEABILITY category.
No®Go To 2
2 With the DRB erase Codes.
Ignition On, Engine Not Running
Start engine and allow engine to idle for 30 seconds.
With the DRB read codes.
Does the DRB show9No change in MAP from start to run9?All
Ye s®Go To 3
No®Go To 6
3 Ignition on, with engine not running.
Disconnect MAP Sensor.
Note:Check connectors - clean/repair as necessary.
Ignition on, with engine not running.
Using a Voltmeter, measure the MAP Sensor 5-Volt Supply Circuit at the MAP
Sensor Connector.
Is the voltage above 4.0 volts?All
Ye s®Go To 4
No®Repair the open MAP Sensor 5-volt Supply Circuit.
Perform Powertrain Verification Test VER-5A.
183
DRIVEABILITY
ProCarManuals.com
Page 190 of 364
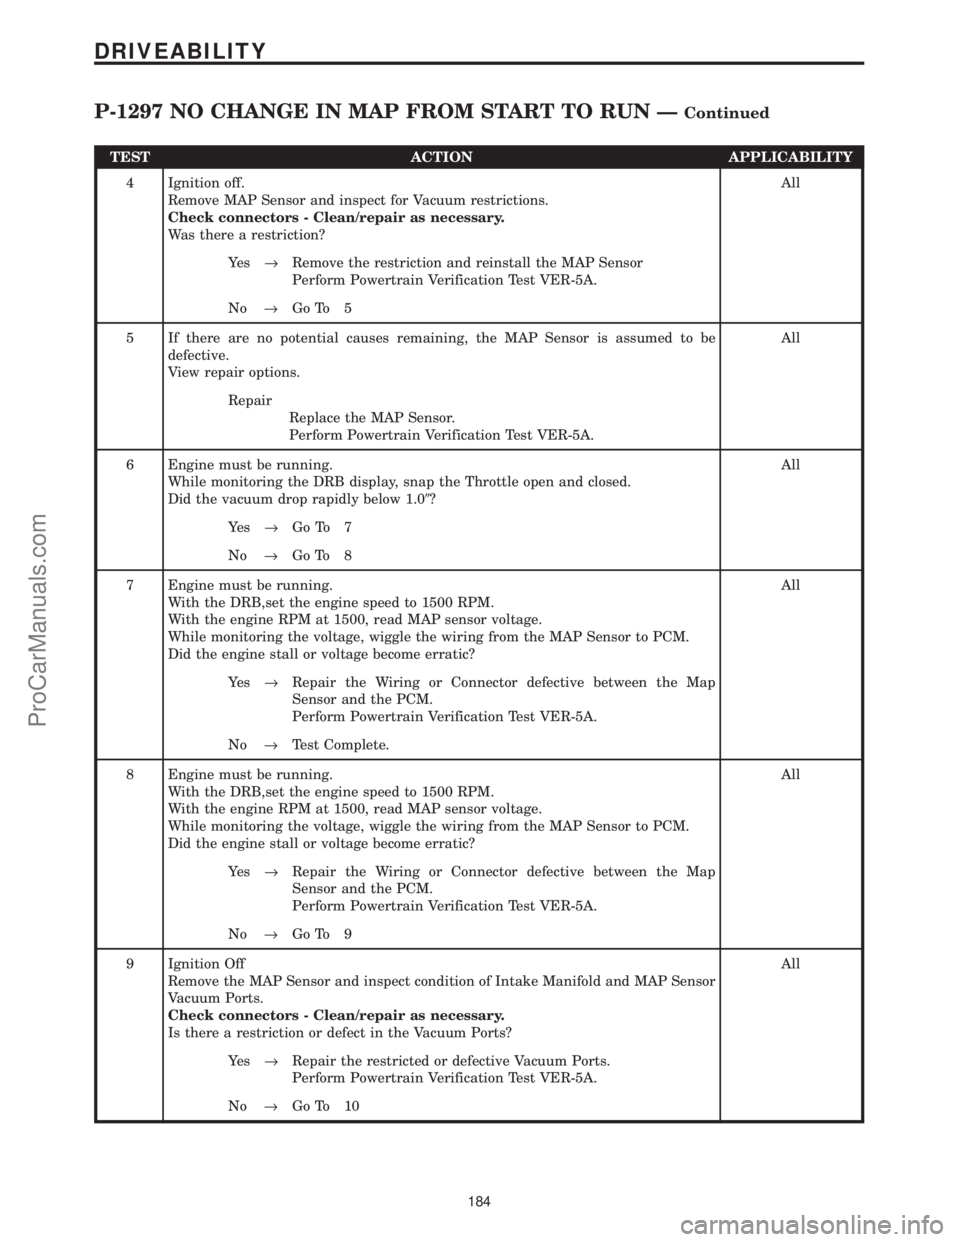
TEST ACTION APPLICABILITY
4 Ignition off.
Remove MAP Sensor and inspect for Vacuum restrictions.
Check connectors - Clean/repair as necessary.
Was there a restriction?All
Ye s®Remove the restriction and reinstall the MAP Sensor
Perform Powertrain Verification Test VER-5A.
No®Go To 5
5 If there are no potential causes remaining, the MAP Sensor is assumed to be
defective.
View repair options.All
Repair
Replace the MAP Sensor.
Perform Powertrain Verification Test VER-5A.
6 Engine must be running.
While monitoring the DRB display, snap the Throttle open and closed.
Did the vacuum drop rapidly below 1.09?All
Ye s®Go To 7
No®Go To 8
7 Engine must be running.
With the DRB,set the engine speed to 1500 RPM.
With the engine RPM at 1500, read MAP sensor voltage.
While monitoring the voltage, wiggle the wiring from the MAP Sensor to PCM.
Did the engine stall or voltage become erratic?All
Ye s®Repair the Wiring or Connector defective between the Map
Sensor and the PCM.
Perform Powertrain Verification Test VER-5A.
No®Test Complete.
8 Engine must be running.
With the DRB,set the engine speed to 1500 RPM.
With the engine RPM at 1500, read MAP sensor voltage.
While monitoring the voltage, wiggle the wiring from the MAP Sensor to PCM.
Did the engine stall or voltage become erratic?All
Ye s®Repair the Wiring or Connector defective between the Map
Sensor and the PCM.
Perform Powertrain Verification Test VER-5A.
No®Go To 9
9 Ignition Off
Remove the MAP Sensor and inspect condition of Intake Manifold and MAP Sensor
Vacuum Ports.
Check connectors - Clean/repair as necessary.
Is there a restriction or defect in the Vacuum Ports?All
Ye s®Repair the restricted or defective Vacuum Ports.
Perform Powertrain Verification Test VER-5A.
No®Go To 10
184
DRIVEABILITY
P-1297 NO CHANGE IN MAP FROM START TO RUN ÐContinued
ProCarManuals.com