Page 100 of 326

2-37
Interior Lamps
Instrument Panel Intensity Control
You can brighten or dim
the instrument panel cluster
lights by turning the switch,
located on the instrument
panel, to the left of the
steering wheel.
Illuminated Entry/Exit System
When you open any door, the lamps inside your
vehicle will go on. These lamps will fade out after about
10 seconds, or when the ignition is turned on after all
doors have been closed. These lamps will also go on
when you press the vehicle symbol, the trunk release
button, UNLOCK button or the horn symbol button
on the keyless entry system transmitter (if your vehicle
has this feature).The lamps inside your vehicle will stay on for about
15 seconds after your key is removed from the ignition
to provide an illuminated exit.
Mirror Reading Lamps (If Equipped)
Press the switch on the lower front portion of the mirror
to turn on the lamp. Press the other side of the switch to
turn the lamp off.
Three-Position Dome Lamp
The switch on this lamp has three positions. The ON
position will turn on the light. The DOOR position will
turn on the light whenever a door is opened. The OFF
position will shut off the lamp completely, even when a
door is opened.
Trunk Lamp
The trunk lamp comes on when you open your trunk.
Battery Saver
Your vehicle is equipped with a battery saver feature
designed to protect your vehicle's battery.
When any interior lamp (trunk, reading, footwell or
glove box) is left on when the ignition is turned off, the
battery saver system will automatically shut the lamp off
after 20 minutes. This will avoid draining the battery.
Page 101 of 326

2-38
To reactivate the interior lamps, either:
�the ignition must be turned on,
�the activated lamp switch must be turned off and
then on,
�a door must be opened,
�press any remote keyless entry transmitter button
(if you have this feature) or
�press the remote trunk release button.
The battery saver feature will also be activated when
any door of your vehicle is left open and the ignition is
to OFF.
Mirrors
Inside Day/Night Rearview Mirror
This mirror can be adjusted two ways. First, to adjust
the angle of the mirror, move the mirror to a position
that allows you see to out the back window. To adjust
the height of the mirror, adjust the arm that connects the
mirror to the windshield.
To reduce glare from lights behind you, move the lever
toward you to the night position.
Manual Remote Control Mirror
The outside rearview mirror should be adjusted so you
can just see the side of your vehicle when you are sitting
in a comfortable driving position.
Adjust the driver's side
outside mirror with the
control lever on the
driver's door.
To adjust your passenger's side mirror, sit in the driver's
seat and have a passenger adjust the mirror for you.
Page 104 of 326

Your vehicle may have a convenience net. Youll see it
just inside the back wall of the trunk.
Put small loads, like grocery bags, behind the net. It can
help keep t")
2-41 Convenience Net (If Equipped)
Your vehicle may have a convenience net. You'll see it
just inside the back wall of the trunk.
Put small loads, like grocery bags, behind the net. It can
help keep them from falling over during sharp turns or
quick starts and stops.
The net isn't for larger, heavier loads. Store them in the
trunk as far forward as you can.
You can unhook the net so that it will lie flat when
you're not using it.
Ashtray and Lighter
The ashtray is located at the lower part of the center of
the instrument panel. To remove the ashtray for cleaning,
pull up on the metal tab and pull the bin out.
NOTICE:
Don't put papers and other things that burn
into your ashtrays. If you do, cigarettes or
other smoking materials could set them on fire,
causing damage.
The lighter is located above the ashtray. To use it, just
push it in all the way and let go. When it's ready, it will
pop back by itself.
NOTICE:
Don't hold a cigarette lighter in with your hand
while it is heating. If you do, it won't be able to
back away from the heating element when it's
ready. That can make it overheat, damaging the
lighter and the heating element.
Page 108 of 326
2-45
The main components of your instrument panel are:
A. Instrument Panel Brightness Control
B. Fog Lamp Switch (If Equipped)
C. Turn Signal Multifunction Lever
D. Cruise Control Switches (If Equipped)
E. Instrument Cluster
F. Windshield Wiper/Washer Lever
G. Ignition Switch
H. Hazard Switch
I. Fuse Panels
J. Climate Control SystemK. Accessory Power Outlet
L. Ashtray
M. Lighter
N. Audio System
O. Horn
P. Parking Brake
Q. Tilt Wheel Lever
R. Hood Release
S. Remote Trunk Release Switch
T. Instrument Panel Cupholder
Page 171 of 326
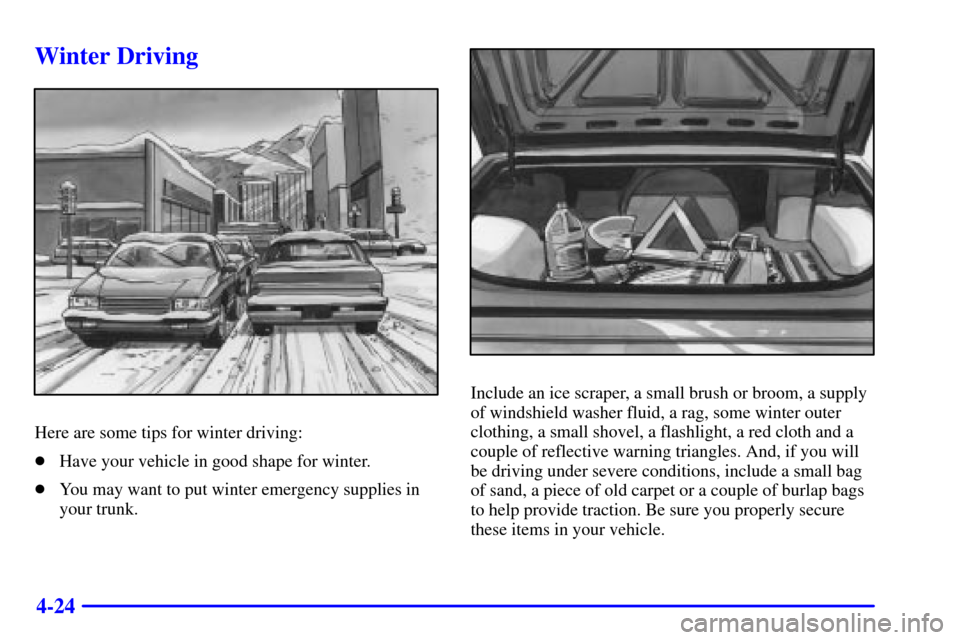
4-24
Winter Driving
Here are some tips for winter driving:
�Have your vehicle in good shape for winter.
�You may want to put winter emergency supplies in
your trunk.
Include an ice scraper, a small brush or broom, a supply
of windshield washer fluid, a rag, some winter outer
clothing, a small shovel, a flashlight, a red cloth and a
couple of reflective warning triangles. And, if you will
be driving under severe conditions, include a small bag
of sand, a piece of old carpet or a couple of burlap bags
to help provide traction. Be sure you properly secure
these items in your vehicle.
Page 177 of 326

4-30
Loading Your Vehicle
Two labels on your vehicle show how much weight it
may properly carry. The Tire
-Loading Information
label found on the rear edge of the driver's side rear
passenger door tells you the proper size, speed rating
and recommended inflation pressures for the tires on your
vehicle. It also gives you important information about
the number of people that can be in your vehicle and the
total weight that you can carry. This weight is called the
Vehicle Capacity Weight, and includes the weight of all
occupants, cargo and all nonfactory
-installed options.
The other label is the Certification label, found on
the rear edge of the driver's side door. It tells you the
gross weight capacity of your vehicle, called the Gross
Vehicle Weight Rating (GVWR). The GVWR includes
the weight of the vehicle, all occupants, fuel and cargo.
Never exceed the GVWR for your vehicle, or the Gross
Axle Weight Rating (GAWR) for either the front or
rear axle.
And, if you do have a heavy load, you should spread
it out. Don't carry more than 132 lbs. (60 kg) in
your trunk.
Page 178 of 326
4-31
CAUTION:
Do not load your vehicle any heavier than the
GVWR, or either the maximum front or rear
GAWR. If you do, parts on your vehicle can
break, and it can change the way your vehicle
handles. These could cause you to lose control
and crash. Also, overloading can shorten the life
of your vehicle.
CAUTION:
Things you put inside your vehicle can strike
and injure people in a sudden stop or turn, or
in a crash.
�Put things in the trunk of your vehicle.
In a trunk, put them as far forward as you
can. Try to spread the weight evenly.
�Never stack heavier things, like suitcases,
inside the vehicle so that some of them are
above the tops of the seats.
�Don't leave an unsecured child restraint
in your vehicle.
�When you carry something inside the
vehicle, secure it whenever you can.
�Don't leave a seat folded down unless you
need to.
Page 205 of 326
5-19 Removing the Spare Tire and Tools
The equipment you'll need
is in the trunk. Turn the
center retainer nut on the
compact spare cover
counterclockwise to
remove it.
Lift and remove the cover. (See ªCompact Spare Tireº
later in this section for more information about the
compact spare.) You will find the jacking instructions
label on the underside of the tire cover.
Turn the wing nut
counterclockwise and
remove it. Then lift off
the adapter and remove
the spare tire.
Remove the jack and wrench from the trunk. Your
vehicle's jack and wrench are stored in a foam tray.

C. Turn Signal Multifunction Lever
D. Cruise Control Switches (If Equippe")