Page 212 of 365
yellowblue
4-29
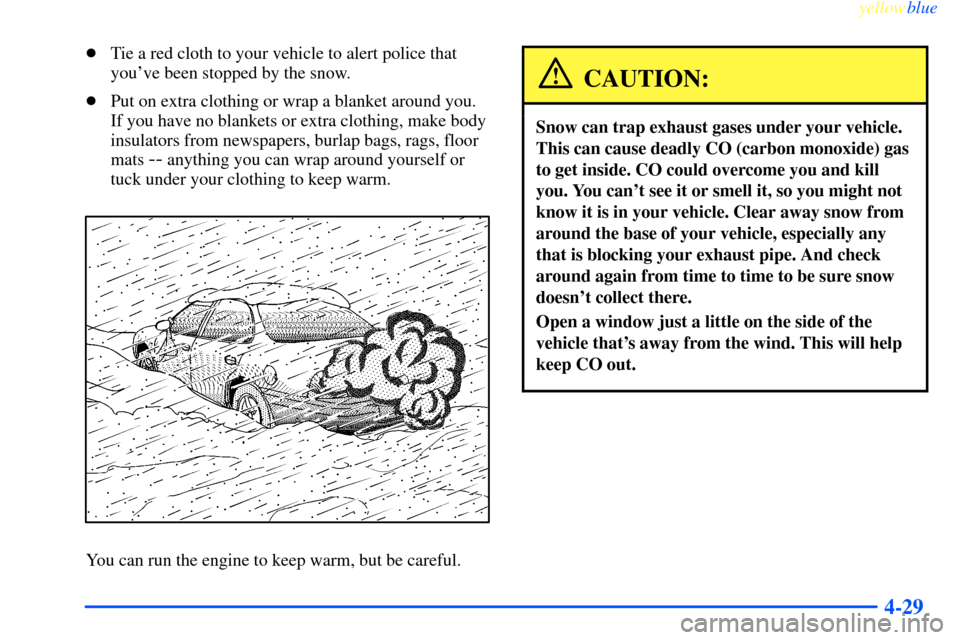
�Tie a red cloth to your vehicle to alert police that
you've been stopped by the snow.
�Put on extra clothing or wrap a blanket around you.
If you have no blankets or extra clothing, make body
insulators from newspapers, burlap bags, rags, floor
mats
-- anything you can wrap around yourself or
tuck under your clothing to keep warm.
You can run the engine to keep warm, but be careful.
CAUTION:
Snow can trap exhaust gases under your vehicle.
This can cause deadly CO (carbon monoxide) gas
to get inside. CO could overcome you and kill
you. You can't see it or smell it, so you might not
know it is in your vehicle. Clear away snow from
around the base of your vehicle, especially any
that is blocking your exhaust pipe. And check
around again from time to time to be sure snow
doesn't collect there.
Open a window just a little on the side of the
vehicle that's away from the wind. This will help
keep CO out.
Page 220 of 365

yellowblue
4-37 Making Turns
NOTICE:
Making very sharp turns while trailering could
cause the trailer to come in contact with the
vehicle. Your vehicle could be damaged. Avoid
making very sharp turns while trailering.
When you're turning with a trailer, make wider turns than
normal. Do this so your trailer won't strike soft shoulders,
curbs, road signs, trees or other objects. Avoid jerky or
sudden maneuvers. Signal well in advance.
Turn Signals When Towing a Trailer
When you tow a trailer, your vehicle may need a different
turn signal flasher and/or extra wiring. Check with your
dealer. The arrows on your instrument panel will flash
whenever you signal a turn or lane change. Properly
hooked up, the trailer lamps will also flash, telling other
drivers you're about to turn, change lanes or stop.When towing a trailer, the arrows on your instrument
panel will flash for turns even if the bulbs on the trailer
are burned out. Thus, you may think drivers behind you
are seeing your signal when they are not. It's important
to check occasionally to be sure the trailer bulbs are
still working.
Driving On Grades
Reduce speed and shift to a lower gear before you start
down a long or steep downgrade. If you don't shift
down, you might have to use your brakes so much that
they would get hot and no longer work well.
On a long uphill grade, shift down and reduce your
speed to around 45 mph (70 km/h) to reduce the
possibility of engine and transaxle overheating.
If you have overdrive, you may want to drive in
THIRD (3), instead of AUTOMATIC
OVERDRIVE (�).
Page 221 of 365

yellowblue
4-38 Parking on Hills
CAUTION:
You really should not park your vehicle, with a
trailer attached, on a hill. If something goes
wrong, your rig could start to move. People can
be injured, and both your vehicle and the trailer
can be damaged.
But if you ever have to park your rig on a hill, here's
how to do it:
1. Apply your regular brakes, but don't shift into
PARK (P) yet.
2. Have someone place chocks under the trailer wheels.
3. When the wheel chocks are in place, release the
regular brakes until the chocks absorb the load.
4. Reapply the regular brakes. Then apply your parking
brake, and then shift to PARK (P).
5. Release the regular brakes.
When You Are Ready to Leave After
Parking on a Hill
1. Apply your regular brakes and hold the pedal down
while you:
�Start your engine;
�Shift into a gear; and
�Release the parking brake.
2. Let up on the brake pedal.
3. Drive slowly until the trailer is clear of the chocks.
4. Stop and have someone pick up and store the chocks.
Maintenance When Trailer Towing
Your vehicle will need service more often when you're
pulling a trailer. See the Maintenance Schedule for more
on this. Things that are especially important in trailer
operation are automatic transaxle fluid (don't overfill),
engine oil, drive belts, cooling system and brake system.
Each of these is covered in this manual, and the Index will
help you find them quickly. If you're trailering, it's a good
idea to review this information before you start your trip.
Check periodically to see that all hitch nuts and bolts are tight.
Engine Cooling When Trailer Towing
Your cooling system may temporarily overheat during
severe operating conditions. See ªEngine Overheatingº
in the Index.
Page 227 of 365
yellowblue
5-6
5. Check that the jumper cables don't have loose or
missing insulation. If they do, you could get a shock.
The vehicles could be damaged, too.
Before you connect the cables, here are some basic
things you should know. Positive (+) will go to
positive (+) and negative (
-) will go to an unpainted
metal engine part. Don't connect positive (+) to
negative (
-), or you'll get a short that would damage
the battery and maybe other parts, too.
CAUTION:
Fans or other moving engine parts can injure you
badly. Keep your hands away from moving parts
once the engine is running.6. Connect the red positive (+) cable to the positive (+)
terminal of the vehicle with the dead battery. Use a
remote positive (+) terminal if the vehicle has one.
Page 235 of 365

yellowblue
5-14
If the coolant inside the coolant recovery tank is boiling,
don't do anything else until it cools down.
When the engine is cold, the coolant level should be at
or above the COLD mark on the coolant recovery tank.
To check the coolant level, look for the COLD mark on
the side of the coolant recovery tank that faces the
engine. Check to make sure that the coolant level is up
to the COLD fill level on the side of the coolant
recovery tank. If it isn't, you may have a leak in the
radiator hoses, heater hoses, radiator, water pump or
somewhere else in the cooling system.
CAUTION:
Heater and radiator hoses, and other engine
parts, can be very hot. Don't touch them.
If you do, you can be burned.
Don't run the engine if there is a leak. If you run
the engine, it could lose all coolant. That could
cause an engine fire, and you could be burned.
Get any leak fixed before you drive the vehicle.
NOTICE:
Engine damage from running your engine
without coolant isn't covered by your warranty.
See ªOverheated Engine Protection Operating
Modeº in the Index.
Page 236 of 365
 coolant.
If coolant other than DEX-COOL is added to
the system, premature engine, heate")
yellowblue
5-15
NOTICE:
When adding coolant, it is important that you
use only DEX
-COOL� (silicate-free) coolant.
If coolant other than DEX-COOL is added to
the system, premature engine, heater core or
radiator corrosion may result. In addition, the
engine coolant will require change sooner
-- at
30,000 miles (50 000 km) or 24 months,
whichever occurs first. Damage caused by the
use of coolant other than DEX
-COOL� is not
covered by your new vehicle warranty.
If there seems to be no leak, with the engine on, check to
see if the electric engine cooling fans are running. If the
engine is overheating, both fans should be running. If
they aren't, your vehicle needs service.
How to Add Coolant to the Coolant
Recovery Tank
If you haven't found a problem yet, but the coolant level
isn't at the COLD mark, add a 50/50 mixture of clean,
drinkable water and DEX
-COOL� engine coolant at the
coolant recovery tank. (See ªEngine Coolantº in the
Index for more information.)
CAUTION:
Adding only plain water to your cooling system
can be dangerous. Plain water, or some other
liquid like alcohol, can boil before the proper
coolant mixture will. Your vehicle's coolant
warning system is set for the proper coolant
mixture. With plain water or the wrong mixture,
your engine could get too hot but you wouldn't
get the overheat warning. Your engine could
catch fire and you or others could be burned.
Use a 50/50 mixture of clean, drinkable water
and DEX
-COOL� coolant.
Page 244 of 365

yellowblue
5-23
12. Then replace the pressure cap. At any time during
this procedure if coolant begins to flow out of the
filler neck, reinstall the pressure cap. Be sure the
arrows on the pressure cap line up like this.
13. Check the coolant in the recovery tank. The level in
the coolant recovery tank should be at the HOT
mark when the engine is hot or at the COLD mark
when the engine is cold.
If a Tire Goes Flat
It's unusual for a tire to ªblow outº while you're driving,
especially if you maintain your tires properly. If air goes
out of a tire, it's much more likely to leak out slowly.
But if you should ever have a ªblowout,º here are a few
tips about what to expect and what to do:
If a front tire fails, the flat tire will create a drag that
pulls the vehicle toward that side. Take your foot off the
accelerator pedal and grip the steering wheel firmly.
Steer to maintain lane position, and then gently brake to
a stop well out of the traffic lane.
A rear blowout, particularly on a curve, acts much like a
skid and may require the same correction you'd use in a
skid. In any rear blowout, remove your foot from the
accelerator pedal. Get the vehicle under control by
steering the way you want the vehicle to go. It may be
very bumpy and noisy, but you can still steer. Gently
brake to a stop
-- well off the road if possible.
If a tire goes flat, the next part shows how to use your
jacking equipment to change a flat tire safely.
Page 258 of 365

6-
yellowblue
6-1
Section 6 Service and Appearance Care
Here you will find information about the care of your vehicle. This section begins with service and fuel information,
and then it shows how to check important fluid and lubricant levels. There is also technical information about your
vehicle, and a part devoted to its appearance care.
6
-2 Service
6
-3 Fuel
6
-5 Fuels in Foreign Countries
6
-6 Filling Your Tank
6
-8 Filling a Portable Fuel Container
6
-8 Checking Things Under the Hood
6
-12 Engine Oil
6
-18 Engine Air Cleaner/Filter
6
-20 Automatic Transaxle Fluid
6
-23 Engine Coolant
6
-27 Radiator Pressure Cap
6
-27 Power Steering Fluid
6
-28 Windshield Washer Fluid
6
-30 Brakes
6
-33 Battery6
-34 Bulb Replacement
6
-42 Windshield Wiper Blade Replacement
6
-43 Tires
6
-52 Appearance Care
6
-53 Cleaning the Inside of Your Vehicle
6
-55 Care of Safety Belts
6
-56 Cleaning the Outside of Your Vehicle
6
-58 Finish Damage
6
-59 GM Vehicle Care/Appearance Materials
6
-60 Vehicle Identification Number (VIN)
6
-60 Service Parts Identification Label
6
-60 Electrical System
6
-68 Replacement Bulbs
6
-68 Capacities and Specifications
6
-69 Normal Maintenance Replacement Parts