Page 240 of 391
5-19
Changing a Flat Tire
If a tire goes flat, avoid further tire and wheel damage
by driving slowly to a level place. Turn on your hazard
warning flashers.
CAUTION:
Changing a tire can cause an injury. The vehicle
can slip off the jack and roll over you or other
people. You and they could be badly injured.
Find a level place to change your tire. To help
prevent the vehicle from moving:
1. Set the parking brake firmly.
2. Put the shift lever in PARK (P).
3. Turn off the engine.
4. Put the wheel blocks at the front and
rear of the tire farthest away from the
one being changed. That would be the
tire on the other side of the vehicle, at
the opposite end.The following steps will tell you how to use the jack and
change a tire.
Page 251 of 391
5-30
CAUTION:
Incorrect wheel nuts or improperly tightened
wheel nuts can cause the wheel to become loose
and even come off. This could lead to an accident.
Be sure to use the correct wheel nuts. If you have
to replace them, be sure to get new GM original
equipment wheel nuts.
Stop somewhere as soon as you can and have
the nuts tightened with a torque wrench to
100 lb
-ft (140 N´m).
NOTICE:
Improperly tightened wheel nuts can lead to
brake pulsation and rotor damage. To avoid
expensive brake repairs, evenly tighten the wheel
nuts in the proper sequence and to the proper
torque specification.
13. Remove the wheel blocks.
NOTICE:
Wheel covers won't fit on your compact spare.
If you try to put a wheel cover on your compact
spare, you could damage the cover or the spare.
Page 256 of 391

6-
6-1
Section 6 Service and Appearance Care
Here you will find information about the care of your vehicle. This section begins with service and fuel information,
and then it shows how to check important fluid and lubricant levels. There is also technical information about your
vehicle, and a part devoted to its appearance care.
6
-2 Service
6
-3 Fuel
6
-5 Filling Your Tank
6
-7 Filling a Portable Fuel Container
6
-8 Checking Things Under the Hood
6
-11 Engine Oil
6
-15 Engine Cover
6
-19 Engine Air Cleaner/Filter
6
-20 Automatic Transmission Fluid
6
-24 All-Wheel Drive
6
-25 Rear Axle
6
-26 Engine Coolant
6
-29 Radiator Pressure Cap
6
-30 Power Steering Fluid
6
-31 Windshield Washer Fluid
6
-32 Brakes6
-35 Battery
6
-36 Bulb Replacement
6
-42 Windshield Wiper Blade Replacement
6
-43 Tires
6
-51 Appearance Care
6
-51 Cleaning the Inside of Your Vehicle
6
-54 Cleaning the Outside of Your Vehicle
6
-56 Cleaning Tires
6
-57 Finish Damage
6
-57 Underbody Maintenance
6
-58 GM Vehicle Care/Appearance Materials
6
-59 Vehicle Identification Number (VIN)
6
-59 Service Parts Identification Label
6
-60 Electrical System
6
-68 Capacities and Specifications
6
-69 Normal Maintenance Replacement Parts
Page 263 of 391
6-8
Checking Things Under the Hood
CAUTION:
Things that burn can get on hot engine parts and
start a fire. These include liquids like fuel, oil,
coolant, brake fluid, windshield washer and other
fluids, and plastic or rubber. You or others could
be burned. Be careful not to drop or spill things
that will burn onto a hot engine.
Hood Release
To open the hood, first pull the handle located inside the
vehicle on the lower driver's side of the kick panel.
Page 265 of 391
6-10
When you open the hood, this is what you will see:
A. Windshield Washer Fluid Fill Location
B. Coolant Fill Location
C. Oil Dipstick Location
D. Transmission Dipstick/Fill Location
E. Engine Air Cleaner/FilterF. Engine Oil Fill Location
G. Brake Master Cylinder Reservoir
H. Power Steering Fluid Reservoir
I. Battery
Page 277 of 391
6-22
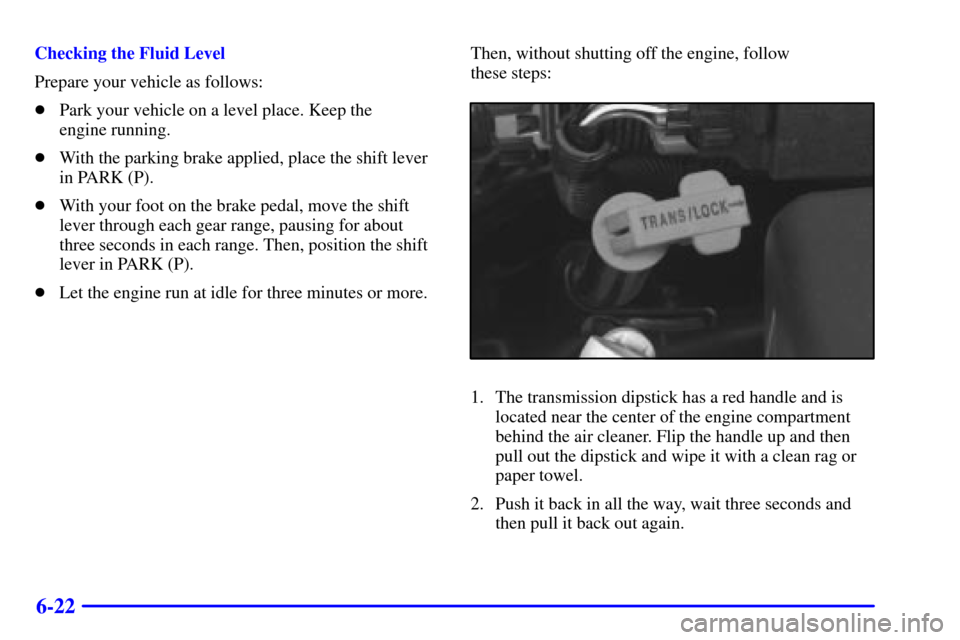
Checking the Fluid Level
Prepare your vehicle as follows:
�Park your vehicle on a level place. Keep the
engine running.
�With the parking brake applied, place the shift lever
in PARK (P).
�With your foot on the brake pedal, move the shift
lever through each gear range, pausing for about
three seconds in each range. Then, position the shift
lever in PARK (P).
�Let the engine run at idle for three minutes or more.Then, without shutting off the engine, follow
these steps:
1. The transmission dipstick has a red handle and is
located near the center of the engine compartment
behind the air cleaner. Flip the handle up and then
pull out the dipstick and wipe it with a clean rag or
paper towel.
2. Push it back in all the way, wait three seconds and
then pull it back out again.
Page 287 of 391

6-32
Brakes
Brake Fluid
Your brake master cylinder reservoir is here. It is filled
with DOT
-3 brake fluid.
There are only two reasons why the brake fluid level in the
reservoir might go down. The first is that the brake fluid
goes down to an acceptable level during normal brake
lining wear. When new linings are put in, the fluid level
goes back up. The other reason is that fluid is leaking out of the brake
system. If it is, you should have your brake system fixed,
since a leak means that sooner or later your brakes won't
work well, or won't work at all.
So, it isn't a good idea to ªtop offº your brake fluid.
Adding brake fluid won't correct a leak. If you add fluid
when your linings are worn, then you'll have too much
fluid when you get new brake linings. You should add
(or remove) brake fluid, as necessary, only when work is
done on the brake hydraulic system.
CAUTION:
If you have too much brake fluid, it can spill on the
engine. The fluid will burn if the engine is hot
enough. You or others could be burned, and your
vehicle could be damaged. Add brake fluid only
when work is done on the brake hydraulic system.
Refer to the Maintenance Schedule to determine when to
check your brake fluid. See ªPeriodic Maintenance
Inspectionsº in the Index.
Page 288 of 391
6-33
Checking Brake Fluid
You can check the brake fluid without taking off the cap.
Just look at the brake fluid reservoir. The fluid level
should be above MIN. If it isn't, have your brake system
checked to see if there is a leak.
After work is done on the brake hydraulic system, make
sure the level is above the MIN but not over the
MAX mark.What to Add
When you do need brake fluid, use only DOT
-3 brake
fluid. Refer to ªRecommended Fluids and Lubricantsº
in the Index. Use new brake fluid from a sealed
container only.
Always clean the brake fluid reservoir cap and the area
around the cap before removing it. This will help keep
dirt from entering the reservoir.
CAUTION:
With the wrong kind of fluid in your brake
system, your brakes may not work well, or they
may not even work at all. This could cause a
crash. Always use the proper brake fluid.