Page 147 of 359

2-87
TRACTION OFF - 89: This message will be displayed
after the traction control has been turned off by the
button on the center console.
TRACTION READY
- 90: This message informs
the driver that the traction control system is available.
This occurs when the traction control switch on the
console has been returned to ON (pressing the button
once turns the traction control system off: pressing the
button again turns the system back on). This message
will automatically disappear from the display after
five seconds.
TRACTION SUSPENDED
- 56: This message
displays when the traction control system has been
temporarily shut off because your vehicle's brakes
have overheated. This message does not indicate a
problem with your vehicle's traction control system.
After a few minutes, the traction control system will be
available again and the TRACTION READY message
will appear.TRANS HOT IDLE ENGINE
- 112: This message
indicates that the transaxle fluid in your vehicle is too
hot. Stop and allow your vehicle to idle until it cools
down or until this message is removed.
TRUNK OPEN
- 24: This message indicates that the
trunk is open when the ignition is on.
TURN SIGNAL ON
- 20: This message is a reminder,
after driving about a mile, that you have the turn signal
on. A multiple chime will also sound when this message
is displayed.
VEHICLE OVERSPEED
- 52: This message is
displayed when the vehicle speed exceeds a certain limit
as required by some export countries. A continuous
chime will also sound when this message is displayed.
Page 200 of 359

3-46
While performing the information update, the radio will
temporarily disable the RDS buttons. The RDS buttons
will be enabled again once the update is completed.
When the radio begins an update, the information
contained in the radio's memory is cleared. If you
perform an immediate update and then quickly cancel it,
NO TEXT AVAILABLE will appear on the display.
Viewing the News/Information
To view the news/information, press and release the
INFO button. The radio will display TOPIC: ALL.
The radio will then begin displaying all the received
information at a rate of approximately three seconds
per display. You can page through the topics at a faster
rate by pressing and releasing the INFO button after
the text appears.
You can access a topic directly from the TOPIC: ALL
display by pressing and releasing the INFO button until
the desired topic is displayed. The radio will display the
information for that topic only.
If the radio has not received any information, NO TEXT
AVAILABLE will appear on the display. This will be
followed by the UPDATE NOW? PRESS RDM display
previously described.
Vehicle Control
Your radio can provide you with safety and convenience
features by performing the following vehicle control actions:
�Unlocking or locking the doors,
�opening the trunk,
�flashing the parking lights and
�sounding the horn.
If you need one of these services, contact the OnStar
�
service center.
When you turn your vehicle off, the radio will
automatically tune to your FM provider's station and
check for a vehicle control request received through
RDS. Your vehicle control request will be completed in
five minutes or less if your vehicle is in the continental
United States and in a location that can receive
FM broadcasts.
Vehicle control is available for six days from the time
you last turned off your vehicle. This time can be
increased up to 11 days by turning off the automatic
information updates as described previously. This would
be useful if you are going to be away from your vehicle
for an extended period of time.
For more information see OnStar in the Index.
Page 235 of 359
4-25
Winter Driving
Here are some tips for winter driving:
�Have your vehicle in good shape for winter.
�You may want to put winter emergency supplies in
your trunk.
Include an ice scraper, a small brush or broom, a supply
of windshield washer fluid, a rag, some winter outer
clothing, a small shovel, a flashlight, a red cloth and a
couple of reflective warning triangles. And, if you will
be driving under severe conditions, include a small bag
of sand, a piece of old carpet or a couple of burlap bags
to help provide traction. Be sure you properly secure
these items in your vehicle.
Page 240 of 359
4-30
The other label is the Certification label, found on
the rear edge of the driver's door. It tells you the
gross weight capacity of your vehicle, called the Gross
Vehicle Weight Rating (GVWR). The GVWR includes
the weight of the vehicle, all occupants, fuel and cargo.
Never exceed the GVWR for your vehicle, or the Gross
Axle Weight Rating (GAWR) for either the front or
rear axle.If you do have a heavy load, you should spread it out.
Don't carry more than 176 lbs. (80 kg) in your trunk.
CAUTION:
Do not load your vehicle any heavier than the
GVWR, or either the maximum front or rear
GAWR. If you do, parts on your vehicle can
break, and it can change the way your vehicle
handles. These could cause you to lose control
and crash. Also, overloading can shorten the life
of your vehicle.
NOTICE:
Your warranty does not cover parts or
components that fail because of overloading.
Page 241 of 359

4-31
If you put things inside your vehicle -- like suitcases,
tools, packages, or anything else
-- they will go as fast
as the vehicle goes. If you have to stop or turn quickly,
or if there is a crash, they'll keep going.
CAUTION:
Things you put inside your vehicle can strike
and injure people in a sudden stop or turn,
or in a crash.
�Put things in the trunk of your vehicle. In a
trunk, put them as far forward as you can.
Try to spread the weight evenly.
�Never stack heavier things, like suitcases,
inside the vehicle so that some of them are
above the tops of the seats.
�Don't leave an unsecured child restraint in
your vehicle.
�When you carry something inside the
vehicle, secure it whenever you can.
Electronic Level Control
This feature keeps the rear of your vehicle level as the
load changes. It's automatic
-- you don't need to
adjust anything.
Towing a Trailer
CAUTION:
If you don't use the correct equipment and drive
properly, you can lose control when you pull a
trailer. For example, if the trailer is too heavy,
the brakes may not work well
-- or even at all.
You and your passengers could be seriously
injured. You may also damage your vehicle; the
resulting repairs would not be covered by your
warranty. Pull a trailer only if you have followed
all the steps in this section. Ask your dealer for
advice and information about towing a trailer
with your vehicle.
Page 267 of 359
5-19 Removing the Spare Tire and Tools
The equipment you'll need is in the trunk. (Instructions
for changing your tires are on the inside of the tire cover.)
1. Lift the tire cover to gain access to the spare tire
and jacking equipment. To do this:
Press the area at the front
of the handle so that the
back edge raises.
Grab the handle and
remove the cover.
Page 268 of 359
5-20
2. Unscrew the wing nuts to remove the container that
holds the wrench and jack.
3. Remove the wheel wrench, jack and the spare tire
from the trunk. See ªCompact Spare Tireº later in this
section for more information about the compact spare.
The tools you'll be using include the jack (A) and the
wheel wrench (B).
Removing the Wheel Cover
SLS Wheel Shown
On the SLS, there is a center wheel cover on the aluminum
wheel. Using the flat end of the wheel wrench, gently pry
the wheel cover off. Be careful not to scratch the aluminum
wheel edge and don't try to remove it with your hands.
On the STS, the wheel nuts and wheel nut covers are
exposed. Use the wheel wrench to remove the wheel
nut covers.
Page 273 of 359

5-25
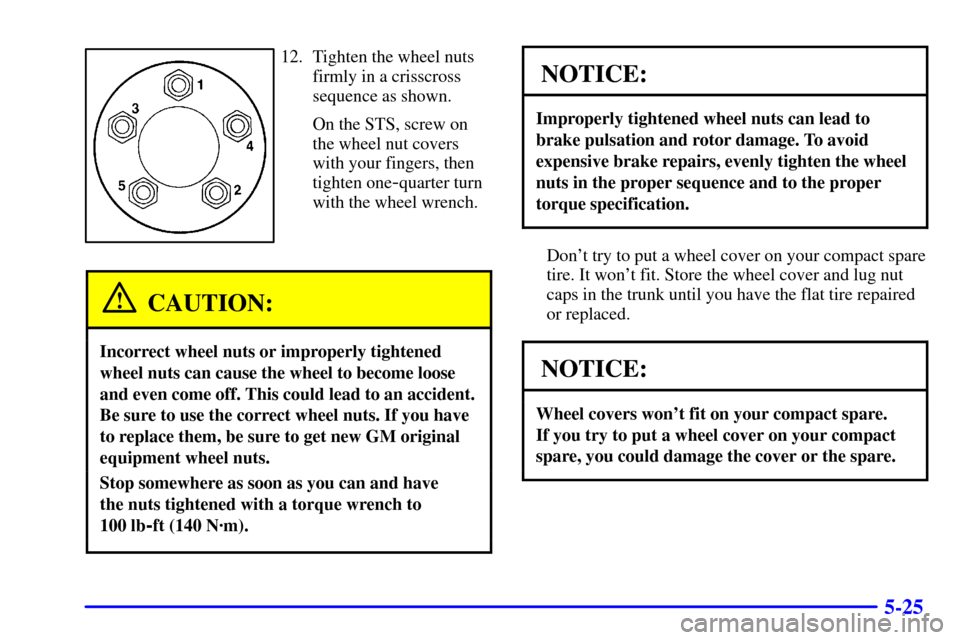
12. Tighten the wheel nuts
firmly in a crisscross
sequence as shown.
On the STS, screw on
the wheel nut covers
with your fingers, then
tighten one
-quarter turn
with the wheel wrench.
CAUTION:
Incorrect wheel nuts or improperly tightened
wheel nuts can cause the wheel to become loose
and even come off. This could lead to an accident.
Be sure to use the correct wheel nuts. If you have
to replace them, be sure to get new GM original
equipment wheel nuts.
Stop somewhere as soon as you can and have
the nuts tightened with a torque wrench to
100 lb
-ft (140 N´m).
NOTICE:
Improperly tightened wheel nuts can lead to
brake pulsation and rotor damage. To avoid
expensive brake repairs, evenly tighten the wheel
nuts in the proper sequence and to the proper
torque specification.
Don't try to put a wheel cover on your compact spare
tire. It won't fit. Store the wheel cover and lug nut
caps in the trunk until you have the flat tire repaired
or replaced.
NOTICE:
Wheel covers won't fit on your compact spare.
If you try to put a wheel cover on your compact
spare, you could damage the cover or the spare.