Page 5 of 385
iv
Fuel
Checking Fluids and Lubricants
Passenger Compartment Air Filter (If Equipped)
Bulb Replacement
Windshield Wiper Blade ReplacementTires and Wheels
Appearance Care
Electrical System/Fuses and Circuit Breakers
Capacities and Specifications
Normal Maintenance Replacement Parts
Table of Contents (cont'd)
Maintenance Schedule Service and Appearance Care
Section
6
Scheduled Maintenance
Periodic Maintenance InspectionsRecommended Fluids and Lubricants
Maintenance Records
See separate Maintenance Schedule Booklet
Page 10 of 385
ix
For example,
these symbols
are used on an
original battery:
CAUTION
POSSIBLE
INJURY
PROTECT
EYES BY
SHIELDING
CAUSTIC
BATTERY
ACID COULD
CAUSE
BURNS
AVOID
SPARKS OR
FLAMES
SPARK OR
FLAME
COULD
EXPLODE
BATTERY
These symbols
are important
for you and
your passengers
whenever your
vehicle is
driven:
DOOR LOCK
UNLOCK
FASTEN
SEAT
BELTS
POWER
WINDOW
AIR BAG
These symbols
have to do with
your lamps:
MASTER
LIGHTING
SWITCH
TURN
SIGNALS
PARKING
LAMPS
HAZARD
WARNING
FLASHER
DAYTIME
RUNNING
LAMPS
FOG LAMPS
These symbols
are on some of
your controls:
WINDSHIELD
WIPER
WINDSHIELD
WASHER
WINDSHIELD
DEFROSTER
REAR
WINDOW
DEFOGGER
VENTILATING
FAN
These symbols
are used on
warning and
indicator lights:
ENGINE
COOLANT
TEMP
BATTERY
CHARGING
SYSTEM
BRAKE
COOLANT
ENGINE OIL
PRESSURE
ANTI-LOCK
BRAKES
Here are some
other symbols
you may see:
FUSE
LIGHTER
HORN
SPEAKER
FUEL
Vehicle Symbols
These are some of the symbols you may find on your vehicle.
Page 11 of 385
For
a More
Detailed Look at
What's Under the Hood
See Section 6
Tire Pressure
See Section 6
Service Station Guide
Oil Viscosity
Engine Oil
See Section 6
Engine Oil Dipstick
See Section 6Remote Fuel
Door Release
See Section 6
Premium Fuel Recommended
Use unleaded gas only,
91 Octane or higher.
See Section 6
Cooling System
See Section 5
Hood Release
See Section 6
Windshield Washer
Fluid
See Section 6
Spare Tire Pressure
See Section 5
Alternate
Fuel Door Release
See Section 6
Battery
See Section 6
Page 86 of 385

2-17
Testing the Alarm
1. From inside the vehicle, roll down the window, then
get out of the vehicle, keeping the door open.
2. From outside of the vehicle, with the door open, lock
the vehicle using the power door lock or the remote
keyless entry transmitter and close the door.
Wait 30 seconds until the SECURITY light goes off.
3. Reach in and unlock the door using the manual lock
and open the door. The horn will sound and the
headlamps will flash.
If the alarm does not sound when it should, check to see
if the horn works. The horn fuse may be blown. To
replace the fuse, see ªFuses and Circuit Breakersº in the
Index. If the fuse does not need to be replaced, you may
need to have your vehicle serviced.
To reduce the possibility of theft, always activate the
theft
-deterrent system when leaving your vehicle.
Valet Lockout Switch
The valet lockout switch is
located inside the glovebox.
Pushing the VALET lockout switch to ON will disable
the use of the power trunk, fuel door and garage door
openers. Pushing the switch to OFF again will make
these features reusable. Locking the glove box with the
key will also help to secure your vehicle.
The remote keyless entry transmitter cannot be used to
open the trunk or fuel door if the valet lockout switch is
in the ON position. Also, the valet key will not unlock
the glovebox or trunk.
Page 87 of 385

theft
-deterrent system. PASS-Key III is a passive
theft
-deterrent system. This means you d")
2-18
PASS-Key� III
Your vehicle is equipped with the PASS-Key III
(Personalized Automotive Security System)
theft
-deterrent system. PASS-Key III is a passive
theft
-deterrent system. This means you don't have to do
anything different to arm or disarm the system. It works
when you insert or remove the key from the ignition.
Your PASS
-Key III system operates on a radio
frequency subject to Federal Communications
Commission (FCC) Rules and with Industry Canada.
This device complies with Part 15 of the FCC Rules.
Operation is subject to the following two conditions:
(1) this device may not cause harmful interference,
and (2) this device must accept any interference
received, including interference that may cause
undesired operation.
This device complies with RSS
-210 of Industry Canada.
Operation is subject to the following two conditions:
(1) this device may not cause interference, and (2) this
device must accept any interference received, including
interference that may cause undesired operation of
the device.Changes or modifications to this system by other than an
authorized service facility could void authorization to
use this equipment.
PASS
-Key III uses a radio frequency transponder in the
key that matches a decoder in your vehicle.
When the PASS
-Key III system senses that someone is
using the wrong key, it shuts down the vehicle's starter
and fuel systems. The starter will not work and fuel will
stop being delivered to the engine. Anyone using a
trial
-and-error method to start the vehicle will be
discouraged because of the high number of electrical
key codes.
When trying to start the vehicle if the engine does not
start and the SECURITY light comes on, the key may
have a damaged transponder. Turn the ignition off and
try again.
If the engine does not start, and the key appears to be
undamaged, try another ignition key. At this time, you
may also want to check the fuse (see ªFuses and Circuit
Breakersº in the Index). If the engine still does not start
with the other key, your vehicle needs service. If your
vehicle does start, the first key may be faulty. See your
dealer or a locksmith who can service the PASS
-Key III
to have a new key made.
Page 93 of 385
2-24
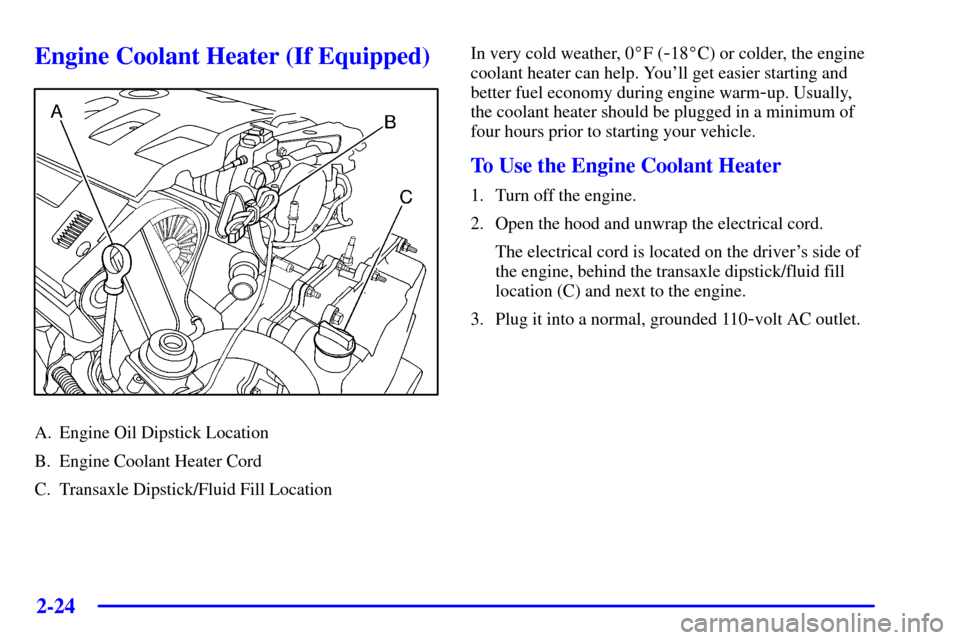
Engine Coolant Heater (If Equipped)
A. Engine Oil Dipstick Location
B. Engine Coolant Heater Cord
C. Transaxle Dipstick/Fluid Fill LocationIn very cold weather, 0�F (
-18�C) or colder, the engine
coolant heater can help. You'll get easier starting and
better fuel economy during engine warm
-up. Usually,
the coolant heater should be plugged in a minimum of
four hours prior to starting your vehicle.
To Use the Engine Coolant Heater
1. Turn off the engine.
2. Open the hood and unwrap the electrical cord.
The electrical cord is located on the driver's side of
the engine, behind the transaxle dipstick/fluid fill
location (C) and next to the engine.
3. Plug it into a normal, grounded 110
-volt AC outlet.
Page 97 of 385
 or NEUTRAL (N) with the engine
racing isnt covered by your warranty.
DRIVE (D): This position is for normal driving. If you
ne")
2-28
NOTICE:
Damage to your transaxle caused by shifting out
of PARK (P) or NEUTRAL (N) with the engine
racing isn't covered by your warranty.
DRIVE (D): This position is for normal driving. If you
need more power for passing, and you're:
�Going less than 35 mph (55 km/h), push the
accelerator pedal about halfway down.
�Going about 35 mph (55 km/h) or more, push the
accelerator all the way down.
The transaxle will shift down to the next gear and
have more power.
NOTICE:
If your vehicle seems to start up rather slowly, or
if it doesn't seem to shift gears as you accelerate,
something may be wrong with a transaxle system
sensor. If you drive very far that way, your
vehicle can be damaged. So if this happens, have
your vehicle serviced right away. Until then, you
can use SECOND (2) when you are driving less
than 35 mph (55 km/h) and DRIVE (D) for
higher speeds.
THIRD (3): This position is also used for normal
driving, however, it offers more power and lower fuel
economy than DRIVE (D).
Here are examples for using THIRD (3) instead of
DRIVE (D).
�When driving on hilly, winding roads.
�When towing a trailer, so there is less shifting
between gears.
�When going down a steep hill.
Page 139 of 385
2-70
Digital Cluster (If Equipped)
The instrument panel cluster is designed to let you know at a glance how your vehicle is running. You'll know how fast you're
going, how much fuel you're using and many of the other things you'll need to know to drive safely and economically.
United States version shown, Canada similar

Bulb Replacement
Windshield Wiper Blade ReplacementTires and Wheels
Appearance Care
Electrical System/Fuses and Ci")


The instrument panel cluster is designed to let you know at a glance how your vehicle is running. Youll know how fast youre
going, how much fuel youre using and m")