Page 4 of 392
Table of Contents
Keys and Door Locks
Remote Keyless Entry System
Trunk Release
Automatic Transmission
Parking Brake
Windows
Tilt Wheel
Turn Signal/Multifunction Lever
Windshield Wipers
Cruise Control
Interior and Exterior LampsMirrors
Storage Compartments
Convenience Net
Auxiliary Power Outlets
OnStar® System (If Equipped)
Sunroof (Option)
HomeLink® Transmitter (If Equipped)
Instrument Panel, Warning Lights and Gages
Head-Up Display (If Equipped)
Driver Information Center (If Equipped)
Personal Choice Features Seats and Seat Controls
Safety BeltsAir Bag Systems
Child Restraints
Section
1
Section
2
Seats and Restraint Systems
Features and Controls
Page 100 of 392
2-35
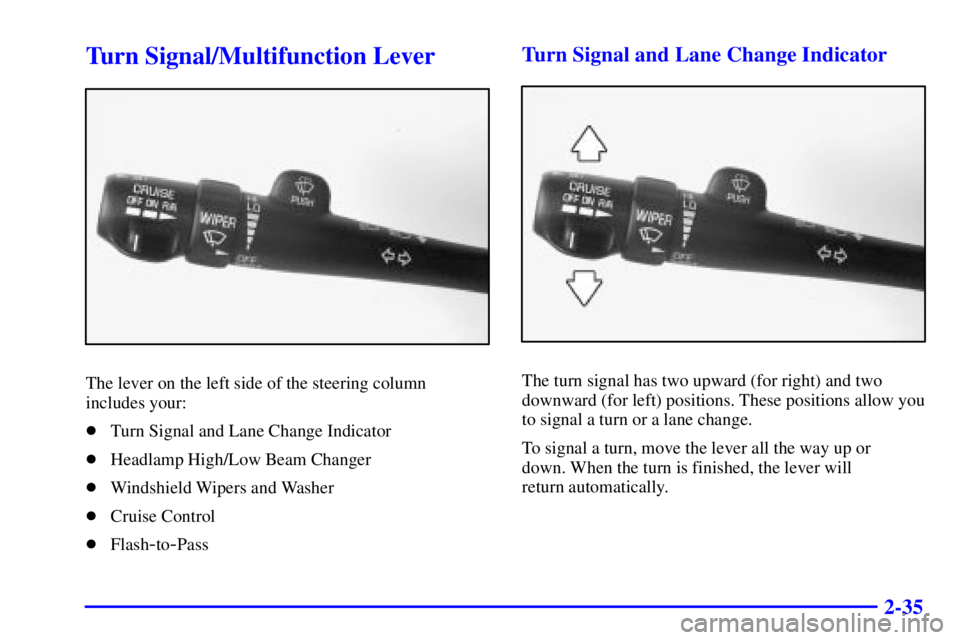
Turn Signal/Multifunction Lever
The lever on the left side of the steering column
includes your:
�Turn Signal and Lane Change Indicator
�Headlamp High/Low Beam Changer
�Windshield Wipers and Washer
�Cruise Control
�Flash
-to-Pass
Turn Signal and Lane Change Indicator
The turn signal has two upward (for right) and two
downward (for left) positions. These positions allow you
to signal a turn or a lane change.
To signal a turn, move the lever all the way up or
down. When the turn is finished, the lever will
return automatically.
Page 102 of 392

2-37 Flash-to-Pass Feature
This feature lets you use your high-beam headlamps to
signal a driver in front of you that you want to pass.
It works even if your headlamps are off.
To use it, pull the turn signal lever toward you,
but not so far that you hear a click.
If your headlamps are off or on low beam, your
high
-beam headlamps will turn on. They'll stay on
as long as you hold the lever toward you and the
high
-beam indicator on the dash will come on.
Release the lever to turn the high
-beam headlamps off.
Windshield Wipers
You control the windshield wipers by turning the band
marked WIPER.
For a single wiping cycle, turn the band to MIST.
Hold it there until the wipers start, then let go.
The wipers will stop after one cycle. If you want more
cycles, hold the band on MIST longer.
Use the delay position to set the wiper speed for a long
or short delay between wipes. This can be very useful
in light rain or snow. Turn the band to choose the
delay time. The closer to LO, the shorter the delay
between wipes.
For steady wiping at low speed, turn the band away
from you to the LO position. For high
-speed wiping,
turn the band further, to HI. To stop the wipers,
turn the band to OFF.
Remember that damaged wiper blades may prevent you
from seeing well enough to drive safely. To avoid
damage, be sure to clear ice and snow from the wiper
blades before using them. If they're frozen to the
windshield, carefully loosen or thaw them. If your
blades become damaged, get new blades or
blade inserts.
Heavy snow or ice can overload your wiper motor.
A circuit breaker will stop the motor until it cools.
Clear away snow or ice to prevent an overload.
Page 103 of 392

The moisture sensor is mounted on the passengers
interior side of the windshield behind the rearview
mirror and is used to automatically o")
2-38
Moisture-Sensing Delay Windshield Wipers
(If Equipped)
The moisture sensor is mounted on the passenger's
interior side of the windshield behind the rearview
mirror and is used to automatically operate the
wipers by monitoring the amount of moisture on
the windshield.The moisture
-sensing system is activated by turning the
wiper control band to one of the five sensitivity levels
within the delay area. The delay position closest to
OFF/MIST is the lowest sensitivity setting. This allows
more water to collect on the windshield between wipes.
You can increase the sensitivity of the system and the
frequency of wipes by turning the wiper control band
away from you to the other delay settings. A single wipe
will occur each time you turn the wiper control band to a
higher sensitivity level.
An initial wipe will occur when you turn the ignition on
and the wiper switch is left in one of the sensitivity
settings, as a reminder that the rain sense feature is active.
The moisture
-sensing wipers operate in a delay mode as
well as a continuous low or high speed, depending on the
amount of moisture on the windshield and the sensitivity
setting. The MIST and wash cycles operate as normal and
are not affected by the moisture
-sensing function.
NOTICE:
Turn the wiper band to OFF to avoid wiper damage
when going through an automatic car wash.
Page 104 of 392

2-39
It is important to note that the moisture-sensing delay
wiping feature can be overridden at any time by
manually turning the wiper band to LO or HI speed.
If the windshield on your vehicle ever needs
replacement, make sure that the new windshield is
moisture
-sensing delay compatible.
Windshield Washer
At the top of the multifunction lever there is a paddle
with the word PUSH on it. For ªprogrammedº
operation, press and release the paddle. The washer will
provide a measured amount of fluid to the windshield
and the wiper will either stop or return to your original
wiping speed. For ªdemandº operation, press and hold
the paddle for at least two seconds. Release the paddle
when you have enough fluid and the wipers will either
stop or return to your original wiping speed.
CAUTION:
In freezing weather, don't use your washer until
the windshield is warmed. Otherwise the washer
fluid can form ice on the windshield, blocking
your vision.
If your vehicle is equipped with a DIC, a WINDSHIELD
WASHER FLUID LOW message will appear on the
display when the vehicle is low on washer fluid.
Cruise Control
With cruise control, you can maintain a speed of about
25 mph (40 km/h) or more without keeping your foot on
the accelerator. This can really help on long trips.
Cruise control does not work at speeds below about
25 mph (40 km/h).
When you apply your brakes, the cruise control
shuts off.
Page 307 of 392
6-45
7. Turn the bulb socket
one
-quarter turn
counterclockwise and
pull it out. You can use
pliers to remove the
bulb socket if you are
unable to do it by hand.
8. Once the socket has
been removed, pull
the bulb straight out
to remove it from
the socket.
9. Reverse the above steps to reinstall the
taillamp assembly.
Windshield Wiper Blade Replacement
Windshield wiper blades should be inspected at least
twice a year for wear or cracking. See ªWiper Blade
Checkº in the Index for more information.
Replacement blades come in different types and are
removed in different ways.
To replace the wiper blade assembly:
1. Position the wipers on the windshield in the ªmidº
wipe position.
2. Lift the windshield wiper arm away from the
windshield. The windshield wiper does not have a
locking upright position feature.