Page 100 of 392
2-35
Turn Signal/Multifunction Lever
The lever on the left side of the steering column
includes your:
�Turn Signal and Lane Change Indicator
�Headlamp High/Low Beam Changer
�Windshield Wipers and Washer
�Cruise Control
�Flash
-to-Pass
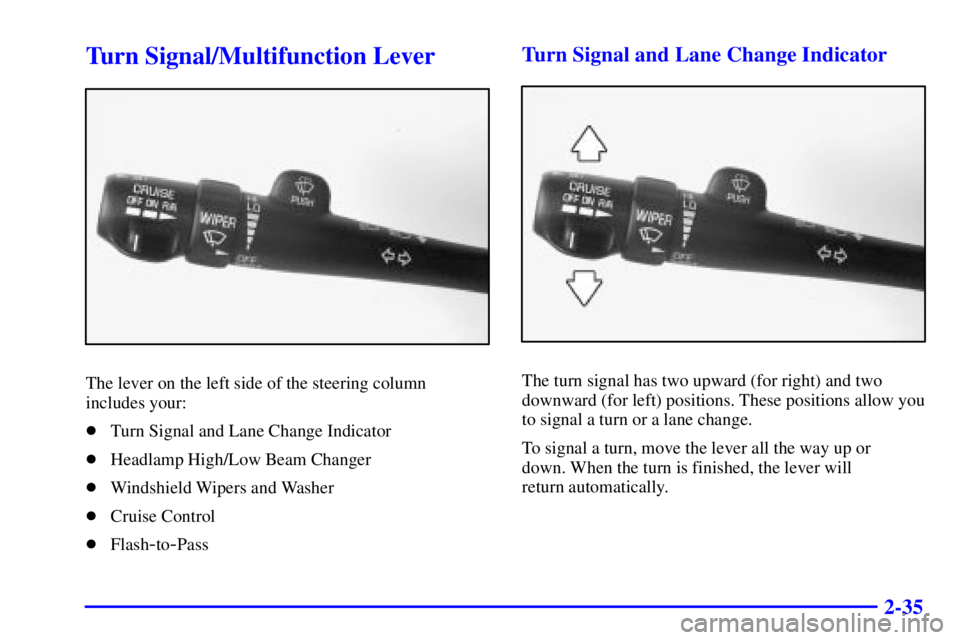
Turn Signal and Lane Change Indicator
The turn signal has two upward (for right) and two
downward (for left) positions. These positions allow you
to signal a turn or a lane change.
To signal a turn, move the lever all the way up or
down. When the turn is finished, the lever will
return automatically.
Page 101 of 392
, an arrow will also appear in the disp")
2-36
An arrow on the instrument
panel cluster will flash in
the direction of the turn or
lane change.
If your vehicle is equipped with the Head
-Up Display
(HUD), an arrow will also appear in the display area to
indicate the direction of the turn or lane change.
To signal a lane change, just raise or lower the lever
until the arrow starts to flash. Hold it there until you
complete your lane change. The lever will return by
itself when you release it.
As you signal a turn or a lane change, if the arrows flash
at twice the normal rate, this may indicate that a signal
bulb may be burned out and other drivers won't see your
turn signal.
If a bulb is burned out, replace it to help avoid an
accident. If the arrows don't go on at all when you
signal a turn, check the fuse (see ªFuses and Circuit
Breakersº in the Index) and for burned
-out bulbs.If you have a trailer towing option with added wiring for
the trailer lamps, the signal indicator will flash even if a
turn signal bulb is burned out. Check the front and rear
turn signal lamps regularly to make sure they are
working. You do not need to add a different flasher.
Turn Signal On Chime
If your turn signal is left on for more than 3/4 of a mile
(1.2 km), a chime will sound at each flash of the turn
signal. To turn off the chime, move the turn signal lever
to the off position.
Headlamp High/Low Beam Changer
To change the headlamps from low beam to high or high
to low, pull the turn signal lever toward you, then
release it.
When the high beams are
on, a light on the instrument
panel cluster will also be on.
If your vehicle is equipped
with HUD, this light will
also appear in the
display area.
Page 102 of 392

2-37 Flash-to-Pass Feature
This feature lets you use your high-beam headlamps to
signal a driver in front of you that you want to pass.
It works even if your headlamps are off.
To use it, pull the turn signal lever toward you,
but not so far that you hear a click.
If your headlamps are off or on low beam, your
high
-beam headlamps will turn on. They'll stay on
as long as you hold the lever toward you and the
high
-beam indicator on the dash will come on.
Release the lever to turn the high
-beam headlamps off.
Windshield Wipers
You control the windshield wipers by turning the band
marked WIPER.
For a single wiping cycle, turn the band to MIST.
Hold it there until the wipers start, then let go.
The wipers will stop after one cycle. If you want more
cycles, hold the band on MIST longer.
Use the delay position to set the wiper speed for a long
or short delay between wipes. This can be very useful
in light rain or snow. Turn the band to choose the
delay time. The closer to LO, the shorter the delay
between wipes.
For steady wiping at low speed, turn the band away
from you to the LO position. For high
-speed wiping,
turn the band further, to HI. To stop the wipers,
turn the band to OFF.
Remember that damaged wiper blades may prevent you
from seeing well enough to drive safely. To avoid
damage, be sure to clear ice and snow from the wiper
blades before using them. If they're frozen to the
windshield, carefully loosen or thaw them. If your
blades become damaged, get new blades or
blade inserts.
Heavy snow or ice can overload your wiper motor.
A circuit breaker will stop the motor until it cools.
Clear away snow or ice to prevent an overload.
Page 109 of 392

2-44
When it's dark enough outside, your high-beam
headlamps will change to low
-beam headlamps at full
brightness. The other lamps that turn on with your
headlamps will also turn on. When it's bright enough
outside, the regular lamps will turn off, and your
high
-beam headlamps change to the reduced brightness
of DRL.
To idle your vehicle with the DRL off, shift the
transaxle into PARK (P). The DRL will stay off until
you shift out of PARK (P).
To turn off all exterior lighting at night when you are
parked, turn off the headlamps and move the Twilight
Sentinel control all the way to the left in the slider
control. When released, the control will return to the
Twilight Sentinel minimum delay position and the lights
will turn off.
As with any vehicle, you should turn on the regular
headlamp system when you need it.
Cornering Lamps
The cornering lamps are designed to come on when you
signal a turn. This will provide more light for cornering
at night.
Twilight Sentinel�
Twilight Sentinel turns
your headlamps on and off
by sensing how dark it
is outside.
To operate this feature, slide the control to any position
to vary the lamp timeout.
If you move the control all the way to MAX, your lamps
will remain on for three minutes after you turn off your
engine. If you move the control almost all the way in the
other direction, so it's just on, the lamps will go off
quickly when you turn off your engine. You can set this
delay time from only a few seconds to three minutes.
Light Sensor
Your Twilight Sentinel and Daytime Running Lamps
work with the light sensor on top of the instrument
panel. Don't cover it up. If you do, it will read ªdarkº
and the headlamps will come on.
Page 147 of 392
2-82
Head-Up Display (HUD)
(If Equipped)
CAUTION:
If the HUD image is too bright, or too high in
your field of view, it may take you more time to
see things you need to see when it's dark outside.
Be sure to keep the HUD image dim and placed
low in your field of view.
If your vehicle is equipped with the Head-Up Display
(HUD), you can see some of the driver information that
appears on your instrument panel cluster.
The information may be displayed in English or metric
units and appears as a reflection in the windshield.
The HUD consists of the following information:
�Speedometer Reading
�Turn Signal Indicators
�High
-Beam Headlamp Indicator
�CHECK GAGES Message
The HUD shows these images when they are lighted on
the instrument panel cluster.
Be sure to continue scanning your displays, controls and
driving environment just as you would in a vehicle
without HUD. If you never look at your instrument
panel, you may not see something important, such as a
warning light.
Page 213 of 392

4-18
You can be temporarily blinded by approaching
headlamps. It can take a second or two, or even several
seconds, for your eyes to readjust to the dark. When you
are faced with severe glare (as from a driver who
doesn't lower the high beams, or a vehicle with
misaimed headlamps), slow down a little. Avoid staring
directly into the approaching headlamps.
Keep your windshield and all the glass on your vehicle
clean
-- inside and out. Glare at night is made much
worse by dirt on the glass. Even the inside of the glass
can build up a film caused by dust. Dirty glass makes
lights dazzle and flash more than clean glass would,
making the pupils of your eyes contract repeatedly.
Remember that your headlamps light up far less of a
roadway when you are in a turn or curve. Keep your
eyes moving; that way, it's easier to pick out dimly
lighted objects. Just as your headlamps should be
checked regularly for proper aim, so should your
eyes be examined regularly. Some drivers suffer from
night blindness
-- the inability to see in dim
light
-- and aren't even aware of it.
Driving in Rain and on Wet Roads
Rain and wet roads can mean driving trouble. On a wet
road, you can't stop, accelerate or turn as well because
your tire
-to-road traction isn't as good as on dry roads.
And, if your tires don't have much tread left, you'll get
even less traction. It's always wise to go slower and be
cautious if rain starts to fall while you are driving. The
surface may get wet suddenly when your reflexes are
tuned for driving on dry pavement.
Page 300 of 392
,
or if oncoming drivers fl")
6-38
If your vehicle is damaged in an accident, the headlamp
aim may be affected. Aim adjustment may be necessary
if it is difficult to see lane markers (for horizontal aim),
or if oncoming drivers flash their high beams at you
(for vertical aim). If you believe your headlamps need to
be re
-aimed, we recommend that you take it to your
dealer for service; however, it is possible for you to
re
-aim your headlamps as described in the
following procedure.
NOTICE:
To make sure your headlamps are aimed
properly, read all the instructions before
beginning. Failure to follow these instructions
could cause damage to headlamp parts.
To check the aim, the vehicle should be properly
prepared as follows:
�The vehicle must have all four tires on a perfectly
level surface.
�If necessary, pads may be used on an uneven surface.
�The vehicle should not have any snow, ice or mud
attached to it.
�The vehicle should be fully assembled and all other
work stopped while headlamp aiming is being done.
�There should not be any cargo or loading of the
vehicle, except it should have a full tank of fuel and
one person or 160 lbs. (75 kg) on the driver's seat.
�Close all doors.
�Tires should be properly inflated.
�Rock the vehicle to stabilize the suspension.
Start with the horizontal aim. The adjustment screws
can be turned with an E8 Torx
� socket or
T15 Torx screwdriver.
Once the horizontal aim is adjusted, then adjust the
vertical aim.
Page 332 of 392
6-70
Minifuses Usage
4
Pre
-Oxygen Sensor,
Post
-Oxygen Sensor
5 Air Bag (SIR)
6 PCM
7 AC Clutch
8 Ignition Feed
9 Horn Relay
10 Spare
11 Spare
12
Injectors #1
-6
13
C
-31
14 Right High Beam
15 Spare
16 Left High Beam
17 SpareMinifuses Usage
18 Right Low Beam
19 Left Low Beam
20 Stop
21 Fuel Pump Relay (Wire in BEC)
22 Run/CRK
23 PCM
24 Parking Lamp
25 Hazard Flashers
26 Spare
27 Spare
28 ABS #2
Mini Relays Usage
29 Ignition
30 Horn
31 Cool Fan #2
32 Starter

(If Equipped)
CAUTION:
If the HUD image is too bright, or too high in
your field of view, it may take you more time to
see things you need to see when its dark outside.
Be")

6 PCM
7 AC Clutch
8 Ignition Feed
9 Horn Relay
10 Spare
11 Spare
12
Injectors #1
-6
13
C
-31
14 Right High Beam
15 Spare")