Page 251 of 392

5-16
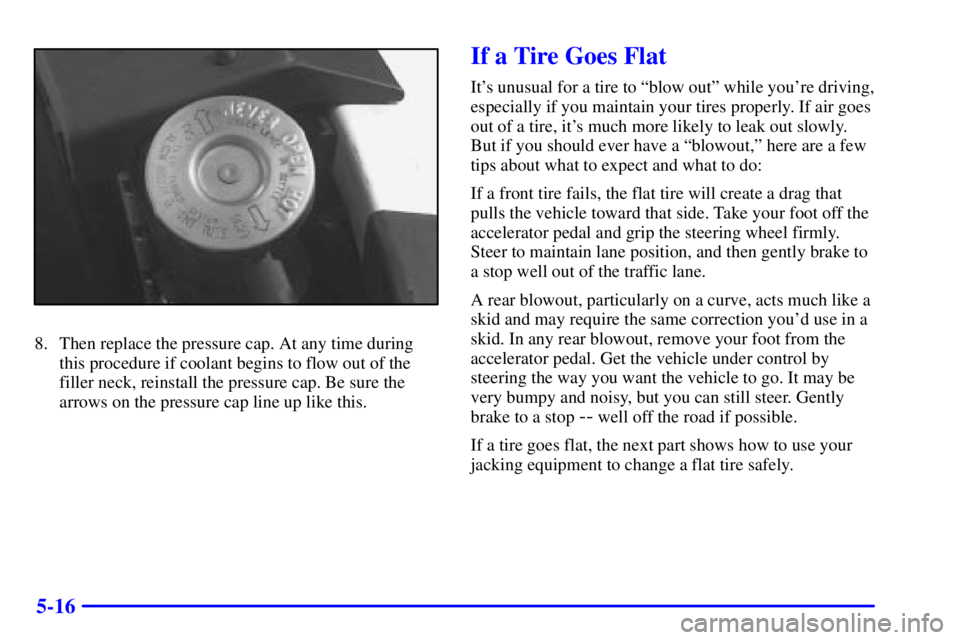
8. Then replace the pressure cap. At any time during
this procedure if coolant begins to flow out of the
filler neck, reinstall the pressure cap. Be sure the
arrows on the pressure cap line up like this.
If a Tire Goes Flat
It's unusual for a tire to ªblow outº while you're driving,
especially if you maintain your tires properly. If air goes
out of a tire, it's much more likely to leak out slowly.
But if you should ever have a ªblowout,º here are a few
tips about what to expect and what to do:
If a front tire fails, the flat tire will create a drag that
pulls the vehicle toward that side. Take your foot off the
accelerator pedal and grip the steering wheel firmly.
Steer to maintain lane position, and then gently brake to
a stop well out of the traffic lane.
A rear blowout, particularly on a curve, acts much like a
skid and may require the same correction you'd use in a
skid. In any rear blowout, remove your foot from the
accelerator pedal. Get the vehicle under control by
steering the way you want the vehicle to go. It may be
very bumpy and noisy, but you can still steer. Gently
brake to a stop
-- well off the road if possible.
If a tire goes flat, the next part shows how to use your
jacking equipment to change a flat tire safely.
Page 252 of 392
5-17
Changing a Flat Tire
If a tire goes flat, avoid further tire and wheel damage
by driving slowly to a level place. Turn on your hazard
warning flashers.
CAUTION:
Changing a tire can cause an injury. The vehicle
can slip off the jack and roll over you or other
people. You and they could be badly injured.
Find a level place to change your tire. To help
prevent the vehicle from moving:
1. Set the parking brake firmly.
2. Put the shift lever in PARK (P).
3. Turn off the engine.
To be even more certain the vehicle won't move,
you can put blocks at the front and rear of the
tire farthest away from the one being changed.
That would be the tire on the other side of the
vehicle, at the opposite end.
The following steps will tell you how to use the jack and
change a tire.
Page 255 of 392
5-20 Removing the Flat Tire and Installing the
Spare Tire
1. Use the wheel wrench to loosen the wheel nuts, but
don't remove them yet.
2. The jack has a bolt at the
end. Attach the wheel
wrench to the bolt to
create a jack handle.
3. Turn the wheel wrench counterclockwise to lower
the jack head until it fits under the vehicle.
4. Near each wheel well is a notch in the plastic trim
panel to position the jack head. You'll find the word
JACK and an arrow stamped into the plastic near
each notch. Position the jack under the vehicle and
raise the jack head until it fits firmly against the
sheet metal next to the word JACK. Do not raise the
vehicle yet. Put the compact spare tire near you.
Page 256 of 392
5-21
CAUTION:
Getting under a vehicle when it is jacked up is
dangerous. If the vehicle slips off the jack, you
could be badly injured or killed. Never get under
a vehicle when it is supported only by a jack.
CAUTION:
Raising your vehicle with the jack improperly
positioned can damage the vehicle and even make
the vehicle fall. To help avoid personal injury
and vehicle damage, be sure to fit the jack lift
head into the proper location before raising
the vehicle.5. Raise the vehicle by turning the wheel wrench
clockwise in the jack. Raise the vehicle far enough
off the ground so there is enough room for the spare
tire to fit.
6. Remove all the wheel nuts and take off the flat tire.
Page 258 of 392
5-23
8. Lower the vehicle by turning the wheel wrench
counterclockwise. Lower the jack completely.
Using the wheel
wrench, tighten
the wheel nuts
firmly in a
crisscross sequence.
CAUTION:
Incorrect wheel nuts or improperly tightened
wheel nuts can cause the wheel to become loose
and even come off. This could lead to an accident.
Be sure to use the correct wheel nuts. If you have
to replace them, be sure to get new GM original
equipment wheel nuts.
Stop somewhere as soon as you can and have
the nuts tightened with a torque wrench to
100 lb
-ft (140 N´m).
NOTICE:
Improperly tightened wheel nuts can lead to
brake pulsation and rotor damage. To avoid
expensive brake repairs, evenly tighten the wheel
nuts in the proper sequence and to the proper
torque specification.
Store the wheel cover in the trunk until you have the
flat tire repaired or replaced.
Page 259 of 392
5-24
NOTICE:
Wheel covers won't fit on your compact spare.
If you try to put a wheel cover on your compact
spare, you could damage the cover or the spare.
Storing the Flat Tire and Tools
CAUTION:
Storing a jack, a tire or other equipment in the
passenger compartment of the vehicle could
cause injury. In a sudden stop or collision, loose
equipment could strike someone. Store all these
in the proper place.
After you've put the compact spare tire on your vehicle,
you'll need to store the flat tire in your trunk. Use the
following procedure to secure the flat tire in the trunk.
Store the flat tire as far forward in the trunk as possible.
Store the jack and wheel wrench in their compartment in
the trunk.
Page 261 of 392

5-26
Compact Spare Tire
Although the compact spare tire was fully inflated when
your vehicle was new, it can lose air after a time.
Check the inflation pressure regularly. It should be
60 psi (420 kPa).
After installing the compact spare on your vehicle,
you should stop as soon as possible and make sure
your spare tire is correctly inflated. The compact spare
is made to perform well at speeds up to 65 mph
(105 km/h) for distances up to 3,000 miles (5 000 km),
so you can finish your trip and have your full
-size tire
repaired or replaced where you want. You must calibrate
the Check Tire Pressure System after installing or
removing the compact spare. See ªCheck Tire Pressure
Systemº in the Index. Of course, it's best to replace
your spare with a full
-size tire as soon as you can.
Your spare will last longer and be in good shape in case
you need it again.
NOTICE:
When the compact spare is installed, don't take
your vehicle through an automatic car wash with
guide rails. The compact spare can get caught on
the rails. That can damage the tire and wheel,
and maybe other parts of your vehicle.
Don't use your compact spare on other vehicles.
And don't mix your compact spare tire or wheel with
other wheels or tires. They won't fit. Keep your spare
tire and its wheel together.
NOTICE:
Tire chains won't fit your compact spare. Using
them can damage your vehicle and can damage
the chains too. Don't use tire chains on your
compact spare.
Page 300 of 392

6-38
If your vehicle is damaged in an accident, the headlamp
aim may be affected. Aim adjustment may be necessary
if it is difficult to see lane markers (for horizontal aim),
or if oncoming drivers flash their high beams at you
(for vertical aim). If you believe your headlamps need to
be re
-aimed, we recommend that you take it to your
dealer for service; however, it is possible for you to
re
-aim your headlamps as described in the
following procedure.
NOTICE:
To make sure your headlamps are aimed
properly, read all the instructions before
beginning. Failure to follow these instructions
could cause damage to headlamp parts.
To check the aim, the vehicle should be properly
prepared as follows:
�The vehicle must have all four tires on a perfectly
level surface.
�If necessary, pads may be used on an uneven surface.
�The vehicle should not have any snow, ice or mud
attached to it.
�The vehicle should be fully assembled and all other
work stopped while headlamp aiming is being done.
�There should not be any cargo or loading of the
vehicle, except it should have a full tank of fuel and
one person or 160 lbs. (75 kg) on the driver's seat.
�Close all doors.
�Tires should be properly inflated.
�Rock the vehicle to stabilize the suspension.
Start with the horizontal aim. The adjustment screws
can be turned with an E8 Torx
� socket or
T15 Torx screwdriver.
Once the horizontal aim is adjusted, then adjust the
vertical aim.