Page 807 of 1002
Downloaded from www.Manualslib.com manuals search engine
1 410 Fenders. Engine Hood
General ........................... .41 0.2 Engine Hood ...................... 410-6
Special tools ........................ .41 0.2 Hood, raising to service position ......... 410-6
........... Hood. removing and installing 41 0-7 Front Fenders ..................... .41 0.2 Hood. aligning ....................... 41 0-8 Front fender. removing and installing ..... .41 0.2 Hood latch components ............... 41 0-10
Hood release cable and
spring pins, adjusting
................. 410-1 1
Page 813 of 1002
Downloaded from www.Manualslib.com manuals search engine
Fenders, Engine ~ood/
Hood, removing and installing
With hood open:
Remove hood wiring harness mounting clip
(A)
Disconnect electrical harness connector (B).
Unplug windshield washer hose (C).
WARNING-
The hood is heavy Before removing the hoodsupports, be
sure to have an assistant help
support the hood.
Mark position of hinge plates.
With the help of a assistant, support hood and remove retain-
ing clips
(A) on upper end of pressurized lifting struts. Pull
struts off hood.
Loosen upper hinge bolts
(B)
Remove lower hinge bolts (C). Lift hood off carefully.
Installation is reverse of removal.
* Repair any paint damage and paint any exposed metal
Check hood alignment. See
Hood, aligning.
NOTE-
The hood was fitted and attached to an unfinished body at
the factory Unfinished
sun'aces exposed by this procedure
must be touched up with paint,
Page 814 of 1002
Downloaded from www.Manualslib.com manuals search engine
41 0-8
(Fenders, Engine Hood
Hood, aligning
When installing the hood, align the hinges as close to the orig-
inal painted surface as possible. Movement of the hood on its
attaching hardware may require touch-up paint.
The hood should be aligned so that gap
(arrows) to fender is
as even as possible.
4 If height adjustment at rear of hood is off, adjust height using
adjusting screw in lower hinge
(arrow). Loosen and reposi-
tion as necessary.
If height adjustment at
ing adjusting screw: rear
of
hood cannot be completed us-
Q Loosen lower hinge screws (1) and (2).
Add or remove washers as needed to correct height set-
ting.
Page 817 of 1002

Downloaded from www.Manualslib.com manuals search engine
Fenders, Ensine HOO~I
Hood release cable and spring pins,
adjusting
Before adjusting hood pins, be sure the hood is aligned even-
ly to fenders and front panel.
- Malte sure bowden cable, which connects both hood loclts
together, is seated in lock guide on both left and right loclts.
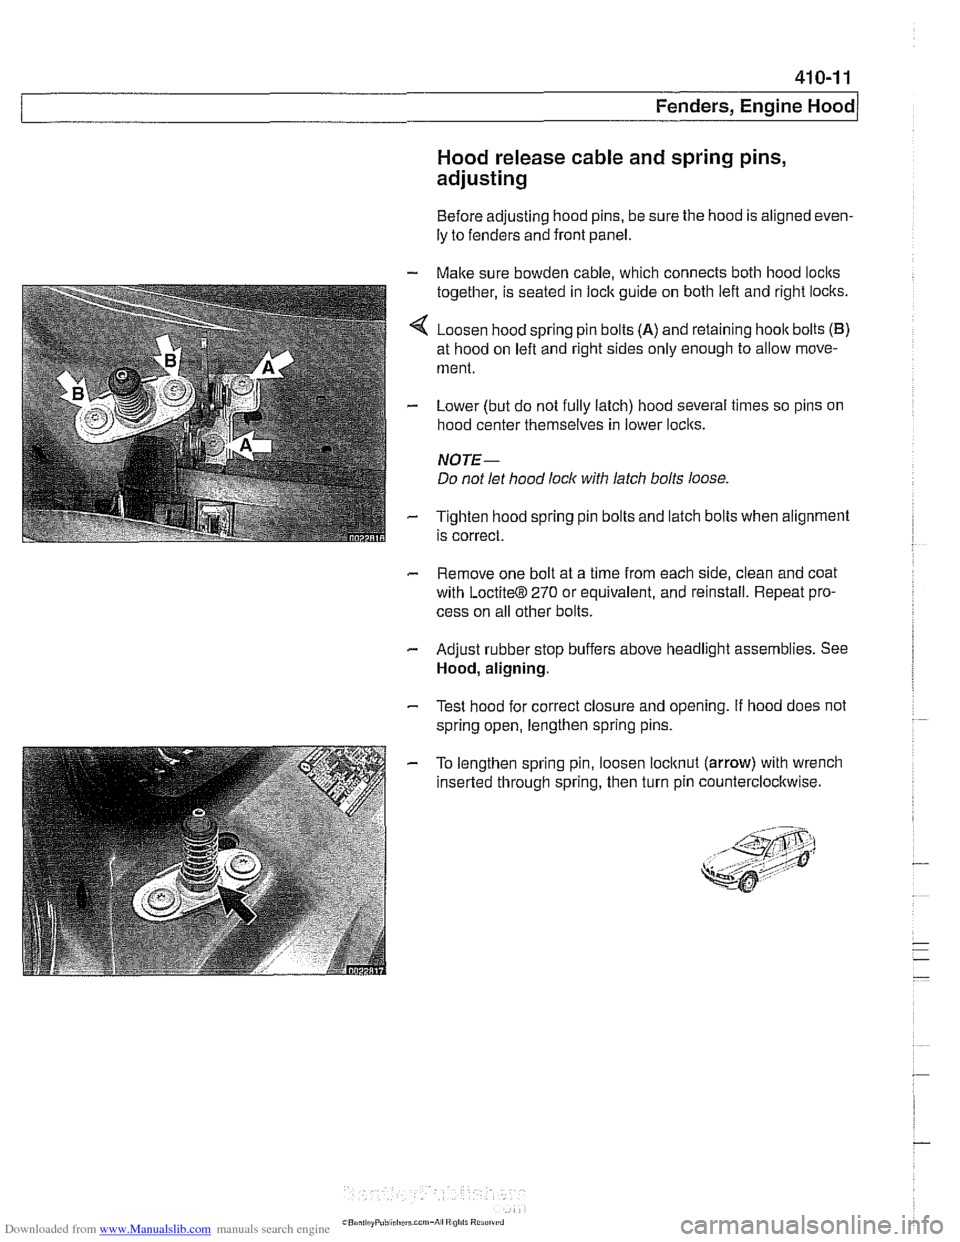
4 Loosen hood spring pin bolts (A) and retaining hoolt bolts (B)
at hood on left and right sides only enough to allow move-
ment.
- Lower (but do not fully latch) hood several times so pins on
hood center themselves in lower loclts.
NOTE-
Do not let hood lock with latch bolts loose
- Tighten hood spring pin bolts and latch bolts when alignment
is correct.
- Remove one bolt at a time from each side, clean and coat
with
LoctiteB 270 or equivalent, and reinstall. Repeat pro-
cess on all other bolts.
- Adjust rubber stop buffers above headlight assemblies. See
Hood, aligning.
- Test hood for correct closure and opening. If hood does not
spring open, lengthen spring pins.
- To lengthen spring pin, loosen locltnut (arrow) with wrench
inserted through spring, then turn pin counterclocltwise.