2000 BMW 528i windows
[x] Cancel search: windowsPage 876 of 1002

Downloaded from www.Manualslib.com manuals search engine
512-12
I Door Windows
- Disconnect window from window guide rail as described in
Door window, removing
and installing. Do not remove
window from door.
* Push window up and use wedge to hold in position.
- If necessary, remove speaker unit from door.
- Removing window regulator from door:
Disconnect window motor electrical harness connector.
4 Remove lower window regulator fasteners (arrows).
Remove window regulator fasteners (arrows)
Loosen fasteners (arrows) and slide regulator up to remove
from mounts.
- Remove window regulatorthrough opening in bottom of door,
checking for any wiring that might become snagged during
removal.
- Installation is reverse of removal.
Be sure to route wiring harnesses to keep them away from
moving window mechanism. Use new wire ties as neces-
sary.
-
Tightening torques -
Window motor to regulator 5 Nm (44 in-lb)
502512211
Window regulator to door 8 Nm (71 in-lb)
Adjust window
as described earlier.
- -
W~ndow to guide 8 Nm (71 in-lb)
--
Page 877 of 1002

Downloaded from www.Manualslib.com manuals search engine
Door windows1
Rear window regulator, removing and
installing
NOTE-
BMW recommends removing the window regulator and mo-
tor as one unit, then separating the
two on the bench.
- Disconnect negative (-) cable from battery
- Remove door panel as described in 411 Doors
- Remove airbag unit and vapor barrier from door. See 721
Airbag System (SRS).
- Disconnect window from window guide rail as described in
Door window, removing and installing. Do not remove
window from door.
Push window up and use wedge to
hold in position.
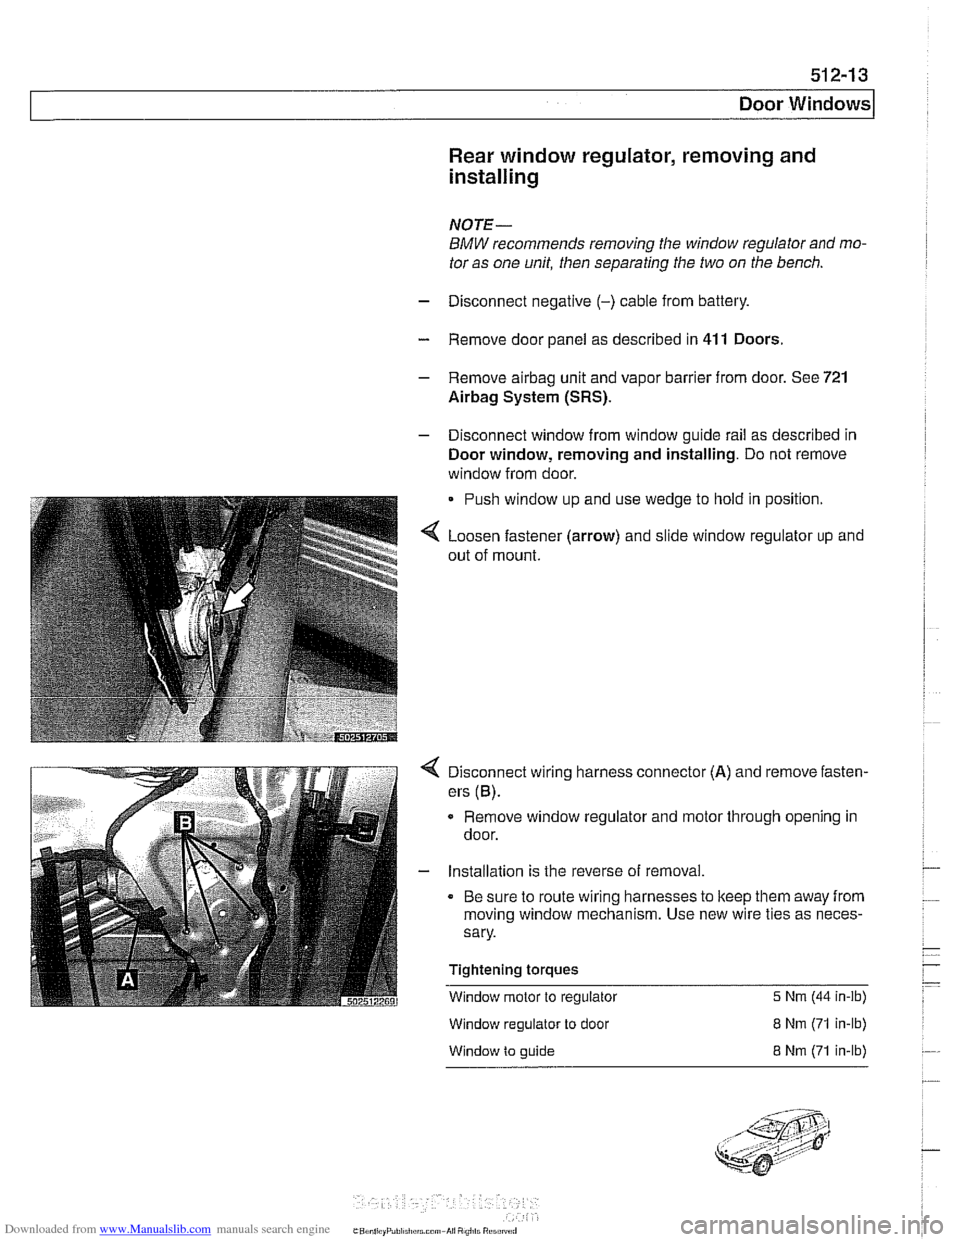
Loosen fastener (arrow) and slide window regulator up and
out of mount.
Disconnect wiring harness connector (A) and remove fasten-
ers
(6).
Remove window regulator and motor through opening in
door.
- Installation is the reverse of removal.
Be sure to route wiring harnesses to keep them away from
moving window mechanism. Use new wire ties as neces-
sary.
Tightening torques
Window motor to regulator
5 Nrn (44 in-ib)
Window regulator to door
Window to guide
8 Nrn (71 in-lb)
8 Nrn (71 in-lb)
Page 899 of 1002

Downloaded from www.Manualslib.com manuals search engine
Central Locking and Anti-Theft
DWA alarm
The DWA alarm system is
armedldisarmed when thevehicle
is locked / unlocked from either the door or trunk.
Convenience closing
I opening
The windows and sun roof can be closed or opened by hold-
ing the key in the
loclc I unlock position.
Crash sensor
The crash sensor is located in the left front
kick panel. It func-
tions by unlocking all doors in the event of an accident.
NOTE-
Continuous and repeated locliing / unlocking may cause
timedarrest of
the locliing system. When activated, the timed
arrest lasts for two minutes. The timed arrest does not affect
the crash sensor
unlocliing the doors in case of an accident.
Door locks
The driver's door lock location is the only point outside of the
vehicle where the ltey can mechanically control all of the cen-
tral locking system functions.
4 Door key positions for electrical / manual loclting and
unlocking are:
1. Manual unlock
2. Unlock, DWA disarmed, convenience open
(hold until activated)
3. Neutral position
4. Lock, DWA armed, convenience closing
(hold until activated)
5. Manual lock
The door lock actuators are sealed. self contained units with
no replaceable parts. The
actuators use Hall effect sensors in
place of pin contacts and microswitches to provide DOOR
OPEN
I DOOR CLOSED status signal. Each door lock button
only affects the actuator it controls. There is no effect on the
other doors.
An automatic locking feature activates door locks when a
road speed signal of 4 mph is detected via the K-Bus. The fac-
tory default coding for this feature is OFF, but can be coded
ON for individual users with the Key Memoryfunction. See
Car Memory
1 Key Memory later in this section.
Page 901 of 1002

Downloaded from www.Manualslib.com manuals search engine
Central Locking and Anti-Theft
Trunk lock
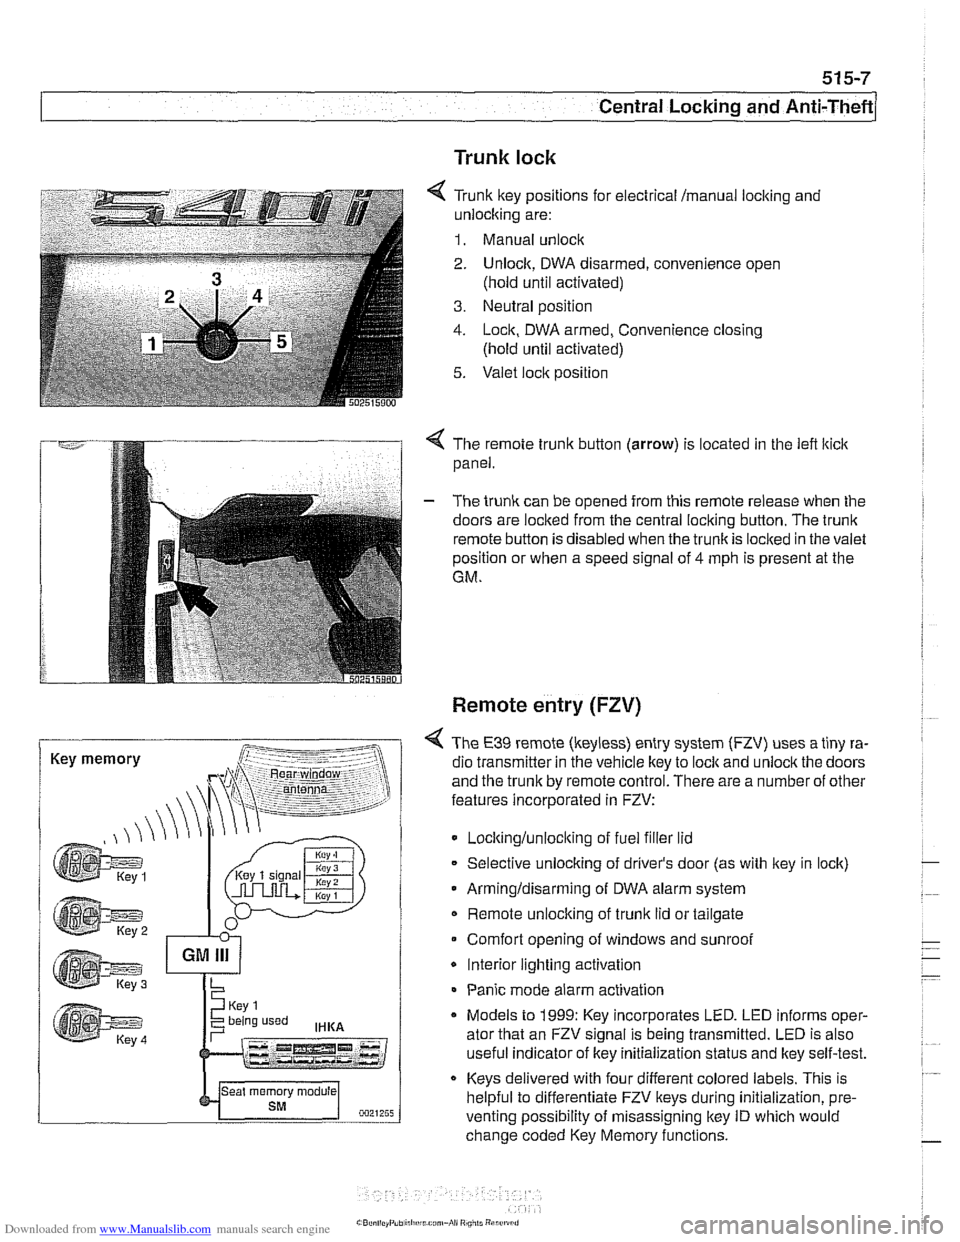
6 Tr~nk ftey pos~rions for eecir'cal mama, locking and
-nlock~ng are:
1. Manual unock .. - - - ........ - ..- .- ................. s.=.=-- 2. Unlock. DWA oisarmed, conven:ence open
(nold
un1:l aclivaledj
3. Ne~tral posit'on
1. -ocn. DWA armeo, Convenience closng
(hold ~nti activated)
5. Valet .oc,t position
. -- .............-... .- . - -.....
Key memory
< The remote trunk button (arrow) is located in the lefl lticlc
panel.
- The trunk can be opened from this remote release when the
doors are locked from the central locking button. The
trunk
remote button is disabled when the trunkis loclted in the valet
position or when a speed signal of
4 mph is present at the
GM.
Remote entry (FZV)
< The €39 remote (keyless) entry system (FZV) uses a tiny ra-
dio transmitter in the vehicle key to
lock and unlock the doors
and the trunk by remote control. There are a number of other
features incorporated in FZV:
Locltinglunloclting of fuel filler lid
Selective unlocking of driver's door (as with key in lock)
Armingldisarming of DWA alarm system
Remote unlocking of
trunk lid or tailgate
Comfort opening of windows and sunroof
* Interior lighting activation
Panic mode alarm activation
* Models to 1999: Key incorporates LED. LED informs oper-
ator that an FZV signal is being transmitted. LED is also
useful indicator of key initialization status and lkey self-test.
Keys delivered with four different colored labels. This is
helpful to differentiate FZV keys during initialization,
pre.
venting possibility of misassigning key ID which would
change coded Key Memory functions.
Page 906 of 1002

Downloaded from www.Manualslib.com manuals search engine
51 5-12
I Central Locking and Anti-Theft
Key battery
9
4 1997 - 1999 models: Two lithium batteries are used to sup-
ply power to key transmitter. When replacement is neces-
sary, remove cover and two fasteners (arrows) from rear of
key to access batteries
NOTE-
If you replace the batteries within one minute, the FZV ley
will not require a new initialization procedure.
2000 and later models: FZV key battery is recharged by ring
antenna while ltey is in ignition switch. There is no need to re-
place ltey battery.
Car Memory 1 Key Memory
A number of features and functions can be customized to the
driver(s) preference. The identity of the vehicle user is provid-
ed by a
s~gnal from the keyless entry system (FZV).
Car Memory and Key Memory are actually two separate func-
tions, although they are marketed as a combined feature.
Car Memory
Pr'or ro new
veh c,e de very, the BMW scan roo (DISp us,
GTI or MOD C) is ~sed lo cooc ine driver preierences nro ine
appropriate control modules. Thereafter these choices can-
not be changed without
recoding with a BMW scan tool.
The functions that can be set using Car Memory include:
Alarm system (DWA) features such as armingldisarming
with
lkeyless entry (FZV), activation of tilt sensor or interior
sensor
lnterior light activation when central
locking is used
Convenience opening of
windows/sunroof
lnterior and external lighting preferences
Heating
I A/C preferences (IHKA)
Seat and mirror preferences (triggered by Key Memory)
Instrument cluster display units (for example: km vs. miles)
Page 911 of 1002

Downloaded from www.Manualslib.com manuals search engine
Central Locking and ~nti-~heel
Door latch, removing and installing
- Close window on subject door and open all other windows.
- Disconnect battery negative (-) cable
CAUTION-
Prior to disconnecting the batterl: read the battery discon-
nection cautions given in
001 General Warnings and Cau-
tions.
- Remove door trim panel. See 411 Doors.
- Remove air bag. See 721 Airbag System (SRS).
- Remove outer door handle. See Door handle (outer), re-
moving and installing.
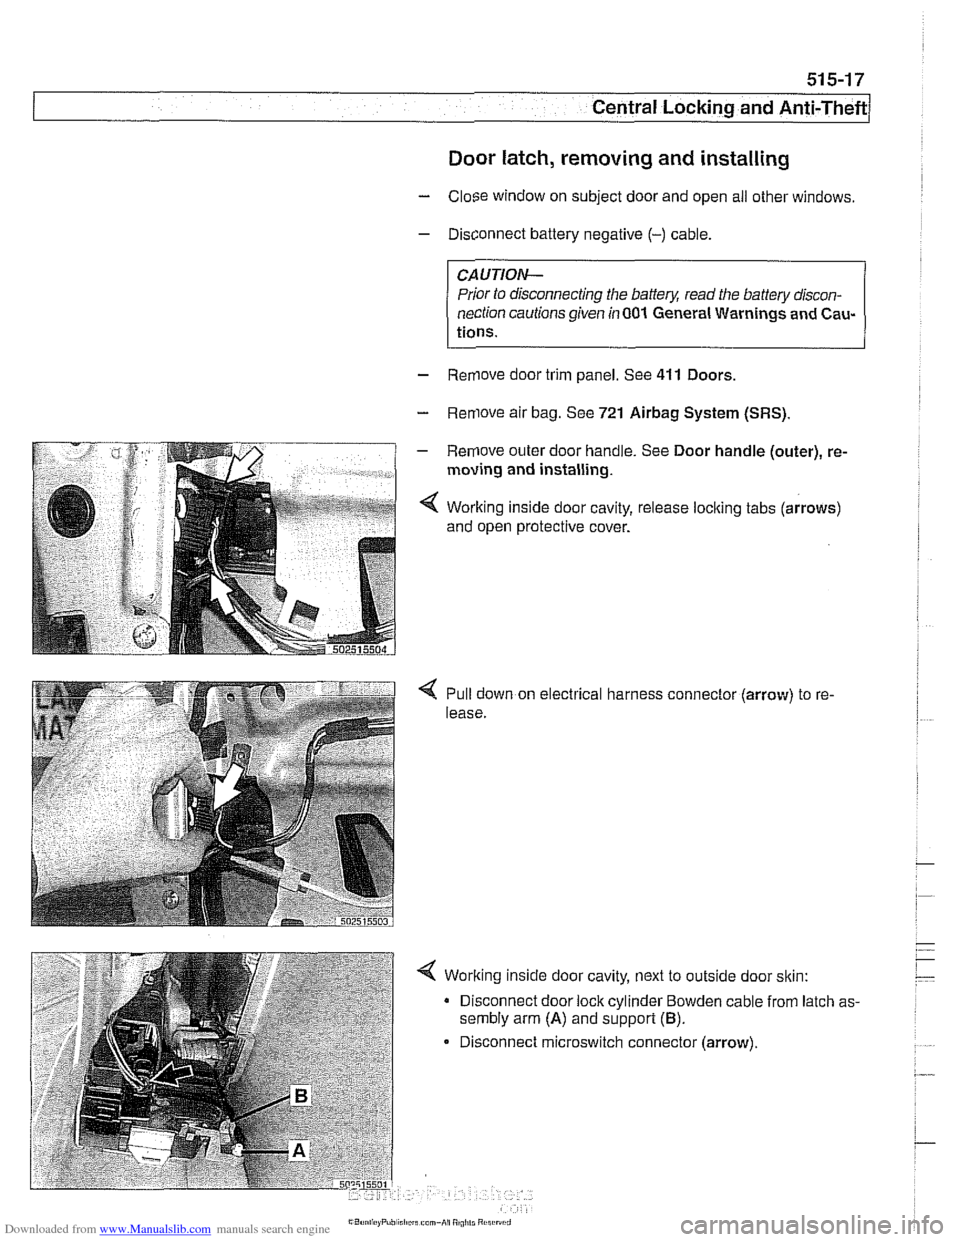
< Working inside door cavity, release loclting tabs (arrows)
and open protective cover.
Pull down on electrical harness connector (arrow) to re-
lease.
< Working inside door cavity, next to outside door sltin:
Disconnect door lock cylinder Bowden cable from latch as-
sembly arm
(A) and support (B).
Disconnect microswitch connector (arrow).
Page 912 of 1002

Downloaded from www.Manualslib.com manuals search engine
51 5-1 8
I Central Locking and Anti-Theft
< Working at outer door edge:
Disconnect inside door release
Bowden cable guide by
sliding mounting clip (A) forward.
Remove latch mounting fasteners
(B) and (C) and remove
latch.
NOTE-
In the photo below, door handle assembly and latch assem-
bly are shown removed from the car
for clarity.
Installation: Slide latch into position in door making sure that
cross-shaped tip of door
loclc cylinder mechanism fits cor-
rectly into corresponding opening in latch mechanism (in-
set).
Remainder of installation is reverse of removal. Operate
loclc
using key before installing door trim panel.
Tightening torques
Airbag to door (replace screws) 8.5 Nm (75 in-lb)
Outer door lock cylinder, removing and
installing
- Close window on subject door. Open all other windows
- Disconnect battery negative (-) cable.
CA UTIOIG
Prior to disconnecting the baffeg read the battery discon-
nection cautions given in
001 General Warnings and Cau-
tions.
- Remove door trim panel. See 411 Doors.
- Remove door air bag. See 721 Airbag System (SRS).
- Remove outer door handle. See Door handle (outer), re-
moving and installing.
- Remove door latch. See Door latch, removing and install-
ing.
Page 918 of 1002

Downloaded from www.Manualslib.com manuals search engine
51 5-24
l~entral Locking and Anti-Theft
ANTI-THEFT SYSTEM (DWA)
When the anti-then system (DWA) is armed, the doors, hood,
windows, trunk lid or tailgate are monitored against forcible
entry by switches and sensors. The vehicle is protected
against being jacked up or towed away by a tilt sensor.
The control electronics for DWA are integrated in the General
Module (GM). In addition to the control electronics, the sys-
tem includes the following components.
* DWA horn
DWA LED indicator
- Tilt sensor
- Monitoring switches and sensors
The system can be armed or disarmed from the driver's door
lock,
trunklid lock, tailgate lockorthe remote transmitter (FZV
Itey). When armed, the alarm horn
soundsfor30seconds and
the low beam headlights and turn signals flash for
5 minutes.
The electronic immobilizer (EWS) is also activated when
DWA is activated.
The alarm is switched off immediately if key is inserted in door
loclt or FZV key button is used.
DWA LED Status
The DWA status LED is located in the rear view mirror (ar-
row). When DWA is armed, the LED flashes slowly to indi-
cate armed status.
The LED and exterior lights flash once and the alarm horn
sounds when the system is successfully armed ordisarmed.
The LED will continue to flash slowly denoting the armed sta-
tus. If any monitored input is not closed when the system is
armed, the LED will flash rapidly for
10 seconds to indicate
the fault.
Tilt sensor
-
4 The tilt sensor, located on the left side of trunlt or cargo com- -
partment, consists of a conductive liquid chamber, a proces-
sor board and metal probes. The probes are submersed in
the liquid and produce a resistance value dependent on the
tilt of the sensor (angle of the vehicle). This resistance be-
comes the reference value when the DWA system is armed.
.-