2000 BMW 328Ci COUPE towing
[x] Cancel search: towingPage 14 of 189

Contents
Owner service procedures
Advanced technology
Technical data
Replacement procedures:
Onboard tool kit140
Windshield wiper blades140
Lamps and bulbs140
Remote control147
Changing tires148
Battery151
Fuses153
Microfilter154
In case of electrical
malfunction:
Fuel filler door155
Sliding/tilt sunroof155
Assistance, giving and
receiving:
Jump-starting156
Towing the vehicle157Adaptive Transmission Control
(ATC)160
Airbags161
Dynamic Stability Control
(DSC)161
Radio reception162
Safety belt tensioner162
Inside rearview mirror with
automatic dimmer163
Tire Pressure Control (RDC)164
Rain sensor165
Self-diagnostics166
Xenon lamp167Engine data170
Dimensions171
Weights172
Capacities173
Electrical system174
Ribbed V-belt174
Page 29 of 189

27n
RepairsIndexOverview Controls Car care Technology Data
Tire inflation pressure The inflation pressures are indicated on
a sticker attached to the B-pillar behind
the driver's door (visible with door
open).Check tire pressuresAll pressure specifications are stated in
psi (kilopascal) with cold tires (cold =
ambient temperature). Refer to the next
page as well.
For trailer towing, the inflation pressure
for heavier loads always applies.
For vehicles with RDC (Tire Pressure
Control)
*:
After a correction of the tire inflation
pressure, reactivate the system. Refer
to page 82.
462de197
Check tire inflation pressures reg-
ularly – at least every two weeks
and before beginning a longer trip. In-
correct tire pressure can otherwise lead
to tire damage and accidents.
Also check the inflation pressure of the
space-saver tire or spare tire
*. Inflate
the spare tire to the highest inflation
specified for your vehicle.<
Comply with tire approval
specificationsThe inflation pressures in the table apply
to tires from BMW-approved manufac-
turers. Your BMW center is familiar with
these pressures. Higher pressures may
be specified for tires from other manu-
facturers. You will find a list of approved
tires beginning on page 117.
Page 44 of 189

42n
Alarm system
*
The conceptThe vehicle's alarm system responds:
>When a door, the hood or the lug-
gage compartment lid is opened
>To motion within the passenger com-
partment (interior motion sensor)
>To a change in the inclination of the
vehicle, e. g. during an attempted
wheel theft of unauthorized towing
>To interruption of battery voltage.
The alarm system signals unauthorized
access to the vehicle or an attempted
theft in different ways:
>Sounding an acoustical alarm for
30 seconds
>Activating the hazard warning flash-
ers for approx. five minutes
*.
To activate and deactivate the
alarm systemWhen the vehicle is locked or unlocked
by using a key or with the remote con-
trol, the alarm system is also simulta-
neously armed or disarmed.
The interior motion sensor is activated
approx. 30 seconds after you have fin-
ished locking the car.
If the alarm system has been armed
correctly, the hazard warning flashers
cycle once. An acoustic warning signal
sounds at the same time.
You can have various confirmation
messages set to inform you that
the alarm system has been armed or
disarmed.<
You can also open the luggage com-
partment lid when the system is armed
by pressing button 3 of the remote con-
trol (refer to page 37). When it is closed,
the lid is once again secured.
Indicator lamp displaysThe indicator lamp is located under the
inside rearview mirror.
>When the indicator lamp flashes
continuously: The system is armed
>The indicator lamp flashes when it is
armed: The door(s), the hood or lug-
gage compartment lid are not com-
pletely closed. Even if you do not
close the alerted area, the system be-
gins to monitor the remaining areas,
and the indicator lamp flashes contin-
uously after 10 seconds. However,
the interior motion sensor is not
activated
>If the indicator lamp goes out when
the system is disarmed: No manipula-
tion or attempted intrusions have
been detected in the period since the
system was armed460de105
Page 70 of 189

68n
Automatic transmission with Steptronic
*
The Steptronic will "think" for you in the
following situations:
>In order to keep the engine from
overrevving, it will automatically shift
into the next higher gear shortly be-
fore the governed speed.
>If you do not do anything to interfere,
it will automatically downshift at
lower speeds.
>In kickdown, it will downshift into the
lowest gear possible, depending on
the engine speed.
Available displays
P R N D SD M1 M2 M3 M4 M5462us019
Electronic transmission control
module
If the indicator lamp comes on,
there is a malfunction in the
transmission system.
Bring the vehicle to a stop, select trans-
mission position "P", set the parking
brake and turn the engine off (ignition
key to position 0).
Wait a few seconds, then start the engine.
If the indicator lamp goes out after a few
seconds, normal transmission perfor-
mance has been restored. Drive off
normally.
If the indicator lamp does not go out, all
selector lever positions can still be se-
lected; however in the forward positions
the vehicle has limited performance as
it drives only in 3
rd and 4
th gear.
If this happens, avoid extreme engine
loads and consult the nearest authorized
BMW center.
Do not carry out any work on the
car in the engine compartment
without first making sure that the selector
lever is in position P or N, and that
the parking brake has been set.<
For towing, tow-starting or jump-start-
ing the vehicle, refer to the information
beginning on page 156.
Page 102 of 189

100n
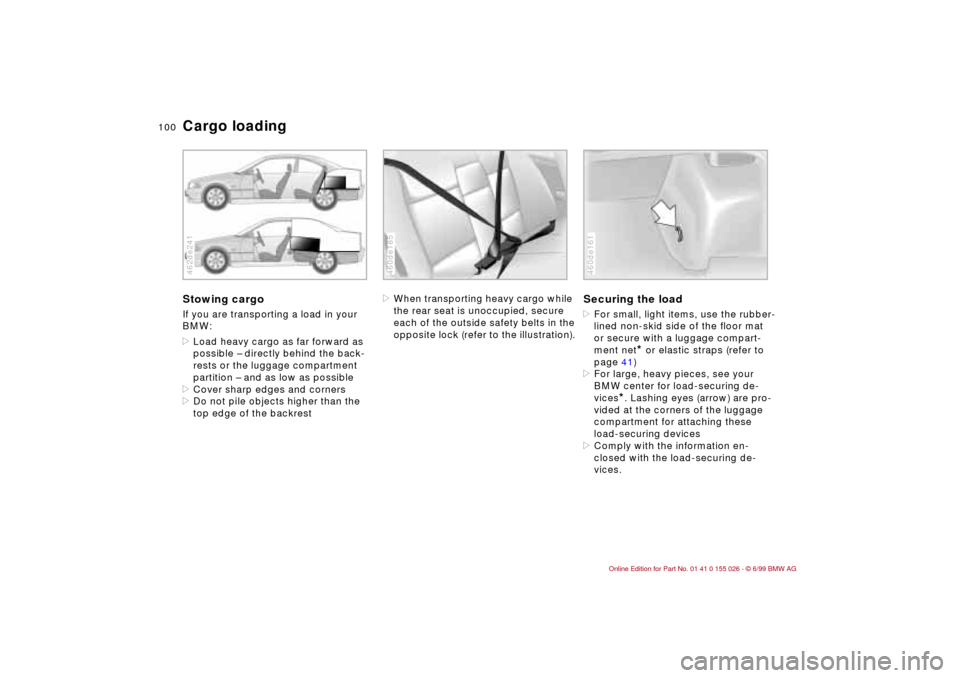
Cargo loadingStowing cargo If you are transporting a load in your
BMW:
>Load heavy cargo as far forward as
possible – directly behind the back-
rests or the luggage compartment
partition – and as low as possible
>Cover sharp edges and corners
>Do not pile objects higher than the
top edge of the backrest462de241
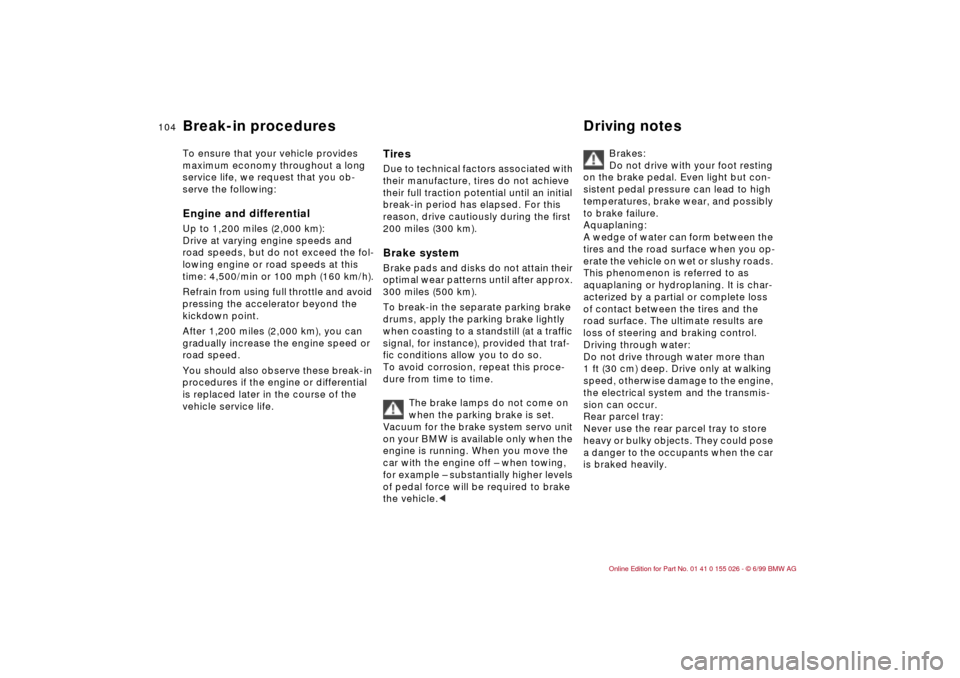
>When transporting heavy cargo while
the rear seat is unoccupied, secure
each of the outside safety belts in the
opposite lock (refer to the illustration).460de185
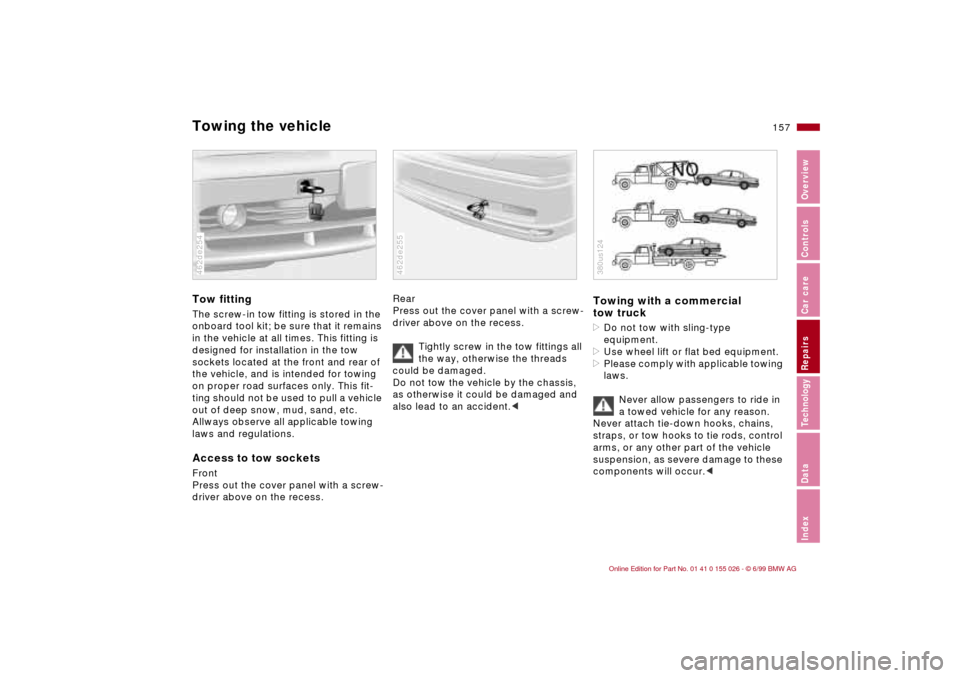
Securing the load >For small, light items, use the rubber-
lined non-skid side of the floor mat
or secure with a luggage compart-
ment net
* or elastic straps (refer to
page 41)
>For large, heavy pieces, see your
BMW center for load-securing de-
vices
*. Lashing eyes (arrow) are pro-
vided at the corners of the luggage
compartment for attaching these
load-securing devices
>Comply with the information en-
closed with the load-securing de-
vices.
460de161
Page 106 of 189

104n
To ensure that your vehicle provides
maximum economy throughout a long
service life, we request that you ob-
serve the following:
Engine and differentialUp to 1,200 miles (2,000 km):
Drive at varying engine speeds and
road speeds, but do not exceed the fol-
lowing engine or road speeds at this
time: 4,500/min or 100 mph (160 km/h).
Refrain from using full throttle and avoid
pressing the accelerator beyond the
kickdown point.
After 1,200 miles (2,000 km), you can
gradually increase the engine speed or
road speed.
You should also observe these break-in
procedures if the engine or differential
is replaced later in the course of the
vehicle service life.
TiresDue to technical factors associated with
their manufacture, tires do not achieve
their full traction potential until an initial
break-in period has elapsed. For this
reason, drive cautiously during the first
200 miles (300 km).Brake systemBrake pads and disks do not attain their
optimal wear patterns until after approx.
300 miles (500 km).
To break-in the separate parking brake
drums, apply the parking brake lightly
when coasting to a standstill (at a traffic
signal, for instance), provided that traf-
fic conditions allow you to do so.
To avoid corrosion, repeat this proce-
dure from time to time.
The brake lamps do not come on
when the parking brake is set.
Vacuum for the brake system servo unit
on your BMW is available only when the
engine is running. When you move the
car with the engine off – when towing,
for example – substantially higher levels
of pedal force will be required to brake
the vehicle.<
Brakes:
Do not drive with your foot resting
on the brake pedal. Even light but con-
sistent pedal pressure can lead to high
temperatures, brake wear, and possibly
to brake failure.
Aquaplaning:
A wedge of water can form between the
tires and the road surface when you op-
erate the vehicle on wet or slushy roads.
This phenomenon is referred to as
aquaplaning or hydroplaning. It is char-
acterized by a partial or complete loss
of contact between the tires and the
road surface. The ultimate results are
loss of steering and braking control.
Driving through water:
Do not drive through water more than
1 ft (30 cm) deep. Drive only at walking
speed, otherwise damage to the engine,
the electrical system and the transmis-
sion can occur.
Rear parcel tray:
Never use the rear parcel tray to store
heavy or bulky objects. They could pose
a danger to the occupants when the car
is braked heavily.
Break-in procedures Driving notes
Page 141 of 189

Overview
Controls and features
Operation, care
and maintenance
Owner service procedures
Technical data
Index Advanced technology
139n
RepairsIndexOverview Controls Car care Technology Data
Replacement procedures:
Onboard tool kit140
Windshield wiper blades140
Lamps and bulbs140
Remote control147
Changing tires148
Battery151
Fuses153
Microfilter154
In case of electrical
malfunction:
Fuel filler door155
Sliding/tilt sunroof155
Assistance, giving and
receiving:
Jump-starting156
Towing the vehicle157
Page 159 of 189

157n
RepairsIndexOverview Controls Car care Technology Data
Towing the vehicleTow fittingThe screw-in tow fitting is stored in the
onboard tool kit; be sure that it remains
in the vehicle at all times. This fitting is
designed for installation in the tow
sockets located at the front and rear of
the vehicle, and is intended for towing
on proper road surfaces only. This fit-
ting should not be used to pull a vehicle
out of deep snow, mud, sand, etc.
Allways observe all applicable towing
laws and regulations.Access to tow socketsFront
Press out the cover panel with a screw-
driver above on the recess.462de254
Rear
Press out the cover panel with a screw-
driver above on the recess.
Tightly screw in the tow fittings all
the way, otherwise the threads
could be damaged.
Do not tow the vehicle by the chassis,
as otherwise it could be damaged and
also lead to an accident.<462de255
Towing with a commercial
tow truck>Do not tow with sling-type
equipment.
>Use wheel lift or flat bed equipment.
>Please comply with applicable towing
laws.
Never allow passengers to ride in
a towed vehicle for any reason.
Never attach tie-down hooks, chains,
straps, or tow hooks to tie rods, control
arms, or any other part of the vehicle
suspension, as severe damage to these
components will occur.c380us124