Page 69 of 71
‒ → Check for a factory marking
(coloured dot) on the propshaft and
on the propshaft flange on the final drive at the rear. If not present, mark the position of the propshaft flange -
arrow A- relative to the rear final
drive -arrow B-.
‒ Remove the three upper securing
bolts from each constant velocity
joint on the propshaft. ‒ → Attach the assembly device 3139
with spacers 3139/3 and tighten the
plastic nuts.
Note:
Never fit assembly appliance onto balance plates.
‒ Remove the three remaining
securing bolts from the constant
velocity joints at the front and rear. ‒ → Remove the securing nuts Page 2 of 45-Speed Manual Gearbox 01A 4WD4.3.2014vw-wi://rl/A.en-GB.4B-S-S01AA.wi::21141363.xml?xsl=2
Page 70 of 71

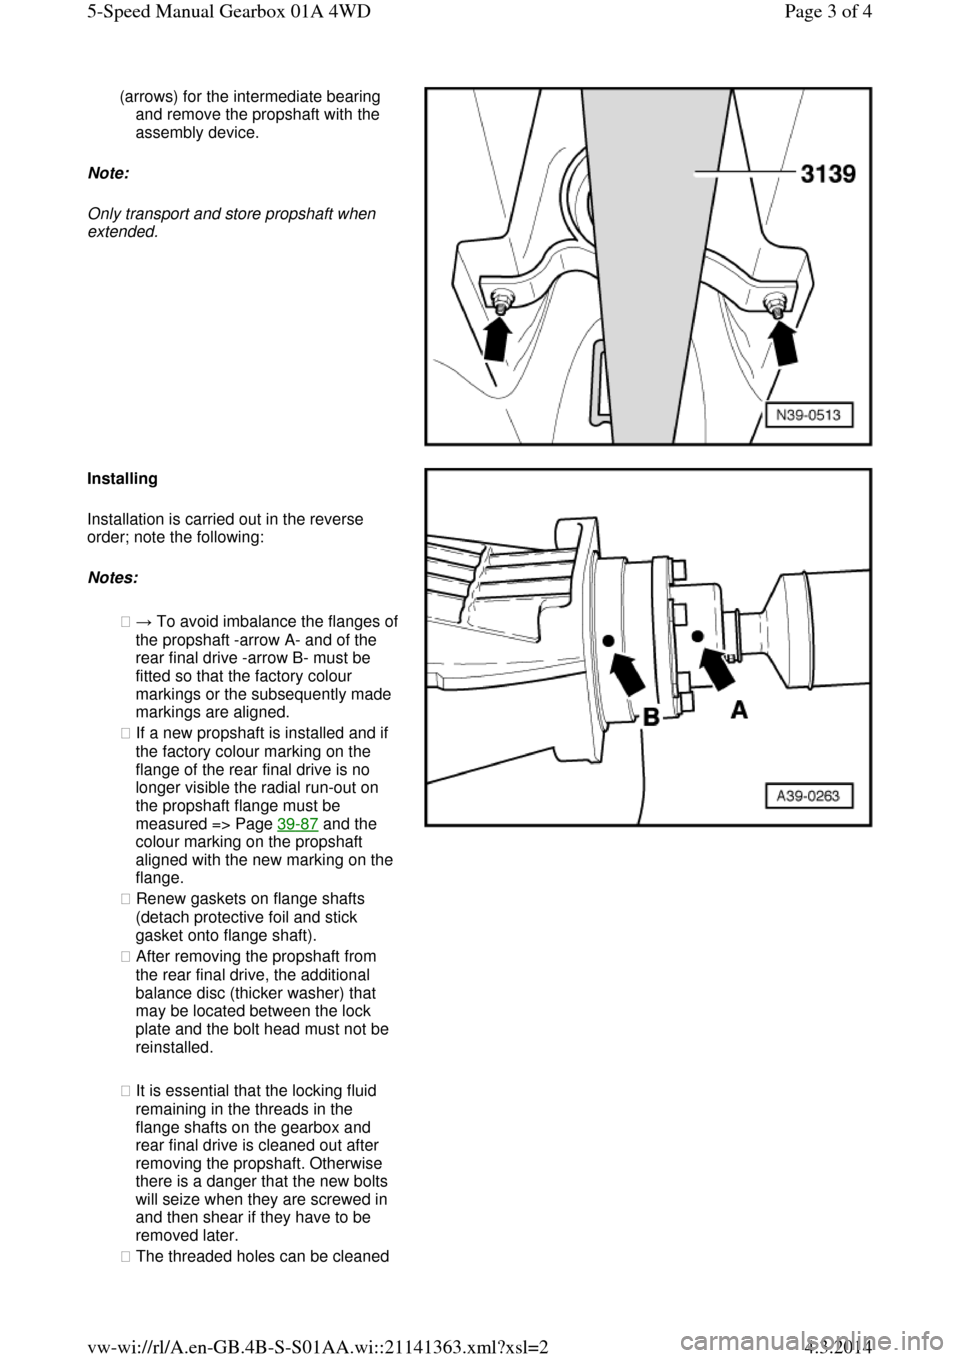
(arrows) for the intermediate bearing
and remove the propshaft with the
assembly device.
Note:
Only transport and store propshaft when
extended. Installing Installation is carried out in the reverse
order; note the following:
Notes:
◆ → To avoid imbalance the flanges of the propshaft -arrow A- and of the
rear final drive -arrow B- must be
fitted so that the factory colour
markings or the subsequently made
markings are aligned.
◆ If a new propshaft is installed and if
the factory colour marking on the
flange of the rear final drive is no
longer visible the radial run-out on
the propshaft flange must be
measured => Page 39-87 and the
colour marking on the propshaft
aligned with the new marking on the
flange.
◆ Renew gaskets on flange shafts
(detach protective foil and stick
gasket onto flange shaft).
◆ After removing the propshaft from
the rear final drive, the additional
balance disc (thicker washer) that
may be located between the lock
plate and the bolt head must not be
reinstalled.
◆ It is essential that the locking fluid
remaining in the threads in the
flange shafts on the gearbox and
rear final drive is cleaned out after
removing the propshaft. Otherwise
there is a danger that the new bolts
will seize when they are screwed in
and then shear if they have to be
removed later.
◆ The threaded holes can be cleaned Page 3 of 45-Speed Manual Gearbox 01A 4WD4.3.2014vw-wi://rl/A.en-GB.4B-S-S01AA.wi::21141363.xml?xsl=2
Page 71 of 71
with a thread tap.
◆ Replace propshaft bolts (self-
locking).
‒ Tension free alignment of exhaust
system
=> 4-cylinder Engine (5-valve turbo), Mechanical Components; Repair group 26; Removing and installing parts of exhaust system; Stress-free alignment of exhaust system
=> 6-cylinder Engine (5-valve), Mechanical Components; Repair group 26; Removing and installing parts of exhaust system; Stress-free alignment of exhaust system
Tightening torques
1) Replace bolt Component Nm
Intermediate bearing to body 25
Propshaft to manual gearbox 1) 55
Propshaft to rear final drive 1) 55
Heat shield for propshaft to
Torsen differential cover 25
Front cross member under
exhaust system to body 25
Nuts for clamp 40 Page 4 of 45-Speed Manual Gearbox 01A 4WD4.3.2014vw-wi://rl/A.en-GB.4B-S-S01AA.wi::21141363.xml?xsl=2