Page 17 of 35
17-17
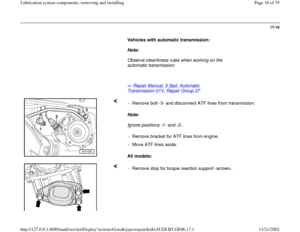
- Where present unclip operating rod of vehicle level sender from lower
transverse link -arrow-.
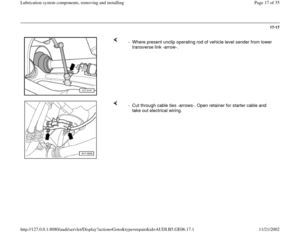
- Cut through cable ties -arrows-. Open retainer for starter cable and
take out electrical wiring.
Pa
ge 17 of 35 Lubrication s
ystem com
ponents, removin
g and installin
g
11/21/2002 htt
p://127.0.0.1:8080/audi/servlet/Dis
play?action=Goto&t
yp
e=re
pair&id=AUDI.B5.GE06.17.1
Page 18 of 35
17-18
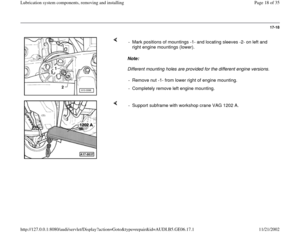
Note:
Different mounting holes are provided for the different engine versions. - Mark positions of mountings -1- and locating sleeves -2- on left and
right engine mountings (lower).
- Remove nut -1- from lower right of engine mounting.
- Completely remove left engine mounting.
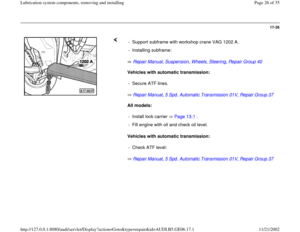
- Support subframe with workshop crane VAG 1202 A.
Pa
ge 18 of 35 Lubrication s
ystem com
ponents, removin
g and installin
g
11/21/2002 htt
p://127.0.0.1:8080/audi/servlet/Dis
play?action=Goto&t
yp
e=re
pair&id=AUDI.B5.GE06.17.1
Page 19 of 35
17-19
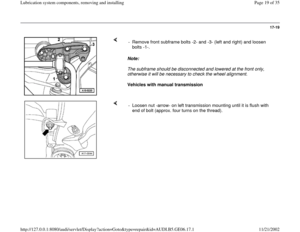
Note:
The subframe should be disconnected and lowered at the front only,
otherwise it will be necessary to check the wheel alignment.
Vehicles with manual transmission - Remove front subframe bolts -2- and -3- (left and right) and loosen
bolts -1-.
- Loosen nut -arrow- on left transmission mounting until it is flush with
end of bolt (approx. four turns on the thread).
Pa
ge 19 of 35 Lubrication s
ystem com
ponents, removin
g and installin
g
11/21/2002 htt
p://127.0.0.1:8080/audi/servlet/Dis
play?action=Goto&t
yp
e=re
pair&id=AUDI.B5.GE06.17.1
Page 20 of 35
17-20
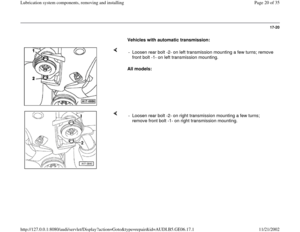
Vehicles with automatic transmission:
All models: - Loosen rear bolt -2- on left transmission mounting a few turns; remove
front bolt -1- on left transmission mounting.
- Loosen rear bolt -2- on right transmission mounting a few turns;
remove front bolt -1- on right transmission mounting.
Pa
ge 20 of 35 Lubrication s
ystem com
ponents, removin
g and installin
g
11/21/2002 htt
p://127.0.0.1:8080/audi/servlet/Dis
play?action=Goto&t
yp
e=re
pair&id=AUDI.B5.GE06.17.1
Page 21 of 35
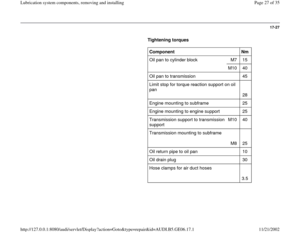
17-21
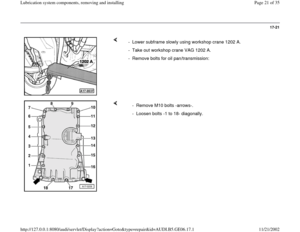
- Lower subframe slowly using workshop crane 1202 A.
- Take out workshop crane VAG 1202 A.
- Remove bolts for oil pan/transmission:
- Remove M10 bolts -arrows-.
- Loosen bolts -1 to 18- diagonally.
Pa
ge 21 of 35 Lubrication s
ystem com
ponents, removin
g and installin
g
11/21/2002 htt
p://127.0.0.1:8080/audi/servlet/Dis
play?action=Goto&t
yp
e=re
pair&id=AUDI.B5.GE06.17.1
Page 22 of 35
17-22
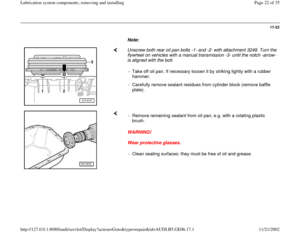
Note:
Unscrew both rear oil pan bolts -1- and -2- with attachment 3249. Turn the
flywheel on vehicles with a manual transmission -3- until the notch -arrow-
is aligned with the bolt.
- Take off oil pan. If necessary loosen it by striking lightly with a rubber
hammer.
- Carefully remove sealant residues from cylinder block (remove baffle
plate).
WARNING!
Wear protective glasses. - Remove remaining sealant from oil pan, e.g. with a rotating plastic
brush.
- Clean sealing surfaces: they must be free of oil and grease.
Pa
ge 22 of 35 Lubrication s
ystem com
ponents, removin
g and installin
g
11/21/2002 htt
p://127.0.0.1:8080/audi/servlet/Dis
play?action=Goto&t
yp
e=re
pair&id=AUDI.B5.GE06.17.1
Page 23 of 35
17-23
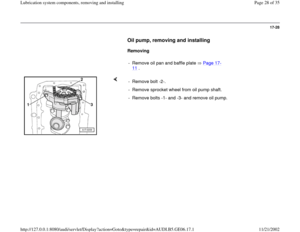
Installing
Installation is carried out in the reverse order of
removal; note the following:
Note:
The oil pan must be installed within 5 minutes
after applying the silicone sealant.
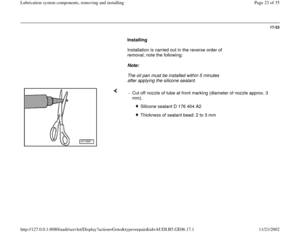
- Cut off nozzle of tube at front marking (diameter of nozzle approx. 3
mm).
Silicone sealant D 176 404 A2
Thickness of sealant bead: 2 to 3 mm
Pa
ge 23 of 35 Lubrication s
ystem com
ponents, removin
g and installin
g
11/21/2002 htt
p://127.0.0.1:8080/audi/servlet/Dis
play?action=Goto&t
yp
e=re
pair&id=AUDI.B5.GE06.17.1
Page 24 of 35
17-24
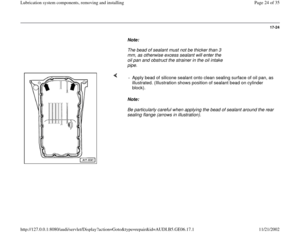
Note:
The bead of sealant must not be thicker than 3
mm, as otherwise excess sealant will enter the
oil pan and obstruct the strainer in the oil intake
pipe.
Note:
Be particularly careful when applying the bead of sealant around the rear
sealing flange (arrows in illustration). - Apply bead of silicone sealant onto clean sealing surface of oil pan, as
illustrated. (Illustration shows position of sealant bead on cylinder
block).
Pa
ge 24 of 35 Lubrication s
ystem com
ponents, removin
g and installin
g
11/21/2002 htt
p://127.0.0.1:8080/audi/servlet/Dis
play?action=Goto&t
yp
e=re
pair&id=AUDI.B5.GE06.17.1


.")


