Page 89 of 311

HomeLink Universal Transmitte
Canadian Owners:
The remote control you are trainingfrom may stop transmitting after tw oseconds. This is not long enough for
the HomeLink transmitter to learn the code. Release and press the
button on the remote control every
two seconds until the transmitter has learned the code.
5. The red light in the transmitter should begin flashing. It will flash
slowly at first, then rapidly.
6. When the red light flashes rapidly, release both buttons. The
transmitter should have learned the code from the remote control.
7. Plug in the garage door opener motor, then test the transmitter
button by pushing it. It should operate the garage door.
If the button does not work, repeat
this procedure to train it again. If it still does not work, you may have a
variable or rolling code garage door opener. Test this by pressing
and holding the HomeLink
transmitter button you just trained. If the red light blinks for two
seconds, then stays on, you have a
rolling code garage door opener.
You may be able to verify this with
the manufacturer's documentation.
Go to "Training With a Rolling
Code System."
8. Repeat these steps to train the other two transmitter buttons to
operate any other remotely-
controlled devices around your
home (lighting, automatic gate , security system, etc.). Training With a Rolling Code
SystemFor security purposes, newer garage
door opening systems use a "rolling"
or variable code. Information from
the remote control and the garage door opener are needed before the
HomeLink transmitter can operate
the garage door opener.
The 'Training the Transmitter" procedure trains the HomeLink
transmitter to the proper garagedoor opener code. The following
procedure synchronizes the
HomeLink transmitter to the garage door opener so they send and
receive the correct codes.
Instruments and Controls
Page 90 of 311

HomeLink Universal Transmitter
It may be helpful to have someone
assist you with this procedure.1. Make sure you have properly completed the "Training the
Transmitter" procedure.
2. Find the "Training" button on your garage door opener unit. The
location will vary, depending onthe manufacturer. Themanufacturer's documentation
may help. TRAINING BUTTON
3. Press the Training button on the garage door opener unit until the
light next to the button comes on,
then release it. The light may blink,or come on and stay on. You then
have approximately 30 seconds to complete the following steps. 4. Press and release the button on
the HomeLink transmitter. (Thesame button you trained with the
"Training the Transmitter"
procedure.)
5. Press and release the HomeLink transmitter button again. Thisshould turn off the training light
on the garage door opener unit. (Some systems may require you to
press and release the button up to
three times.)
6. Press the transmitter button again. It should operate the garage door.
Instruments and Controls
Page 91 of 311

HomeLink Universal Transmitter
Retraining a Button
To train an already programmed transmitter button to operate a newdevice:
1. Select the transmitter button you want to train.
2. Press and hold the transmitter button until the red light begins toflash slowly (approximately 20seconds).
3. While continuing to hold the transmitter button, place the
remote control for the device 1 to
3 inches from the HomeLink
transmitter.
4. Press and hold the button on the remote control. Hold both buttons
until the red light begins to flash
rapidly. 5. Release both buttons. The
transmitter, should now be trained
to operate the device.
Erasing Codes
To erase the codes stored in all three buttons, press and hold the twooutside buttons until the red light
begins to flash, then release the
buttons.
You should erase all three codes before selling the car.As required by the FCC:
This device complies with Part 15 of the
FCC rules. Operation is subject to the
following two conditions: (1) This device may not cause harmful interference, and (2) this device must accept any
interference received, including
interference that may cause undesired operation.
Changes or modifications not expressly
approved by the party responsible for compliance could void the user's
authority to operate the equipment.
This device complies with Industry
Canada Standard RSS-210. Operation is subject to the following two
conditions: (1) this device may not cause
interference, and (2) this device must accept any interference that may causeundesired operation of the device.
Instruments and Controls
Page 92 of 311
Seat Adjustments
Driver's Seat Full Power
Adjustments
See pages 12 — 14 for important safety
information and warnings about how to
properly position seats and seat-backs.
The two power seat adjustment switches are on the outside edge of
the seat bottom. The horizontal switch adjusts the seat bottom in
several directions. The short verticalswitch adjusts the seat-back angle.
You can adjust the seat with the ignition switch in any position. Make
all adjustments before you start
driving. Push the horizontal switch forward
or backward to move the seat
forward or backward. Pull up or push down on the front of
the switch to move the seat bottom's
front edge up or down. Pull up or
push down on the rear of the switch
to move the rear of the seat bottom
up or down.
CONTINUED
Instruments and Controls
Page 93 of 311
Seat Adjustments
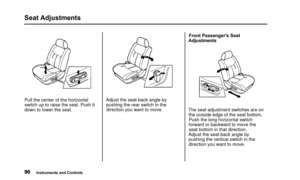
Pull the center of the horizontal
switch up to raise the seat. Push it
down to lower the seat.Adjust the seat-back angle by
pushing the rear switch in thedirection you want to move. Front Passenger's Seat
Adjustments
The seat adjustment switches are on the outside edge of the seat bottom.Push the long horizontal switch
forward or backward to move the seat bottom in that direction.
Adjust the seat-back angle by pushing the vertical switch in thedirection you want to move.
Instruments and Controls
Page 94 of 311

Seat Adjustments
Driver's Lumbar Support
Vary the lumbar support by moving the lever on the right side of the seat-back. Pivot the lever forward
until it stops, then let it return. Doing
this several times adjusts the lumbar support through its full range. Head Restraints
RELEASE BUTTON
See page 14 for important safety
information and a warning about how to
properly position the head restraints.
The head restraints help protect you and your passengers from whiplash
and other injuries. They are most
effective when you adjust them so
the back of the occupant's head rests against the center of the restraint. A
taller person should adjust the
restraint as high as possible.
The front head restraints adjust for height. You need both hands toadjust the restraint. Do not attempt
to adjust it while driving. To raise it, pull upward. To lower the restraint,
push the release button sideways
and push the restraint down.
To remove a head restraint for cleaning or repair, pull it up as far as
it will go. Push the release button
and pull the restraint out of the seat-
back.
Instruments and Controls
Page 95 of 311
Seat Adjustments
Center Console Armrest
The center console armrest can be moved forward and backward. Rear Seat Armrest
The rear seat armrest is located at the center of the rear seat. Pivot itdown to use it. Trunk Pass-through Cover
KNOB
The pass-through cover can be
opened from either side; it folds
forward onto the center armrest. Open the cover by sliding the knob
downward and pushing or pulling on
the cover. To close the cover, swing
it up and push firmly on the top.
Make sure it latches properly.
Instruments and Controls
Page 96 of 311
Seat Adjustments
Make sure all items in the trunk and
those extending through the pass-
through are secured.
For security, this cover can be
locked and unlocked only with the master key. To lock the cover, insert
the key and turn it clockwise. Never drive with this cover open and
the trunk lid open.
See Carbon Monoxide Hazard on
page 49.
Instruments and Controls