Page 246 of 330

Tire
s
Tubeless tires have some ability to self-seal if they are punctured.
However, because leakage is often
very slow, you should look closely
for punctures if a tire starts losing
pressure. Inspectio
n
Every time you check inflation, you
should also examine the tires for
damage, foreign objects, and wear.
You should look for: Bumps or bulges in the tread or
side of the tire. Replace the tire if
you find either of these conditions. Cuts, splits, or cracks in the side
of the tire. Replace the tire if you
can see fabric or cord. Excessive tread wear.
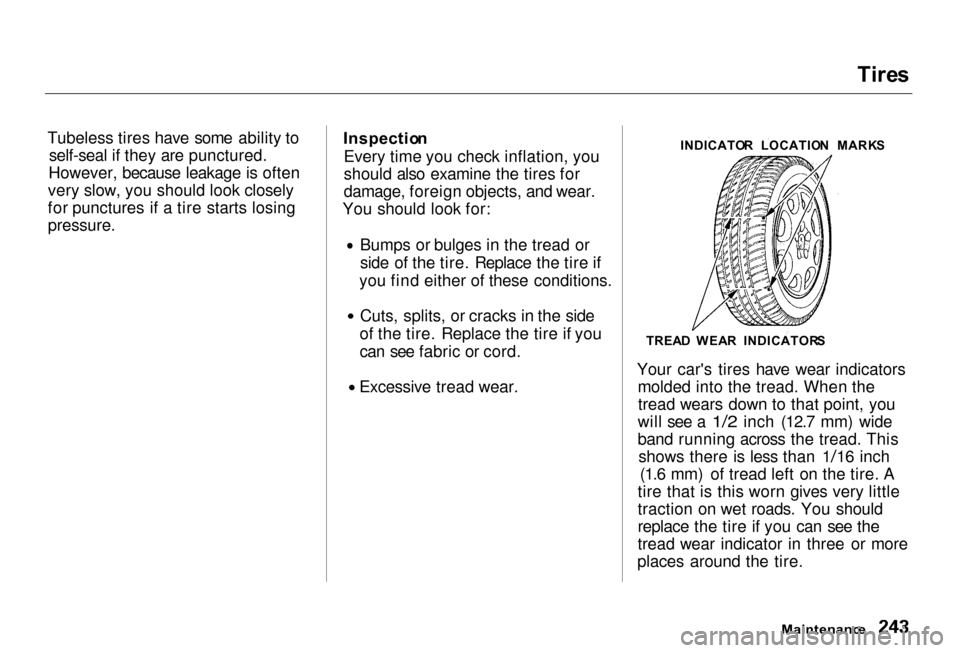
Your car's tires have wear indicators
molded into the tread. When thetread wears down to that point, you
will see a 1/2 inch (12.7 mm) wide
band running across the tread. This shows there is less than 1
/16 inch
(1.6 mm) of tread left on the tire. A
tire that is this worn gives very little
traction on wet roads. You should
replace the tire if you can see the
tread wear indicator in three or more
places around the tire.
Maintenance
INDICATO
R LOCATIO N MARK S
TREA D WEA R INDICATOR S
Page 250 of 330

Tire
s
Snow Tires
If you mount snow tires on your
Acura, make sure they are radial tires of the same size and load rangeas the original tires. Mount snow
tires on all four wheels to balance
your car's handling in all weather conditions. Keep in mind the traction
provided by snow tires on dry roads
may not be as high as your car's original equipment tires. You should
drive cautiously even when the roads
are clear. Check with the tire dealer
for maximum speed recommen-
dations.
Tire Chains
Because your Acura has limited tire
clearance, mount only SAE Class "S"
cable-type traction devices on the
front tires. Use traction devices only when required by driving conditionsor local laws. Make sure they are the
correct size for your tires.
Metal link-type "chains" should not
be used. No matter how tight they seem to be installed, they can come
into contact with the body and
suspension, causing serious damage. When installing cables, follow the
manufacturer's instructions and
mount them as tightly as you can.
Drive slowly with them installed. If
you hear them coming in contact with the body or chassis, stop andinvestigate. Make sure the cables are
installed tightly, and that they are
not contacting the brake lines or
suspension.
Remove them as soon as you begin driving on cleared roads.
Traction devices that are the wrong
size or improperly installed can damage your car's brake lines,
suspension, body, and wheels. Stop
driving if they are hitting any part of the car.
Maintenance
NOTIC
E
Page 252 of 330
Light
s
Check the following:
Headlights (low and high beam)
Fog lights
Parking lights Taillights
Brake lights Turn signals
Back-up lights
Hazard light function
License plate light
Side marker lights
High-mount brake light
Daytime running lights (Canadian
models)
If you find any bulbs are burned out,
replace them as soon as possible.
Refer to the chart on page 299 to
determine what type of replacement
bulb is needed.
Maintenance
HIGH-MOUN
T BRAK E LIGH T
TURN SIGNA L LIGH T
LICENS E PLAT E
LIGHT S
BACK-U P LIGH T
STOP/TAIL LIGHT S
Page 256 of 330

Light
s
Replacin g Fron t Tur n Signal/
Parkin g an d Sid e Marker Light
Bulb s
1. If you are changing the bulb on the driver's side, start the engine,
turn the steering wheel all the way
to the right, and turn off the engine. If you are changing the
bulb on the passenger's side, turn
the steering wheel to the left. 2. Use a flat-tipped screwdriver to
remove the holding clip from the
inner fender.
3. Pull the inner fender cover back.
4. Remove the socket from the headlight assembly by turning itone-quarter turn counterclockwise. 5. To remove the front turn signal/
parking light bulb, push it inslightly and turn it
counterclockwise. To remove the side marker bulb, pull it straight
out of its socket.
6. Install the new bulb in the socket.
7. Insert the socket back into the headlight assembly. Turn itclockwise to lock it in place.
8. Test the lights to make sure the new bulb is working.
9. Put the inner fender cover in place. Install the holding clip. Lock it in
place by pushing on the center.
Maintenance
HOLDIN
G CLI P
Page 258 of 330
Light
s
8. Reset the fastener by pushing on the pointed end until it pops backalmost flush with the fingers on
the housing.
9. Put the fastener in the hole in the side of the trunk lining and push
on the center until it locks (the
center is flush with the head). Replacin
g a High-moun t Brak e
Ligh t Bul b
1. Open the trunk and remove the socket from the light assembly by
turning it one-quarter turn counter-
clockwise.
2. Remove the bulb by pushing it in slightly and turning it counter-
clockwise.
Install the new bulb in the socket. 3. Reinstall the socket. Turn it
clockwise until it locks.
4. Test the lights to make sure the new bulb is working.
Maintenance
Page 262 of 330

Storin
g You r Ca r
If you need to park your car for an
extended period (more than one
month), there are several things you
should do to prepare it for storage.
Proper preparation helps prevent
deterioration and makes it easier to
get your car back on the road. If
possible, store your car indoors. Fill the fuel tank.
Change the engine oil and filter
(see page 217). Wash and dry the exterior
completely.
Clean the interior. Make sure the
carpeting, floor mats, etc. are
completely dry. Leave the parking brake off. Put
the transmission in Park. Block the rear wheels.
If the car is to be stored for a
longer period, it should be supported on jackstands so the
tires are off the ground. Leave one window open slightly (if
the car is being stored indoors). Disconnect the battery.
Support the front wiper blade
arms with a folded towel or rag so
they do not touch the windshield.
To minimize sticking, apply a silicone spray lubricant to all door
and trunk seals. Also, apply a
vehicle body wax to the painted surfaces that mate with the door
and trunk seals. Cover the car with a "breathable"
cover, one made from a porous
material such as cotton.
Nonporous materials, such as
plastic sheeting, trap moisture,
which can damage the paint. If possible, run the engine for a
while periodically (preferably once a month).
If you store your car for 12 months or longer, have your Acura dealer
perform the inspections called for in
the 24 months/30,000 miles (48,000
km) maintenance schedule (Normal Conditions) as soon as you take it
out of storage (see page 206). The
replacements called for in the
maintenance schedule are not
needed unless the car has actually
reached that time or mileage.
Maintenance
Page 269 of 330

Corrosion
Protectio n
Two factors normally contribute to causing corrosion in your car:
1. Moisture trapped in body cavities. Dirt and road salt that collects in
hollows on the underside of the
vehicle stays damp, promoting corrosion in that area.
2. Removal of paint and protective coatings from the exterior and
underside of the car. Many corrosion-preventive measures
are built into your Acura. You can
help keep your car from corroding
by performing some simple periodic
maintenance:
Repair chips and scratches in the
paint as soon as you discover them. Inspect and clean out the drain
holes in the bottom of the doors
and body. Check the floor coverings for
dampness. Carpeting and floor
mats may remain damp for a long
time, especially in winter. This dampness can eventually cause
the floor panels to corrode. Use a high-pressure spray to clean
the underside of your car. This is especially important in areas that
use road salt in winter. It is also a
good idea in humid climates and areas subject to salt air. Be carefulof the ABS wheel sensors and
wiring at each wheel. Have the corrosion-preventive
coatings on the underside of your
car inspected and repaired
periodically.
Appearanc e Car e
Page 308 of 330

Emission
s Control s
The burning of gasoline in your car's engine produces several byproducts.
Some of these are carbon monoxide (CO), oxides of nitrogen (NOx) and
hydrocarbons (HC). Gasoline evaporating from the tank also
produces hydrocarbons. Controlling
the production of NOx, CO, and HC
is important to the environment.
Under certain conditions of sunlight
and climate, NOx and HC react to
form photochemical "smog." Carbon
monoxide does not contribute to smog creation, but it is a poisonous
gas.
Th
e Clea n Ai r Ac t
The United States Clean Air Act*
sets standards for automobile
emissions. It also requires that
automobile manufacturers explain to owners how their emissions controls
work and what to do to maintain
them. This section summarizes how
the emissions controls work.
Scheduled maintenance is on page
206.
* In Canada, Acura vehicles comply
with the Canadian Motor Vehicle
Safety Standards (CMVSS) for
Emissions valid at the time they are
manufactured.
Crankcas e Emission s Contro l
Syste m
Your car has a Positive Crankcase
Ventilation System. This keeps gasses that build up in the engine'scrankcase from going into the
atmosphere. The Positive Crankcase
Ventilation valve routes them from the crankcase back to the intake
manifold. They are then drawn into
the engine and burned.
Evaporativ e Emission s Contro l
Syste m
As gasoline evaporates in the fuel tank, an evaporative emissionscontrol canister filled with charcoal
adsorbs the vapor. It is stored in this
canister while the engine is off. After
the engine is started and warmed up,
the vapor is drawn into the engine and burned during driving.
Onboar d Refuelin g Vapo r
Recover y
The Onboard Refueling Vapor Recovery (ORVR) system captures
the fuel vapors during refueling. The
vapors are adsorbed in a canister
filled with activated carbon. While driving, the fuel vapors are drawn
into the engine and burned off.
Technical Informatio n