Page 214 of 273

Appearanc
e Car e
Regular cleaning and polishing of
your Acura helps to keep it "new" looking. This section gives you hintson how to clean your car and
preserve its appearance: the paint,
brightwork, wheels and interior. Also included are several things you cando to help prevent corrosion. Exterior Care.................................. 212
Washing...................................... 212Waxing........................................ 213
Aluminum Wheels..................... 213
Paint Touch-up........................... 213
Interior Care................................... 214 Carpeting.................................... 214
Fabric.......................................... 214
Vinyl............................................ 214
Leather........................................ 214
Seat Belts.................................... 214
Windows..................................... 215
Air Fresheners........................... 215
Corrosion Protection..................... 216
Body Repairs.................................. 217
Appearance Car e
Page 216 of 273

Exterio
r Car e
Waxin g
Always wash and dry the whole car before waxing it. You should wax
your car, including the metal trim,
whenever water sits on the surface in large patches. It should form into
beads or droplets after waxing.
You should use a quality liquid or paste wax. Apply it according to theinstructions on the container. In
general, there are two types of products:
Waxes — A wax coats the finish and protects it from damage by exposureto sunlight, air pollution, etc. You should use a wax on your Acura
when it is new.
Polishes — Polishes and cleaner/
waxes can restore the shine to paint that has oxidized and lost some of its shine. They normally contain mild
abrasives and solvents that remove
the top layer of the finish. You should use a polish on your Acura if the finish does not have its original
shine after using a wax.
Cleaning tar, insects, etc. with
removers also takes off the wax.
Remember to re-wax those areas,
even if the rest of the car does not
need waxing.
Aluminu m Wheel s
Clean your Acura's aluminum alloy wheels as you do the rest of the
exterior. Wash them with the same
solution, and rinse them thoroughly.
The wheels have a protective clear- coat that keeps the aluminum from
corroding and tarnishing. Using
harsh chemicals, including some commercial wheel cleaners, or stiff
brushes can damage this clear-coat. Only use a mild detergent and soft
brush or sponge to clean the wheels. Pain
t Touch-u p
Your dealer has touch-up paint to match your car's color. The color
code is printed on a sticker on the driver's doorjamb. Take this code to
your dealer so you are sure to get the correct color.
Inspect your car frequently for chips
or scratches in the paint. Repair
them right away to prevent corrosion of the metal underneath. Use the
touch-up paint only on small chips and scratches. More extensive paintdamage should be repaired by a
professional.
Appearance Car e
Page 219 of 273

Corrosio
n Protectio n
Two factors normally contribute to causing corrosion in your car:
1. Moisture trapped in body cavities. Dirt and road salt that collects in
hollows on the underside of the car stays damp, promoting
corrosion in that area.
2. Removal of paint and protective coatings from the exterior and
underside of the car. Many corrosion-preventive measures
are built into your Acura. You can
help keep your car from corroding by performing some simple periodic
maintenance:
Repair chips and scratches in the
paint as soon as you discover them.
Inspect and clean out the drain
holes in the bottom of the doors and body.
Check the floor coverings for
dampness. Carpeting and floor
mats may remain damp for a long
time, especially in winter. This dampness can eventually cause
the floor panels to corrode. Use a high-pressure spray to clean
the underside of your car. This is
especially important in areas that
use road salt in winter. It is also a
good idea in humid climates and areas subject to salt air. Cars
equipped with ABS have a sensor
and wiring at each wheel. Be
careful not to damage them. Have the corrosion-preventive
coatings on the underside of your
car inspected and repaired
periodically.
Appearanc e Car e
Page 223 of 273

Compac
t Spar e Tir e
Your car has a compact spare tire that takes up less space. Use this spare tire as a temporary replace-
ment only. Get your regular tire
repaired or replaced and put back on
your car as soon as you can.
Check the inflation pressure of the
compact spare tire every time you
check the other tires. It should be
inflated to:6 0 ps i (42 0 kP a , 4. 2 kgf/cm 2
)
Follow thes
e precautions whenever
you are using the compact spare tire:
Do not exceed 50 mph (80 km/h)
under any circumstances.
This tire gives a harsher ride and
less traction on some road sur-
faces than the regular tire. Use
greater caution while driving on
this tire.
Do not mount snow chains on the
compact spare.
The wheel of the folding spare tire
is designed especially to fit your
car. Do not use your spare tire on
another car unless it is the same
make and model.
The compact spare tire has a shorter
tread life than a regular tire. Replace
it when you can see the tread wear
indicator bars. The replacementshould be the same size and design
tire, mounted on the same wheel.
The compact spare tire is not designed to be mounted on a regular
wheel, and the compact wheel is not designed for mounting a regular tire.
Takin g Car e o f th e Unexpecte d INDICATO
R LOCATIO N MAR K
TREA D WEA R INDICATO R BA R
Page 225 of 273
Changin
g a Fla t Tir e
6. Turn the jack's end bracket counterclockwise to loosen it, then
remove the jack. 7. Loosen the four wheel nuts 1/2
turn with the wheel wrench. 8. Find the jacking point nearest the
wheel you are removing. Place the
jack under the jacking point. Turn the end bracket clockwise until the top of the jack contacts the
jacking point. Make sure the
jacking point tab is resting in the
jack notch.
Takin g Car e o f th e Unexpecte d JACKIN
G POIN T
JAC K
Page 226 of 273
Changin
g a Fla t Tir e
9. Use the extension and wheel wrench as shown to raise the
vehicle until the flat tire is off the
ground.
10.Remove the wheel nuts and flat
tire. Temporarily place the flat tire
on the ground with the outside
surface of the wheel facing up.
You could scratch the wheel if you put it face down. 11.Before mounting the spare tire,
wipe any dirt off the mounting
surface of the wheel and hub with
a clean cloth. Wipe the hub
carefully, it may be hot from
driving.
CONTINUED
Takin g Car e o f th e Unexpecte d
EXTENSIO
N
WHEE L WRENC H BRAK
E HU B
Page 227 of 273
Changin
g a Fla t Tir e
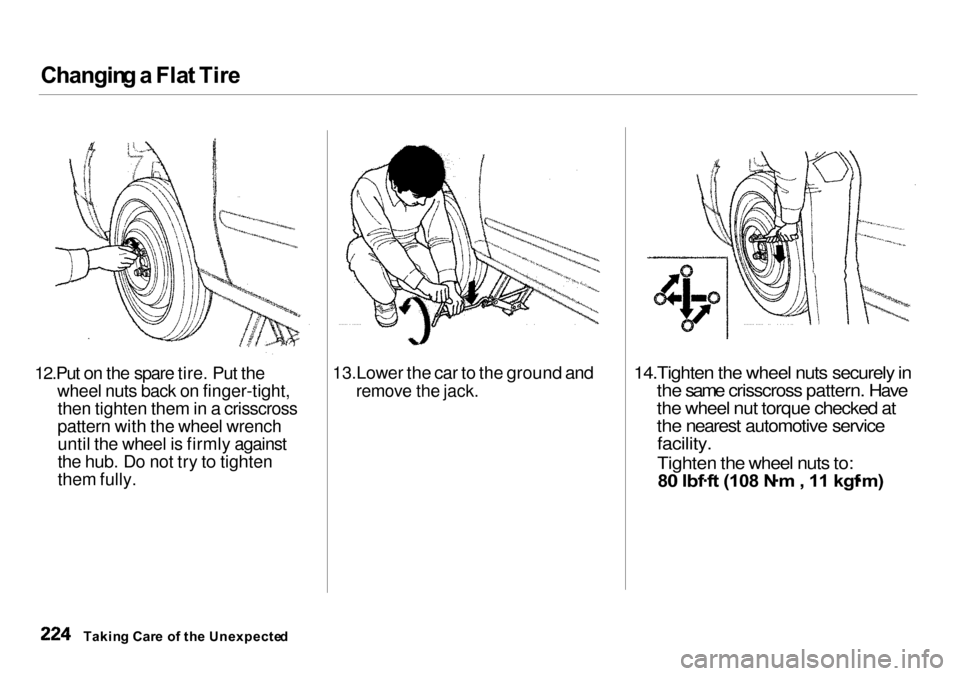
12.Put on the spare tire. Put the wheel nuts back on finger-tight,then tighten them in a crisscross
pattern with the wheel wrench
until the wheel is firmly against
the hub. Do not try to tighten
them fully. 13.Lower the car to the ground and
remove the jack.
14.Tighten the wheel nuts securely in
the same crisscross pattern. Have
the wheel nut torque checked at
the nearest automotive service
facility.
Tighten the wheel nuts to:
80 Ibf .
ft (108 N .
m , 11 kgf .
m)
Takin g Car e o f th e Unexpecte d
Page 228 of 273
Changin
g a Fla t Tir e
15.Remove the wheel cover or center
cap.
Place the flat tire face down in the
spare tire well.
16.Remove the spacer cone from the wing bolt, turn it over, and put itback on the bolt.
17.Secure the flat tire by screwing the wing bolt back into its hole. 18.Store the jack in its holder with
the end bracket facing to the right.
Turn the jack's end bracket to lock
it in place. Store the tool kit.
19.Store the wheel cover or centercap in the trunk. Make sure it does
not get scratched or damaged.
Takin g Car e o f th e Unexpecte d
SPACE
R
CON E
WIN
G BOL T
Loose items can fly around the
interior in a crash and could
seriously injure the occupants.
Store the wheel, jack and tools
securely before driving.