Page 228 of 381
5 - 9
COOL
OIL COOLER
EB501000
OIL COOLER
Order Job/Part Q’ty Remarks
Removing the oil cooler
Remove the parts in the order listed.
Radiator assembly Refer to “RADIATOR AND THERMO-
STAT”.
Exhaust pipe assembly Refer to “ENGINE” in chapter 4.
Engine oil Drain.
Refer to “CHANGING THE ENGINE
OIL” in chapter 3.
1 Oil cooler outlet hose 1
2 Bolt 1
3 Gasket 1
4 Oil cooler 1
5 Oil cooler inlet hose 1
6 Water pump outlet pipe 1
7 Water jacket joint inlet hose 1
8 Water jacket joint 1
For installation, reverse the removal
procedure.
Page 229 of 381
5 - 10
COOL
OIL COOLER
EB501010
CHECKING THE OIL COOLER
1. Check:
• oil cooler
Cracks/damage
®
Replace.
2. Check:
• oil cooler inlet hose
• oil cooler outlet hose
Cracks/damage/wear
®
Replace.
3. Check:
• water jacket joint
• water jacket joint inlet hose
• water pump outlet hose
Cracks/damage
®
Replace.
EB501020
INSTALLING THE OIL COOLER
1. Clean:
• mating surfaces of the oil cooler and
the crankcase
(with a cloth dampened with lacquer
thinner)
2. Install:
• O-ring
• oil cooler
1
• gasket 2
• bolt 3
NOTE:
• Before installing the oil cooler, lubri-
cate the oil cooler bolt and O-ring with
a thin coat of engine oil.
• Make sure that the O-ring is positioned
properly.
• Align the projection a on the oil
cooler with the projection b in the
crankcase.
1�
1�
3�
3�
2�
2�
a ab
b
New
New
T R..63 Nm (6.3 m · kg, 45 ft · lb)
Page 230 of 381
5 - 11
COOLOIL COOLER
3. Fill:
• cooling system
(with the specified amount of the rec-
ommended coolant)
Refer to “CHANGING THE COOLANT”
in chapter 3.
• crankcase
(with the specified amount of the rec-
ommended engine oil)
Refer to “CHANGING THE ENGINE
OIL” in chapter 3.
4. Check:
• cooling system
Leaks ® Repair or replace any faulty
part.
5. Measure:
• radiator cap opening pressure
Below the specified pressure ®
Replace the radiator cap.
Refer to “CHECKING THE RADIATOR”.
Page 245 of 381
6 - 10
EFI
ELECTRONIC FUEL INJECTION
CHECKING THE PRESSURE REGULATOR
1. Check:
• pressure regulator
Damage
®
Replace.
EAS00502
CHECKING AND ADJUSTING THE
THROTTLE POSITION SENSOR
NOTE:
Before adjusting the throttle position
sensor, the engine idling speed should
be properly adjusted.
1. Check:
• throttle position sensor
(installed on the throttle body)
t t t t t t t t t t t t t t t t t t t t t t t t t t t
a. Disconnect the throttle position sen-
sor coupler from the throttle position
sensor.
b. Connect the pocket tester (
W
´
1k) to
the throttle position sensor.
c. Measure the maximum throttle posi-
tion sensor resistance.
Out of specification
®
Replace the
throttle position sensor.
Positive tester probe
®
blue terminal
1
Negative tester probe
®
black/blue terminal
2
Maximum throttle position
sensor resistance
4.0 ~ 6.0 k
W
at 20 ˚C (68 ˚F)
(blue — black/blue)
B/LYL
231
Page 249 of 381
6 - 14
EFIELECTRONIC FUEL INJECTION
CHECKING THE FUEL PUMP AND
PRESSURE REGULATOR OPERATION
1. Check:
• pressure regulator operation
t t t t t t t t t t t t t t t t t t t t t t t t t t t
a. Remove the fuel tank and air filter
case cover.
Refer to “FUEL TANK AND AIR FIL-
TER” in chapter 3.
b. Disconnect the nagative pressure
hose 1 from the pressure regulator
at the joint.
c. Disconnect the injector fuel pipe 3 2
from the fuel distributor.
d. Connect the mity vac 3 onto the neg-
ative pressure hose from the pressure
regulator.
e. Install the pressure gauge 4 and
adapter 5 with the washers and
injector fuel pipe 3 onto the fuel dis-
tributor.
f. Install the fuel tank.
Refer to “FUEL TANK AND AIR FIL-
TER” in chapter 3.
g. Start the engine.
h. Measure the fuel pressure.
Mity vac
90890-06756
Pressure gauge
90890-03153
Adapter
90890-03151
T R..
Adapter
30 Nm (3.0 m • kg, 22 ft • lb)
Fuel pressure
250 ~ 260 kPa
(2.5 ~ 2.6 kgf/cm
2,
35.6 ~ 37.0 psi)
Page 330 of 381
7 - 80
CHAS
EB707000
SWINGARM AND DRIVE CHAIN
Order Job/Part Q’ty Remarks
Removing the swingarm and drive
chainRemove the parts in the order listed.
Drive sprocket Refer to “ENGINE” in chapter 4.
Rear wheel Refer to “REAR WHEEL, BRAKE DISC,
AND REAR WHEEL SPROCKET”.
Rear shock absorber assembly Refer to “REAR SHOCK ABSORBER
ASSEMBLY”.
1 Spacer 1
2 Adjusting bolt/locknut 2/2
3 Left drive chain puller 1
4 Right drive chain puller 1
5 Drive chain guard 1 1
6 Drive chain guard 3 1
7 Brake hose holder 3
8 Pivot shaft nut/washer 1/1
9 Right pivot shaft boss 1
SWINGARM AND DRIVE CHAIN
Page 335 of 381

7 - 85
CHAS
c. Remove the drive chain from the ker-
osine and completely dry it.
ACHTUNG:CAUTION:
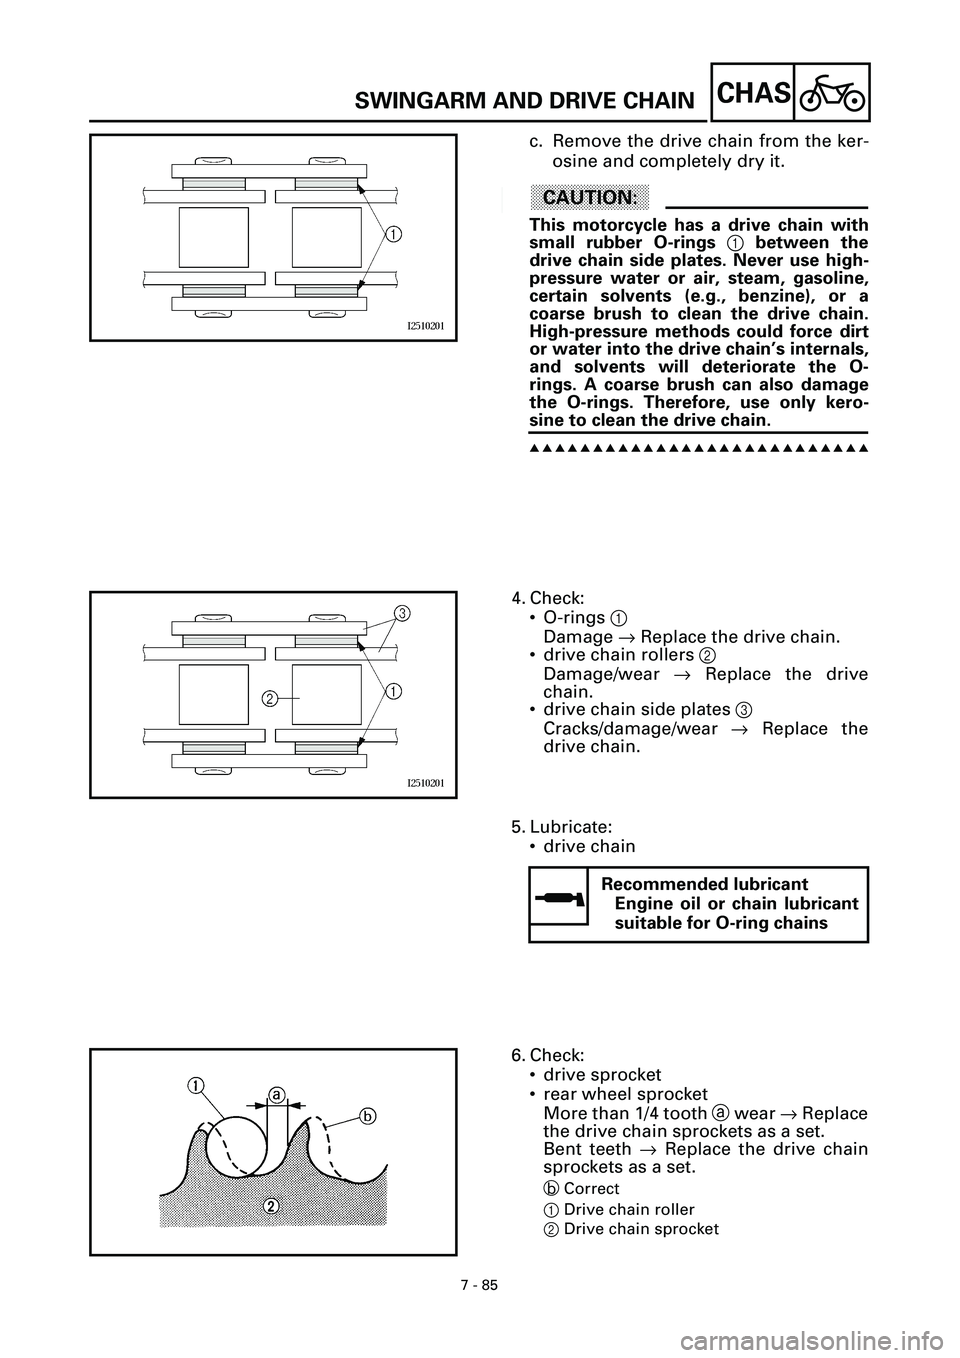
This motorcycle has a drive chain with
small rubber O-rings 1 between the
drive chain side plates. Never use high-
pressure water or air, steam, gasoline,
certain solvents (e.g., benzine), or a
coarse brush to clean the drive chain.
High-pressure methods could force dirt
or water into the drive chain’s internals,
and solvents will deteriorate the O-
rings. A coarse brush can also damage
the O-rings. Therefore, use only kero-
sine to clean the drive chain.
s s s s s s s s s s s s s s s s s s s s s s s s s s s
4. Check:
• O-rings 1
Damage ® Replace the drive chain.
• drive chain rollers 2
Damage/wear ® Replace the drive
chain.
• drive chain side plates 3
Cracks/damage/wear ® Replace the
drive chain.
5. Lubricate:
• drive chain
Recommended lubricant
Engine oil or chain lubricant
suitable for O-ring chains
6. Check:
• drive sprocket
• rear wheel sprocket
More than 1/4 tooth a wear ® Replace
the drive chain sprockets as a set.
Bent teeth ® Replace the drive chain
sprockets as a set.
b Correct
1Drive chain roller
2Drive chain sprocket
SWINGARM AND DRIVE CHAIN
Page 338 of 381

8 - 2
–+ELEC
SWITCHES
EB801000
SWITCHES
CHECKING SWITCH CONTINUITY
Check each switch for continuity with the
pocket tester. If the continuity reading is
incorrect, check the wiring connections and
if necessary, replace the switch.
CAUTION:
Never insert the tester probes into the cou-
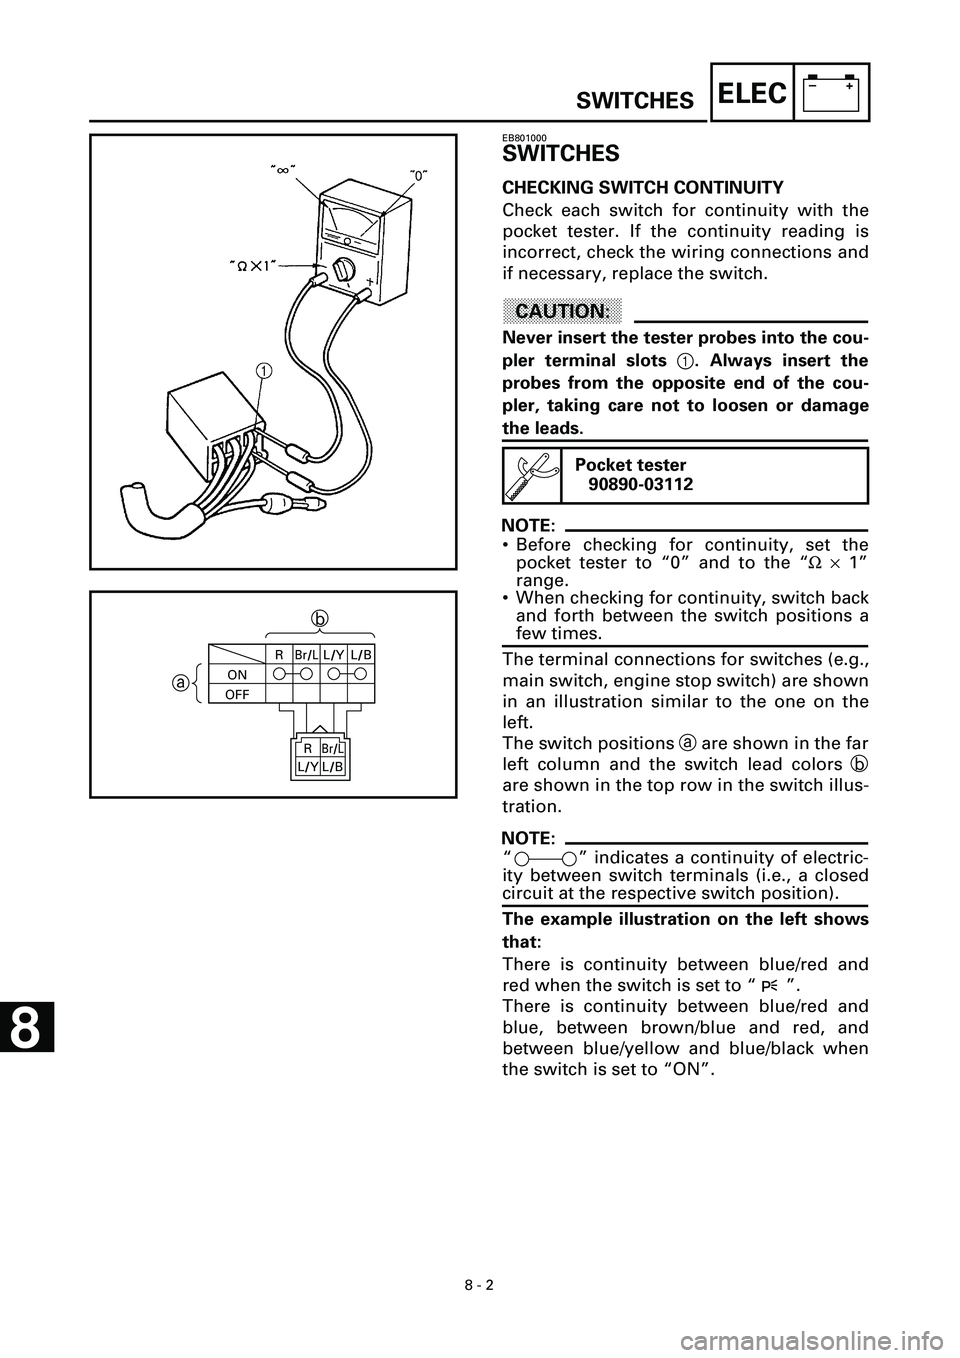
pler terminal slots
1
. Always insert the
probes from the opposite end of the cou-
pler, taking care not to loosen or damage
the leads.
NOTE:
• Before checking for continuity, set the
pocket tester to “0” and to the “
W
´
1”
range.
• When checking for continuity, switch back
and forth between the switch positions a
few times.
The terminal connections for switches (e.g.,
main switch, engine stop switch) are shown
in an illustration similar to the one on the
left.
The switch positions
a
are shown in the far
left column and the switch lead colors
b
are shown in the top row in the switch illus-
tration.
NOTE:
“ ” indicates a continuity of electric-
ity between switch terminals (i.e., a closed
circuit at the respective switch position).
The example illustration on the left shows
that:
There is continuity between blue/red and
red when the switch is set to “ ”.
There is continuity between blue/red and
blue, between brown/blue and red, and
between blue/yellow and blue/black when
the switch is set to “ON”.
Pocket tester
90890-03112
ONR
Br/LL/YL/B
OFF
ab
Br/L
L/B R
L/Y
8