Page 68 of 244

SOLARA_U
68
If your child restraint system requires
the use of a top strap, latch the hook
onto the anchor bracket and tighten the
top strap.
See the following instructions to install the
anchor bracket.
103 mm
(4.1 in.)
391 mm
(15.4 in.)Anchor bracket
178.5 mm
(7.0 in.)
Bolt
Spacer
On the filler p anel behind the rear seat
Center anchorÐ
a. Using the illustration as a guide, run
your fingers across the trim of the f iller
panel itself to locate the position of the
holes underneath.
b. Make a hole in the covering directly
above the hole in the f iller panel.
c. Insert a 15 mm (0.6 in.) spacer and
tighten down the anchor bracket for your
child restraint system with a bolt. Torque
the bolt to 16.5Ð24.7 N Vm (1.68Ð2.52
kgf Vm, 12.2Ð18.2 ft Vlbf).
Outside anchorsÐ
a. Should you select to use the outer
anchor positions, please contact your
Toyota dealer for proper modifications to
the filler p anel.
b. After modifications have been made to
the filler p anel, insert a 15 mm (0.6 in.)
spacer and tighten down the anchor brack-
et for your child restraint system with a
bolt. Torque the bolt to 16.5Ð24.7 N Vm
(1.68Ð2.52 kgf Vm, 12.2Ð18.2 ft Vlbf).
c. Securely latch the hook of the top strap
onto the anchor bracket and make sure
the hook does not make contact with the
filler p anel.
ÐTop strap anchors and
locations
Page 187 of 244

SOLARA_U187
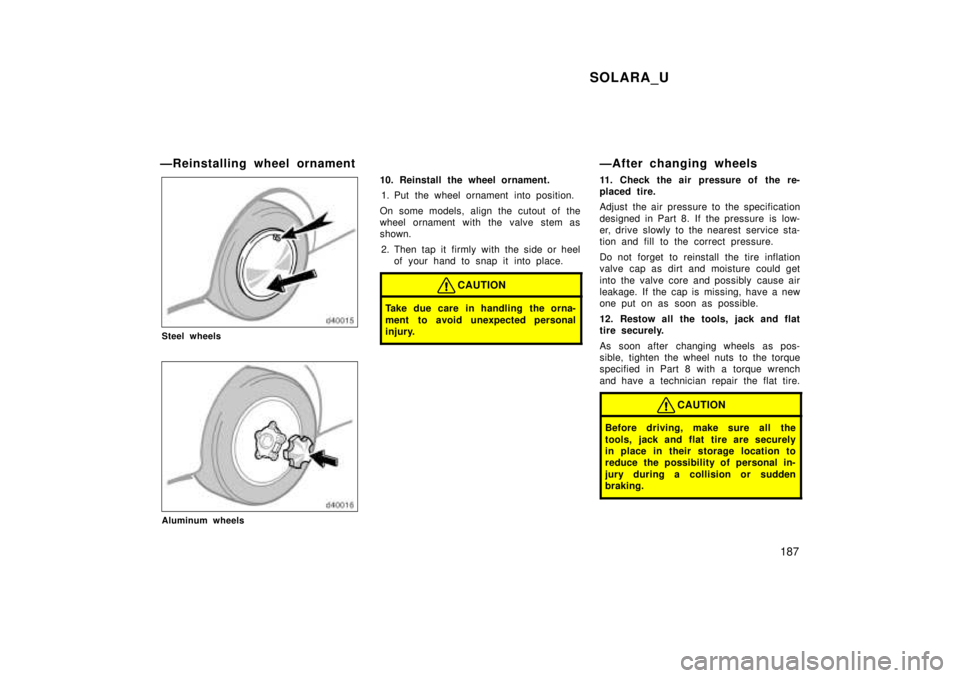
ÐReinstalling wheel ornament
Steel wheels
Aluminum wheels
10. Reinstall the wheel ornament.
1. Put the wheel ornament into position.
On some models, align the cutout of the
wheel ornament with the valve stem as
shown. 2. Then tap it firmly with the side or heel of your hand to snap it into place.
CAUTION
Take due care in handling the orna-
ment to avoid unexpected personal
injury.
ÐAfter changing wheels
11. Check the air pressure of the re-
placed tire.
Adjust the air pressure to the specification
designed in Part 8. If the pressure is low-
er, drive slowly to the nearest service sta-
tion and fill to the correct pressure.
Do not forget to reinstall the tire inflation
valve cap as dirt and moisture could get
into the valve core and possibly cause air
leakage. If the cap is missing, have a new
one put on as soon as possible.
12. Restow all the tools, jack and flat
tire securely.
As soon after changing wheels as pos-
sible, tighten the wheel nuts to the torque
specified in Part 8 with a torque wrench
and have a technician repair the flat tire.
CAUTION
Before driving, make sure all the
tools, jack and flat tire are securely
in place in their storage location to
reduce the possibility of personal in-
jury during a collision or s udden
braking.
Page 238 of 244
SOLARA_U239
Tires
Tire size and pressure: kPa (kgf/cm2
or bar, psi)
Tire size
FrontRearWheel size
P205/65R15200 (2.0, 29)200 (2.0, 29)15 �6JJ
P205/60R16220 (2.2, 32)220 (2.2, 32)16 �6JJ
When driving under the above vehicle load conditions at sustained high speeds above 160 km/h (100 mph), in countries where such
speeds are permitted by- law, inflate the front and rear tires to 240 kPa (2.4 kgf/cm2
or bar, 35 psi) provided that it does not exceed
the maximum cold tire pressure molded on the tire sidewall.
Wheel nut torque, N �m (kgf Vm, ft �lbf):
103 (10.5, 76)