1999 TOYOTA SOLARA headlights
[x] Cancel search: headlightsPage 14 of 244

SOLARA_U
14
You have 30 seconds to open a door after
using the wireless remote unlock feature.
If a door is not opened by then, both
doors will be automatically locked again.
If the ºLOCKº or ºUNLOCKº switch is kept
pressed in, the locking or unlocking opera-
tion is not repeated. Release the button
and then push again.
ºPANICº SWITCH
Pushing the ºPANICº switch blows the
horn intermittently and flashes the
headlights and tail lights.
The ºPANICº switch is used to deter the
vehicle theft when you witness anyone at-
tempting to brake into or damage your
vehicle.
The alarm will last for one minute. To stop
this in the midway, push the ºPANICº
switch once again, unlock any door with
the key or transmitter, or turn the ignition
key from the ºLOCKº to ºONº position.
The ºPANICº mode does not work when
the ignition key is in the ºONº position.
WIRELESS REMOTE CONTROL TRANS-
MITTER
The wireless remote control transmitter is
an electronic component. Observe the fol-
lowing instructions in order not to cause
damage on the transmitter.
� Do not leave the transmitter on the
places where the temperature becomes
high such as on the dashboard.
� Do not disassemble it.
� Avoid knocking it hard against other
objects or dropping it.
� Avoid putting it in water.
You can use up to 4 wireless remote con-
trol transmitters for the same vehicle.
Contact your Toyota dealer for detailed
information.
If the wireless remote control transmitter
does not actuate the doors or alarm, or
operate from a normal distance:
Page 21 of 244
SOLARA_U21
Theft deterrent systemÐ
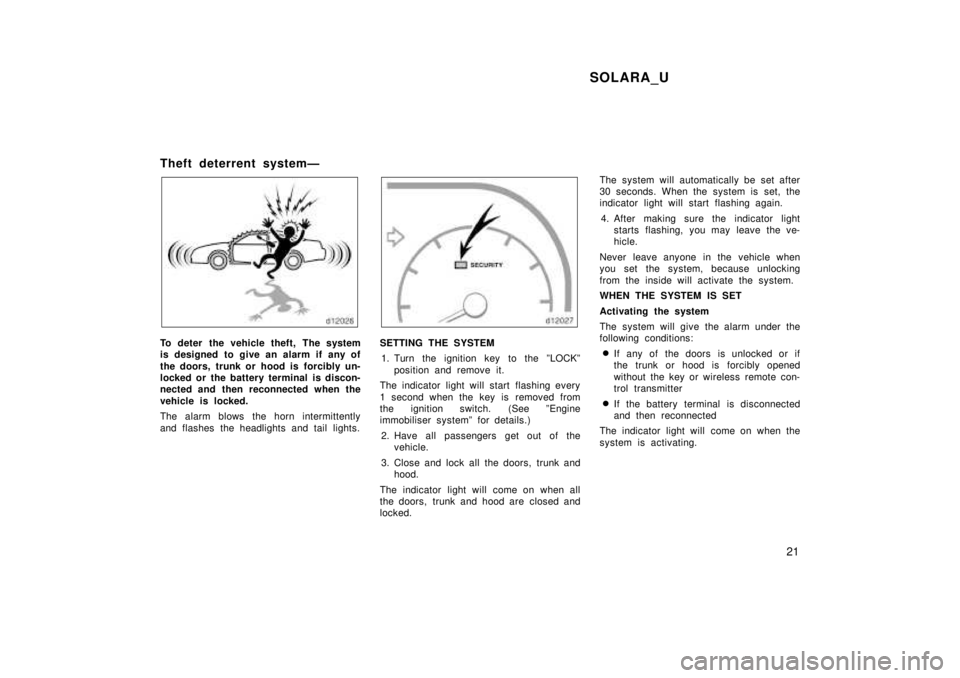
To deter the vehicle theft, The system
is designed to give an alarm if any of
the doors, trunk or hood is forcibly un-
locked or the battery terminal is discon-
nected and then reconnected when the
vehicle is locked.
The alarm blows the horn intermittently
and flashes the headlights and tail lights.SETTING THE SYSTEM
1. Turn the ignition key to the ºLOCKº position and remove it.
The indicator light will start flashing every
1 second when the key is removed from
the ignition switch. (See ºEngine
immobiliser systemº for details.)
2. Have all passengers get out of the vehicle.
3. Close and lock all the doors, trunk and hood.
The indicator light will come on when all
the doors, trunk and hood are closed and
locked. The system will automatically be set after
30 seconds. When the system is set, the
indicator light will start flashing again.
4. After making sure the indicator light starts flashing, you may leave the ve-
hicle.
Never leave anyone in the vehicle when
you set the system, because unlocking
from the inside will activate the system.
WHEN THE SYSTEM IS SET
Activating the system
The system will give the alarm under the
following conditions: � If any of the doors is unlocked or if
the trunk or hood is forcibly opened
without the key or wireless remote con-
trol transmitter
� If the battery terminal is disconnected
and then reconnected
The indicator light will come on when the
system is activating.
Page 71 of 244
SOLARA_U71
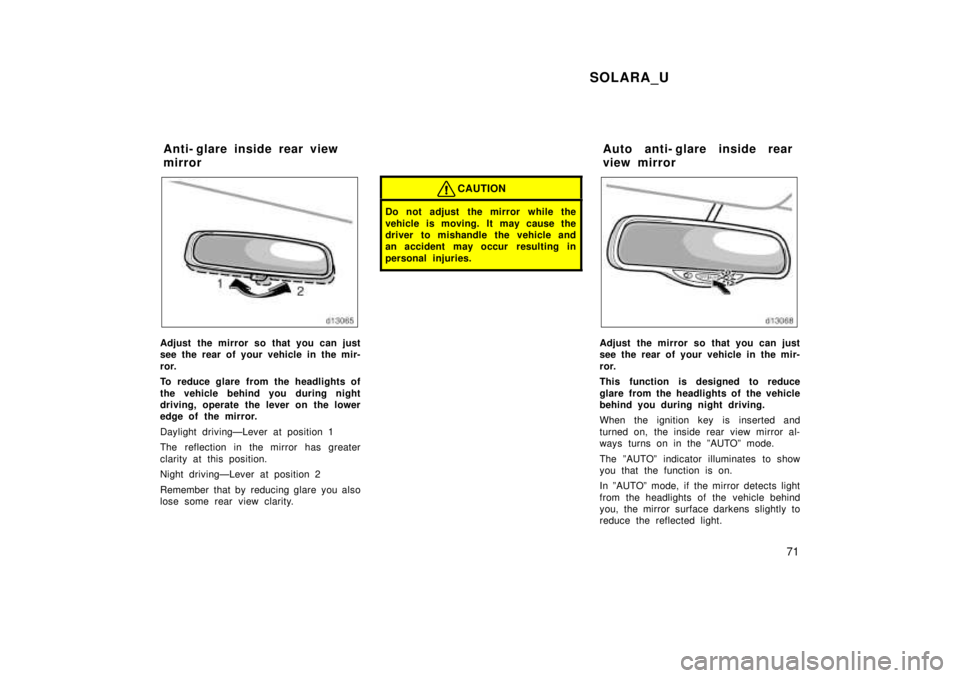
Adjust the mirror so that you can just
see the rear of your vehicle in the mir-
ror.
To reduce glare from the headlights of
the vehicle behind you during night
driving, operate the lever on the lower
edge of the mirror.
Daylight drivingÐLever at position 1
The reflection in the mirror has greater
clarity at this position.
Night drivingÐLever at position 2
Remember that by reducing glare you also
lose some rear view clarity.
CAUTION
Do not adjust the mirror while the
vehicle is moving. It may cause the
driver to mishandle the vehicle and
an accident may occur resulting in
personal injuries.
Adjust the mirror so that you can just
see the rear of your vehicle in the mir-
ror.
This function is designed to reduce
glare from the headlights of the vehicle
behind you during night driving.
When the ignition key is inserted and
turned on, the inside rear view mirror al-
ways turns on in the ºAUTOº mode.
The ºAUTOº indicator illuminates to show
you that the function is on.
In ºAUTOº mode, if the mirror detects light
from the headlights of the vehicle behind
you, the mirror surface darkens slightly to
reduce the reflected light.
Anti- glare inside rear view
mirror
Auto anti- glare inside rear
view mirror
Page 72 of 244
SOLARA_U
72
To turn off the automatic function, press
the switch on the ºOFFº side. The indica-
tor lights up in the ºOFFº side.
To turn on the automatic function again,
press the switch on the ºAUTOº side.
Adjust it before driving so that the rear
view is in the best condition.
When the outside air temperature is low,
it may take little longer for the mirror to
darken in response to the detection of
headlights.
CAUTION
Do not adjust the mirror while the
vehicle is moving. It may cause the
driver to mishandle the vehicle and
an accident may occur resulting in
personal injuries.
Sun visorsÐ
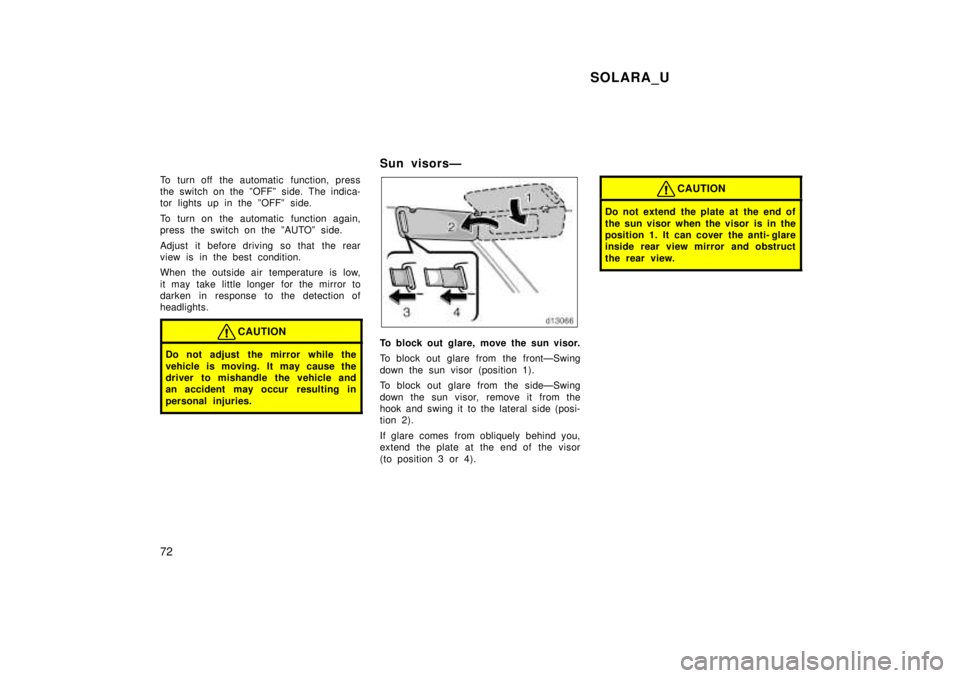
To block out glare, move the sun visor.
To block out glare from the frontÐSwing
down the sun visor (position 1).
To block out glare from the sideÐSwing
down the sun visor, remove it from the
hook and swing it to the lateral side (posi-
tion 2).
If glare comes from obliquely behind you,
extend the plate at the end of the visor
(to position 3 or 4).
CAUTION
Do not extend the plate at the end of
the sun visor when the visor is in the
position 1. It can cover the anti- glare
inside rear view mirror and obstruct
the rear view.
Page 75 of 244
SOLARA_U75
Part 1
OPERATION OF
INSTRUMENTS AND
CONTROLSÐ
Chapter 1- 4
Lights, Wipers and Defogger �
Headlights and turn signals
�Emergency flashers
�Instrument panel light control
�Front fog lights
�Interior light
�Ignition switch light
�Personal light
�Windshield wipers and washer
�Rear window and outside
rear view mirror defoggers
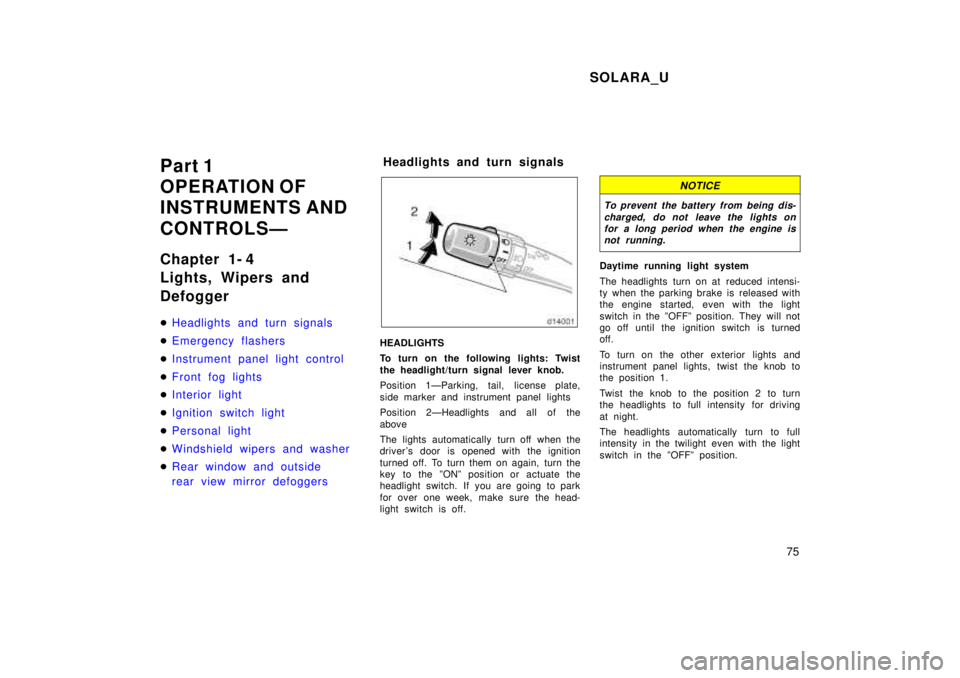
HEADLIGHTS
To turn on the following lights: Twist
the headlight/turn signal lever knob.
Position 1ÐParking, tail, license plate,
side marker and instrument panel lights
Position 2ÐHeadlights and all of the
above
The lights automatically turn off when the
driver 's door is opened with the ignition
turned off. To turn them on again, turn the
key to the ºONº position or actuate the
headlight switch. If you are going to park
for over one week, make sure the head-
light switch is off.
NOTICE
To prevent the battery from being dis-
charged, do not leave the lights onfor a long period when the engine is not running.
Daytime running light system
The headlights turn on at reduced intensi-
ty when the parking brake is released with
the engine started, even with the light
switch in the ºOFFº position. They will not
go off until the ignition switch is turned
off.
To turn on the other exterior lights and
instrument panel lights, twist the knob to
the position 1.
Twist the knob to the position 2 to turn
the headlights to full intensity for driving
at night.
The headlights automatically turn to full
intensity in the twilight even with the light
switch in the ºOFFº position.
Headlights and turn signals
Page 76 of 244
SOLARA_U
76
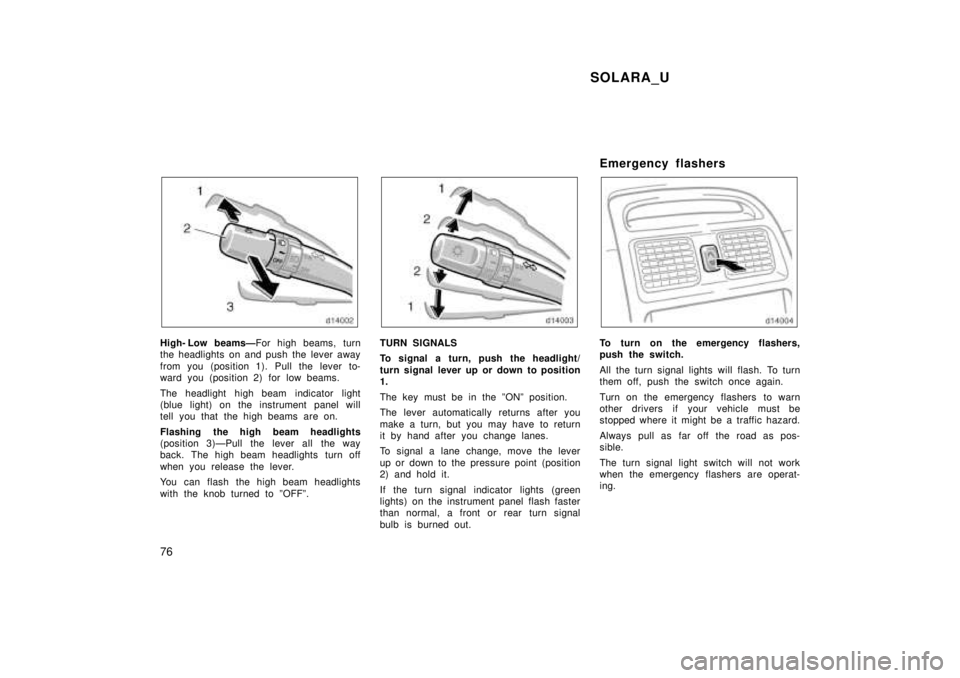
High- Low beamsÐ For high beams, turn
the headlights on and push the lever away
from you (position 1). Pull the lever to-
ward you (position 2) for low beams.
The headlight high beam indicator light
(blue light) on the instrument panel will
tell you that the high beams are on.
Flashing the high beam headlights
(position 3)ÐPull the lever all the way
back. The high beam headlights turn off
when you release the lever.
You can flash the high beam headlights
with the knob turned to ºOFFº.TURN SIGNALS
To signal a turn, push the headlight/
turn signal lever up or down to position 1.
The key must be in the ºONº position.
The lever automatically returns after you
make a turn, but you may have to return
it by hand after you change lanes.
To signal a lane change, move the lever
up or down to the pressure point (position
2) and hold it.
If the turn signal indicator lights (green
lights) on the instrument panel flash faster
than normal, a front or rear turn signal
bulb is burned out. Emergency flashersTo turn on the emergency flashers,
push the switch.
All the turn signal lights will flash. To turn
them off, push the switch once again.
Turn on the emergency flashers to warn
other drivers if your vehicle must be
stopped where it might be a traffic hazard.
Always pull as far off the road as pos-
sible.
The turn signal light switch will not work
when the emergency flashers are operat-
ing.
Page 200 of 244

SOLARA_U
200
Tire surface and wheel nuts
Check the tires carefully for cuts, damage
or excessive wear. See Chapter 7- 2 for
additional information. When checking the
tires, make sure no nuts are missing, and
check the nuts for looseness. Tighten
them if necessary.
Tire rotation
Rotate the tires every 12000 km (7500
miles). See Chapter 7- 2 for additional in-
formation.
Fluid leaks
Check underneath for leaking fuel, oil, wa-
ter or other fluid after the vehicle has
been parked for a while. If you smell fuel
fumes or notice any leak, have the cause
found and corrected immediately.
Doors and engine hood
Check that all doors including trunk lid
operate smoothly and all latches lock se-
curely. Make sure the engine hood sec-
ondary latch secures the hood from open-
ing when the primary latch is released.
INSIDE THE VEHICLE
Items listed below should be checked
regularly, e.g. while performing periodic
services, cleaning the vehicle, etc.
Lights
Make sure the headlights, stop lights, tail
lights, turn signal lights, and other lights
are all working. Check headlight aim.
Service reminder indicators and warning
buzzers
Check that all service reminder indicators
and warning buzzers function properly.
Steering wheel
Be alert for changes in steering condition,
such as hard steering or strange noise.
Seats
Check that all front seat controls such as
seat adjusters, seatback recliner, etc. op-
erate smoothly and that all latches lock
securely in any position. Check that the
head restraints move up and down
smoothly and that the locks hold securely
in any latched position. For folding- down
rear seatbacks, check that the latches
lock securely.
Seat belts
Check that the seat belt system such as
buckles, retractors and anchors operate
properly and smoothly. Make sure that the
belt webbings not cut, frayed, worn or
damaged.
Accelerator pedal
Check the pedal for smooth operation and
uneven pedal effort or catching.
Clutch pedal
Check the pedal for smooth operation.
Brake pedal
Check the pedal for smooth operation and
that the pedal has the proper clearance.
Check the brake booster function.
Brakes
At a safe place, check that the brakes do
not pull to one side when applied.
Parking brake
Check that the lever has the proper travel
and that, on a safe incline, your vehicle
is held securely with only the parking
brake applied.
Automatic transmission ºParkº mecha-
nism
Check the lock release button of the se-
lector lever for proper and smooth opera-
tion. On a safe incline, check that your
vehicle is held securely with the selector
lever in ºPº position and all brakes re-
leased.
Page 224 of 244
SOLARA_U
224
Battery recharging precautions
During recharging, the battery is pro-
ducing hydrogen gas.
Therefore, before recharging:
1. If recharging with the battery installed on the vehicle, be sure to disconnect
the ground cable.
2. Be sure the power switch on the re- charger is off when connecting the
charger cables to the battery and when
disconnecting them.
CAUTION
�Always charge the battery in an un-
confined area. Do not charge the
battery in a garage or closed room
where there is not sufficient ventila-
tion.
� Only do a slow charge (5A or less).
Charging at a quicker rate is dan-
gerous. The battery may explode,
causing personal injuries.
NOTICE
Never recharge the battery while the
engine is running. Also, be sure allaccessories are turned off.
Checking and replacing fuses
Ty p e C
Ty p e A
Ty p e B
Good
Good
Good Brown
Brown
Brown
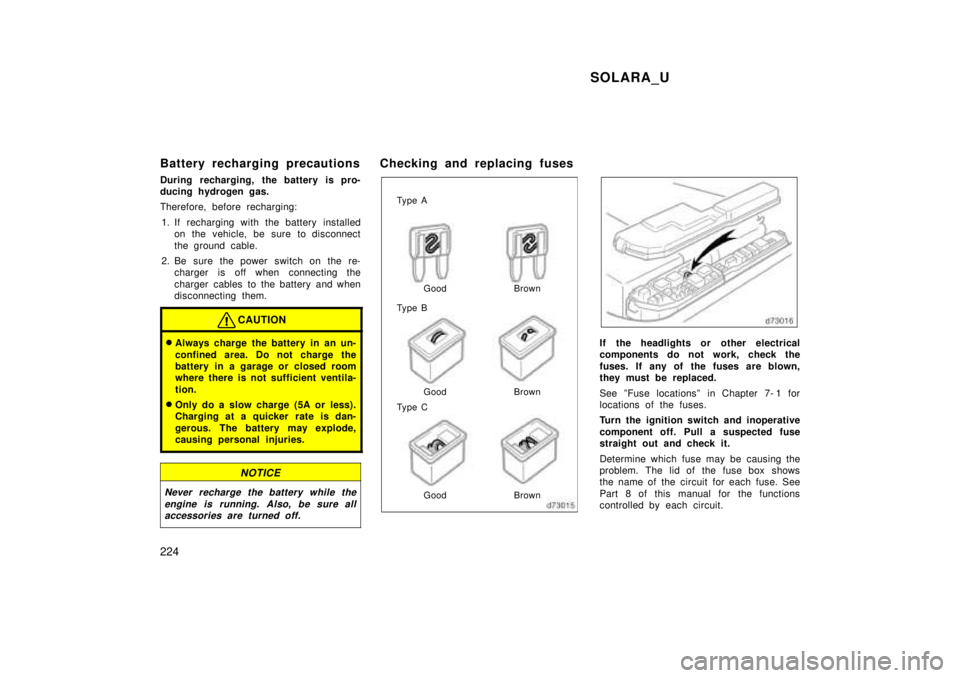
If the headlights or other electrical
components do not work, check the
fuses. If any of the fuses are blown,
they must be replaced.
See ºFuse locationsº in Chapter 7- 1 for
locations of the fuses.
Turn the ignition switch and inoperative
component off. Pull a suspected fuse
straight out and check it.
Determine which fuse may be causing the
problem. The lid of the fuse box shows
the name of the circuit for each fuse. See
Part 8 of this manual for the functions
controlled by each circuit.