1999 TOYOTA SOLARA bulb
[x] Cancel search: bulbPage 76 of 244

SOLARA_U
76
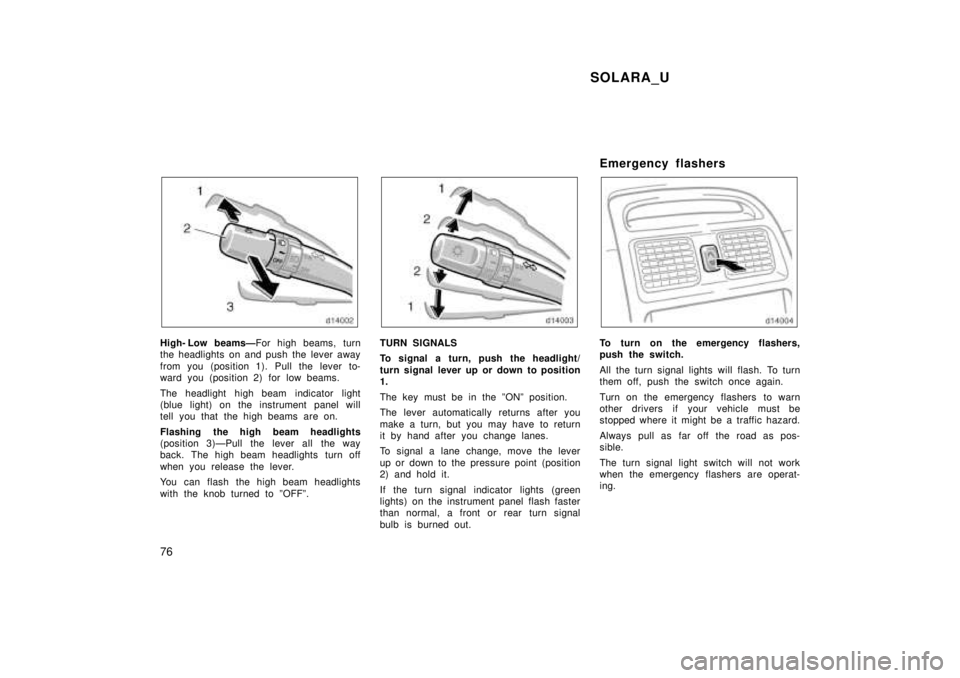
High- Low beamsÐ For high beams, turn
the headlights on and push the lever away
from you (position 1). Pull the lever to-
ward you (position 2) for low beams.
The headlight high beam indicator light
(blue light) on the instrument panel will
tell you that the high beams are on.
Flashing the high beam headlights
(position 3)ÐPull the lever all the way
back. The high beam headlights turn off
when you release the lever.
You can flash the high beam headlights
with the knob turned to ºOFFº.TURN SIGNALS
To signal a turn, push the headlight/
turn signal lever up or down to position 1.
The key must be in the ºONº position.
The lever automatically returns after you
make a turn, but you may have to return
it by hand after you change lanes.
To signal a lane change, move the lever
up or down to the pressure point (position
2) and hold it.
If the turn signal indicator lights (green
lights) on the instrument panel flash faster
than normal, a front or rear turn signal
bulb is burned out. Emergency flashersTo turn on the emergency flashers,
push the switch.
All the turn signal lights will flash. To turn
them off, push the switch once again.
Turn on the emergency flashers to warn
other drivers if your vehicle must be
stopped where it might be a traffic hazard.
Always pull as far off the road as pos-
sible.
The turn signal light switch will not work
when the emergency flashers are operat-
ing.
Page 84 of 244

SOLARA_U
84 (g) Stop and check.
(h) Take vehicle to
Toyota dealer.
(i) Close all doors.
(j) Replace bulb.(type A)
(type B)
(f) Fill up tank.
Low fuel level
warning light
If the indicator or Do this.
buzzer comes on...
(l) Add washer fluid.
(m) Take vehicle to Toyota dealer.
(n) Remove key.Key reminder
buzzer
(k) Take vehicle to
Toyota dealer
immediately.
If the indicator or Do this.
buzzer comes on... (a) Brake System Warning Light
This light has the following functions:
Parking brake reminder
If this light is on, make sure the parking
brake is fully released. The light should
go off.
Low brake fluid level warning
If this light comes on and stays on while
you are driving, slow down and pull off
the road. Then stop the vehicle carefully.
Remember that stopping distance and ped-
al effort may be increased. There may be
a problem somewhere in the brake sys-
tem. Check the fluid level of the see-
through reservoir.
To make sure the parking brake has not
caused the warning light to come on,
check to see that the parking brake is
fully released.
If the brake fluid level is low...
At a safe place, test your brakes by start-
ing and stopping.
� If you judge that the brakes still work
adequately, drive cautiously to your
nearest dealer or shop for repairs.
� If the brakes are not working, have the
vehicle towed in for repairs. (For tow-
ing information, see Part 4.)
Page 86 of 244

SOLARA_U
86
The light may occasionally flicker when
the engine is idling or it may come on
briefly after a hard stop. There is no
cause for concern if it then goes out when
the engine is accelerated slightly.
The light may come on when the oil level
is extremely low. It is not designed to
indicate low oil level, and the oil level
must be checked using the level dipstick.
NOTICE
Do not drive the vehicle with the
warning light onÐeven for one block.It may ruin the engine.
(h) ºABSº Warning Light
This light warns that there is a problem
somewhere in your anti- lock brake sys-
tem.
If the light comes on while you are driv-
ing, have your vehicle checked by your
Toyota dealer as soon as possible.
The light will come on when the ignition
key is turned to the ºONº position. After
a few seconds, the light will go off. When the ºABSº warning light is on (and
the brake system warning light is off), the
brake system operates conventionally but
anti- lock brake system is not assisting
brake performance so that the wheels can
lock- up during sudden braking or braking
on slippery road surfaces.
(i) Open Door Warning Light
This light remains on until all the doors
and back door are completely closed.
(j) Rear Light Failure Warning Light
If this light comes on when the headlight
switch is turned on (at the first or second
clickstop), it indicates that one or more of
the tail lights are burned out.
If it comes on when the brake pedal is
depressed, one or more stop lights are
burned out.
Have defective bulbs replaced as soon as
possible.
(k) SRS Airbag Warning Light
This light will come on when the igni-
tion key is turned to the ºACCº or
ºONº position. After about 6 seconds,
the light will go off. This means the
systems of the airbag and front seat
belt pretensioner are operating properly.The warning light system monitors the air-
bag sensor assembly, seat belt pretension-
er assembly, inflators, warning light, inter-
connecting wiring and power sources.
If either of the following conditions occurs,
this indicates a malfunction somewhere in
the parts monitored by the warning light
system. Contact your Toyota dealer as
soon as possible to service the vehicle.
� The light does not come on when the
ignition key is turned to the ºACCº or
ºONº position or remains on.
� The light comes on or flashes while
driving.
(l) Low Windshield Washer Fluid Level Warning Light
The light warns that the windshield washer
fluid level is too low. Add washer fluid at
your earliest opportunity. (For instructions,
see ºAdding washer fluidº in Chapter 7- 3.)
(m) ºTRAC OFFº Indicator/Warning Light
This light comes on when the ignition key
is turned to ºONº, and will go off after a
few seconds. This means that the system
is operating properly.
Page 87 of 244

SOLARA_U87
If one of the following conditions occurs,
this indicates a malfunction somewhere in
the parts monitored by the warning light
system. Contact your Toyota dealer as
soon as possible to service the vehicle.
� The light remains on more than a few
seconds after the ignition switch is
turned on.
� The light comes on while driving even
if the ºTRAC OFFº switch is not
pushed.
� The light flashes.
(n) Key Reminder Buzzer
This buzzer reminds you to remove the
key when you open the driver 's door with
the ignition key in the ºACCº or ºLOCKº
position. CHECKING SERVICE REMINDER INDICA-
TORS (except the low fuel level warning
light and low windshield washer fluid
level warning light)
1. Apply the parking brake.
2. Open one of the doors. The open door warning light should
come on.
3. Close the door. The open door warning light should go
off.
4. Turn the ignition key to ºACCº. The SRS airbag warning light should
come on. It goes off after about 6 se-
conds.
5. Turn the ignition key to ºONº, but do not start the engine.
All the service reminder indicators except
the open door warning light, SRS airbag
warning light and low windshield washer
fluid level warning light should come on.
The ºABSº warning light goes off after a
few seconds.
If any service reminder indicator or warn-
ing buzzer does not function as described
above, either the bulb is burned out or the
circuit is in need of repair. Have it
checked by your Toyota dealer as soon as
possible.
Page 210 of 244

SOLARA_U
210
Parts and tools
Here is a list of parts and tools you will
need on performing do- it- yourself mainte-
nance. Remember all Toyota parts are de-
signed in metric sizes, so your tools must
be metric.
Checking the engine oil level
Parts (if level is low):
� Engine oil API grade SJ,
ºEnergy- Conservingº or ILSAC
multigrade having viscosity proper for
your climate
Tools: � Rag or paper towel
� Funnel (only for adding oil)
Checking the engine coolant level
Parts (if level is low): � ºToyota Long Life Coolantº or equiva-
lent
See Chapter 7- 2 for details about cool-
ant type selection.
� Demineralized or distilled water
Tools: � Funnel (only for adding coolant)
Checking brake fluid
Parts (if level is low): � SAE J1703 or FMVSS No. 116 DOT 3
brake fluid Tools:
� Rag or paper towel
� Funnel (only for adding fluid)
Checking power steering fluid
Parts (if level is low): � Automatic transmission fluid DEXRON )
II or III
Tools: � Rag or paper towel
� Funnel (only for adding fluid)
Checking battery condition
Tools: � Warm water
� Baking soda
� Grease
� Conventional wrench (for terminal
clamp bolts)
Checking and replacing fuses
Parts (if replacement is necessary): � Genuine Toyota fuse or equivalent with
same amperage rating as original
Adding washer fluid
Parts: � Water
� Washer fluid containing antifreeze (for
winter use)
Tools: � Funnel Replacing light bulbs
Parts:
� Bulb with same number and wattage
rating as original (See charts in ºRe-
placing light bulbsº in Chapter 7- 3.)
Tools: � Screwdriver
� Flat- bladed screwdriver
Page 222 of 244

SOLARA_U
222
Part 7
DO- IT- YOURSELF
MAINTENANCEÐ
Chapter 7- 3
Electrical components �
Checking battery condition
�Battery recharging precautions
�Checking and replacing fuses
�Adding washer fluid
�Replacing light bulbs
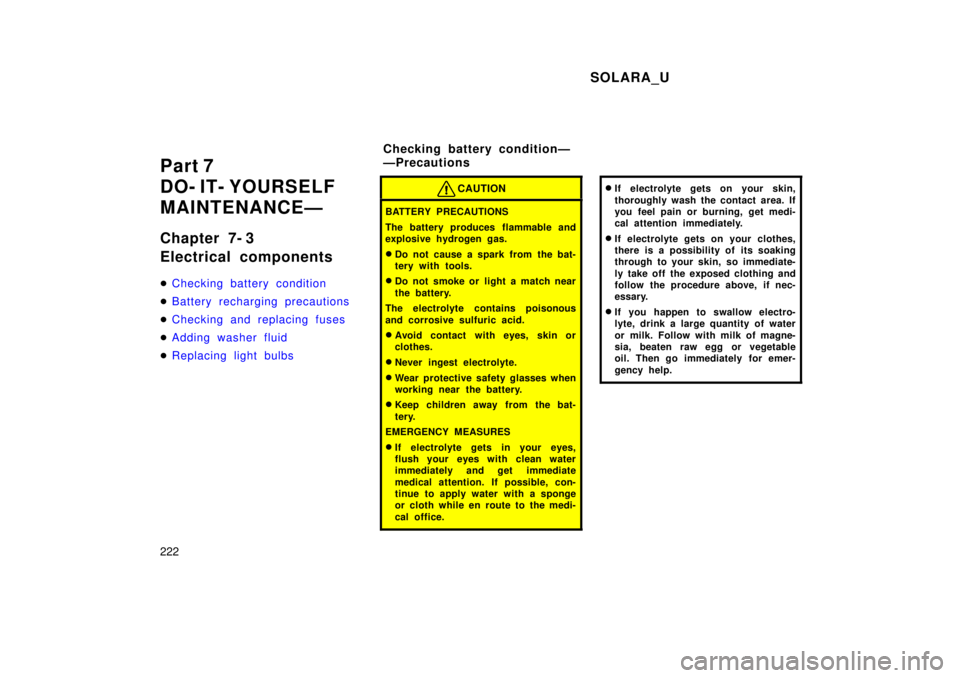
CAUTION
BATTERY PRECAUTIONS
The battery produces flammable and
explosive hydrogen gas. �
Do not cause a spark from the bat-
tery with tools.
� Do not smoke or light a match near
the battery.
The electrolyte contains poisonous
and corrosive sulfuric acid. � Avoid contact with eyes, skin or
clothes.
� Never ingest electrolyte.
� Wear protective safety glasses when
working near the battery.
� Keep children away from the bat-
tery.
EMERGENCY MEASURES � If electrolyte gets in your eyes,
flush your eyes with clean water
immediately and get immediate
medical attention. If possible, con-
tinue to apply water with a sponge
or cloth while en route to the medi-
cal office.
�If electrolyte gets on your skin,
thoroughly wash the contact area. If
you feel pain or burning, get medi-
cal attention immediately.
� If electrolyte gets on your clothes,
there is a possibility of its soaking
through to your skin, so immediate-
ly take off the exposed clothing and
follow the procedure above, if nec-
essary.
� If you happen to swallow electro-
lyte, drink a large quantity of water
or milk. Follow with milk of magne-
sia, beaten raw egg or vegetable
oil. Then go immediately for emer-
gency help.
Checking battery c onditionÐ
ÐPrecautions
Page 226 of 244

SOLARA_U
226
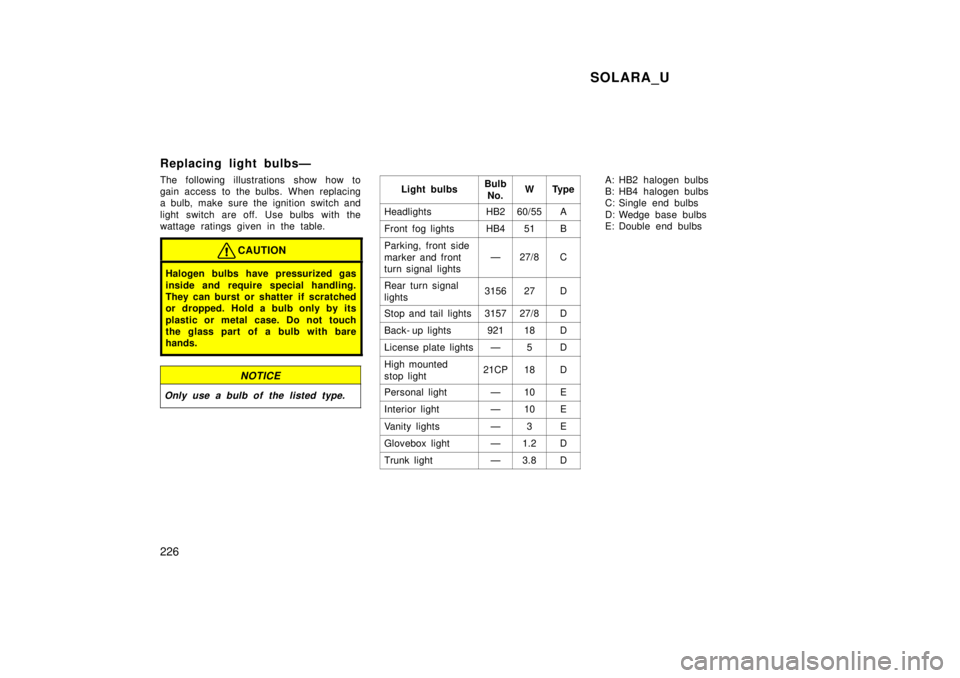
Replacing light bulbsÐ
The following illustrations show how to
gain access to the bulbs. When replacing
a bulb, make sure the ignition switch and
light switch are off. Use bulbs with the
wattage ratings given in the table.
CAUTION
Halogen bulbs have pressurized gas
inside and require special handling.
They can burst or shatter if scratched
or dropped. Hold a bulb only by its
plastic or metal case. Do not touch
the glass part of a bulb with barehands.
NOTICE
Only use a bulb of the listed type.
Light bulbsBulb
No.WTy p e
HeadlightsHB260/55A
Front fog lightsHB451B
Parking, front side
marker and front
turn signal lights
Ð27/8C
Rear turn signal
lights315627D
Stop and tail lights315727/8D
Back- up lights92118D
License plate lightsÐ5D
High mounted
stop light21CP18D
Personal lightÐ10E
Interior lightÐ10E
Vanity lightsÐ3E
Glovebox lightÐ1.2D
Trunk lightÐ3.8D
A: HB2 halogen bulbs
B: HB4 halogen bulbs
C: Single end bulbs
D: Wedge base bulbs
E: Double end bulbs
Page 227 of 244

SOLARA_U227
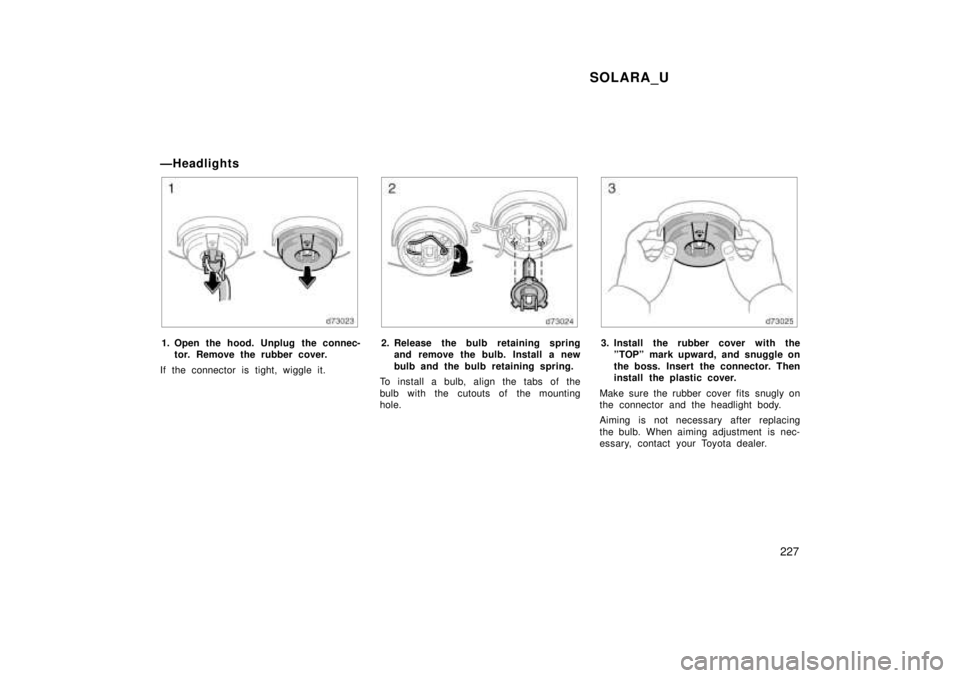
ÐHeadlights
1. Open the hood. Unplug the connec-
tor. Remove the rubber cover.
If the connector is tight, wiggle it.2. Release the bulb retaining spring and remove the bulb. Install a new
bulb and the bulb retaining spring.
To install a bulb, align the tabs of the
bulb with the cutouts of the mounting
hole.3. Install the rubber cover with the ºTOPº mark upward, and snuggle on
the boss. Insert the connector. Then
install the plastic cover.
Make sure the rubber cover fits snugly on
the connector and the headlight body.
Aiming is not necessary after replacing
the bulb. When aiming adjustment is nec-
essary, contact your Toyota dealer.