Page 4 of 272
name. SIENNA (45403U)
4
1. Engine coolant temperature gauge
2. Tachometer
3. Service reminder indicators and
indicator lights4. Speedometer
5. Fuel gauge
6. Trip meter reset knob7. Odometer and two trip meters
Instrument cluster overview
�With tachometer
ProCarManuals.com
Page 5 of 272
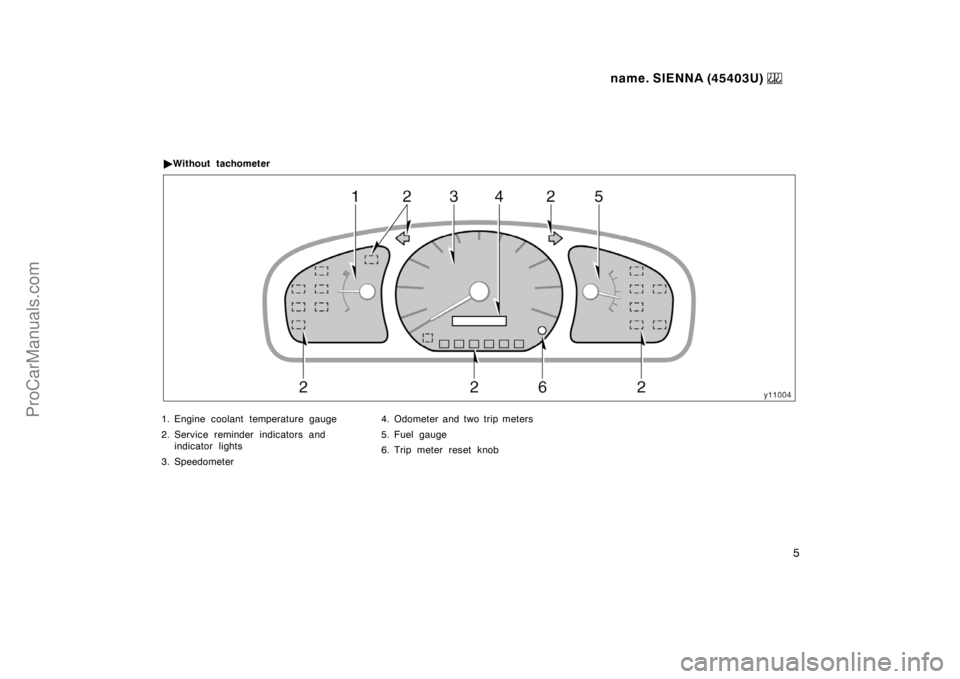
name. SIENNA (45403U)
5
1. Engine coolant temperature gauge
2. Service reminder indicators and
indicator lights
3. Speedometer4. Odometer and two trip meters
5. Fuel gauge
6. Trip meter reset knob �Without tachometer
ProCarManuals.com
Page 115 of 272

11 5
Part 1
OPERATION OF
INSTRUMENTS AND
CONTROLS—
Chapter 1−5
Gauges, Meters and
Service reminder
indicators
�Fuel gauge
�Engine coolant temperature
gauge
�Tachometer
�Od")
name. SIENNA (45403U)
11 5
Part 1
OPERATION OF
INSTRUMENTS AND
CONTROLS—
Chapter 1−5
Gauges, Meters and
Service reminder
indicators
�Fuel gauge
�Engine coolant temperature
gauge
�Tachometer
�Odometer and two trip meters
�Service reminder indicators and
warning buzzers
Fuel gauge
With tachometer
Low fuel
level warning
light
Without tachometer
The gauge works when the ignition
switch is on and indicates the approxi-
mate quantity of fuel remaining in the
tank.
Nearly full—Needle at ”F”
Nearly empty—Needle at ”E”
It is a good idea to keep the tank over
1/4 full.
This fuel gauge has a non−return type
needle which remains at the last indicated
position when the ignition switch is turned
off.
If the fuel level approaches ”E” or the low
fuel level warning light comes on, fill the
fuel tank as soon as possible.
On inclines or curves, due to the move-
ment of fuel in the tank, the fuel gauge
needle may fluctuate or the low fuel level
warning light may come on earlier than
usual.
If the fuel tank is completely empty, the
malfunction indicator lamp comes on. Fill
the fuel tank immediately.
The indicator lamp goes off after driving
several times. If the indicator lamp does
not go off, contact your Toyota dealer as
soon as possible.
ProCarManuals.com
Page 117 of 272

11 7
Tachometer
The tachometer indicates engine speed
in thousands of rpm
( revolutions per
minute). Use it while driving to select
correct shift points and to prevent en-
gine")
name. SIENNA (45403U)
11 7
Tachometer
The tachometer indicates engine speed
in thousands of rpm
( revolutions per
minute). Use it while driving to select
correct shift points and to prevent en-
gine lugging and overrevving.
Driving with the engine running too fast
causes excessive engine wear and poor
fuel economy. Remember, in most cases
the slower the engine speed, the greater
the fuel economy.
NOTICE
Do not let the indicator needle get
into the red zone. This may cause
severe engine damage.
Odometer and two trip meters
With tachometer
Without tachometer
This meter displays the odometer and
two trip meters.
1. Odometer—It shows the total distance
the vehicle has been driven.
2. Two trip meters—They show two differ-
ent distances independently driven
since the last time each trip meter was
set to zero.
You can use one trip meter to calculate
the fuel economy and the other to
measure the distance on each trip. All
trip meter data is cancelled if the elec-
trical power source is disconnected.
3. Trip meter reset knob—It can reset the
two trip meters to zero, and also
change the meter display.
To change the meter display, quickly
push and release the knob. The meter
display changes in the order from the
odometer to trip meter A to trip meter
B, then back to the odometer each
time you push.
To reset the trip meter A to zero, dis-
play the meter A reading, then push
and hold the knob until the meter is
set to zero. The same process can be
applied for resetting the trip meter B.
ProCarManuals.com
Page 248 of 272

248�
Take special care when adding air to
the compact spare tire. The smaller
tire size can gain pressure very quick-
ly. Add compressed air in small quanti-
ties and check the")
name. SIENNA (45403U)
248�
Take special care when adding air to
the compact spare tire. The smaller
tire size can gain pressure very quick-
ly. Add compressed air in small quanti-
ties and check the pressure often until
it reaches the specified pressure.
�Do not bleed or reduce tire pressure
after driving. It is normal for the tire
pressure to be higher after driving.
�Never exceed the vehicle capacity
weight. The passenger and luggage
weight should be located so that the
vehicle is balanced.
�Be sure to reinstall the tire inflation
valve caps. Without the valve caps,
dirt or moisture could get into the valve
core and cause air leakage. If the caps
have been lost, have new ones put on
as soon as possible.
Checking and replacing tires
Tread wear indicator
CHECKING YOUR TIRES
Check the tires tread for the tread wear
indicators. If the indicators show, re-
place the tires.
The tires on your Toyota have built−in
tread wear indicators to help you know
when the tires need replacement. When
the tread depth wears to 1.6 mm (0.06
in.) or less, the indicators will appear. If
you can see the indicators in two or more
adjacent grooves, the tire should be re-
placed. The lower the tread, the higher
the risk of skidding.
The effectiveness of snow tires is lost
if the tread wears down below 4 mm
(0.16 in.).Check the tires regularly for damage
such as cuts, splits and cracks. If any
damage is found, consult with a techni-
cian and have the tire repaired or re-
placed.
Even if the damage does not appear seri-
ous, a qualified technician should examine
the damage. Objects which have pene-
trated the tire may have caused internal
damage.
Any tires which are over six years old
must be checked by a qualified techni-
cian even if damage is not obvious.
Tires deteriorate with age even if they
have never or seldom been used.
This applies also to the spare tire and
tires stored for future use.
REPLACING YOUR TIRES
When replacing a tire, use only the
same size and construction as original-
ly installed and with the same or great-
er load capacity.
Using any other size or type of tire may
seriously affect handling, ride, speedome-
ter/odometer calibration, ground clearance,
and clearance between the body and tires
or snow chains.
ProCarManuals.com

4
1. Engine coolant temperature gauge
2. Tachometer
3. Service reminder indicators and
indicator lights4. Speedometer
5. Fuel gauge
6. Trip meter reset knob7. Odometer and two")