Page 212 of 268
4RUNNER ()
212
NOTICE
Use only a cable or chain specifically intended for use in towing vehicles.Securely fasten the cable or chain tothe towing hook provided.
Before towing, release the parking brake
and put the transmission in neutral (manu-
al) or ºNº (automatic) and the transfer in
ºH2º (four- wheel drive models). The key
must be in ºACCº (engine off) or ºONº
(engine running).
CAUTION
If the engine is not running, the pow-
er assist for the brakes and steering
will not work so steering and braking
will be much harder than usual.
Towing hook
cover
Clip
Removing clip
Installing clip 1. Use a phillips-
head screwdriver and re-
move the clip.
2. Unhook the towing hook cover.
ÐRemoving towing hook cover
for emergency towing
(four- wheel drive models)
Page 214 of 268

4RUNNER ()
214
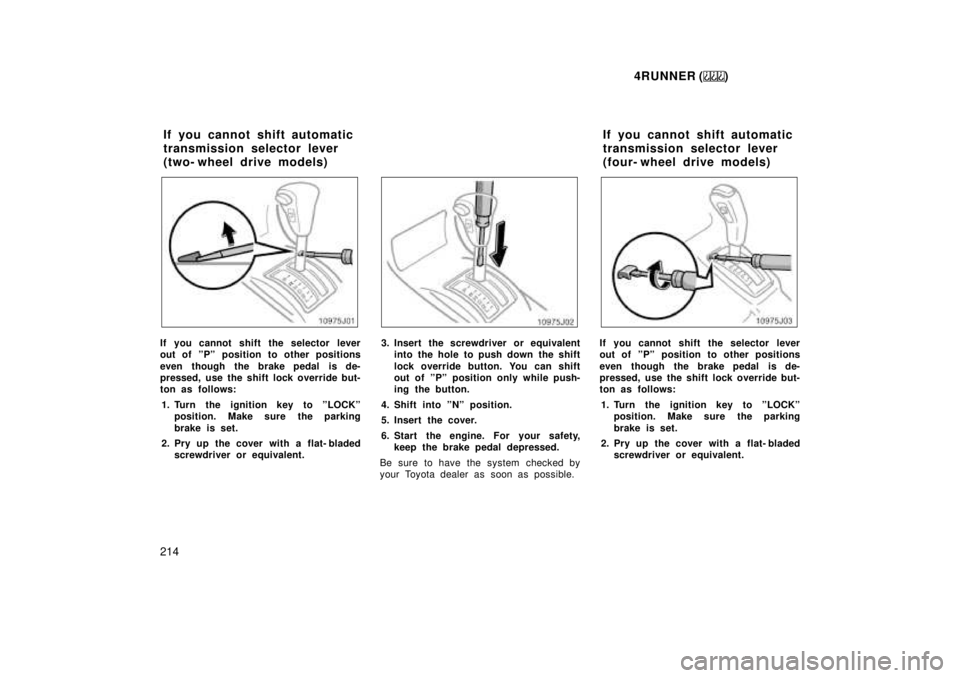
If you cannot shift the selector lever
out of ºPº position to other positions
even though the brake pedal is de-
pressed, use the shift lock override but-
ton as follows: 1. Turn the ignition key to ºLOCKº position. Make sure the parking
brake is set.
2. Pry up the cover with a flat- bladed screwdriver or equivalent.3. Insert the screwdriver or equivalent into the hole to push down the shift
lock override button. You can shift
out of ºPº position only while push-
ing the button.
4. Shift into ºNº position.
5. Insert the cover.
6. Start the engine. For your safety, keep the brake pedal depressed.
Be sure to have the system checked by
your Toyota dealer as soon as possible.If you cannot shift the selector lever
out of ºPº position to other positions
even though the brake pedal is de-
pressed, use the shift lock override but-
ton as follows: 1. Turn the ignition key to ºLOCKº position. Make sure the parking
brake is set.
2. Pry up the cover with a flat- bladed screwdriver or equivalent.
If you cannot shift automatic
transmission selector lever
(two- wheel drive models)
If you cannot shift automatic
transmission selector lever
(four- wheel drive models)
Page 225 of 268

4RUNNER ()225
Tire surface and wheel nuts
Check the tires carefully for cuts, damage
or excessive wear. See Chapter 7- 2 for
additional information. When checking the
tires, make sure no nuts are missing, and
check the nuts for looseness. Tighten
them if necessary.
Tire rotation
Rotate the tires every 12000 km (7500
miles). See Chapter 7- 2 for additional in-
formation.
Fluid leaks
Check underneath for leaking fuel, oil, wa-
ter or other fluid after the vehicle has
been parked for a while. If you smell fuel
fumes or notice any leak, have the cause
found and corrected immediately.
Doors and engine hood
Check that all doors including back door
operate smoothly and all latches lock se-
curely. Make sure the engine hood sec-
ondary latch secures the hood from open-
ing when the primary latch is released.
INSIDE THE VEHICLE
Items listed below should be checked
regularly, e.g. while performing periodic
services, cleaning the vehicle, etc.
Lights
Make sure the headlights, stop lights, tail
lights, turn signal lights, and other lights
are all working. Check headlight aim.
Service reminder indicators and warning
buzzers
Check that all service reminder indicators
and warning buzzers function properly.
Steering wheel
Check that it has the specified freeplay.
Be alert for changes in steering condition,
such as hard steering or strange noise.
Seats
Check that all seat controls such as seat
adjusters, seatback recliner, etc. operate
smoothly and that all latches lock securely
in any position. Check that the head re-
straint move up and down smoothly and
that the locks hold securely in any latched
position. For folding- down rear seatbacks,
swing- up rear seat cushions and detach-
able temporary third seat, check that the
latches lock securely.Seat belts
Check that the seat belt system such as
buckles, retractors and anchors operate
properly and smoothly. Make sure the belt
webbing is not cut, frayed, worn or dam-aged.
Accelerator pedal
Check the pedal for smooth operation and
uneven pedal effort or catching.
Clutch pedal
Check the pedal for smooth operation.
Brake pedal
Check the pedal for smooth operation and
that the pedal has the proper clearance.
Check the brake booster function.
Brakes
At a safe place, check that the brakes do
not pull to one side when applied.
Parking brake
Check that the lever has the proper travel
and that, on a safe incline, your vehicle
is held securely with only the parking
brake applied.
Page 263 of 268
4RUNNER ()263
BRAKES
Minimum pedal clearance when depressed
with the pressure of 490 N (50 kgf, 110 lbf)
with the engine running, mm (in.):
75 (2.9)
Pedal freeplay, mm (in.): 1Ð6 (0.04Ð0.24)
Pad wear limit, mm (in.): 1.0 (0.04)
Lining wear limit, mm (in.): 1.0 (0.04)
Parking brake adjustment when pulled with
the force of 196 N (20 kgf, 44 lbf): 7Ð9 clicks
Fluid type: SAE J1703 or FMVSS No.116 DOT 3
STEERING
Wheel freeplay: Less than 30 mm (1.2 in.)
Power steering fluid type: Automatic transmission fluid DEXRON �II or III Tires
Tire size
Tire pressure
kPa (kgf/cm 2
or bar, psi)
Front Rear
P265/70R16
P225/75R15 220 (2.2, 32) 220 (2.2, 32)
200 (2.0, 29) 200 (2.0, 29) Wheel size
7J
16 *
1
7JJ
16 *
2
7J
15 *
1
7JJ
15 *
2
* 1
: Vehicles with steel wheels
* 2
: Vehicles with aluminum wheel
Wheel nut torque, N
Vm (kgf Vm, ft Vlbf):
110 (11.5, 83)