1999 SUZUKI GRAND VITARA Evap canister
[x] Cancel search: Evap canisterPage 344 of 656

ENGINE AND EMISSION CONTROL SYSTEM (SEQUENTIAL MULTIPORT FUEL INJECTION FOR H27 ENGINE) 6E2-11
TERMINAL CIRCUIT TERMINAL CIRCUIT TERMINAL CIRCUIT
C51-3-1 Intake air temp. (IAT) sensor C51-3-13 Power source for TP sensor C51-3-25 Ground for IAT sensor, MAP sensor and
oxygen sensor (if equipped)
C51-3-2 Engine coolant temp. (ECT) sensor C51-3-14 Power source for MAP sensor (if
equipped)C51-3-26 Ground for CMP sensor
C51-3-3 Knock sensor C51-3-15 Power source
C51-3-4 Power source C51-3-16—
C51-3-5 Ground for MAF sensor C51-3-17 Ground
C51-3-6 Ground C51-3-18 Pressure switch in 4WD air pump
assembly
C51-3-7 4WD switch C51-3-19—
C51-3-8 Manifold absolute pressure (MAP)
sensor (if equipped)C51-3-20 Ignition switch
C51-3-9 Throttle position (TP) sensor C51-3-21 Heated oxygen sensor-1 (Bank2) (if
equipped)
C51-3-10 Mass air flow (MAF) sensor C51-3-22 Heated oxygen sensor-2 (Bank1) (if
equipped)
C51-3-11 Heated oxygen sensor-1 (Bank1) (if
equipped)C51-3-23 Heated oxygen sensor-2 (Bank2) (if
equipped)
C51-3-12 Ground for TP sensor C51-3-24 Ground for ECT sensor
TERMINAL CIRCUIT TERMINAL CIRCUIT TERMINAL CIRCUIT
C51-1-1 Shift solenoid-B (A/T) C51-1-13 CMP sensor C51-1-25 Power steering pressure switch
C51-1-2 Shift solenoid-A (A/T) C51-1-14 Vehicle speed sensor C51-1-26 4WD Low switch
C51-1-3—C51-1-15 EVAP canister purge valve C51-1-27 Transmission range switch “L” (A/T)
C51-1-4 IAC valve (stepper motor coil 2) C51-1-16 IAC valve (stepper motor coil 4) C51-1-28 Transmission range switch “2” (A/T)
C51-1-5 IAC valve (stepper motor coil 1) C51-1-17 IAC valve (stepper motor coil 3)
C51-1-6 Transmission range switch “R” (A/T) C51-1-18 Transmission range switch “D” (A/T)
C51-1-7 Transmission range switch “P” (A/T) C51-1-19 Transmission range switch “N” (A/T)
C51-1-8 TCC solenoid (A/T) C51-1-20 Shield wire ground for A/T output
speed sensor
C51-1-9 4WD air pump assembly C51-1-21 Shield wire ground for A/T input
speed sensor
C51-1-10 A/T input speed sensor (–) C51-1-22 A/T output speed sensor (–)
C51-1-11 A/T input speed sensor (+) C51-1-23 A/T output speed sensor (+)
C51-1-12 CMP sensor C51-1-24 Engine start signal
TERMINAL CIRCUIT TERMINAL CIRCUIT TERMINAL CIRCUIT
C51-2-1 Fuel injector No.2 C51-2-13 EGR valve (stepper motor coil 3) (if
equipped)C51-2-25 Ignition coil assembly for No.4
C51-2-2 Fuel injector No.1 C51-2-14 EGR valve (stepper motor coil 2) (if
equipped)C51-2-26 Ignition coil assembly for No.3
C51-2-3—C51-2-15 EGR valve (stepper motor coil 1) (if
equipped)C51-2-27 Ignition coil assembly for No.2
C51-2-4 Heater of HO2S-1 (Bank1) (if equipped) C51-2-16 Heater of HO2S-2 (Bank1) (if equipped) C51-2-28 Ignition coil assembly for No.1
C51-2-5 Heater of HO2S-1 (Bank2) (if equipped) C51-2-17 Heater of HO2S-2 (Bank2) (if equipped) C51-2-29—
C51-2-6—C51-2-18—C51-2-30 Ground for CKP sensor shield wire (if
equipped)
C51-2-7 Ground C51-2-19 CKP sensor (+) (if equipped)
C51-2-8 Fuel injector No.4 C51-2-20 CKP sensor (–) (if equipped)
C51-2-9 Fuel injector No.3 C51-2-21 Fuel injector No.6
C51-2-10—C51-2-22 Fuel injector No.5
C51-2-11—C51-2-23 Ignition coil assembly for No.6
C51-2-12 EGR valve (stepper motor coil 4) (if
equipped)C51-2-24 Ignition coil assembly for No.5
Page 345 of 656

6E2-12 ENGINE AND EMISSION CONTROL SYSTEM (SEQUENTIAL MULTIPORT FUEL INJECTION FOR H27 ENGINE)
Engine and Emission Control Input/Output Table
Diagnosis
Refer to Section 6-1.
Ignition coil with igniter
HO2S heater control
Input
Output Function
Main relay control
Fuel pump control
Injection control
Ignition control
MIL control Idle air control
EVAP purge control
EGR control
A/C control
A/C condensor fan
controlMain relay
Fuel pump relay
Injectors
MIL
EVAP canister purge
valve IAC valve
EGR valve (if equipped)
HO2S (if equipped)
A/C amplifier
(if equipped)
A/C condensor fan
relay (if equipped)
CMP sensor
MAF sensor
TP sensor
ECT sensor
IAT sensor
HO2S (sensor 1)(if equipped)
VSS
Blower fan switch
Rear defogger switch
PSP switch
Ignition switch
Starter switch
A/C amplifier (if equipped)
TR switch (A/T VEHICLE)
Light switch
Knock sensor
CO adjusting resistor (if equipped)
Test swich terminal (Vehicle with monitor connector)
Diag. swich terminal (Vehicle with monitor connector)
Brake switch (A/T VEHICLE)
ABS control module
Page 346 of 656

ENGINE AND EMISSION CONTROL SYSTEM (SEQUENTIAL MULTIPORT FUEL INJECTION FOR H27 ENGINE) 6E2-13
On-Vehicle Service
General
When hoses are disconnected and system components are removed for service, reinstall components properly,
and route and connect hoses correctly after service. Refer to figure on previous page for proper routing of
hoses.
1. Brake booster hose pipe 8. EGR pipe (if equipped) 15. EVAP canister
2. Vacuum hose for fuel pressure regulator 9. Exhaust manifold 16. Tank pressure control valve
3. Fuel pressure regulator 10. Heated oxygen sensor 17. To fuel tank
4. MAP sensor (if equipped) 11. EGR valve (if equipped) 18. Cap
5. Engine coolant hose 12. PCV hose [A]: Vehicle without monitor connector
6. EVAP canister purge valve 13. IAC valve [B]: Vehicle with monitor connector
7. Breather hose 14. IAC hose
Page 352 of 656

ENGINE AND EMISSION CONTROL SYSTEM (SEQUENTIAL MULTIPORT FUEL INJECTION FOR H27 ENGINE) 6E2-19
6) Remove surge tank cover.
Remove intake air pipe (1) and surge tank pipe (2).
7) Disconnect connectors of TP sensor and IAC valve.
8) Disconnect ground wire at connector.
9) Remove clamp bracket (1) and harness clamps from intake
collector.
10) Disconnect connectors of EVAP canister purge valve (1),
MAP sensor and EGR valve (5).
11) Disconnect PCV valve (6) from cylinder head with hose con-
nected, breather hose (3) from cylinder head and EVAP can-
ister purge valve hose (2).
12) Detach EGR pipe (4) from intake air collector.
13) Remove throttle body (3) and intake collector (2) from intake
manifold (1).
14) Disconnect hoses of PCV from throttle body.
15) Remove throttle body from intake collector.
NOTE:
TP sensor (4), or other components containing rubber
must not be placed in a solvent or cleaner bath. A
chemical reaction will cause these parts to swell,
harden or get distorted.
Don’t put drills or wires into passages for cleaning. It
causes damages in passages.
Page 353 of 656

6E2-20 ENGINE AND EMISSION CONTROL SYSTEM (SEQUENTIAL MULTIPORT FUEL INJECTION FOR H27 ENGINE)
CLEANING
Clean throttle body bore and bypass air passages (1) by blowing
compressed air.
INSTALLATION
1) Clean mating surfaces and install throttle body gasket to
intake collector (1) with new gasket (2).
2) Install throttle body to intake collector and tighten bolts.
3) Connect PCV hose.
4) Install throttle body and intake collector to intake manifold
with new intake collector gaskets.
5) Install EGR pipe with new gaskets.
6) Connect breather hose and EVAP canister purge valve hose
and install PCV valve to cylinder head.
7) Connect connectors of EVAP canister purge valve, MAP
sensor and EGR valve.
Fix wire harness with clamps.
8) Install clamp bracket to intake collector.
9) Connect ground wire connector.
10) Connect connectors of TP sensor, ground and IAC valve.
11) Install surge tank pipe to intake manifold with new gaskets
and intake air pipe to throttle body. Install surge tank cover.
12) Connect engine coolant hoses to throttle body.
13) Connect accelerator cable and A/T throttle cable (A/T).CAUTION:
Do not blow compressed air through bypass air pas-
sage with IAC valve installed to throttle body. This will
cause IAC valve to malfunction.
TP sensor, idle air control valve or other components
containing rubber must not be places in a solvent or
cleaner bath.
A chemical reaction will cause these parts to swell,
harden or get distorted.
Page 377 of 656

6E2-44 ENGINE AND EMISSION CONTROL SYSTEM (SEQUENTIAL MULTIPORT FUEL INJECTION FOR H27 ENGINE)
Emission Control System
EGR system (if equipped)
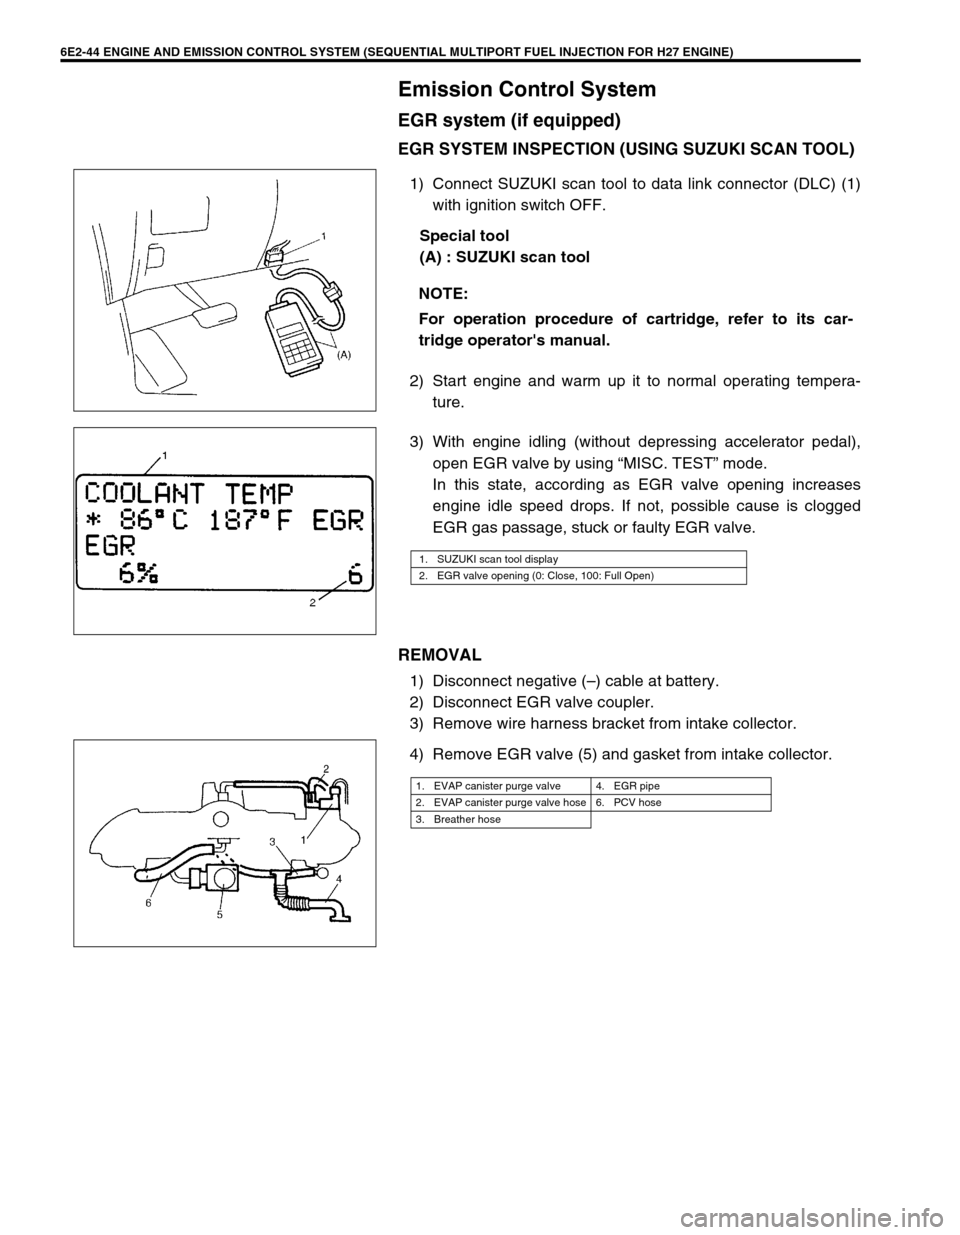
EGR SYSTEM INSPECTION (USING SUZUKI SCAN TOOL)
1) Connect SUZUKI scan tool to data link connector (DLC) (1)
with ignition switch OFF.
Special tool
(A) : SUZUKI scan tool
2) Start engine and warm up it to normal operating tempera-
ture.
3) With engine idling (without depressing accelerator pedal),
open EGR valve by using “MISC. TEST” mode.
In this state, according as EGR valve opening increases
engine idle speed drops. If not, possible cause is clogged
EGR gas passage, stuck or faulty EGR valve.
REMOVAL
1) Disconnect negative (–) cable at battery.
2) Disconnect EGR valve coupler.
3) Remove wire harness bracket from intake collector.
4) Remove EGR valve (5) and gasket from intake collector.NOTE:
For operation procedure of cartridge, refer to its car-
tridge operator's manual.
1. SUZUKI scan tool display
2. EGR valve opening (0: Close, 100: Full Open)
1. EVAP canister purge valve 4. EGR pipe
2. EVAP canister purge valve hose 6. PCV hose
3. Breather hose
Page 378 of 656

ENGINE AND EMISSION CONTROL SYSTEM (SEQUENTIAL MULTIPORT FUEL INJECTION FOR H27 ENGINE) 6E2-45
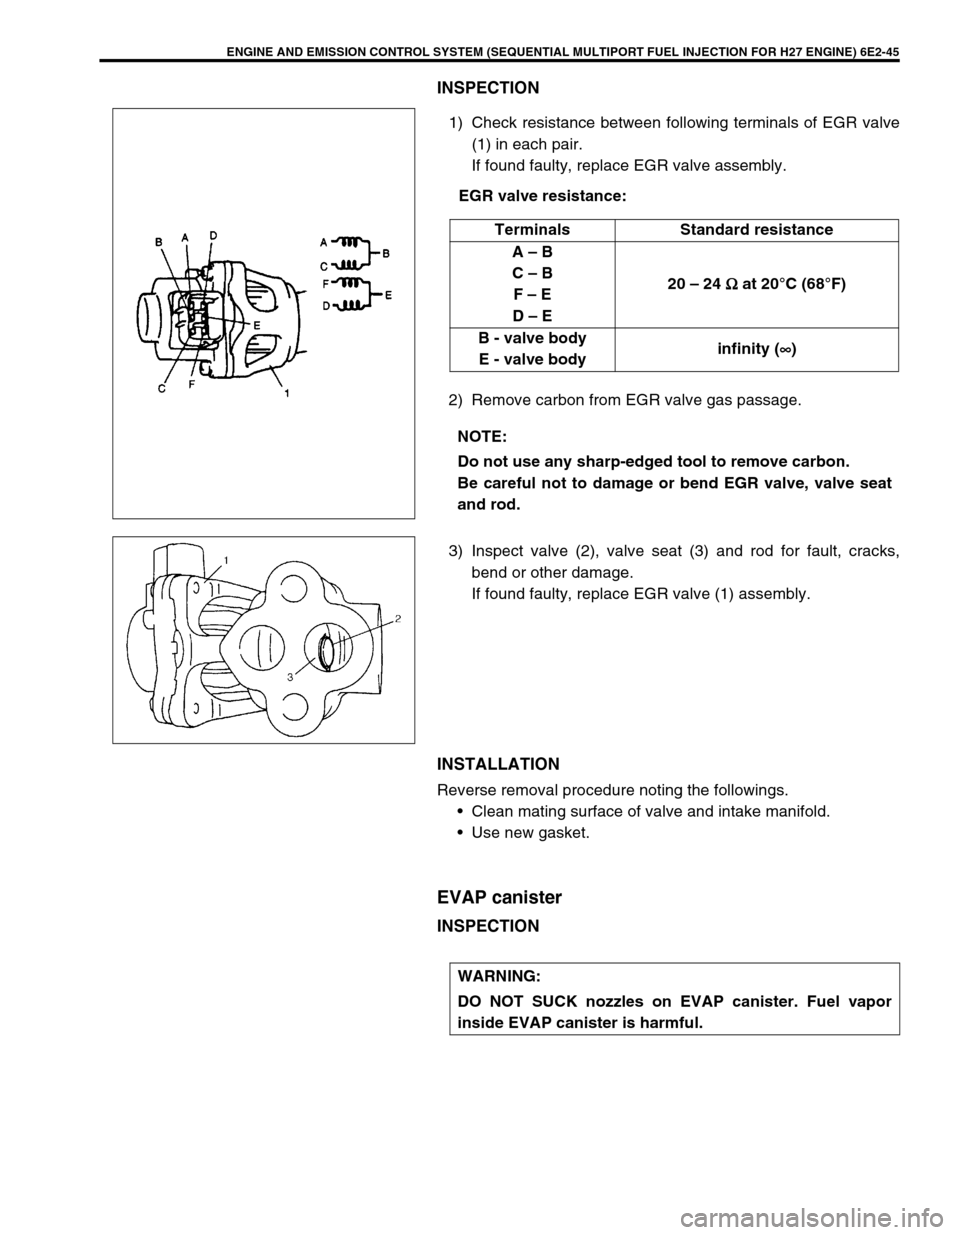
INSPECTION
1) Check resistance between following terminals of EGR valve
(1) in each pair.
If found faulty, replace EGR valve assembly.
EGR valve resistance:
2) Remove carbon from EGR valve gas passage.
3) Inspect valve (2), valve seat (3) and rod for fault, cracks,
bend or other damage.
If found faulty, replace EGR valve (1) assembly.
INSTALLATION
Reverse removal procedure noting the followings.
•Clean mating surface of valve and intake manifold.
•Use new gasket.
EVAP canister
INSPECTION
Terminals Standard resistance
A – B
C – B
F – E
D – E20 – 24 Ω
ΩΩ Ω at 20°C (68°F)
B - valve body
E - valve bodyinfinity (∞
∞∞ ∞)
NOTE:
Do not use any sharp-edged tool to remove carbon.
Be careful not to damage or bend EGR valve, valve seat
and rod.
WARNING:
DO NOT SUCK nozzles on EVAP canister. Fuel vapor
inside EVAP canister is harmful.
Page 379 of 656

6E2-46 ENGINE AND EMISSION CONTROL SYSTEM (SEQUENTIAL MULTIPORT FUEL INJECTION FOR H27 ENGINE)
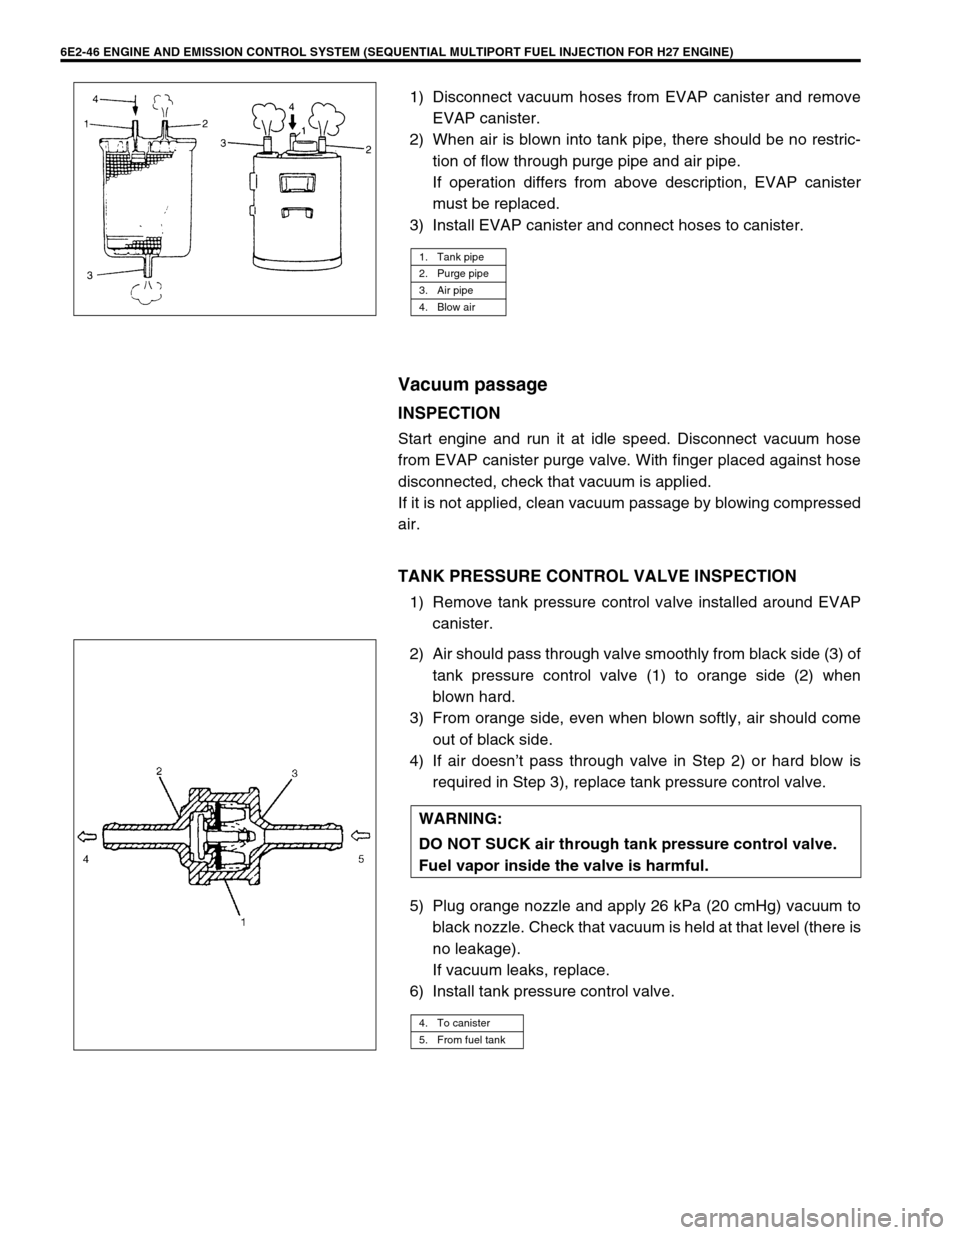
1) Disconnect vacuum hoses from EVAP canister and remove
EVAP canister.
2) When air is blown into tank pipe, there should be no restric-
tion of flow through purge pipe and air pipe.
If operation differs from above description, EVAP canister
must be replaced.
3) Install EVAP canister and connect hoses to canister.
Vacuum passage
INSPECTION
Start engine and run it at idle speed. Disconnect vacuum hose
from EVAP canister purge valve. With finger placed against hose
disconnected, check that vacuum is applied.
If it is not applied, clean vacuum passage by blowing compressed
air.
TANK PRESSURE CONTROL VALVE INSPECTION
1) Remove tank pressure control valve installed around EVAP
canister.
2) Air should pass through valve smoothly from black side (3) of
tank pressure control valve (1) to orange side (2) when
blown hard.
3) From orange side, even when blown softly, air should come
out of black side.
4) If air doesn’t pass through valve in Step 2) or hard blow is
required in Step 3), replace tank pressure control valve.
5) Plug orange nozzle and apply 26 kPa (20 cmHg) vacuum to
black nozzle. Check that vacuum is held at that level (there is
no leakage).
If vacuum leaks, replace.
6) Install tank pressure control valve.
1. Tank pipe
2. Purge pipe
3. Air pipe
4. Blow air
WARNING:
DO NOT SUCK air through tank pressure control valve.
Fuel vapor inside the valve is harmful.
4. To canister
5. From fuel tank