Page 261 of 656

6-1-100 ENGINE GENERAL INFORMATION AND DIAGNOSIS (H27 ENGINE)
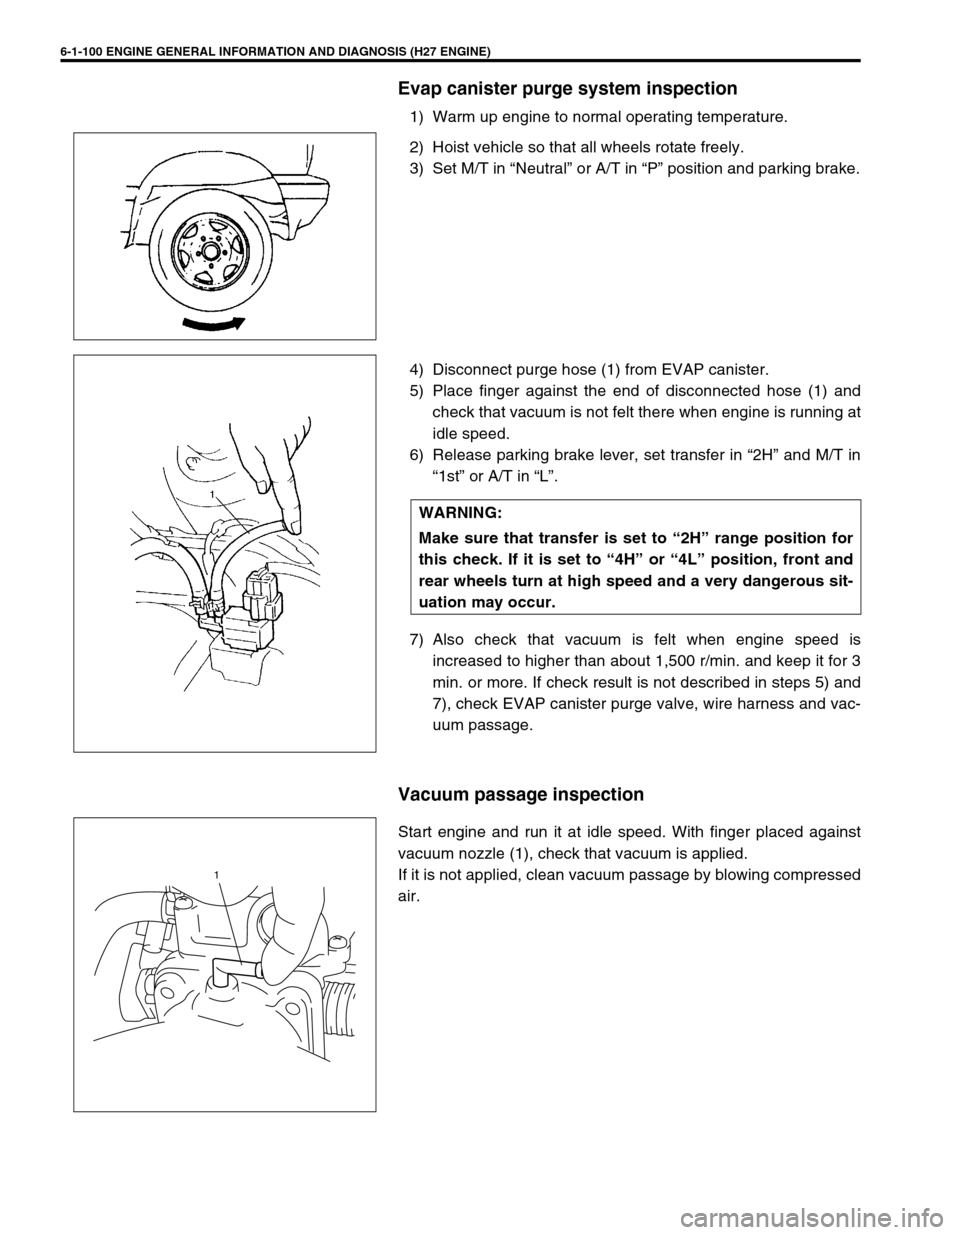
Evap canister purge system inspection
1) Warm up engine to normal operating temperature.
2) Hoist vehicle so that all wheels rotate freely.
3) Set M/T in “Neutral” or A/T in “P” position and parking brake.
4) Disconnect purge hose (1) from EVAP canister.
5) Place finger against the end of disconnected hose (1) and
check that vacuum is not felt there when engine is running at
idle speed.
6) Release parking brake lever, set transfer in “2H” and M/T in
“1st” or A/T in “L”.
7) Also check that vacuum is felt when engine speed is
increased to higher than about 1,500 r/min. and keep it for 3
min. or more. If check result is not described in steps 5) and
7), check EVAP canister purge valve, wire harness and vac-
uum passage.
Vacuum passage inspection
Start engine and run it at idle speed. With finger placed against
vacuum nozzle (1), check that vacuum is applied.
If it is not applied, clean vacuum passage by blowing compressed
air.
WARNING:
Make sure that transfer is set to “2H” range position for
this check. If it is set to “4H” or “4L” position, front and
rear wheels turn at high speed and a very dangerous sit-
uation may occur.
1
Page 262 of 656

ENGINE GENERAL INFORMATION AND DIAGNOSIS (H27 ENGINE) 6-1-101
Vacuum hose inspection
Check hoses for connection, leakage, clog and deterioration.
Replace as necessary.
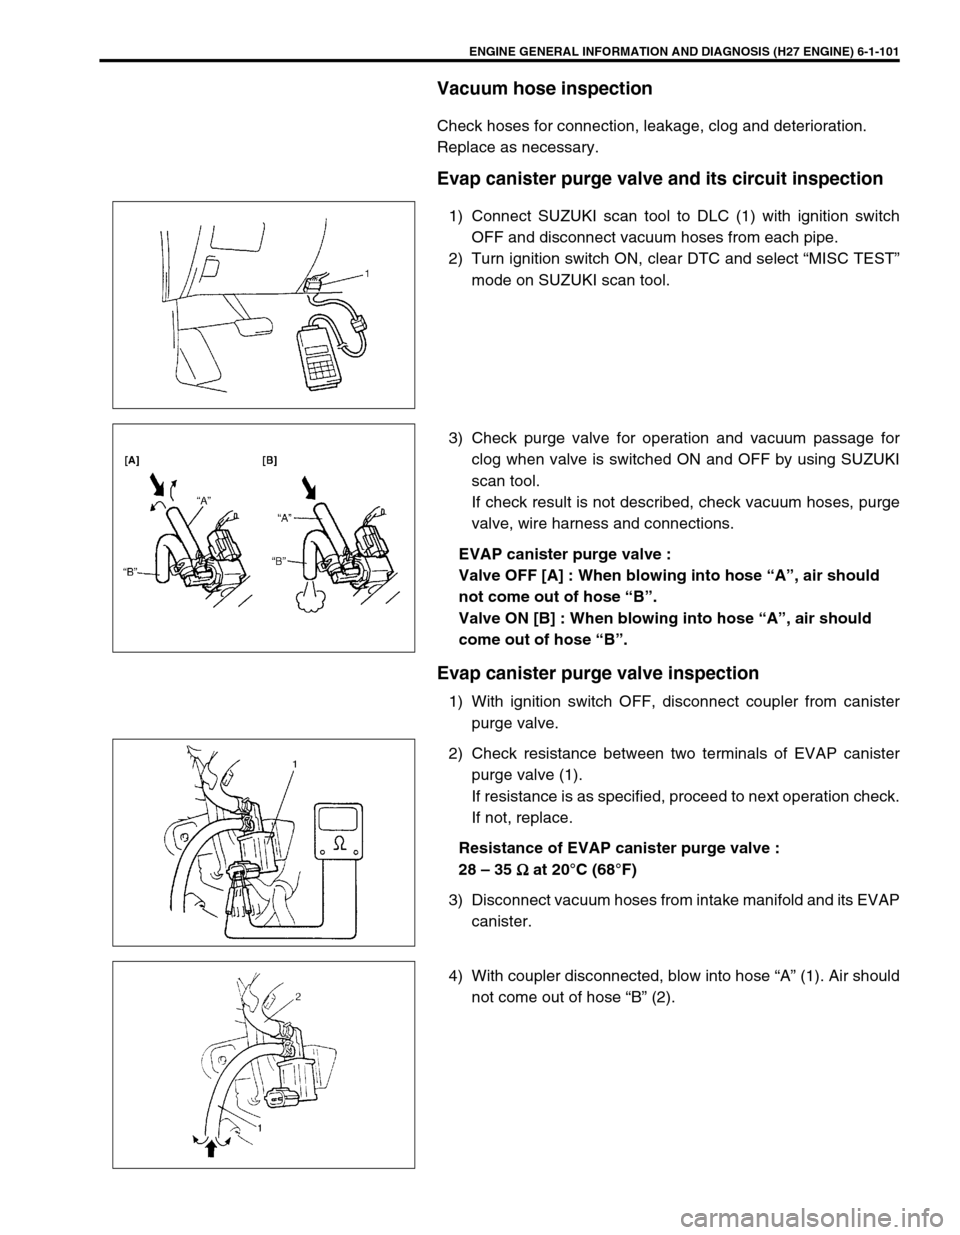
Evap canister purge valve and its circuit inspection
1) Connect SUZUKI scan tool to DLC (1) with ignition switch
OFF and disconnect vacuum hoses from each pipe.
2) Turn ignition switch ON, clear DTC and select “MISC TEST”
mode on SUZUKI scan tool.
3) Check purge valve for operation and vacuum passage for
clog when valve is switched ON and OFF by using SUZUKI
scan tool.
If check result is not described, check vacuum hoses, purge
valve, wire harness and connections.
EVAP canister purge valve :
Valve OFF [A] : When blowing into hose “A”, air should
not come out of hose “B”.
Valve ON [B] : When blowing into hose “A”, air should
come out of hose “B”.
Evap canister purge valve inspection
1) With ignition switch OFF, disconnect coupler from canister
purge valve.
2) Check resistance between two terminals of EVAP canister
purge valve (1).
If resistance is as specified, proceed to next operation check.
If not, replace.
Resistance of EVAP canister purge valve :
28 – 35
Ω
ΩΩ Ω at 20°C (68°F)
3) Disconnect vacuum hoses from intake manifold and its EVAP
canister.
4) With coupler disconnected, blow into hose “A” (1). Air should
not come out of hose “B” (2).
Page 263 of 656
6-1-102 ENGINE GENERAL INFORMATION AND DIAGNOSIS (H27 ENGINE)
5) Connect 12 V-battery to EVAP canister purge valve (3) termi-
nals. In this state, blow hose “A” (1).
Air should come out of hose “B” (2).
If check result is not as described, replace EVAP canister
purge valve.
6) Connect vacuum hoses.
7) Connect EVAP canister purge valve coupler securely.WARNING:
Do not suck the air through valve. Fuel vapor inside valve
is harmful.
Page 271 of 656

6-1-110 ENGINE GENERAL INFORMATION AND DIAGNOSIS (H27 ENGINE)
DTC P0601 (DTC No.71) Internal Control Module Memory Check Sum Error
SYSTEM DESCRIPTION
Internal control module is installed in ECM (PCM).
DTC DETECTING CONDITION AND TROUBLE AREA
DTC CONFIRMATION PROCEDURE
1) Connect scan tool to DLC with ignition switch OFF.
2) Turn ON ignition switch and clear DTC, pending DTC and freeze frame data by using scan tool.
3) Start engine and run it at idle if possible.
4) Check DTC by using scan tool.
TROUBLESHOOTING
Substitute a known-good ECM (PCM) and recheck.6 Was idle speed higher than specification in
Step 2?Check FIA valve for mal-
function.
Check abnormal air inhal-
ing from intake manifold,
throttle body, PCV valve
and EVAP canister purge
control system.Check parts or system
which can cause engine
low idle.
Check FIA valve for stuck.
Air inhaling from between
throttle body and MAF
sensor, EGR valve mal-
function (leakage from
valve seat), accessory
engine load, clog of idle
air passage, engine
mechanical, engine over-
heat and etc. Step Action Yes No
DTC DETECTING CONDITION TROUBLE AREA
Data write error or check sum error ECM (PCM)
Page 283 of 656

6-1-122 ENGINE GENERAL INFORMATION AND DIAGNOSIS (H27 ENGINE)
3 Check IAC valve referring to “IAC VALVE
INSPECTION” in Section 6E2.
Is check result as specified?Go to Step 4. IAC valve malfunction, “BLU/
BLK”, “LT GRN/BLK”, “PPL/
BLK”, “GRY/BLU” or “PPL/
YEL” wire open or short or
poor coupler connection.
If all above are OK, substi-
tute a known-good ECM
(PCM) and recheck.
4 Was idle speed within specification in
Step 1?Check for following :
FIA valve, Vacuum leaks, air inhal-
ing, EVAP canister purge control
system, accessory engine load,
stuck of PCV valve, clog of idle air
passage, MAF sensor, TP sensor,
ECT sensor, EGR valve malfunc-
tion (leakage from valve seat), A/C
signal, transmission range switch
signal and power steering switch
signal.Go to Step 5.
5 Was idle speed higher than specification
in Step 1?Go to Step 6. Go to Step 8.
6 Check A/C (input) signal circuit referring
to Step 1 of “Table B-5”. (A/C signal can
be also checked by using SUZUKI scan
tool.)
Is it in good condition?Go to Step 7. A/C signal circuit open or
short, or A/C system mal-
function.
7 Was IAC duty less than about 2% in Step
1 of this table?
Check FIA valve.
Check abnormal air inhaling from
intake manifold, throttle body, PCV
valve and EVAP canister purge
control system.Check TP sensor (closed
throttle position) and ECT
sensor for performance.
If sensors are OK, substitute
a known-good ECM (PCM)
and recheck.
8 Check transmission range switch signal
referring to “INSPECTION OF ECM
(PCM) AND ITS CIRCUIT” in this section.
Is check result satisfactory?Go to Step 9. Transmission range switch
malfunction or its circuits
open or short.
9 Was IAC duty more than about 30% in
Step 1 of this table?Check parts or system which can
cause engine low idle.
Check FIA valve.
Air inhaling from between throttle
body and MAF sensor, EGR valve
malfunction (leakage from valve
seat), accessory engine load, clog
of idle air passage and etc.Substitute a known-good
ECM (PCM) and recheck. Step Action Yes No
Page 291 of 656

6A2-4 ENGINE MECHANICAL (H27 ENGINE)
8) Disconnect accelerator cable (1) and A/T throttle cable (2)
(for A/T vehicle) from throttle body.
9) Disconnect water hoses (3) from throttle body.
10) Disconnect injector wire (1) coupler.
11) Disconnect brake booster hose (2) from intake manifold.
12) Disconnect couplers of TP sensor (1) and IAC valve (2).
13) Disconnect earth terminal (3) from intake collector.
14) Remove clamp bracket (4) from intake collector.
15) Disconnect couplers from manifold absolute pressure (MAP)
sensor, EVAP canister purge valve, earth terminal and EGR
valve.
16) Disconnect PCV hose from cylinder head cover.
Disconnect breather hoses from throttle body or cylinder
head cover.
17) Disconnect hoses of EVAP canister purge valve and heater.
18) Remove EGR pipe.
12
33
2
1
2
14
3
1. EVAP canister purge valve 6. PCV hose
2. EGR valve 7. Water hose
3. EGR pipe 8. Breather hose
4. EVAP canister purge valve hose 9. Earth terminal coupler
5. Heater hose
9
4
1 7
6
2
35
8
Page 292 of 656
ENGINE MECHANICAL (H27 ENGINE) 6A2-5
19) Disconnect hoses of heater, EVAP canister, fuel feed and
fuel return.
20) Remove throttle body (1) and intake collector (2) from intake
manifold (3).
21) Disconnect hoses of PCV valve and EVAP canister purge
valve from intake collector.
22) Remove throttle body (1) from intake collector.
23) Remove EGR valve and EVAP canister purge valve from
intake collector.
24) Remove intake manifold bolts (8 pc.) and nuts (4 pc.).
25) Remove intake manifold.
1. Heater hose
2. Fuel feed hose
3. Fuel return hose
4. EVAP canister hose
13
2 4
1
3
2
1
Page 293 of 656
6A2-6 ENGINE MECHANICAL (H27 ENGINE)
INSTALLATION
1) Install new intake manifold gaskets (1) to cylinder heads.
2) Install intake manifold (1).
Tighten bolts and nuts to specified torque.
Tightening torque
Intake manifold bolt and nut (a) :
23 N·m (2.3 kg-m, 16.5 lb-ft)
3) Install throttle body (2) to intake collector (1) with new throttle
body gasket.
Tighten bolts and nuts to specified torque.
Tightening torque
Throttle body bolt and nut (b) :
23 N·m (2.3 kg-m, 16.5 lb-ft)
4) Install EGR valve (1), EVAP canister purge valve (2), mani-
fold absolute pressure (MAP) sensor and each hoses to
intake collector and throttle body if removed.
Use new gasket, when installing IAC valve and EGR valve.
5) Install throttle body and intake collector assembly to intake
manifold with new intake collector gaskets.
1
(a)
(a)(a)
(a)
2 1
(b)
(b)
3. EVAP canister purge valve hose
2
1
3