1999 SUZUKI BALENO lights
[x] Cancel search: lightsPage 38 of 65

60G-74E
DRIVING TIPS AND SAFE DRIVING
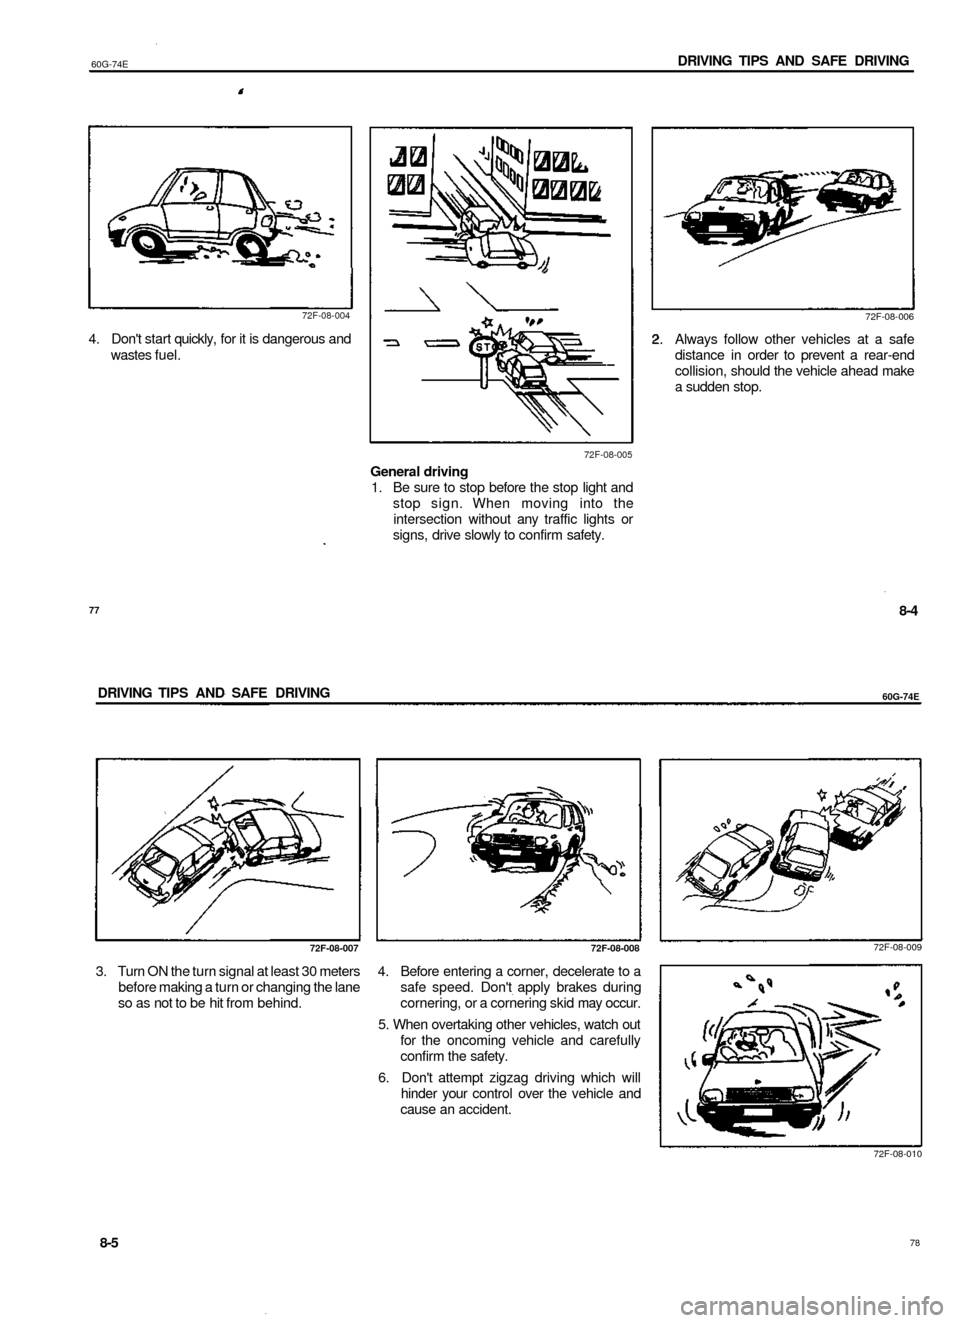
72F-08-004
4. Don't start quickly, for it is dangerous and
wastes fuel.
72F-08-006
72F-08-005
General driving
1. Be sure to stop before the stop light and
stop sign. When moving into the
intersection without any traffic lights or
signs, drive slowly to confirm safety.
Always follow other vehicles at a safe
distance in order to prevent a rear-end
collision, should the vehicle ahead make
a sudden stop.
77
8-4
DRIVING TIPS AND SAFE DRIVING
60G-74E
72F-08-007 72F-08-008
72F-08-009
3.
Turn ON the turn signal at least 30 meters
before making a turn or changing the lane
so as not to be hit from behind.
4. Before entering a corner, decelerate to a
safe speed. Don't apply brakes during
cornering, or a cornering skid may occur.
5. When overtaking other vehicles, watch out
for the oncoming vehicle and carefully
confirm the safety.
6. Don't attempt zigzag driving which will
hinder your control over the vehicle and
cause an accident.
72F-08-010
8-5
78
Page 52 of 65

60G-74E
INSPECTION AND MAINTENANCE
BATTERY
60G-09-022E
When installing the cover, make sure that it is
positioned so that it does not cover or foul the
air valve.
60G-09-038
Batteries produce flammable hydrogen
gas. Keep flames and sparks away from
the battery or an explosion may occur.
Never smoke when working in the
vicinity of the battery .
When checking or servicing the battery,
disconnect the negative cable. Be
careful not to cause a short circuit by
allowing metal objects to contact the
battery posts and the vehicle at the
same time.
To avoid harm to yourself or damage
to your vehicle or battery, follow the
jump starting instructions in the
EMERGENCY SERVICE section of this
manual if it is necessary to jump start
your vehicle.
The level of the battery solution must be kept
between the "UPPER" and the "LOWER" level
lines at all times. If the level is found to be
below the "LOWER" level line, add distilled
water to the "UPPER" level line. You should
periodically check the battery, battery
terminals, and battery holddown bracket for
corrosion. Remove corrosion using a stiff
brush and ammonia mixed with water, or
baking soda mixed with water. After removing
corrosion, rinse with clean water.
If your vehicle is not going to be driven for a
month or longer, disconnect the cable from
the negative terminal of the battery to help
prevent discharge.
105
9-22
INSPECTION AND MAINTENANCE
60G-74E
FUSES
60G-09-024E
©. Main fuse
®. Primary fuse (Lights)
®. Primary fuse (IG)
©. Radiator fan motor fuse
©. Primary fuse (A/C, HTR)
This vehicle has three types of fuses, as
described below:
Main Fuse - The main fuse takes current
directly from the battery.
Primary Fuses - These fuses are between the
main fuse and individual fuses, and are for
electrical load groups.
Individual Fuses - These fuses are in the fuse
box and for individual electrical circuits.
MAIN FUSE / PRIMARY FUSES
80A
60A
60A
30A
60A
All Electric Load
HEAD-R, HEAD-L, TAIL/DOME,
STOP/HORN, HAZARD
CIGAR/RADIO, I.G. COIL/
METER, WIPER/WASHER,
REAR DEF, TURN/BACK,
HEATER RELAY.
RADIATOR FAN MOTOR
A/C, HTR
Main Fuse and Primary Fuses
The main fuse and primary fuses are located
in the engine compartment. If the main fuse
blows, no electrical component will function.
If a primary fuse blows, no electrical
component in the corresponding load group
will function. When replacing the main fuse or
a primary fuse, use a genuine MARUTI
replacement.
If the main fuse or a primary fuse blows,
be sure to have your vehicle inspected
by an authorized MARUTI dealer.
Always use a genuine MARUTI
replacement. Never use a substitute
such as a wire even for a temporary
repair, or extensive electrical damage
and a fire can result.
60G-09-025E
Fuse Box
The fuse boxes are located in the engine
compartment and under the driver's side of
the dashboard.
To remove the fuse box cover under the
dashboard pull off the cover.
9-23
106
Page 53 of 65

60G-74E
INSPECTION AND MAINTENANCE
60G-09-026
Always be sure to replace a blown fuse
with a fuse of the correct amperage.
Never use a substitute such as
aluminium foil or wire to replace a
blown fuse. If you replace a fuse and
the new one blows In a short period of
time, you may have a major electrical
problem. Have your vehicle Inspected
immediately by your MARUTI dealer.
60G-09-027E
NOTE:
Make sure that the fuse box always carries
spare fuses.
70F-07-04SE
60G-09-028E
107
9-24
INSPECTION AND MAINTENANCE
60G-74E
BULB REPLACEMENT
Light bulbs can be hot enough to
burn your finger right after being
turned off.This is true especially for
halogen headlight bulbs. Replace
the bulbs after they become cool
enough.
The headlight bulbs are filled with
pressurized halogen gas. They can
burst and injure you if they are hit
or dropped. Handle them carefully.
CAUTION
The oils from your skin may cause a
halogen bulb to overheat and burst
when the lights are on. Grasp a new
bulb with a clean cloth.
CAUTION
Frequent replacement of a bulb
indicates the need for an inspection of
the electrical system. This should be
carried out by your MARUTI dealer.
60G-09-029
Interior Light
Press down the lens by using a plain screw
driver covered with a soft cloth as shown. To
install it, simply push it back in.
The bulb can be removed by simply pulling it
out. When replacing the bulb, make sure that
the contact springs are holding the bulb
securely.
60G-09-030
NOTE:
If the air cleaner inlet duct (A) obstructs
replacement of the bulbs in the right headlight
housing, remove the duct (A).
After reinstalling the duct, make sure it is
secured in place
9-25
108
Page 54 of 65

60G-74E
INSPECTION AND MAINTENANCE
60G-09-031
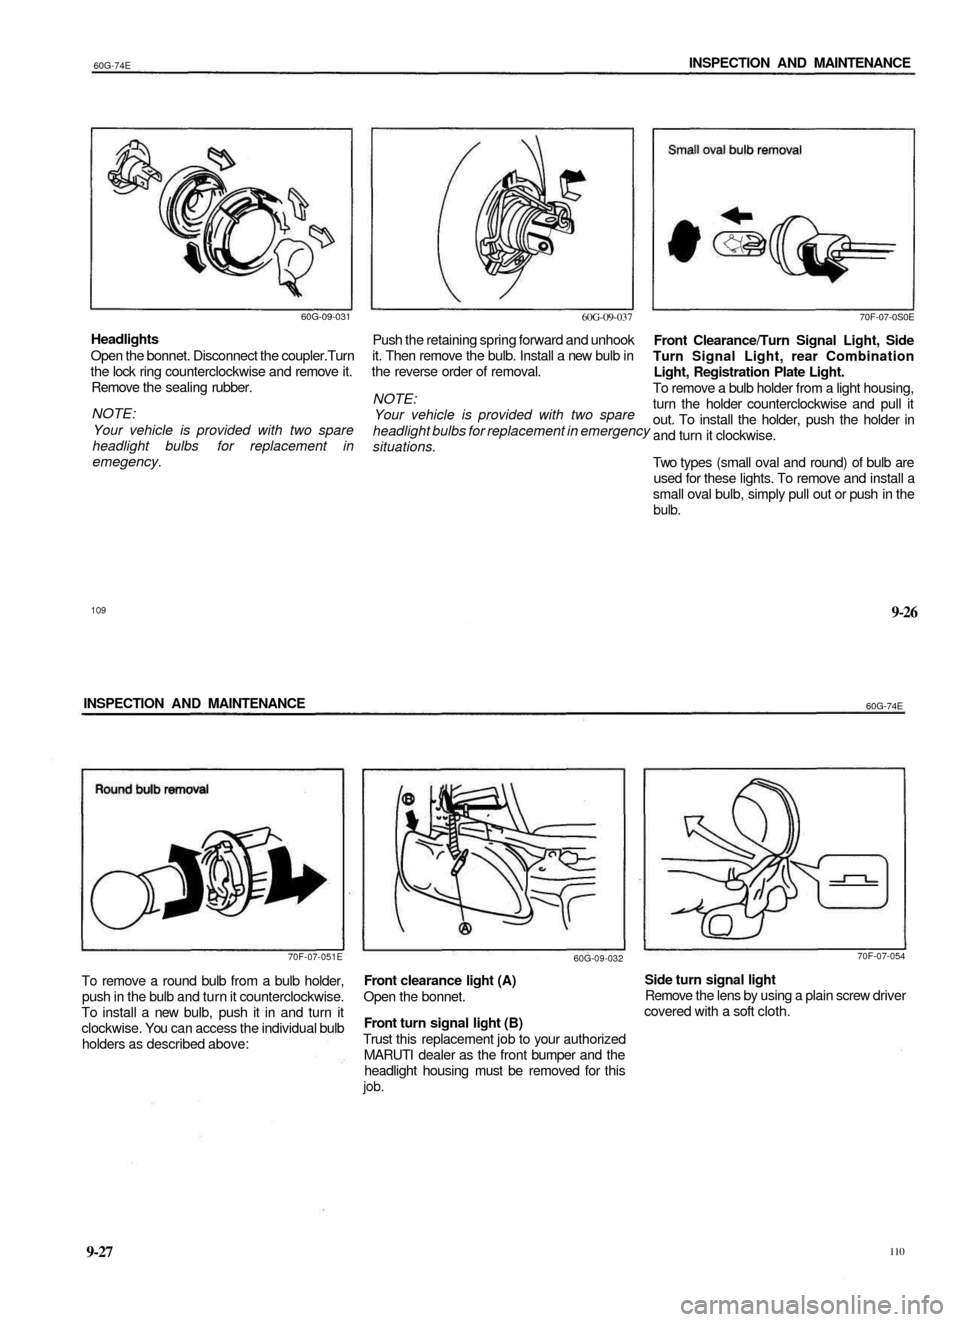
Headlights
Open the bonnet. Disconnect the coupler.Turn
the lock ring counterclockwise and remove it.
Remove the sealing rubber.
NOTE:
Your vehicle is provided with two spare
headlight bulbs for replacement in
emegency.
60G-09-037
Push the retaining spring forward and unhook
it. Then remove the bulb. Install a new bulb in
the reverse order of removal.
NOTE:
Your vehicle is provided with two spare
headlight bulbs for replacement in emergency
situations.
70F-07-0S0E
Front Clearance/Turn Signal Light, Side
Turn Signal Light, rear Combination
Light, Registration Plate Light.
To remove a bulb holder from a light housing,
turn the holder counterclockwise and pull it
out. To install the holder, push the holder in
and turn it clockwise.
Two types (small oval and round) of bulb are
used for these lights. To remove and install a
small oval bulb, simply pull out or push in the
bulb.
109
9-26
INSPECTION AND MAINTENANCE
60G-74E
70F-07-051E
To remove a round bulb from a bulb holder,
push in the bulb and turn it counterclockwise.
To install a new bulb, push it in and turn it
clockwise. You can access the individual bulb
holders as described above:
60G-09-032
Front clearance light (A)
Open the bonnet.
Front turn signal light (B)
Trust this replacement job to your authorized
MARUTI dealer as the front bumper and the
headlight housing must be removed for this
job.
70F-07-054
Side turn signal light
Remove the lens by using a plain screw driver
covered with a soft cloth.
9-27
110
Page 59 of 65

EMERGENCY SERVICE
60G-74E
CAUTION
Vehicle equipped with electronic fuel
injection system will not start by
pushing or towing as the fuel pump
will not work in this condition. This
starting method could also result in
permanent damage to the catalytic
converter. Use jump leads to start a
vehicle with a weak or flat battery.
60G-10-004E
When jump starting your vehicle, use the
following procedure:
1) Use only a 12 volt battery to jump start
your vehicle. Position the good 12V battery
close to your vehicle so that the jump leads
will reach both batteries. When using a
battery installed on another vehicle, DO
NOT LET THE VEHICLES TOUCH. Apply
the parking brakes fully on both vehicles.
2) Turn off all vehicle accessories, except
those necessary for safety reasons (for
example, headlights or hazard lights).
3) Make jump lead connections as follows:
a) Connect one end of the first jump lead
to the positive (+) terminal of the flat
battery.
b) Connect the other end to the positive
(+) terminal of the booster battery.
c) Connect one end of the second jump
lead to the negative (-) terminal of the
booster battery.
d) Make the final connection to an
unpainted, heavy metal part of the
engine of the vehicle with the flat
battery.
Never connect the jump lead directly
to the negative (-) terminal of the
discharged battery, or an explosion
may occur.
10-3
4) If the booster battery you are using is fitted
to another vehicle, start the engine of the
vehicle with the booster battery. Run the
engine at moderate speed.
5) Start the engine of the vehicle with the flat
battery.
6) Remove the jump leads in the exact
reverse order in which you connected
them.
118
60G-74E
EMERGENCY SERVICE
TOWING
If you need to have your vehicle towed, contact
a professional service.
CAUTION
To help avoid damage to your vehicle
during towing, proper equipment and
towing procedures must be used.
Manual Transmission
Whenever possible, your vehicle should be
towed from the front with the front wheels lifted.
If the steering and drivetrain are in good
condition, your vehicle may be towed from the
rear with the rear wheels lifted and the front
wheels on the ground. Before towing, make
sure the steering is unlocked and the
transmission is in neutral.
EMERGENCY REMEDIES
If the Starter Does Not Operate:
1) Try turning the ignition switch to the
"START" position with the headlights
turned on to determine the battery
condition. If the headlights go excessively
dim or go off, it usually means that either
the battery is flat or the battery terminal
contact is poor. Recharge the battery or
correct battery terminal contact as
necessary.
2) If the headlights remain bright, check the
fuses. If the reason for failure of the starter
is not obvious, there may be a major
electrical problem. Have the vehicle
inspected by your authorized MARUTI
dealer.
If the Engine is Flooded
If the engine is flooded with petrol, it may be
hard to start. If this happens, press the
accelerator pedal all the way to the floor and
hold it there while cranking the engine. (Do
not operate the starter motor for more than
15 seconds). Release the accelerator as soon
as the engine has started.
If the Engine Overheats
The engine could overheat temporarily under
severe driving conditions. If the engine coolant
temperature gauge indicates overheating
during driving:
1) Turn off the air conditioner, if equipped.
2) Take the vehicle to a safe place and park.
3) Let the engine run at normal idle speed
for a few minutes until the indicator is within
the normal, acceptable temperature range
between "H" and "C".
If you see or hear escaping steam, stop
the vehicle in a safe place and
Immediately turn off the engine to let it
cool. Do not open the bonnet when
steam is present. When the steam can
no longer be seen or heard, open the
hood to see if the coolant is still boiling.
If it is, you must wait until it stops
boiling before you proceed.
119
10-4