1999 SUZUKI BALENO instrument panel
[x] Cancel search: instrument panelPage 23 of 65
60G-74E
INSTRUMENT PANEL
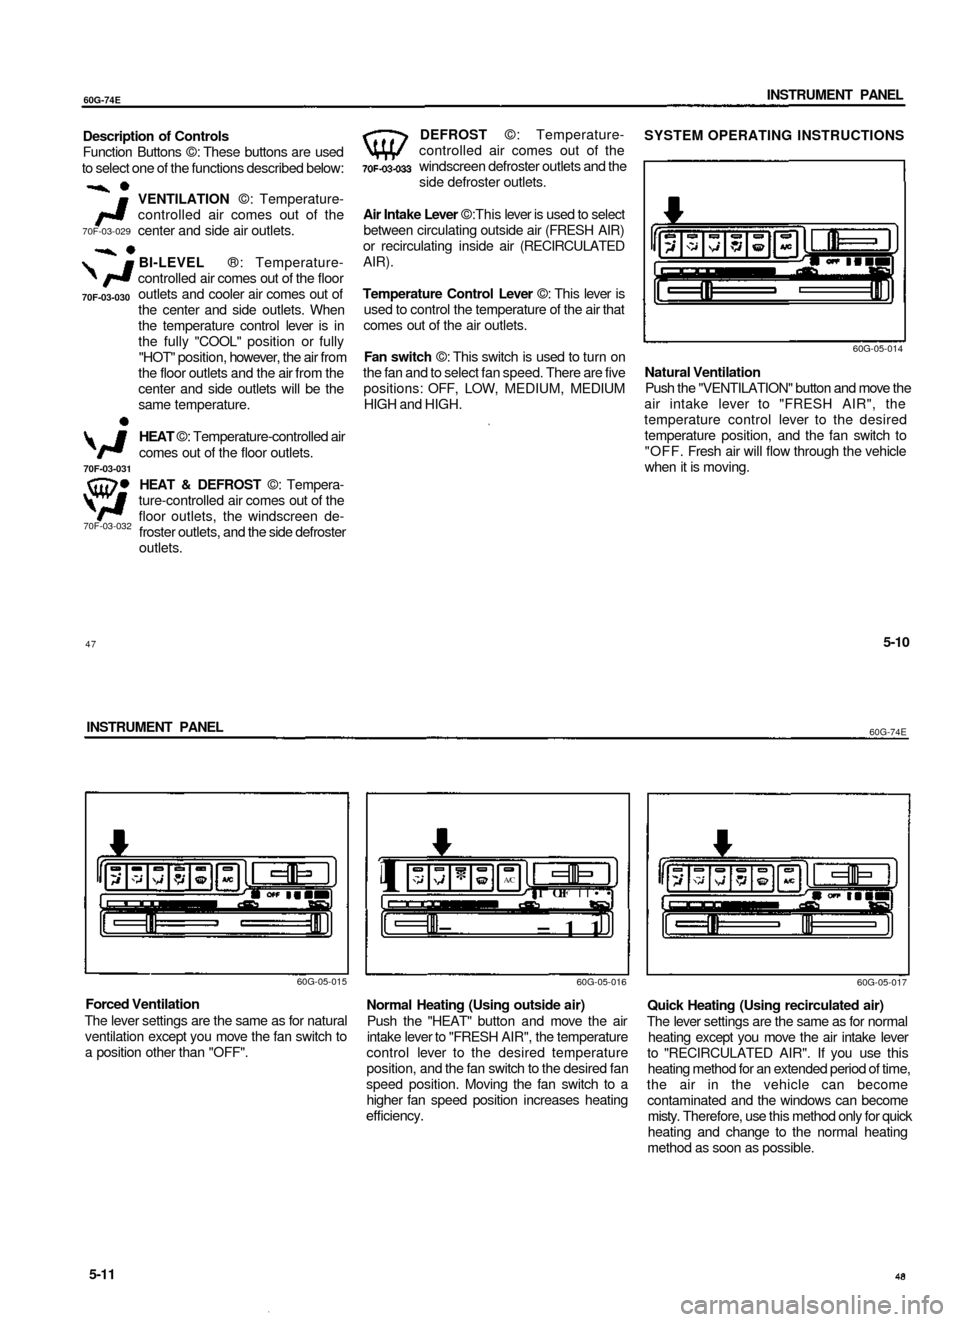
Description of Controls
Function Buttons ©: These buttons are used
to select one of the functions described below:
VENTILATION ©: Temperature-
controlled air comes out of the
center and side air outlets.
BI-LEVEL ®: Temperature-
controlled air comes out of the floor
outlets and cooler air comes out of
the center and side outlets. When
the temperature control lever is in
the fully "COOL" position or fully
"HOT" position, however, the air from
the floor outlets and the air from the
center and side outlets will be the
same temperature.
HEAT ©: Temperature-controlled air
comes out of the floor outlets.
HEAT & DEFROST ©: Tempera-
ture-controlled air comes out of the
floor outlets, the windscreen de-
froster outlets, and the side defroster
outlets.
DEFROST ©: Temperature-
controlled air comes out of the
windscreen defroster outlets and the
side defroster outlets.
Air Intake Lever ©:This lever is used to select
between circulating outside air (FRESH AIR)
or recirculating inside air (RECIRCULATED
AIR).
Temperature Control Lever ©: This lever is
used to control the temperature of the air that
comes out of the air outlets.
Fan switch ©: This switch is used to turn on
the fan and to select fan speed. There are five
positions: OFF, LOW, MEDIUM, MEDIUM
HIGH and HIGH.
SYSTEM OPERATING INSTRUCTIONS
60G-05-014
Natural Ventilation
Push the "VENTILATION" button and move the
air intake lever to "FRESH AIR", the
temperature control lever to the desired
temperature position, and the fan switch to
"OFF. Fresh air will flow through the vehicle
when it is moving.
70F-03-032
47
5-10
INSTRUMENT PANEL
60G-74E
60G-05-015
Forced Ventilation
The lever settings are the same as for natural
ventilation except you move the fan switch to
a position other than "OFF".
1
I
*
A/C
1
OFF
| | ••
= =11
60G-05-016
Normal Heating (Using outside air)
Push the "HEAT" button and move the air
intake lever to "FRESH AIR", the temperature
control lever to the desired temperature
position, and the fan switch to the desired fan
speed position. Moving the fan switch to a
higher fan speed position increases heating
efficiency.
60G-05-017
Quick Heating (Using recirculated air)
The lever settings are the same as for normal
heating except you move the air intake lever
to "RECIRCULATED AIR". If you use this
heating method for an extended period of time,
the air in the vehicle can become
contaminated and the windows can become
misty. Therefore, use this method only for quick
heating and change to the normal heating
method as soon as possible.
5-11
70F-03-031
70F-03-030
70F-03-029
Page 24 of 65
60G-74E
INSTRUMENT PANEL
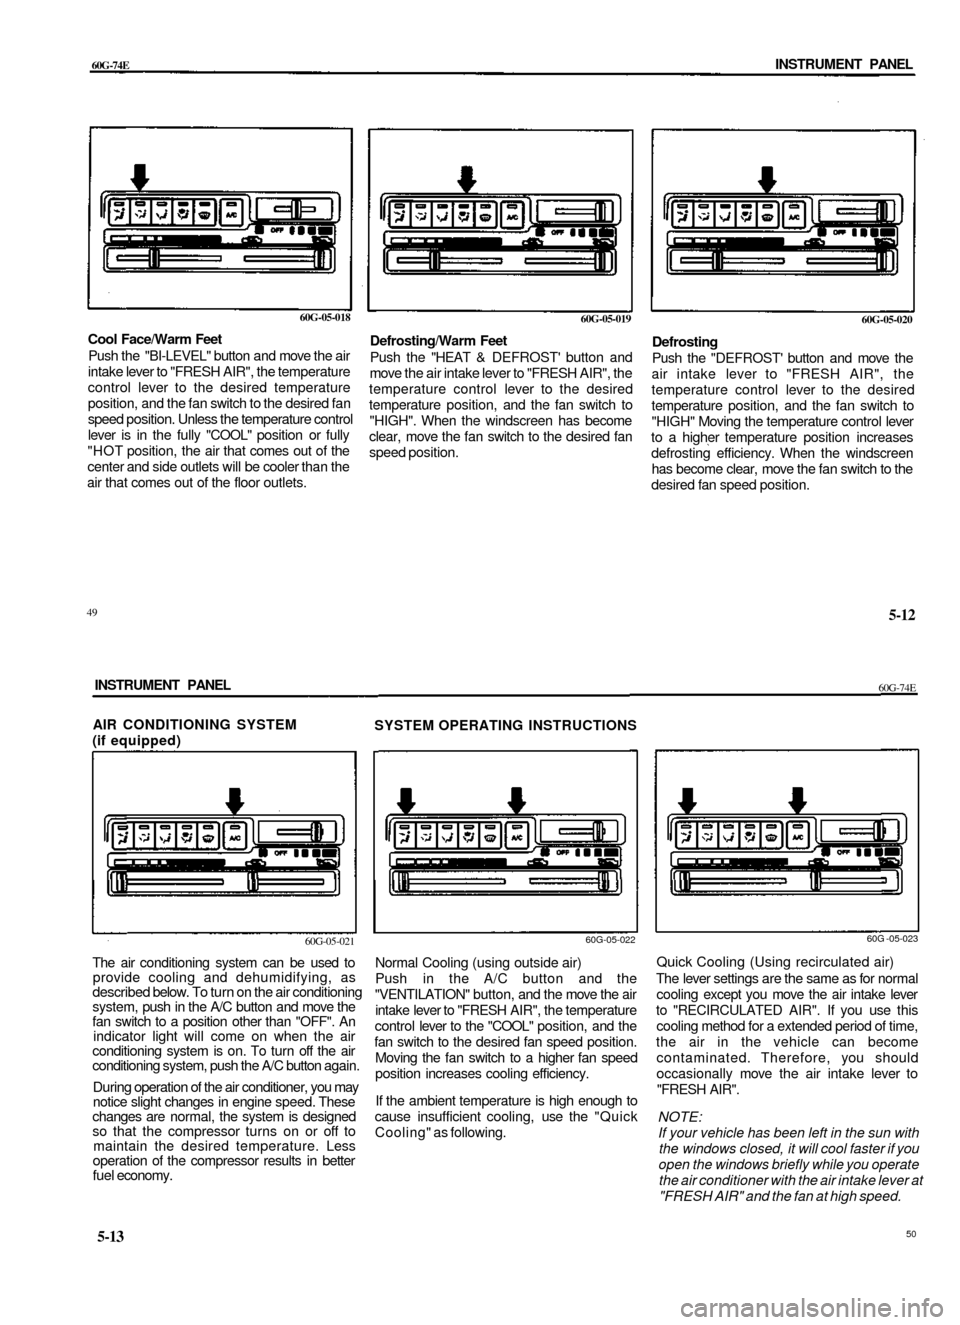
60G-05-018
Cool Face/Warm Feet
Push the "BI-LEVEL" button and move the air
intake lever to "FRESH AIR", the temperature
control lever to the desired temperature
position, and the fan switch to the desired fan
speed position. Unless the temperature control
lever is in the fully "COOL" position or fully
"HOT position, the air that comes out of the
center and side outlets will be cooler than the
air that comes out of the floor outlets.
60G-05-019
Defrosting/Warm Feet
Push the "HEAT & DEFROST' button and
move the air intake lever to "FRESH AIR", the
temperature control lever to the desired
temperature position, and the fan switch to
"HIGH". When the windscreen has become
clear, move the fan switch to the desired fan
speed position.
60G-05-020
Defrosting
Push the "DEFROST' button and move the
air intake lever to "FRESH AIR", the
temperature control lever to the desired
temperature position, and the fan switch to
"HIGH" Moving the temperature control lever
to a higher temperature position increases
defrosting efficiency. When the windscreen
has become clear, move the fan switch to the
desired fan speed position.
49
5-12
INSTRUMENT PANEL
60G-74E
AIR CONDITIONING SYSTEM
(if equipped)
SYSTEM OPERATING INSTRUCTIONS
60G-05-021
The air conditioning system can be used to
provide cooling and dehumidifying, as
described below. To turn on the air conditioning
system, push in the A/C button and move the
fan switch to a position other than "OFF". An
indicator light will come on when the air
conditioning system is on. To turn off the air
conditioning system, push the A/C button again.
During operation of the air conditioner, you may
notice slight changes in engine speed. These
changes are normal, the system is designed
so that the compressor turns on or off to
maintain the desired temperature. Less
operation of the compressor results in better
fuel economy.
60G-05-022
Normal Cooling (using outside air)
Push in the A/C button and the
"VENTILATION" button, and the move the air
intake lever to "FRESH AIR", the temperature
control lever to the "COOL" position, and the
fan switch to the desired fan speed position.
Moving the fan switch to a higher fan speed
position increases cooling efficiency.
If the ambient temperature is high enough to
cause insufficient cooling, use the "Quick
Cooling" as following.
60G -05-023
Quick Cooling (Using recirculated air)
The lever settings are the same as for normal
cooling except you move the air intake lever
to "RECIRCULATED AIR". If you use this
cooling method for a extended period of time,
the air in the vehicle can become
contaminated. Therefore, you should
occasionally move the air intake lever to
"FRESH AIR".
NOTE:
If your vehicle has been left in the sun with
the windows closed, it will cool faster if you
open the windows briefly while you operate
the air conditioner with the air intake lever at
"FRESH AIR" and the fan at high speed.
5-13
50
Page 25 of 65
60G-74E
INSTRUMENT PANEL
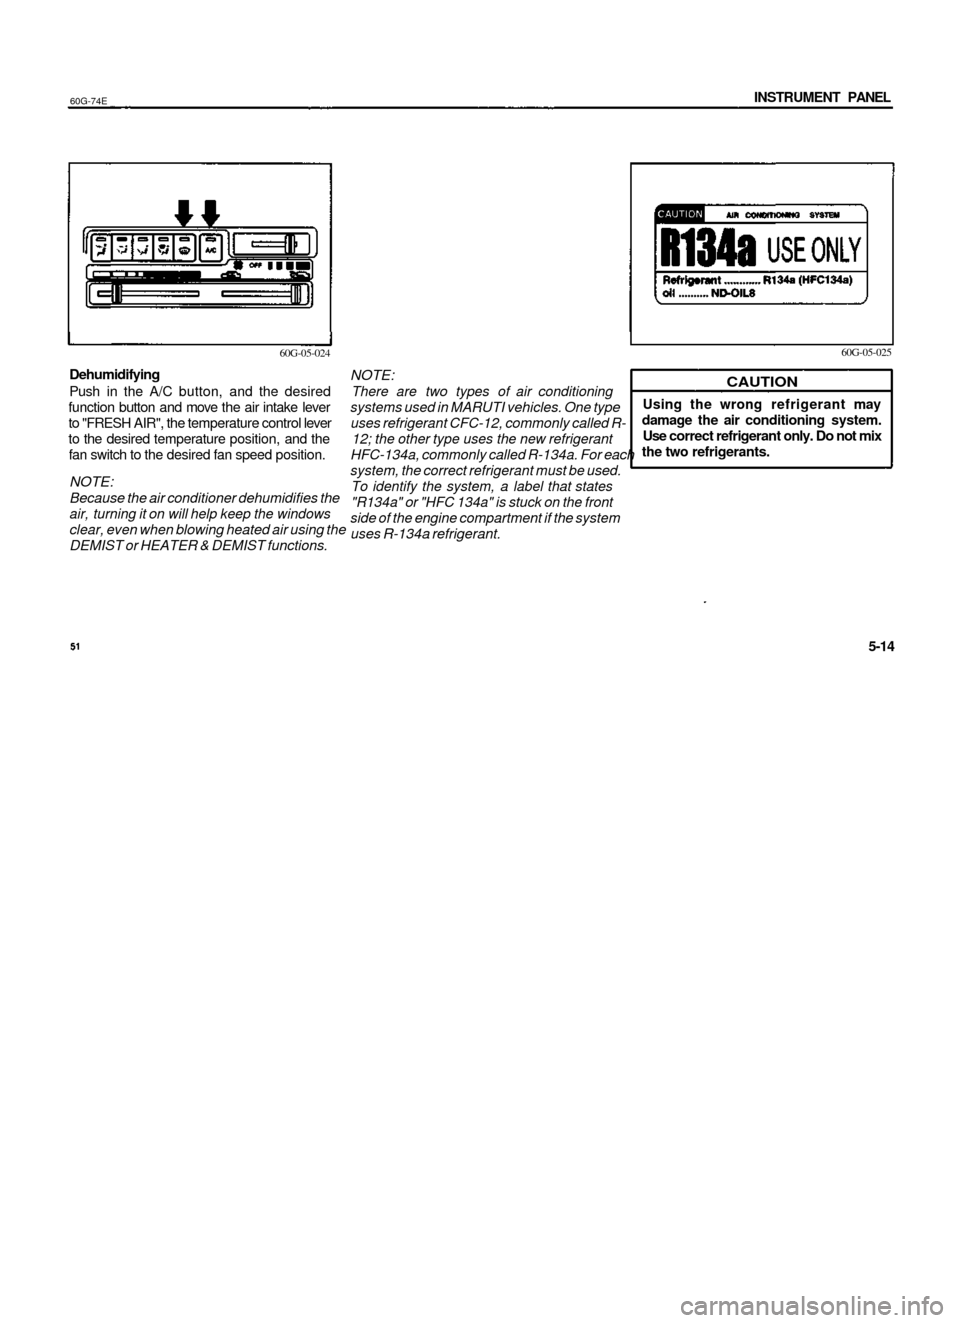
60G-05-024
Dehumidifying
Push in the A/C button, and the desired
function button and move the air intake lever
to "FRESH AIR", the temperature control lever
to the desired temperature position, and the
fan switch to the desired fan speed position.
NOTE:
Because the air conditioner dehumidifies the
air, turning it on will help keep the windows
clear, even when blowing heated air using the
DEMIST or HEATER & DEMIST functions.
60G-05-025
NOTE:
There are two types of air conditioning
systems used in MARUTI vehicles. One type
uses refrigerant CFC-12, commonly called R-
12; the other type uses the new refrigerant
HFC-134a, commonly called R-134a. For each
system, the correct refrigerant must be used.
To identify the system, a label that states
"R134a" or "HFC 134a" is stuck on the front
side of the engine compartment if the system
uses R-134a refrigerant.
CAUTION
Using the wrong refrigerant may
damage the air conditioning system.
Use correct refrigerant only. Do not mix
the two refrigerants.
60G-74E
5-14
OTHER CONTROLS AND EQUIPMENT
OTHER CONTROLS AND EQUIPMENT
Parking Brake Lever 6-1
Pedals 6-2
Gear Lever 6-2
Fuel Filler Cap 6-3
Folding Rear Seats 6-4
Sun Visor 6-5
Interior Light Switch 6-5
Assist Grips 6-5
Bonnet 6-6
Cup Holder (if equipped) 6-7
Tyre Changing Tools 6-7
Luggage Compartment Trim 6-8
Trunk (Boot) Light 6-8
Front Seat Back Pocket (if equipped) 6-9
Rear spoiler with Stop lamp (if equipped) 6-9
Alloy Wheels (if equipped) 6-9
Power Antenna (if equipped) 6-10
Leather Cover (if equipped) 6-10
High Mount Stop Lamp 6-10
53
Page 26 of 65
60G-74E
INSTRUMENT PANEL
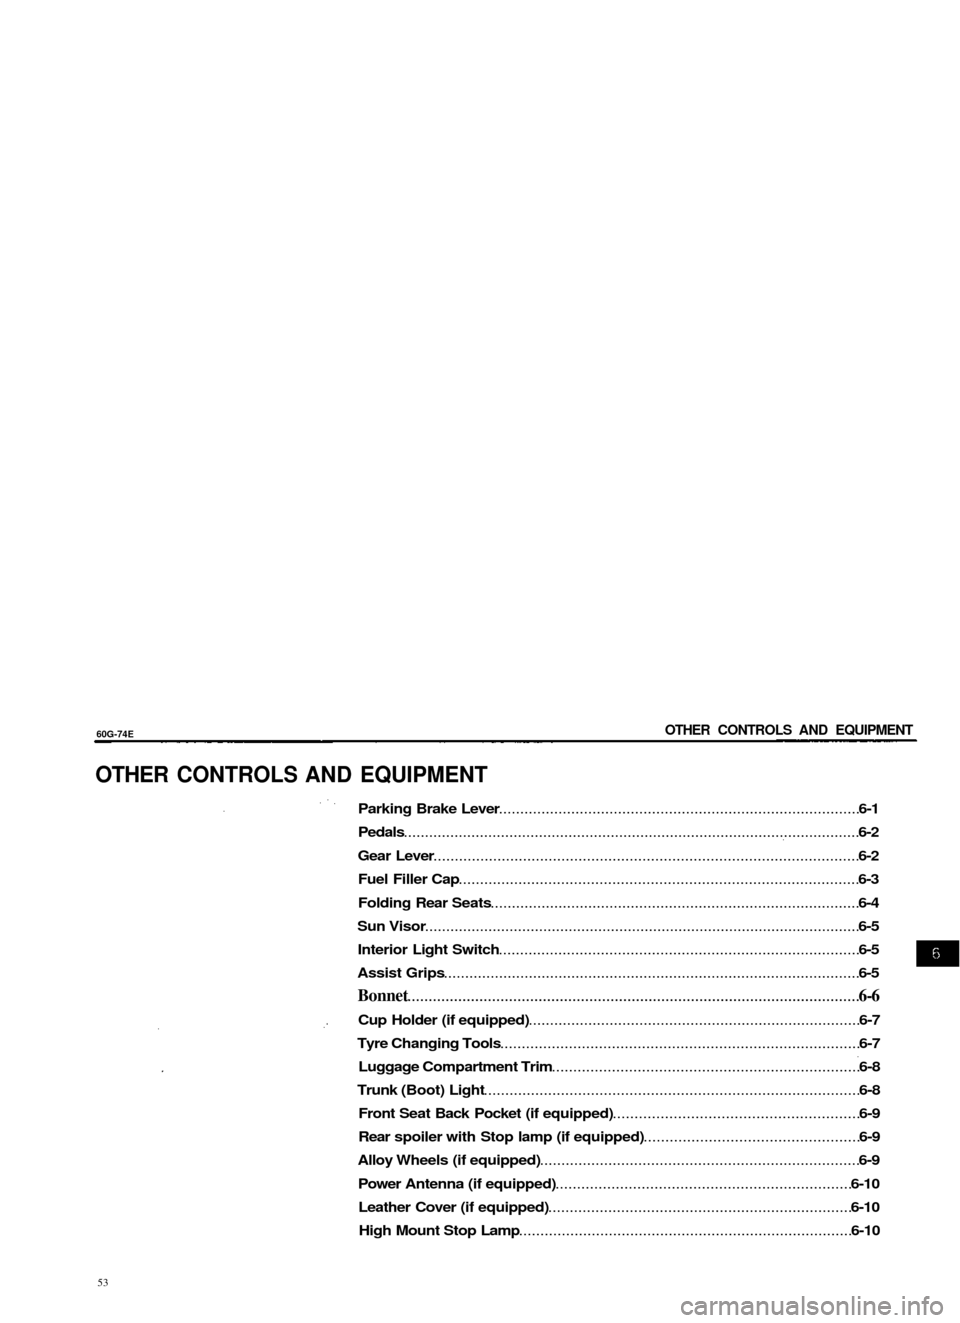
60G-05-024
Dehumidifying
Push in the A/C button, and the desired
function button and move the air intake lever
to "FRESH AIR", the temperature control lever
to the desired temperature position, and the
fan switch to the desired fan speed position.
NOTE:
Because the air conditioner dehumidifies the
air, turning it on will help keep the windows
clear, even when blowing heated air using the
DEMIST or HEATER & DEMIST functions.
60G-05-025
NOTE:
There are two types of air conditioning
systems used in MARUTI vehicles. One type
uses refrigerant CFC-12, commonly called R-
12; the other type uses the new refrigerant
HFC-134a, commonly called R-134a. For each
system, the correct refrigerant must be used.
To identify the system, a label that states
"R134a" or "HFC 134a" is stuck on the front
side of the engine compartment if the system
uses R-134a refrigerant.
CAUTION
Using the wrong refrigerant may
damage the air conditioning system.
Use correct refrigerant only. Do not mix
the two refrigerants.
60G-74E
5-14
OTHER CONTROLS AND EQUIPMENT
OTHER CONTROLS AND EQUIPMENT
Parking Brake Lever 6-1
Pedals 6-2
Gear Lever 6-2
Fuel Filler Cap 6-3
Folding Rear Seats 6-4
Sun Visor 6-5
Interior Light Switch 6-5
Assist Grips 6-5
Bonnet 6-6
Cup Holder (if equipped) 6-7
Tyre Changing Tools 6-7
Luggage Compartment Trim 6-8
Trunk (Boot) Light 6-8
Front Seat Back Pocket (if equipped) 6-9
Rear spoiler with Stop lamp (if equipped) 6-9
Alloy Wheels (if equipped) 6-9
Power Antenna (if equipped) 6-10
Leather Cover (if equipped) 6-10
High Mount Stop Lamp 6-10
53
Page 29 of 65
OTHER CONTROLS AND EQUIPMENTS
60G-74E
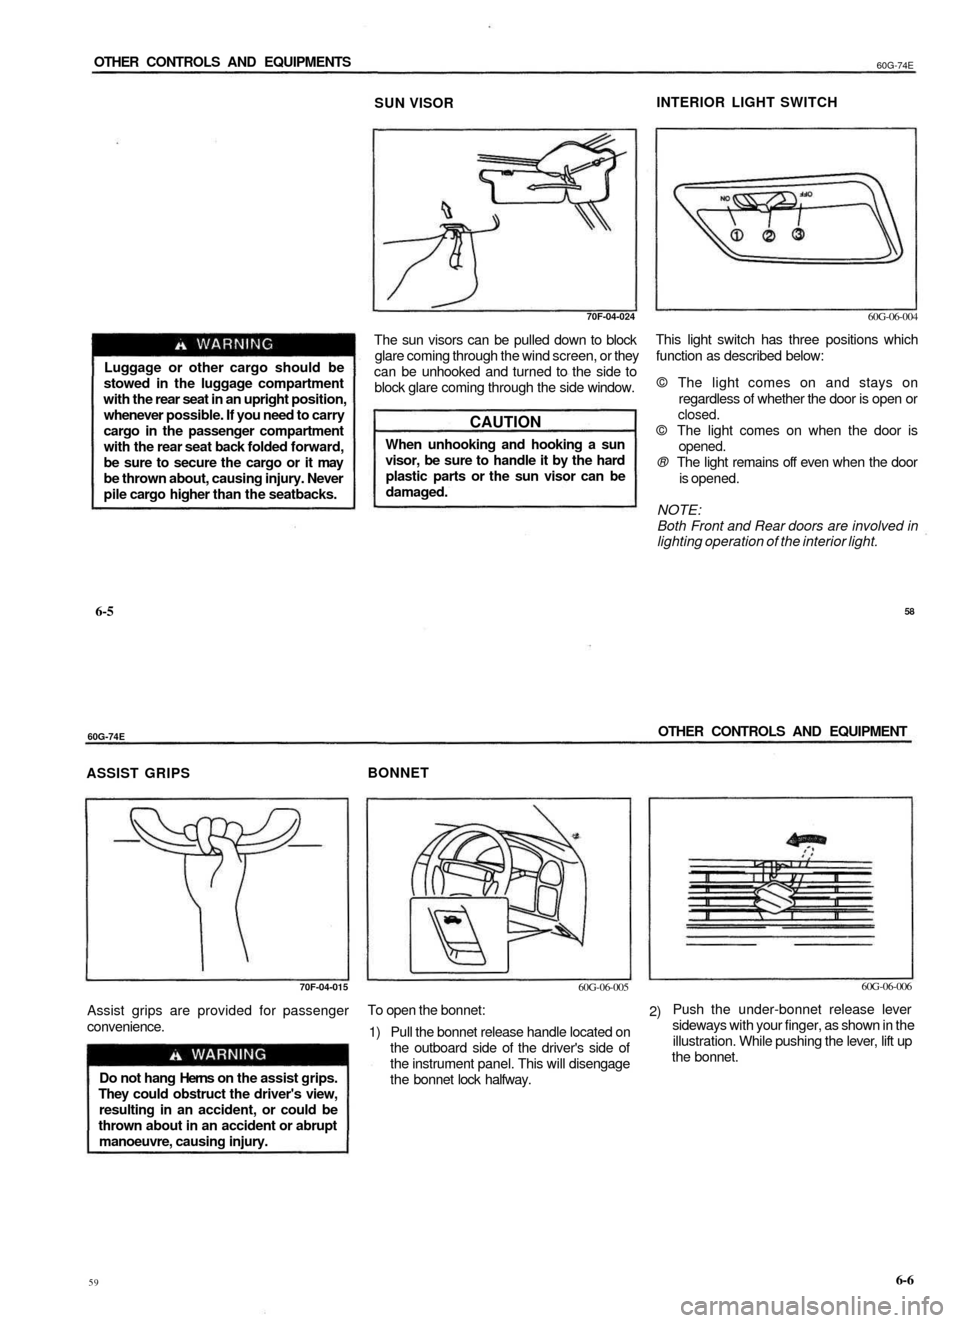
SUN VISOR
INTERIOR LIGHT SWITCH
70F-04-024
Luggage or other cargo should be
stowed in the luggage compartment
with the rear seat in an upright position,
whenever possible. If you need to carry
cargo in the passenger compartment
with the rear seat back folded forward,
be sure to secure the cargo or it may
be thrown about, causing injury. Never
pile cargo higher than the seatbacks.
The sun visors can be pulled down to block
glare coming through the wind screen, or they
can be unhooked and turned to the side to
block glare coming through the side window.
CAUTION
When unhooking and hooking a sun
visor, be sure to handle it by the hard
plastic parts or the sun visor can be
damaged.
60G-06-004
This light switch has three positions which
function as described below:
© The light comes on and stays on
regardless of whether the door is open or
closed.
© The light comes on when the door is
opened.
® The light remains off even when the door
is opened.
NOTE:
Both Front and Rear doors are involved in
lighting operation of the interior light.
6-5
58
60G-74E
OTHER CONTROLS AND EQUIPMENT
ASSIST GRIPS
BONNET
70F-04-015
Assist grips are provided for passenger
convenience.
Do not hang Herns on the assist grips.
They could obstruct the driver's view,
resulting in an accident, or could be
thrown about in an accident or abrupt
manoeuvre, causing injury.
60G-06-005
To open the bonnet:
1) Pull the bonnet release handle located on
the outboard side of the driver's side of
the instrument panel. This will disengage
the bonnet lock halfway.
60G-06-006
2)
Push the under-bonnet release lever
sideways with your finger, as shown in the
illustration. While pushing the lever, lift up
the bonnet.
59
6-6
Page 64 of 65
60G-74E
TABLE OF CONTENTS
MAINTENANCE SERVICE RECORD
WARRANTY POLICY
BEFORE DRIVING
STEERING COLUMN CONTROLS
INSTRUMENT PANEL
OTHER CONTROLS AND EQUIPMENT
OPERATING YOUR VEHICLE
DRIVING TIPS AND SAFE DRIVING
INSPECTION AND MAINTENANCE
EMERGENCY SERVICE
BODY WORK CARE
GENERAL INFORMATION
SPECIFICATIONS
SERVICE NETWORK
60G-74E
FOREWORD
This manual is an essential part of your
vehicle and should be kept with the vehicle
at all times. Please read this manual carefully
and review it from time to time. It contains
important information on safety, operation,
and maintenance. It is especially important
that this manual remain with the vehicle at
the time of resale. The next owner will need
this information also.
You are invited to avail the three free
inspection services as described in this
manual.Three free inspection coupons are
attached to this manual. Please show this
manual to your dealer when you take your
vehicle for any service.
To prolong the life of your vehicle and reduce
maintenance cost, the periodic maintenance
must be carried out according to the
"PERIODIC MAINTENANCE SCHEDULE"
described in "INSPECTION AND
MAINTENANCE" section of this manual.
Periodic maintenance is essential for
preventing trouble and accidents to ensure
your satisfaction and sefety.
Daily Inspection and Care as per "DAILY
INSPECTION CHECKLIST described in the
"INSPECTION AND MAINTENANCE" section
of this Manual is essential for prolonging the
operating lite of the vehicle and for safe driving.
MARUTI UDYOG LIMITED believes in
conservation and protection of Earth's
natural resources.
To that end, we encourage every vehicle
owner to recycle, trade in, or properly
dispose of, as appropriate, used motor oil,
coolant, and' other fluids; batteries; and
tyres.
MARUTI UDYOG LIMITED
All information in this manual is
based on the latest product
information available at the time of
publication. Due to improvements
or other changes, there may be
discrepancies between information
in this manual and your vehicle.
Maruti reserves the right to make
changes at any time without notice.
This vehicle may not comply with
standards or regulations of other
countries. Before attempting to
register this vehicle in any other
country, check all applicable
regulations and make any necessary
modifications.
IMPORTANT
WARNING/CAUTION/NOTE
Please read this manual and follow its
instructions carefully. To emphasise special
information, the words WARNING,
CAUTION, and NOTE have special
meanings. Information following these signal
words should be carefully reviewed.
WARNING
The personal safety of the driver,
passengers, or by standers may be
involved. Disregarding this information
could result in their injury or death.
CAUTION
These instructions point out special
service procedures or precautions that
must be followed to avoid damaging
the vehicle.
NOTE:
This provides special information to make
maintenance easier or important instructions
clearer.
0-1
3