1999 NISSAN SENTRA lock
[x] Cancel search: lockPage 132 of 223
Jacking up vehicle and removing the
damaged tire
Carefully read the caution label attached
to the jack body and the following in-
structions.
1. Loosen each wheel nut one or two turns
by turning counterclockwise with the
wheel nut wrench.Do not remove the
wheel nuts until the tire is off the
ground.2.
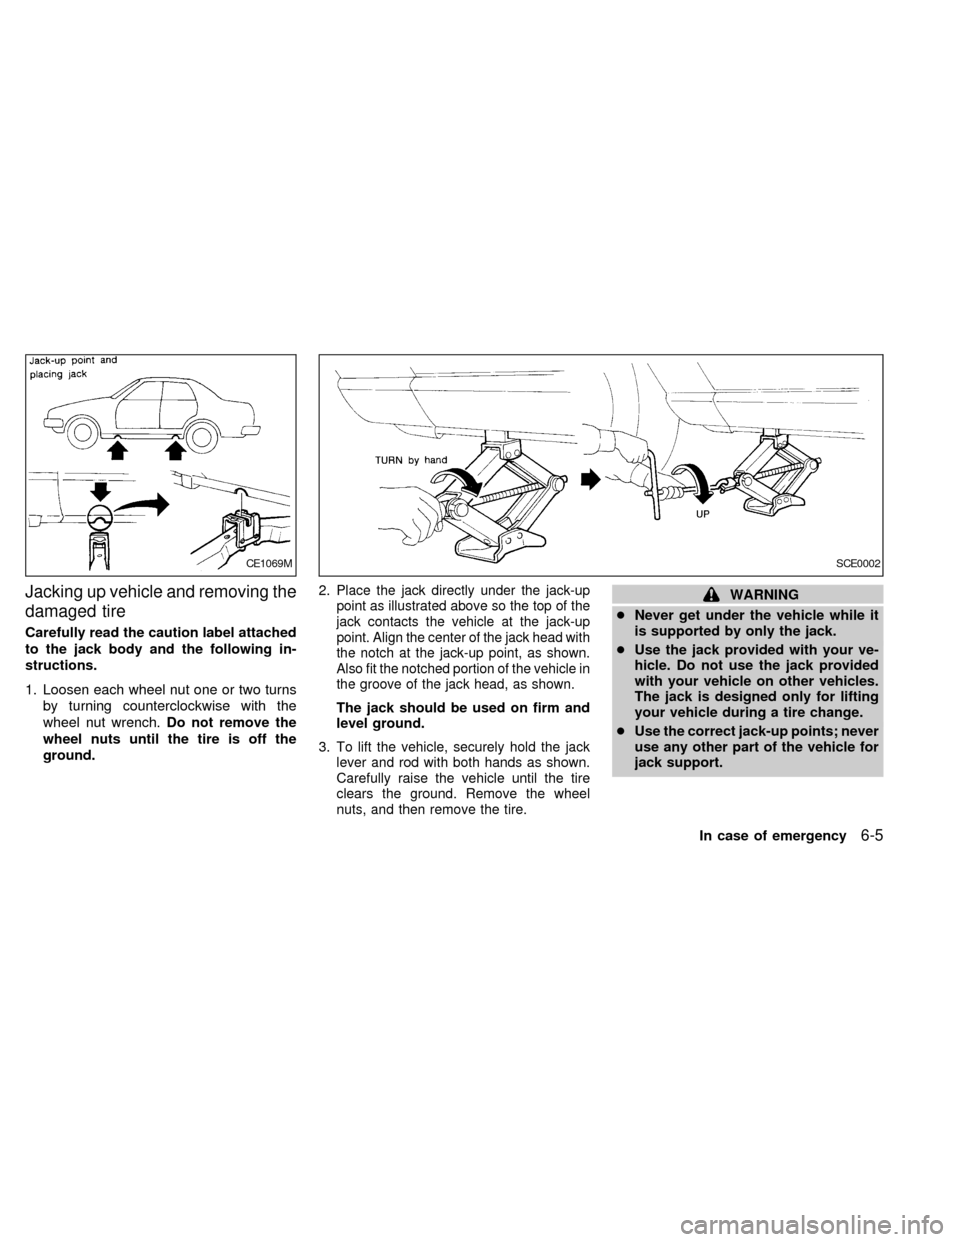
Place the jack directly under the jack-up
point as illustrated above so the top of the
jack contacts the vehicle at the jack-up
point. Align the center of the jack head with
the notch at the jack-up point, as shown.
Also fit the notched portion of the vehicle in
the groove of the jack head, as shown.
The jack should be used on firm and
level ground.
3.
To lift the vehicle, securely hold the jack
lever and rod with both hands as shown.
Carefully raise the vehicle until the tire
clears the ground. Remove the wheel
nuts, and then remove the tire.
WARNING
cNever get under the vehicle while it
is supported by only the jack.
cUse the jack provided with your ve-
hicle. Do not use the jack provided
with your vehicle on other vehicles.
The jack is designed only for lifting
your vehicle during a tire change.
cUse the correct jack-up points; never
use any other part of the vehicle for
jack support.
CE1069MSCE0002
In case of emergency6-5
ZX
Page 133 of 223
cNever jack up the vehicle more than
necessary.
cNever use blocks on or under the
jack.
cDo not start or run engine while
vehicle is on the jack as it may cause
the vehicle to move.
cDo not allow passengers to stay in
the vehicle while it is on the jack.
cNever run the engine with a wheel off
the ground. It may cause the vehicle
to move. This is especially true for
models equipped with a limited slip
differential carrier.
Installing the spare tire
The T-type spare tire is designed for
emergency use. See specific instruc-
tions under the heading ``Wheels and
tires'' in the ``Do-it- yourself'' section of
this owner's manual.
1. Clean any mud or dirt from the surface
between the wheel and hub.
2. Carefully put the spare tire on and tighten
the wheel nuts finger tight.
3. With the wheel nut wrench, tighten wheel
nuts alternately and evenly until they are
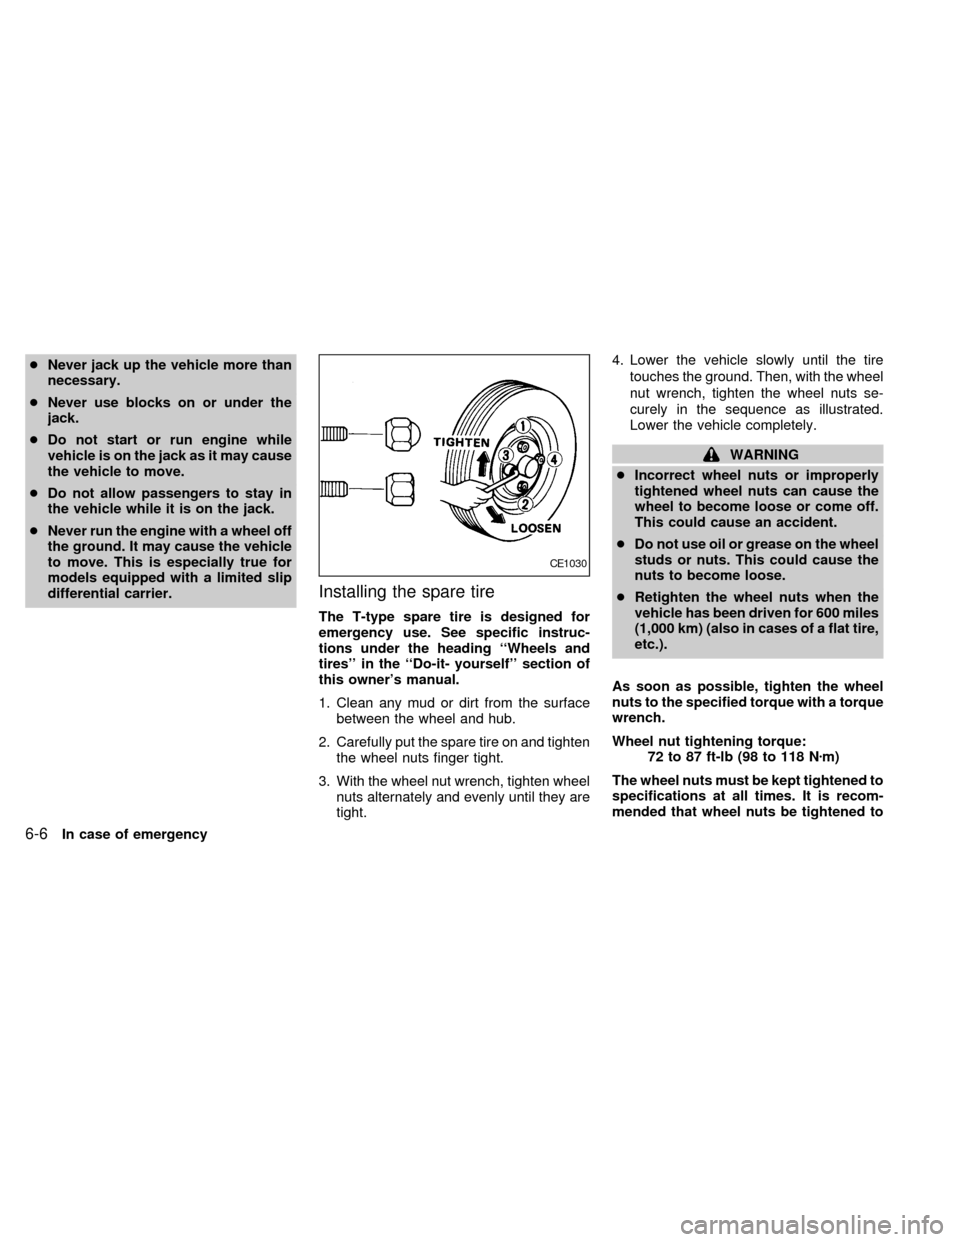
tight.4. Lower the vehicle slowly until the tire
touches the ground. Then, with the wheel
nut wrench, tighten the wheel nuts se-
curely in the sequence as illustrated.
Lower the vehicle completely.
WARNING
cIncorrect wheel nuts or improperly
tightened wheel nuts can cause the
wheel to become loose or come off.
This could cause an accident.
cDo not use oil or grease on the wheel
studs or nuts. This could cause the
nuts to become loose.
cRetighten the wheel nuts when the
vehicle has been driven for 600 miles
(1,000 km) (also in cases of a flat tire,
etc.).
As soon as possible, tighten the wheel
nuts to the specified torque with a torque
wrench.
Wheel nut tightening torque:
72 to 87 ft-lb (98 to 118 Nzm)
The wheel nuts must be kept tightened to
specifications at all times. It is recom-
mended that wheel nuts be tightened to
CE1030
6-6In case of emergency
ZX
Page 134 of 223
specification at each lubrication interval.
Adjust tire pressure to the COLD
pressure.
COLD pressure:
After vehicle has been parked for three
hours or more or driven less than 1 mile
(1.6 km).
COLD tire pressures are shown on the
tire placard affixed to the driver's door
center pillar.
5.
With the spare tire installed on the vehicle,
place the damaged tire in the spare tire
storage area. Put the jack rod and wheel
nut wrench in the tool bag and place the
tool bag in the spare tire storage area.
6. Place the spare tire cover and the trunk
floor carpeting over the damaged tire.
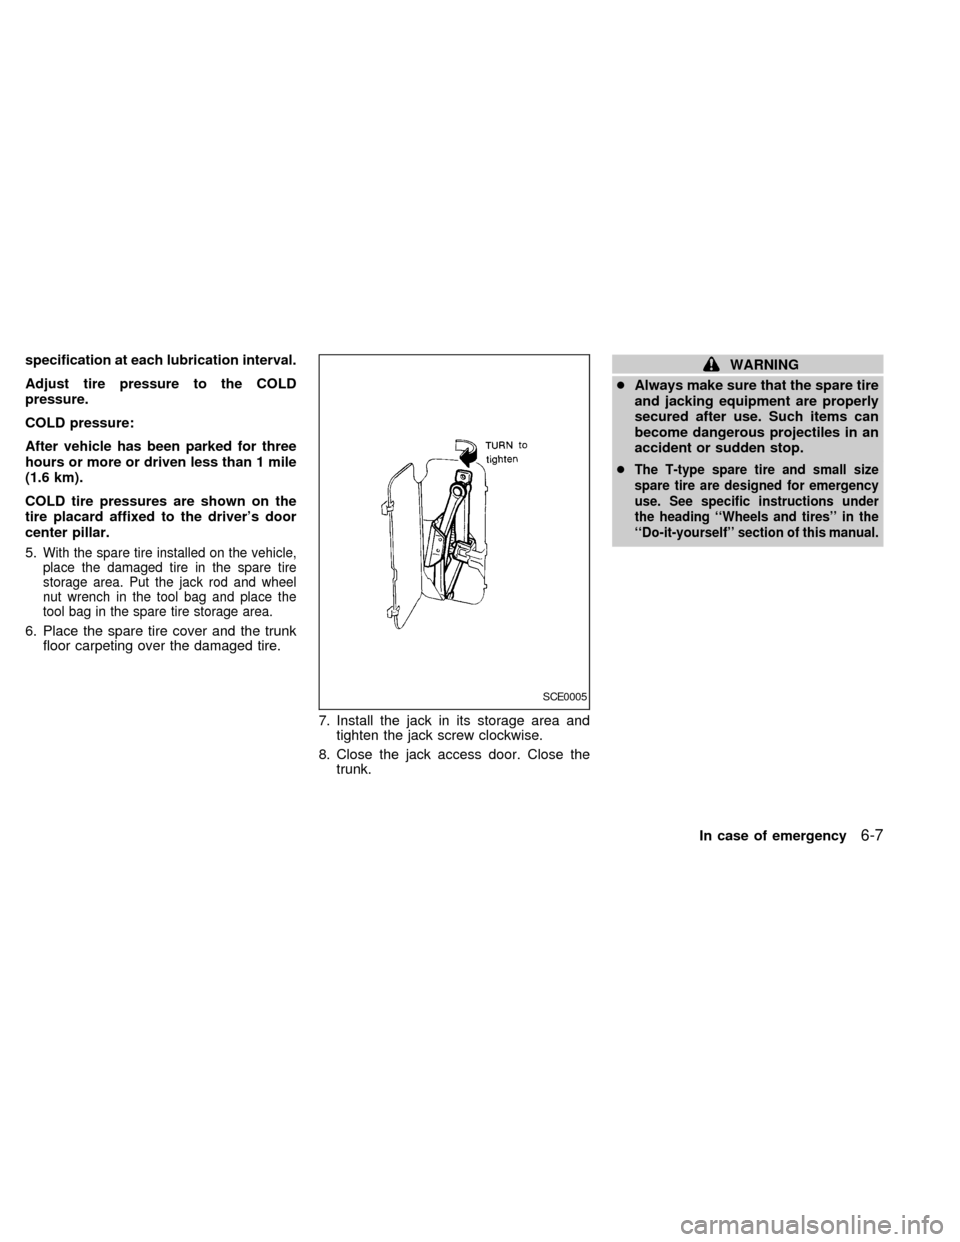
7. Install the jack in its storage area and
tighten the jack screw clockwise.
8. Close the jack access door. Close the
trunk.
WARNING
cAlways make sure that the spare tire
and jacking equipment are properly
secured after use. Such items can
become dangerous projectiles in an
accident or sudden stop.
c
The T-type spare tire and small size
spare tire are designed for emergency
use. See specific instructions under
the heading ``Wheels and tires'' in the
``Do-it-yourself'' section of this manual.
SCE0005
In case of emergency6-7
ZX
Page 138 of 223
WARNING
Be careful not to allow your hands, hair,
jewelry or clothing to come into contact
with, or to get caught in, the running
fan, belts, or fan motor. The fan motor
can start at any time when the coolant
temperature is high.
7. After the engine cools down, check the
coolant level in the reservoir tank with the
engine running. Add coolant to the res-
ervoir tank if necessary. Have your ve-
hicle repaired at an authorized NISSAN
dealer.When towing your vehicle, U.S States, Cana-
dian Provinces and local regulations for tow-
ing must be followed. Incorrect towing equip-
ment could damage your vehicle. Towing
instructions are available from an authorized
NISSAN dealer. Local service operators are
generally familiar with the applicable laws
and procedures for towing. To assure proper
towing and to prevent accidental damage to
your vehicle, NISSAN recommends having a
service operator tow your vehicle. It is advis-
able to have the service operator carefully
read the following precautions.
WARNING
cNever ride in a vehicle that is being
towed.
cNever get under your vehicle after it
has been lifted by a tow truck.
CAUTION
cWhen towing, make sure that the
transmission, axles, steering system
and powertrain are in working con-
dition. If any unit is damaged, dollies
must be used.cWhen towing manual transmission
models with the front wheels on the
ground (if you do not use towing
dollies):
Turn the ignition key to the OFF
position and secure the steering
wheel in a straight ahead position
with a rope or similar device. Never
place the ignition key in the LOCK
position. This will result in damage
to the steering lock mechanism.
Move the gearshift lever to the N
(Neutral) position.
cWhen towing with the rear wheels on
the ground, release the parking
brake.
cAttach safety chains for all towing.
TOW TRUCK TOWING
In case of emergency6-11
ZX
Page 149 of 223
When performing any inspection or mainte-
nance work on your vehicle, always take
care to prevent serious accidental injury to
yourself or damage to the vehicle. The
following are general precautions which
should be closely observed.
WARNING
cPark the vehicle on a level surface,
apply the parking brake securely and
block the wheels to prevent the ve-
hicle from moving. For a manual
transmission, move the gearshift
control lever to N (Neutral). For an
automatic transmission, move the
shift lever to P (Park).
cBe sure the ignition key is OFF when
performing any parts replacement or
repairs.
cBe sure to turn the ignition key to the
OFF or LOCK position. When the
ignition key is in the ON or ACC
position, the cooling fan may start to
operate suddenly even when the en-
gine is not running.cIf you must work with the engine
running, keep your hands, clothing,
hair and tools away from moving
fans, belts and any other moving
parts.
cIt is advisable to remove ties and any
jewelry, such as rings, watches, etc.,
before working on your vehicle.
cIf you must run the engine in an
enclosed space such as a garage, be
sure there is proper ventilation for
exhaust gases.
cNever get under the vehicle while it
is supported by only a jack. If it is
necessary to work under the vehicle,
support it with safety stands.
cKeep smoking materials, flame and
sparks away from fuel and battery.
cOn gasoline engine models with the
Multiport Fuel Injection (MFI) sys-
tem, the fuel filter or fuel lines
should be serviced by an authorized
NISSAN dealer because the fuel
lines are under high pressure even
when the engine is off.
CAUTION
cDo not work under the hood while
the engine is hot. Turn the engine off
and wait until it cools down.
cNever connect or disconnect either
the battery or any transistorized
component connector while the igni-
tion is ON.
c
Avoid contact with used motor oil.
Improperly disposed motor oil and/or
other vehicle fluids can hurt the en-
vironment. Always conform to local
regulations for disposal of vehicle
fluid.
This ``Do-it-yourself'' section gives instruc-
tions regarding only those items which are
relatively easy for an owner to perform.
You should be aware that incomplete or
improper servicing may result in operating
difficulties or excessive emissions, and
could affect your warranty coverage.If in
doubt about any servicing, have it done
by an authorized NISSAN dealer.
MAINTENANCE
PRECAUTIONS
8-2Do-it-yourself
ZX
Page 154 of 223

1. Move the heater or air conditioner tem-
perature control dial to the maximum hot
position.
2. Open the radiator drain plug. Open the
drain plug on the engine block.3. Open the radiator cap to drain the cool-
ant.
4. Flush the cooling system by running
fresh water through the radiator.
5. Close the drain plugs on the radiator and
the engine block securely.
6. See the ``Technical and consumer infor-
mation'' section for cooling system ca-
pacity. Fill the radiator slowly with the
proper mixture of coolant and water. Fill
the reservoir tank up to the MAX level.
7. Open and close the air release plug(s) to
release air. Then fill the radiator again
and install the radiator cap.
8.
Start the engine, and warm it up until it
reaches normal operating temperature.
Then race the engine two or three times
under no load. Watch the engine coolant
temperature gauge for signs of overheating.
ADI0632
ADI0615
Do-it-yourself8-7
ZX
Page 155 of 223

9. Stop the engine. After it completely
cools down, refill the radiator up to the
filler opening. Fill the reservoir tank up
to the MAX level.
10. Open and close the air release plug(s)
to release air. Then fill the radiator again
and install the radiator cap.
11. Check the drain plugs on the radiator
and the engine block for any sign of
leakage. Also check the air release plug
for any sign of leakage.CHECKING ENGINE OIL LEVEL
1. Park the vehicle on a level surface and
apply the parking brake.
2. Start the engine and let it idle until it
reaches operating temperature.3. Turn off the engine.Wait a few minutes
for the oil to drain back into the oil
pan.
4. Remove the dipstick and wipe it clean.
Reinsert it all the way.
5. Remove the dipstick again and check the
oil level. It should be between the H
(High) and L (Low) marks. If the oil level
is below the L (Low) mark, remove the oil
filler cap and pour recommended oil
through the opening.Do not overfill.
DI1249MDI1217MDI1251M
ENGINE OIL
8-8Do-it-yourself
ZX
Page 174 of 223
cAiming is not necessary after replac-
ing the bulb.
cDo not leave the bulb out of the
headlight reflector for a long period
of time as dust, moisture, and smoke
may enter the headlight body and
affect the performance of the head-
light.
Before adjusting the headlights, make sure
all of the tires are properly inflated, the
vehicle is on level ground and there is no
excess weight in the vehicle that would
affect the level of the vehicle.
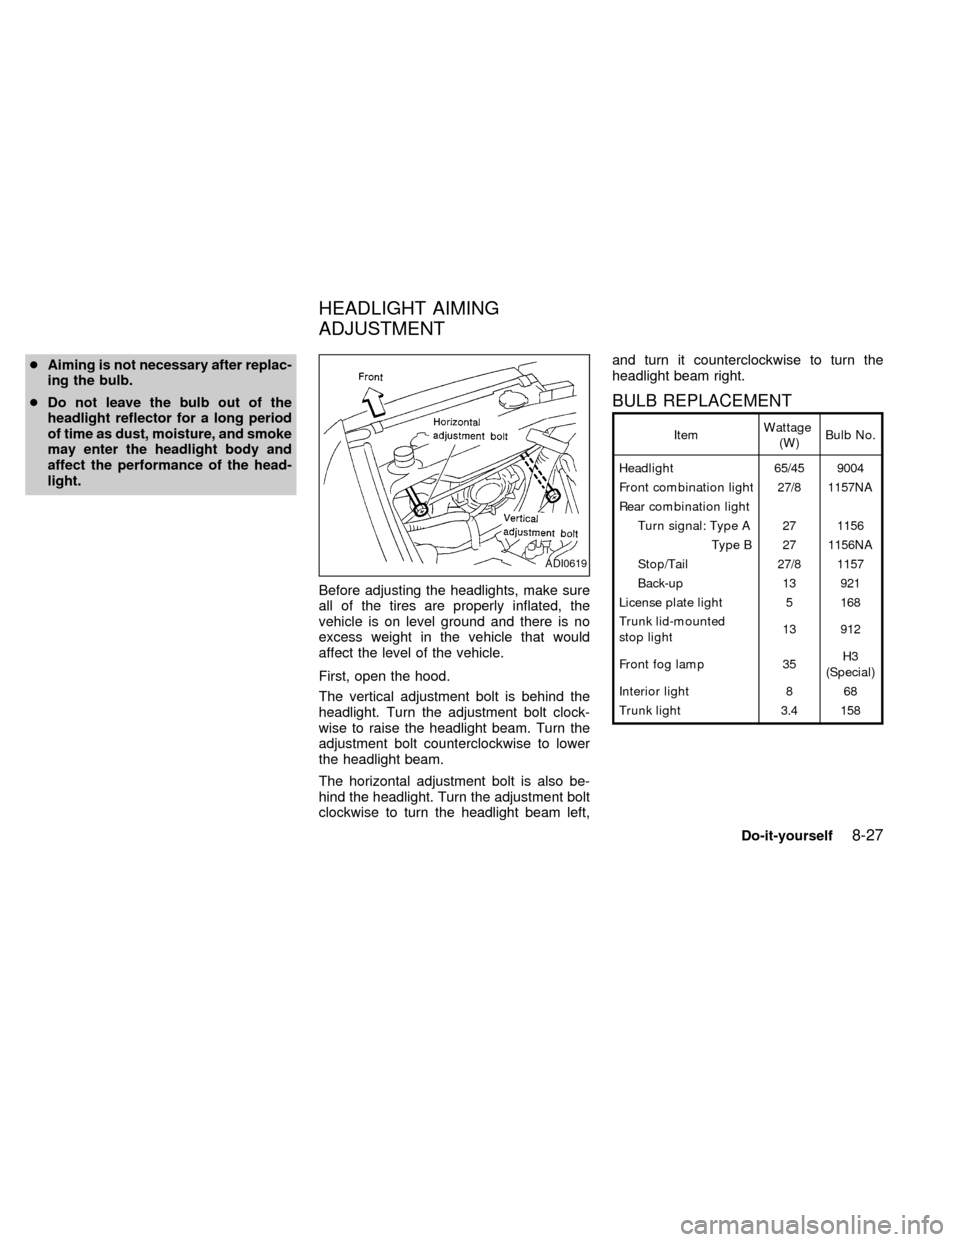
First, open the hood.
The vertical adjustment bolt is behind the
headlight. Turn the adjustment bolt clock-
wise to raise the headlight beam. Turn the
adjustment bolt counterclockwise to lower
the headlight beam.
The horizontal adjustment bolt is also be-
hind the headlight. Turn the adjustment bolt
clockwise to turn the headlight beam left,and turn it counterclockwise to turn the
headlight beam right.
BULB REPLACEMENT
ItemWattage
(W)Bulb No.
Headlight 65/45 9004
Front combination light 27/8 1157NA
Rear combination light
Turn signal: Type A 27 1156
Type B 27 1156NA
Stop/Tail 27/8 1157
Back-up 13 921
License plate light 5 168
Trunk lid-mounted
stop light13 912
Front fog lamp 35H3
(Special)
Interior light 8 68
Trunk light 3.4 158
ADI0619
HEADLIGHT AIMING
ADJUSTMENT
Do-it-yourself8-27
ZX