1999 NISSAN SENTRA seats
[x] Cancel search: seatsPage 39 of 223
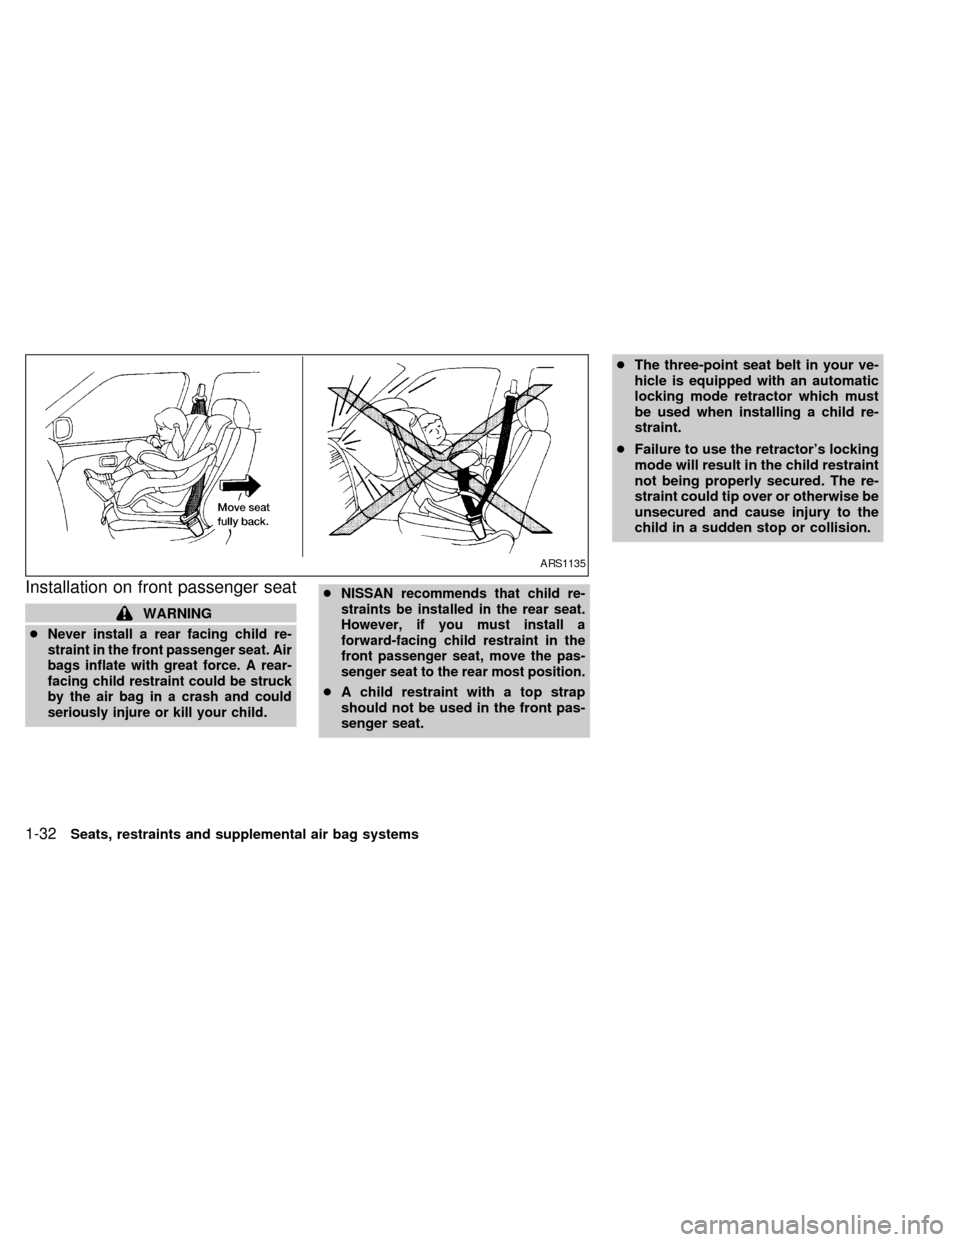
Installation on front passenger seat
WARNING
c
Never install a rear facing child re-
straint in the front passenger seat. Air
bags inflate with great force. A rear-
facing child restraint could be struck
by the air bag in a crash and could
seriously injure or kill your child.cNISSAN recommends that child re-
straints be installed in the rear seat.
However, if you must install a
forward-facing child restraint in the
front passenger seat, move the pas-
senger seat to the rear most position.
cA child restraint with a top strap
should not be used in the front pas-
senger seat.cThe three-point seat belt in your ve-
hicle is equipped with an automatic
locking mode retractor which must
be used when installing a child re-
straint.
cFailure to use the retractor's locking
mode will result in the child restraint
not being properly secured. The re-
straint could tip over or otherwise be
unsecured and cause injury to the
child in a sudden stop or collision.
ARS1135
1-32Seats, restraints and supplemental air bag systems
ZX
Page 40 of 223
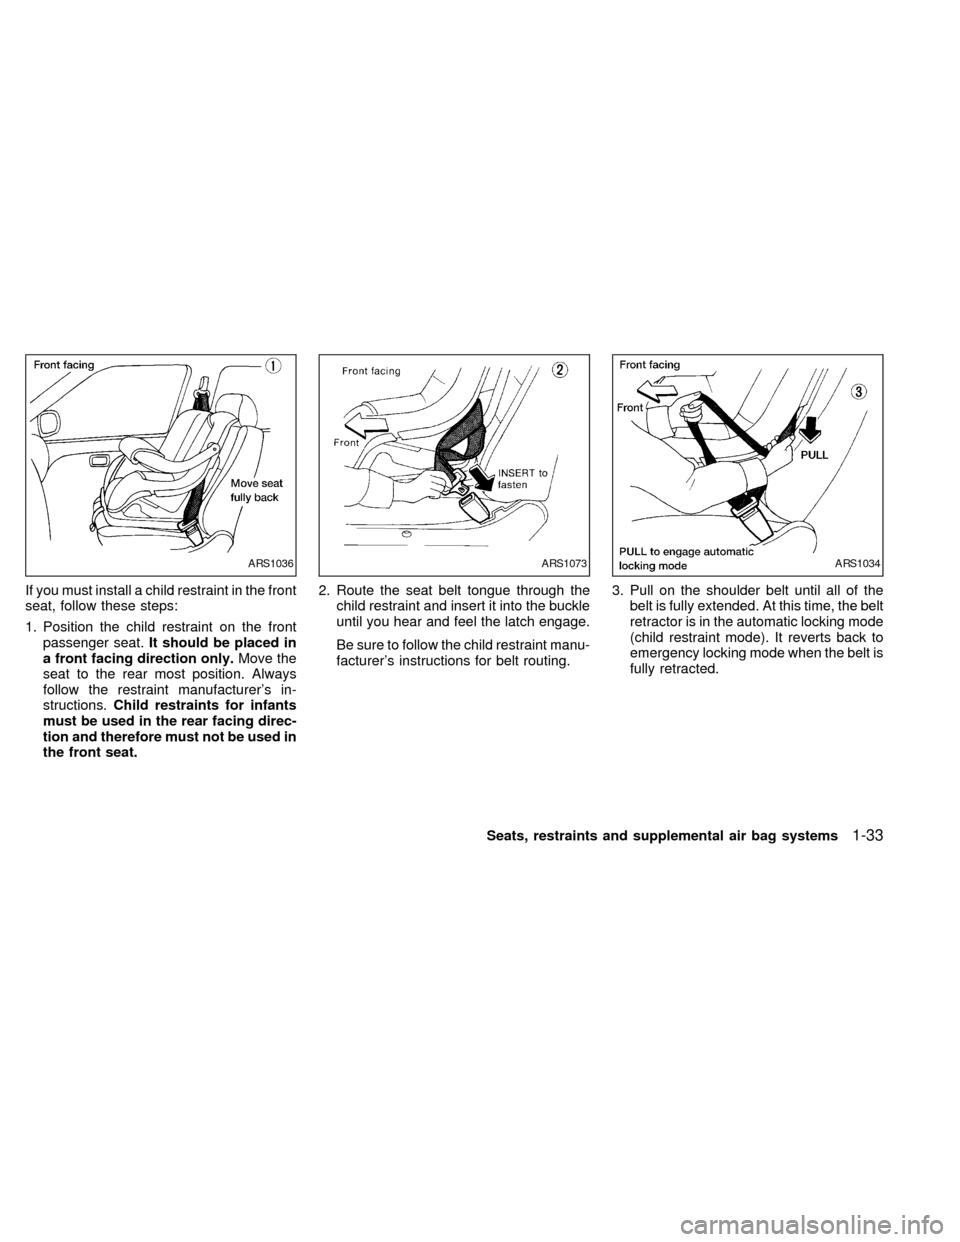
If you must install a child restraint in the front
seat, follow these steps:
1. Position the child restraint on the front
passenger seat.It should be placed in
a front facing direction only.Move the
seat to the rear most position. Always
follow the restraint manufacturer's in-
structions.Child restraints for infants
must be used in the rear facing direc-
tion and therefore must not be used in
the front seat.2. Route the seat belt tongue through the
child restraint and insert it into the buckle
until you hear and feel the latch engage.
Be sure to follow the child restraint manu-
facturer's instructions for belt routing.3. Pull on the shoulder belt until all of the
belt is fully extended. At this time, the belt
retractor is in the automatic locking mode
(child restraint mode). It reverts back to
emergency locking mode when the belt is
fully retracted.
ARS1036ARS1073ARS1034
Seats, restraints and supplemental air bag systems1-33
ZX
Page 41 of 223
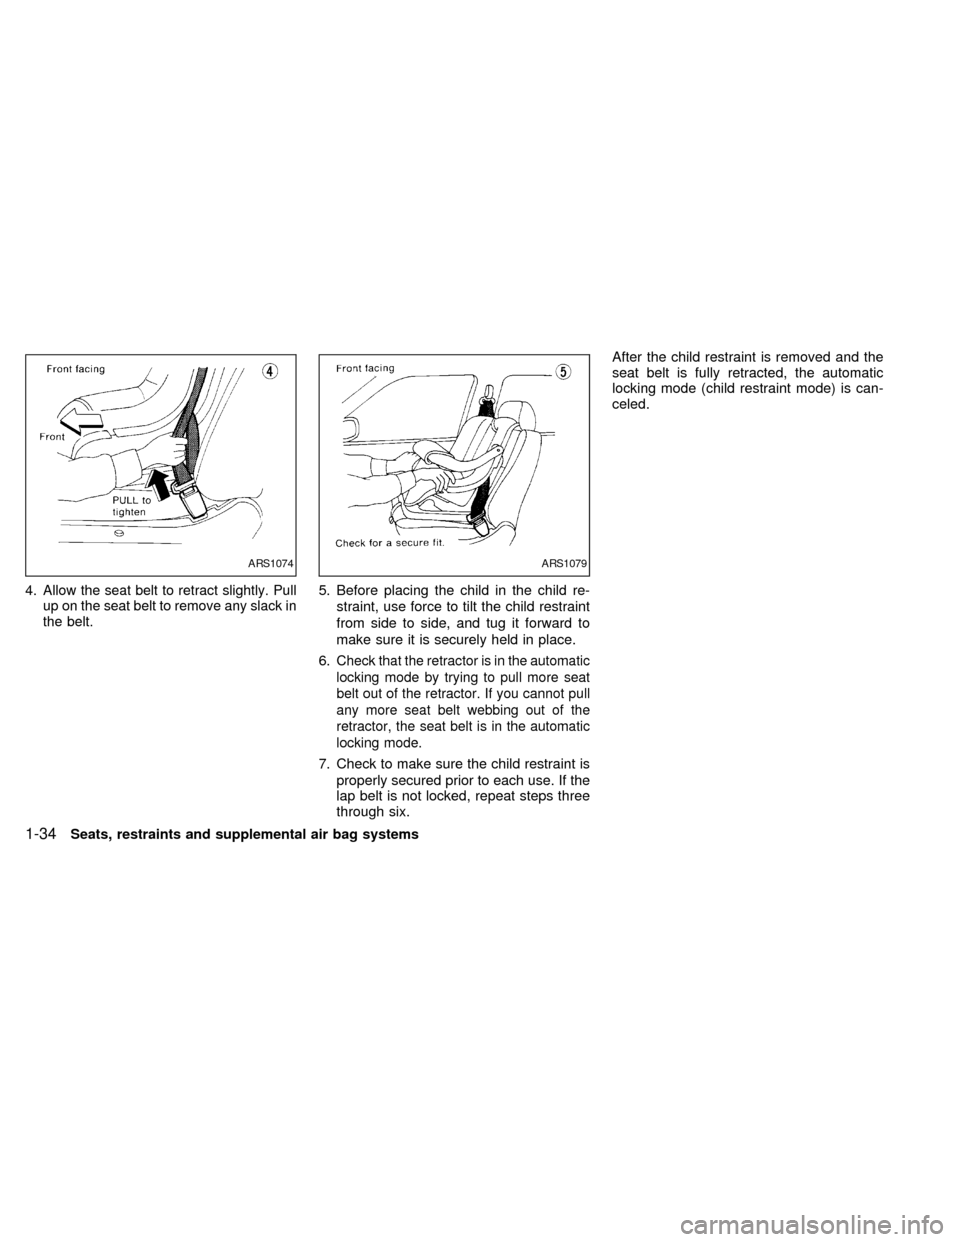
4.Allow the seat belt to retract slightly. Pull
up on the seat belt to remove any slack in
the belt.5. Before placing the child in the child re-
straint, use force to tilt the child restraint
from side to side, and tug it forward to
make sure it is securely held in place.
6.
Check that the retractor is in the automatic
locking mode by trying to pull more seat
belt out of the retractor. If you cannot pull
any more seat belt webbing out of the
retractor, the seat belt is in the automatic
locking mode.
7. Check to make sure the child restraint is
properly secured prior to each use. If the
lap belt is not locked, repeat steps three
through six.After the child restraint is removed and the
seat belt is fully retracted, the automatic
locking mode (child restraint mode) is can-
celed.
ARS1074ARS1079
1-34Seats, restraints and supplemental air bag systems
ZX
Page 47 of 223
charging system. Turn the engine off and
check the generator belt. If the belt is loose,
broken, or missing, or if the light remains on,
see an authorized NISSAN dealer immedi-
ately.
CAUTION
Do not continue driving if the generator
belt is loose, broken or missing.
Low fuel warning light
(if so equipped)
This warning light comes on when the fuel in
the tank is getting low. Refuel as soon as it
is convenient, preferably before the fuel
gauge reaches E (Empty).
There will be a small reserve of fuel remain-
ing in the tank when the fuel gauge reaches
E (Empty).
Door ajar warning light
(if so equipped)
This light comes on when any of the doors
are not closed securely while the ignition
key is ON.
Seat belt warning light and
chime
The light and chime remind you to fasten
seat belts. The light illuminates whenever
the ignition key is turned to ON, and re-
mains illuminated until the driver's seat belt
is fastened. At the same time, the chime
sounds for about seven seconds unless the
driver seat belt is securely fastened.
Refer to ªSeat beltsº in the ªSeats, restraints
and supplemental air bag systemsº section
for precautions on seat belt usage.
Supplemental air bag
warning light
When the ignition key is in the ON or START
position, the supplemental air bag warning
light illuminates for about 7 seconds and
then turns off. This means the system is
operational.
If any of the following conditions occur, the
supplemental air bag system needs servic-
ing and your vehicle must be taken to an
authorized NISSAN dealer:
1. The supplemental air bag warning light
does not come on and remain on for 7seconds and then go off as described
above.
2. The supplemental air bag warning light
flashes intermittently or remains on.
3. The supplemental air bag warning light
does not come on at all.
Unless checked and repaired, the supple-
mental restraint system (air bag system)
may not function properly. For additional
details see ``Supplemental restraint system''
in the ``Seats, restraints and supplemental
air bag systems'' section of this manual.
WARNING
If the supplemental air bag warning
light is on, it could mean that the
supplemental air bag system will not
operate in an accident.
Low washer fluid warning
light (Canada only)
This light comes on when the washer fluid is
at a low level. Add washer fluid as necessary.
See the ``Do-it-yourself'' section of this
manual.
2-6Instruments and controls
ZX
Page 107 of 223
WARNING
cDo not leave children, unreliable
adults, or pets alone in your vehicle.
They could accidentally injure them-
selves or others through inadvertent
operation of the vehicle. Also, on hot,
sunny days, temperatures in a closed
vehicle could quickly become high
enough to cause severe or possibly
fatal injuries to people or animals.
cClosely supervise children when they
are around cars to prevent them from
playing and becoming locked in the
trunk where they could be seriously
injured. Keep the car locked, with the
trunk closed, when not in use, and
prevent children's access to car keys.
EXHAUST GAS (carbon monoxide)
WARNING
Do not breathe exhaust gases; they
contain colorless and odorless carbon
monoxide. Carbon monoxide is dan-
gerous.It can cause unconsciousness
or death.
c
If you suspect that exhaust fumes areentering the vehicle, drive with all
windows fully open, and have the
vehicle inspected immediately.
cDo not run the engine in a closed
space such as a garage.
cDo not park the vehicle with the en-
gine running for any extended length
of time.
cKeep the trunk lid closed while driv-
ing, otherwise exhaust gases could
be drawn into the passenger com-
partment. If you must drive in this
manner for some reason, take the
following steps:
1. Open all the windows.
2. Set the air recirculation button (if
so equipped) off and the fan con-
trol dial to four (high) to circulate
the air.
3.
Be sure the rear seats are secured
and latched in the upright position.
cIf electrical wiring or other cable con-
nections must pass to a trailer
through the seal on the trunk lid or
the body, follow the manufacturer's
recommendation to prevent carbon
monoxide entry into the vehicle.cThe exhaust system and body should
be inspected by a qualified mechanic
whenever:
a. The vehicle is raised for service.
b. You suspect that exhaust fumes
are entering into the passenger
compartment.
c. You notice a change in the sound
of the exhaust system.
d.You have had an accident involv-
ing damage to the exhaust system,
underbody, or rear of the vehicle.
THREE WAY CATALYST
The three way catalyst is an emission con-
trol device installed in the exhaust system.
Exhaust gases in the three way catalyst are
burned at high temperatures to help reduce
pollutants.
WARNING
c
The exhaust gas and the exhaust sys-
tem are very hot. Keep people or flam-
mable materials away from the ex-
haust pipe.
cDo not stop or park the vehicle over
flammable materials such as dry
PRECAUTIONS WHEN
STARTING AND DRIVING
5-2Starting and driving
ZX
Page 144 of 223
you in choosing the proper product.
cWax your vehicle only after a thorough
washing. Follow the instructions supplied
with the wax.
cDo not use a wax containing any abra-
sives, cutting compounds or cleaners
that may damage the vehicle finish.
cIf the surface does not polish easily, use
a ªroad tarº remover and wax again.
Machine compounding or aggressive pol-
ishing on a base coat/clear coat paint finish
may dull the finish or leave swirl marks.
Only use black wax or black shoe polish on
black urethane or polypropylene bumpers.
Removing spots
Remove tar and oil spots, industrial dust,
insects, and tree sap as quickly as possible
from the surface of the paint to avoid lasting
damage or staining. Special cleaning prod-
ucts are available at an authorized NISSAN
dealer or any automotive accessory store.
Underbody
In areas where road salt is used in winter,
the underbody must be cleaned regularly.
This prevents dirt and salt from building upand causing underbody and suspension
corrosion. Before winter and again in the
spring, the underseal must be checked and,
if necessary, re-treated.
Use glass cleaner to remove smoke and
dust film from the glass surfaces. It is nor-
mal for glass to become coated with a film
after the vehicle is parked in the hot sun.
Glass cleaner and a soft cloth easily remove
this film.
CAUTION
When cleaning the inside of the win-
dow, do not use sharp-edged tools,
abrasive cleaners or chlorine based
disinfectant cleaners. They could dam-
age the rear window defogger.
Cleaning aluminum alloy wheels
Wash the wheels regularly, especially dur-
ing winter months in areas where road salt
is used. If not removed, road salt could
discolor the wheels.
Chrome parts
Clean all chrome parts regularly with a
non-abrasive chrome polish to maintain the
finish.
Cleaning interior
Occasionally remove loose dust from the
interior trim, plastic parts and seats using a
vacuum cleaner or soft brush. Wipe the
vinyl and leather surfaces with a clean, soft
cloth dampened in mild soap solution, then
wipe clean with a dry soft cloth. Before
using any fabric protector, read the manu-
facturer's recommendations. Some fabric
protectors contain chemicals that may stain
or bleach the seat material.
CAUTION
cNever use benzine, thinner, or any
similar material.
cNever use fabric protectors unless
recommended by the manufacturer.
Appearance and care
7-3
ZX
Page 188 of 223

check for any loose wheel nuts. Tighten if
necessary.
Tire rotation* ÐTires should be rotated
every 7,500 miles (12,000 km).
Wheel alignment and balance ÐIf the
vehicle should pull to either side while driv-
ing on a straight and level road, or if you
detect uneven or abnormal tire wear, there
may be a need for a wheel alignment.
If the steering wheel or seat vibrates at
normal highway speeds, wheel balancing
may be needed.
Windshield wiper blades* ÐCheck for
cracks or wear if they do not wipe properly.
Doors and hood ÐCheck that all doors
and the hood operate properly. Also ensure
that all latches lock securely. Lubricate
hinges, latches, rollers and links if neces-
sary. Make sure the secondary latch keeps
the hood from opening when the primary
latch is released.
When driving in areas that use road salt or
other corrosive materials, check lubrication
frequently.
Lights* ÐMake sure the headlights, stop
lights, tail lights, turn signal lights, and otherlights are all operating properly and installed
securely. Also check headlight aim.
INSIDE THE VEHICLE
The maintenance items listed here should
be checked on a regular basis, such as
when performing periodic maintenance,
cleaning the vehicle, etc.
Additional information on the following
items with an ``*'' is found in the ``Do-it-
yourself'' section of this manual.
Warning lights and chimes ÐMake sure
all warning lights and chimes are operating
properly.
Windshield wiper and washer* ÐCheck
that the wipers and washer operate properly
and that the wipers do not streak.
Windshield defroster ÐCheck that the air
comes out of the defroster outlets properly
and in sufficient quantity when operating the
heater or air conditioner.
Steering wheel ÐCheck for changes in
the steering conditions, such as excessive
freeplay, hard steering or strange noises.
Seats ÐCheck seat position controls such
as seat adjusters, seatback recliner, etc. toensure they operate smoothly and all
latches lock securely in every position.
Check that the head restraints move up and
down smoothly and the locks hold securely
in all latched positions.
Seat belts ÐCheck that all parts of the seat
belt system (For example buckles, anchors,
adjusters and retractors) operate properly
and smoothly, and are installed securely.
Check the belt webbing for cuts, fraying,
wear or damage.
Accelerator pedal ÐCheck the pedal for
smooth operation and make sure the pedal
does not catch or require uneven effort.
Keep the floor mat away from the pedal.
Clutch pedal* ÐMake sure the pedal
operates smoothly and check that it has the
proper free travel.
Brakes ÐCheck that the brakes do not pull
the vehicle to one side when applied.
Brake pedal and booster* ÐCheck the
pedal for smooth operation and make sure it
has the proper distance under it when de-
pressed fully. Check the brake booster func-
tion. Be certain to keep the floor mat away
from the pedal.
Maintenance
9-3
ZX
Page 208 of 223
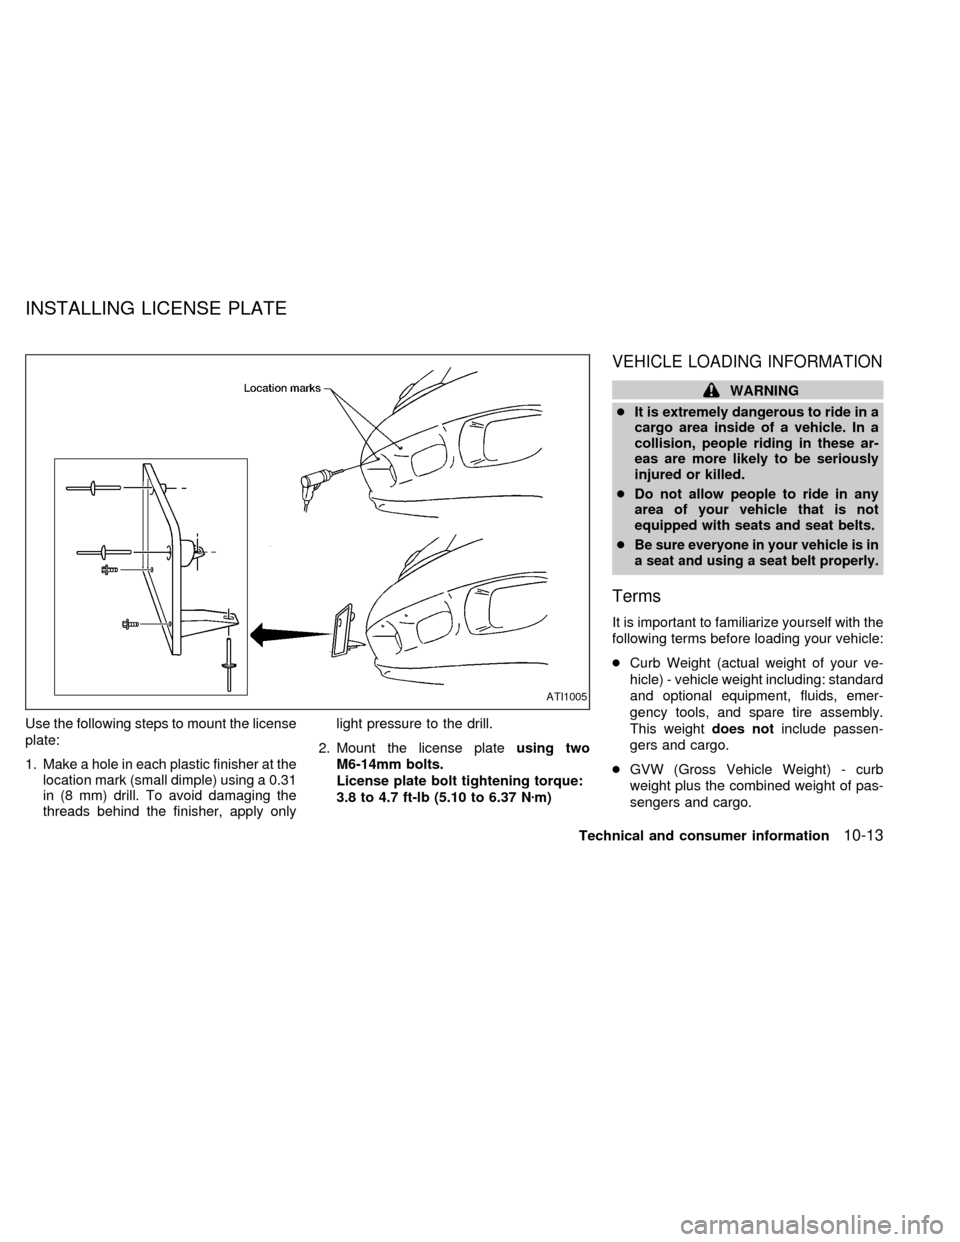
Use the following steps to mount the license
plate:
1. Make a hole in each plastic finisher at the
location mark (small dimple) using a 0.31
in (8 mm) drill. To avoid damaging the
threads behind the finisher, apply onlylight pressure to the drill.
2. Mount the license plateusing two
M6-14mm bolts.
License plate bolt tightening torque:
3.8 to 4.7 ft-lb (5.10 to 6.37 Nzm)
VEHICLE LOADING INFORMATION
WARNING
cIt is extremely dangerous to ride in a
cargo area inside of a vehicle. In a
collision, people riding in these ar-
eas are more likely to be seriously
injured or killed.
cDo not allow people to ride in any
area of your vehicle that is not
equipped with seats and seat belts.
c
Be sure everyone in your vehicle is in
a seat and using a seat belt properly.
Terms
It is important to familiarize yourself with the
following terms before loading your vehicle:
cCurb Weight (actual weight of your ve-
hicle) - vehicle weight including: standard
and optional equipment, fluids, emer-
gency tools, and spare tire assembly.
This weightdoes notinclude passen-
gers and cargo.
cGVW (Gross Vehicle Weight) - curb
weight plus the combined weight of pas-
sengers and cargo.
ATI1005
INSTALLING LICENSE PLATE
Technical and consumer information10-13
ZX