1999 NISSAN SENTRA turn signal
[x] Cancel search: turn signalPage 88 of 223
Turn the ONzOFF/VOL control knob to ad-
just the volume.
Clock operation
Pressing the CLOCK button alternates the
clock and the radio/cassette tape options in
the display.
Clock set
Depressing the CLOCK and thebuttons
together sets hours. Depressing the CLOCK
and
buttons together sets minutes.
Clock priority mode
In this mode the clock is shown in the
display. If any radio or cassette tape func-
tions are activated, the radio (or cassette
tape) display illuminates for 10 seconds
then returns to the clock mode.
NOTE:
After clock adjustment, the radio is in the
clock priority mode.
Radio/Cassette tape priority mode
In this mode, the radio station illuminates in
the display during radio operation. During
cassette tape operation, TAPE illuminates
in the display.
Selecting the desired band
Push thebutton to change from AM
to FM reception.
The FM stereo indicator, ST, illuminates
during FM stereo reception. When the ste-
reo broadcast signal is weak, the radio au-
tomatically changes from stereo to monaural
reception.
TUNE buttons
WARNING
The radio should not be tuned while
driving in order that full attention may
be given to the driving operation.
Use the
andbuttons for
manual tuning. To move quickly through the
channels, hold either of the tune buttons
down for more than 0.5 seconds.
SEEK tuning
Push thetuning buttonfor less
than 1.5 seconds. SEEK tuning begins from
low to high frequencies and stops at the next
broadcasting station. Pushing the button
again continues the SEEK function. Once the
highest broadcasting station is reached, theradio continues in the SEEK mode at the
lowest broadcast station.
SCAN tuning
Push thetuning buttonfor more
than 1.5 seconds. SCAN illuminates in the
display. SCAN tuning begins from low to high
frequencies and stops at each broadcasting
station for five seconds. Pushing the button
again during this five second period stops
SCAN tuning and the radio remains tuned to
that station.
Heater, air conditioner and audio systems4-11
ZX
Page 92 of 223

AM-FM RADIO WITH COMPACT
DISC PLAYER
RADIO OPERATION
To turn the radio on, turn the ignition key to
ACC or ON. If you listen to the radio with the
engine not running, turn the key to the ACC
position.
Radio reception is affected by station signal
strength, distance from radio transmitter,
buildings, bridges, mountains, and other
external influences. Intermittent changes in
reception quality normally are caused by
these external influences.
Using a cellular phone in or near the
vehicle may influence radio reception
quality.
ONzOFF/VOL control knob
Turn the ignition key to ACC or ON, then push
the ONzOFF/VOL control knob. The mode
(radio or CD) which was playing immediately
before the system was turned off resumes
playing. When no CD is loaded, the radio
comes on. Pushing the ONzOFF/VOL button
again turns the system off.
AHA1096
Heater, air conditioner and audio systems4-15
ZX
Page 93 of 223
Turn the ONzOFF/VOL control knob to ad-
just the volume.
Clock operation
Pressing the clock button alternates the
clock and the radio/CD player options in the
display.
Clock set
Depressing the clock andbuttons to-
gether sets hours. Depressing the clock and
buttons together sets minutes.
Clock priority mode
In this mode the clock is shown in the
display. If any radio or CD functions are
activated, the radio or CD display illumi-
nates for 10 seconds then returns to the
clock mode.
NOTE:
After clock adjustment, the radio is in the
clock priority mode.
FM/AM band select button
Push thebutton to change from AM
to FM reception.
The FM stereo indicator, ST, illuminatesduring FM stereo reception. When the ste-
reo broadcast signal is weak, the radio
automatically changes from stereo to mon-
aural reception.
TUNE buttons
WARNING
The radio should not be tuned while
driving in order that full attention may
be given to the driving operation.
Use the
andbuttons for manual
tuning. To move quickly through the chan-
nels, hold either of the tune buttons down
for more than 0.5 seconds.
SEEK/SCAN buttons
SEEK tuning
Push the SEEK/SCAN tuning button
orfor less than 1.5 seconds. SEEK tuning
begins from high to low frequencies or low
to high frequencies, depending on which
button is pressed, and stops at the next
broadcasting station. Once the highest
broadcasting station is reached, the radio
continues in the SEEK mode at the lowest
broadcasting station. If using the
button, once the lowest broadcastingstation is reached, the radio continues in the
SEEK mode at the highest broadcasting
station.
SCAN tuning
Push the SEEK/SCAN tuning button
orfor more than 1.5 seconds. SCAN illu-
minates in the display. SCAN tuning begins
from high to low frequencies or low to high
frequencies, depending on which button is
pressed. SCAN tuning stops at each broad-
casting station for five seconds. Pushing the
button again during this five second period
stops SCAN tuning and the radio remains
tuned to that station.
4-16Heater, air conditioner and audio systems
ZX
Page 97 of 223

AM-FM RADIO WITH CASSETTE
PLAYER AND COMPACT DISC
PLAYER
RADIO OPERATION
To turn the radio on, turn the ignition key to
ACC or ON. If you listen to the radio with the
engine not running, turn the key to the ACC
position.
Radio reception is affected by station signal
strength, distance from radio transmitter,
buildings, bridges, mountains, and other
external influences. Intermittent changes in
reception quality normally are caused by
these external influences.
Using a cellular phone in or near the
vehicle may influence radio reception
quality.
This radio has an FM Diversity reception
system, which employs two antennas. One
is a rod type antenna; the other is an
antenna printed on the rear window. This
system automatically switches to the an-
tenna which is receiving the strongest radio
signal.
AHA1072
4-20Heater, air conditioner and audio systems
ZX
Page 98 of 223
ONzOFF/VOL control knob
Turn the ignition key to ACC or ON, then
push the ONzOFF/VOL control knob button.
The mode (radio, tape or CD) which was
playing immediately before the system was
turned off resumes playing. When no CD or
tape is loaded, the radio comes on. Pushing
the ONzOFF/VOL control knob button again
turns the system off.
Turn the ONzOFF/VOL control knob to ad-
just the volume.
Clock operation
Pressing the clock button alternates the
clock and the radio/cassette/CD player op-
tions in the display.
Clock set
Depressing the clock andbuttons to-
gether sets hours. Depressing the clock and
buttons together sets minutes.
Clock priority mode
In this mode, the clock is shown in the
display. If any radio, cassette or CD func-
tions are activated, the radio, cassette or
CD display illuminates for 10 seconds then
returns to the clock mode.NOTE:
After clock adjustment, the radio is in the
clock priority mode.
FM-AM band select button
Pushing thebutton changes the band.
The FM stereo indicator, ST, illuminates
during FM stereo reception. When the ste-
reo broadcast signal is weak, the radio
automatically changes from stereo to mon-
aural reception.
TUNE/DISC buttons
WARNING
The radio should not be tuned while
driving in order that full attention may
be given to the driving operation.
Use the
andbuttons for manual
tuning. To move quickly through the chan-
nels, hold either of the tuning buttons down.
SEEK/SCAN buttons
SEEK tuning
Push the SEEK/SCAN tuning button
orfor less than 0.5 seconds. SEEK tuning
begins from low to high frequencies or highto low frequencies, depending on which
button is pressed, and stops at the next
broadcasting station. Once the highest
broadcasting station is reached, the radio
continues in the SEEK mode at the lowest
broadcasting station. If using the
button, once the lowest broadcasting
station is reached, the radio continues in the
SEEK mode at the highest broadcasting
station.
SCAN tuning
Push the SEEK/SCAN tuning button
orfor more than 0.5 seconds. SCAN illu-
minates in the display, and the radio station
blinks. SCAN tuning begins from low to high
frequencies or high to low frequencies, de-
pending on which button is pressed. SCAN
tuning stops at each broadcasting station
for five seconds. Pushing the button again
during this five second period stops SCAN
tuning and the radio remains tuned to that
station.
Heater, air conditioner and audio systems
4-21
ZX
Page 129 of 223
If you have a flat tire, follow the instructions
below.
Stopping the vehicle
1. Safely move the vehicle off the road and
away from traffic.
2. Turn on the hazard warning flashers.
3. Park on a level surface and apply the
parking brake. Shift the manual transmis-
sion into R (Reverse), or the automatic
transmission into P (Park).
4. Turn off the engine.
5. Raise the hood to warn other traffic, and
to signal professional road assistance
personnel that you need assistance.
6. Have all passengers get out of the ve-
hicle and stand in a safe place, away
from traffic and clear of the vehicle.
WARNING
cMake sure that the parking brake is
securely applied and the manual
transmission is shifted into R (Re-
verse), or the automatic transmis-
sion into P (Park).cNever change tires when the vehicle
is on a slope, ice or slippery areas.
This is hazardous.
cNever change tires if oncoming traf-
fic is close to your vehicle. Wait for
professional road assistance.
Getting the spare tire and tools
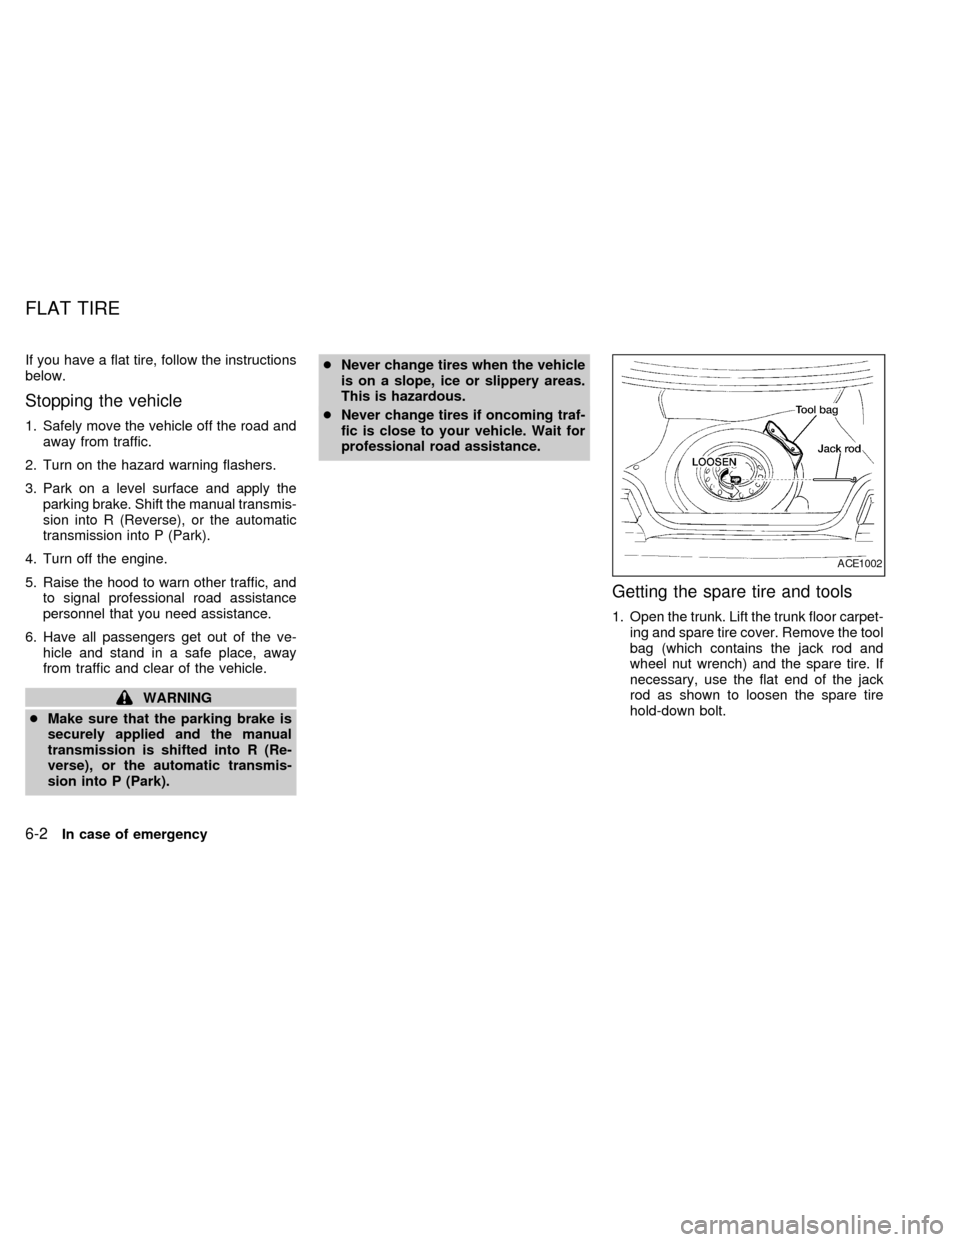
1. Open the trunk. Lift the trunk floor carpet-
ing and spare tire cover. Remove the tool
bag (which contains the jack rod and
wheel nut wrench) and the spare tire. If
necessary, use the flat end of the jack
rod as shown to loosen the spare tire
hold-down bolt.
ACE1002
FLAT TIRE
6-2In case of emergency
ZX
Page 174 of 223
cAiming is not necessary after replac-
ing the bulb.
cDo not leave the bulb out of the
headlight reflector for a long period
of time as dust, moisture, and smoke
may enter the headlight body and
affect the performance of the head-
light.
Before adjusting the headlights, make sure
all of the tires are properly inflated, the
vehicle is on level ground and there is no
excess weight in the vehicle that would
affect the level of the vehicle.
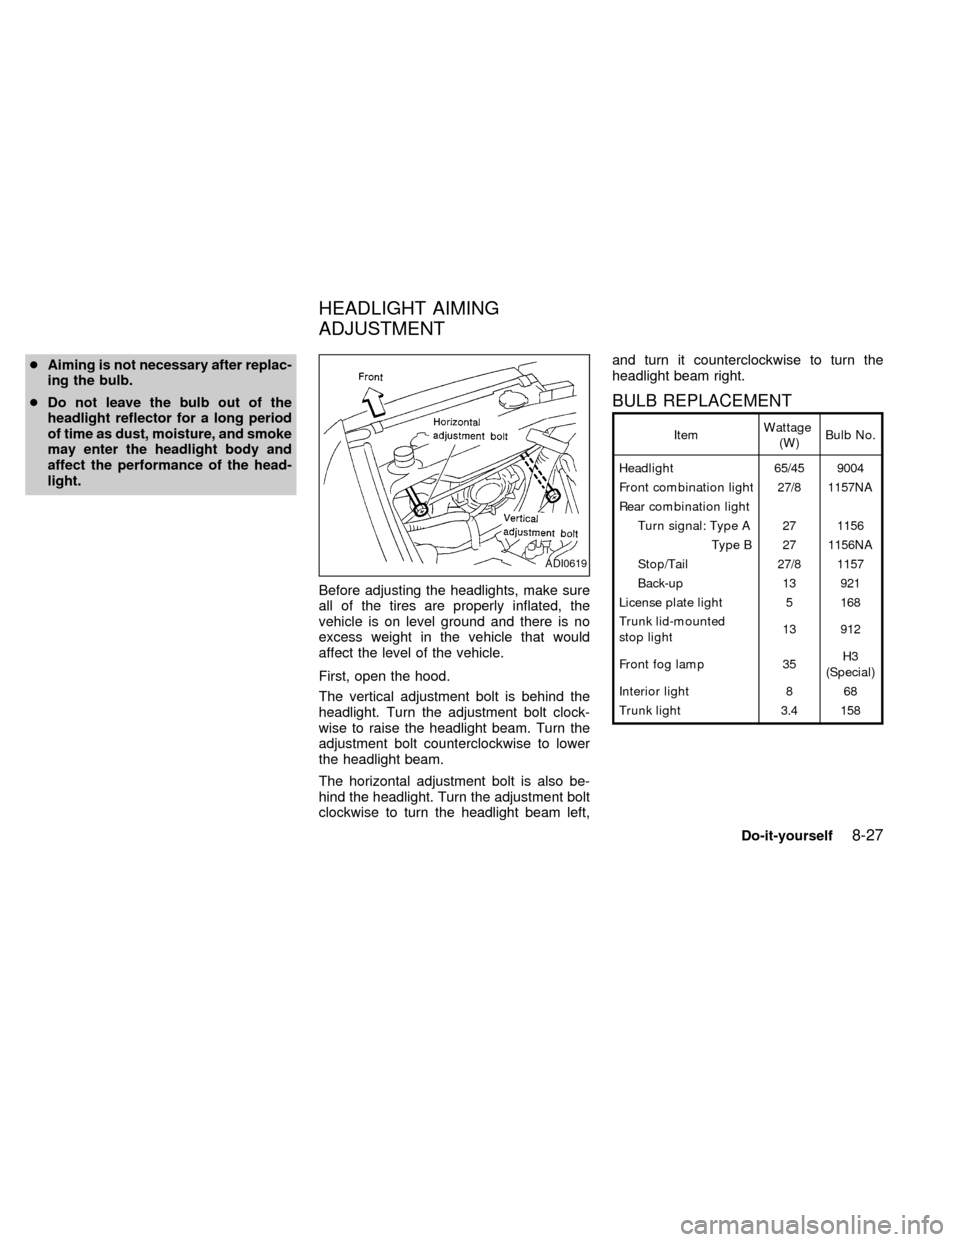
First, open the hood.
The vertical adjustment bolt is behind the
headlight. Turn the adjustment bolt clock-
wise to raise the headlight beam. Turn the
adjustment bolt counterclockwise to lower
the headlight beam.
The horizontal adjustment bolt is also be-
hind the headlight. Turn the adjustment bolt
clockwise to turn the headlight beam left,and turn it counterclockwise to turn the
headlight beam right.
BULB REPLACEMENT
ItemWattage
(W)Bulb No.
Headlight 65/45 9004
Front combination light 27/8 1157NA
Rear combination light
Turn signal: Type A 27 1156
Type B 27 1156NA
Stop/Tail 27/8 1157
Back-up 13 921
License plate light 5 168
Trunk lid-mounted
stop light13 912
Front fog lamp 35H3
(Special)
Interior light 8 68
Trunk light 3.4 158
ADI0619
HEADLIGHT AIMING
ADJUSTMENT
Do-it-yourself8-27
ZX
Page 188 of 223

check for any loose wheel nuts. Tighten if
necessary.
Tire rotation* ÐTires should be rotated
every 7,500 miles (12,000 km).
Wheel alignment and balance ÐIf the
vehicle should pull to either side while driv-
ing on a straight and level road, or if you
detect uneven or abnormal tire wear, there
may be a need for a wheel alignment.
If the steering wheel or seat vibrates at
normal highway speeds, wheel balancing
may be needed.
Windshield wiper blades* ÐCheck for
cracks or wear if they do not wipe properly.
Doors and hood ÐCheck that all doors
and the hood operate properly. Also ensure
that all latches lock securely. Lubricate
hinges, latches, rollers and links if neces-
sary. Make sure the secondary latch keeps
the hood from opening when the primary
latch is released.
When driving in areas that use road salt or
other corrosive materials, check lubrication
frequently.
Lights* ÐMake sure the headlights, stop
lights, tail lights, turn signal lights, and otherlights are all operating properly and installed
securely. Also check headlight aim.
INSIDE THE VEHICLE
The maintenance items listed here should
be checked on a regular basis, such as
when performing periodic maintenance,
cleaning the vehicle, etc.
Additional information on the following
items with an ``*'' is found in the ``Do-it-
yourself'' section of this manual.
Warning lights and chimes ÐMake sure
all warning lights and chimes are operating
properly.
Windshield wiper and washer* ÐCheck
that the wipers and washer operate properly
and that the wipers do not streak.
Windshield defroster ÐCheck that the air
comes out of the defroster outlets properly
and in sufficient quantity when operating the
heater or air conditioner.
Steering wheel ÐCheck for changes in
the steering conditions, such as excessive
freeplay, hard steering or strange noises.
Seats ÐCheck seat position controls such
as seat adjusters, seatback recliner, etc. toensure they operate smoothly and all
latches lock securely in every position.
Check that the head restraints move up and
down smoothly and the locks hold securely
in all latched positions.
Seat belts ÐCheck that all parts of the seat
belt system (For example buckles, anchors,
adjusters and retractors) operate properly
and smoothly, and are installed securely.
Check the belt webbing for cuts, fraying,
wear or damage.
Accelerator pedal ÐCheck the pedal for
smooth operation and make sure the pedal
does not catch or require uneven effort.
Keep the floor mat away from the pedal.
Clutch pedal* ÐMake sure the pedal
operates smoothly and check that it has the
proper free travel.
Brakes ÐCheck that the brakes do not pull
the vehicle to one side when applied.
Brake pedal and booster* ÐCheck the
pedal for smooth operation and make sure it
has the proper distance under it when de-
pressed fully. Check the brake booster func-
tion. Be certain to keep the floor mat away
from the pedal.
Maintenance
9-3
ZX