1999 NISSAN QUEST set
[x] Cancel search: setPage 11 of 286
POWER FRONT SEAT
ADJUSTMENT (if so equipped)
WARNING
cDo not adjust the driver's seat while
driving. The seat may move sud-
denly and could cause loss of con-
trol of the vehicle.
c
Do not leave children unattended in-
side the vehicle. They could unknow-
ingly activate switches or controls.
Unattended children could become
involved in serious accidents.
For memory seat and mirror information
see ``Memory driver seat and mirrors'' in the
``Pre-driving checks and adjustments'' sec-
tion.
Operating tips
cThe motor has an auto-reset overload
protection circuit. If the motor stops dur-
ing operation, wait 30 seconds, then re-
activate the switch.
cDo not operate the power support seat
for a long period of time when the engine
is off. This discharges the battery.
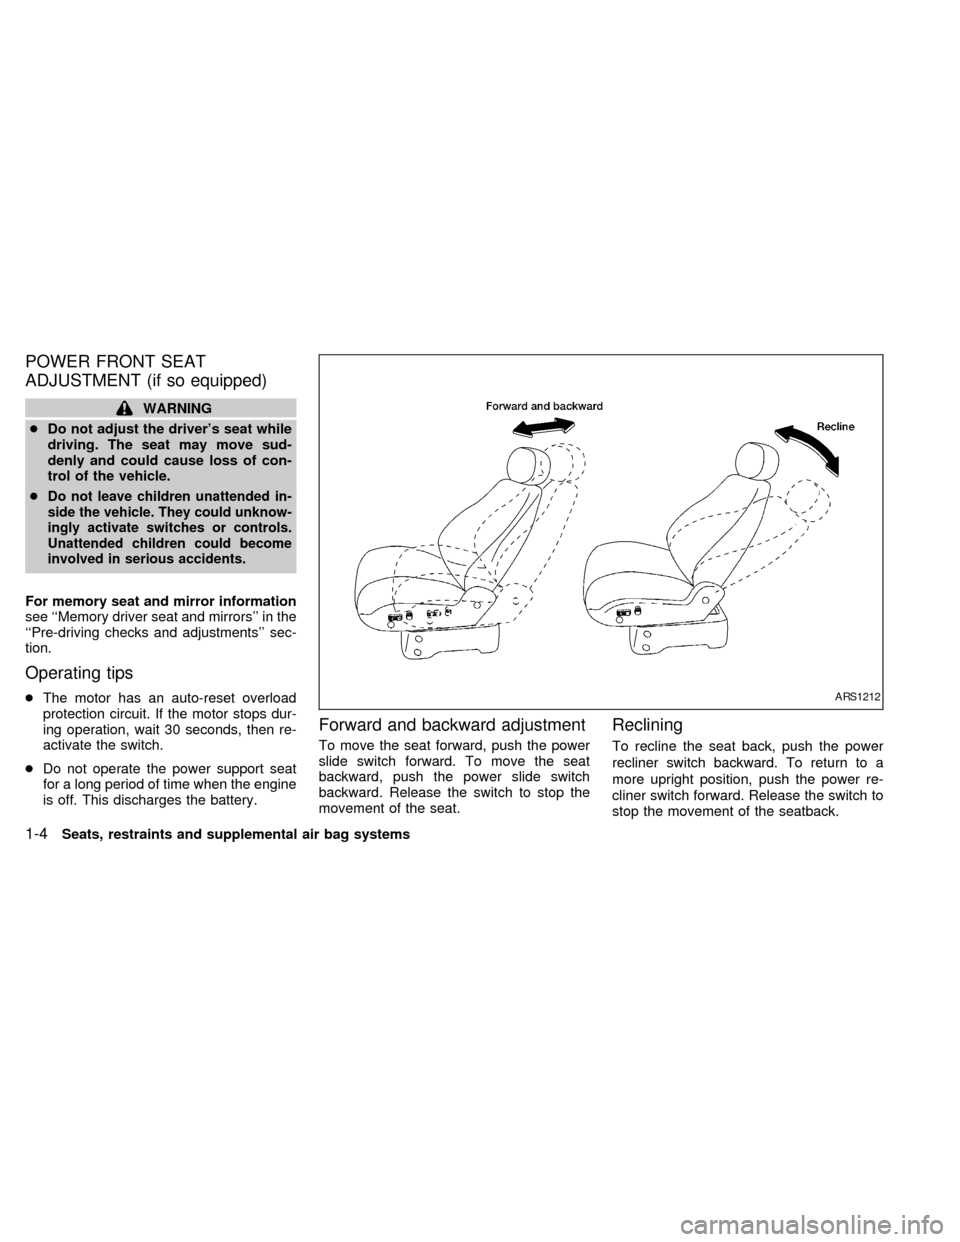
Forward and backward adjustment
To move the seat forward, push the power
slide switch forward. To move the seat
backward, push the power slide switch
backward. Release the switch to stop the
movement of the seat.
Reclining
To recline the seat back, push the power
recliner switch backward. To return to a
more upright position, push the power re-
cliner switch forward. Release the switch to
stop the movement of the seatback.
ARS1212
1-4Seats, restraints and supplemental air bag systems
ZX
Page 32 of 286
If any of the following conditions occur, the
supplemental air bag needs servicing and
should be taken to your nearest authorized
NISSAN dealer:
1. The supplemental air bag light does not
come on and remain on for 7 seconds
and then go off as described.
2. The supplemental air bag light flashes
intermittently, or remains on after 7 sec-
onds.
3. The supplemental air bag light does not
come on at all.
Under these conditions, the Supplemental
Restraint System Air Bag may not operate
properly. It must be checked and repaired.
Take your vehicle to the nearest authorized
NISSAN dealer.
WARNING
If the supplemental air bag warning
light is on, it could mean that the
supplemental air bag system will not
operate in an accident.
Repair and replacement procedure
The supplemental air bag modules are de-
signed to inflate on a one-time-only basis.
As a reminder, unless it is damaged, the
supplemental air bag light remains illumi-
nated after inflation has occurred. Repair
and replacement of the supplemental air
bag system should be done only by an
authorized NISSAN dealer.
To ensure long-term functioning, the
supplemental air bag system must be
inspected 10 years after the date of
manufacture as noted on the certifica-
tion label located on the driver side front
pillar.
When maintenance work is required on the
vehicle, the supplemental air bag system
and related parts should be pointed out to
the person conducting the maintenance.
The ignition key should always be in the
LOCK position when working under the
hood or inside the vehicle.
WARNING
cOnce the supplemental air bag in-
flates, the supplemental air bag
module will not function again and
should be replaced by an authorized
NISSAN dealer. The supplemental air
bag module cannot be repaired.
cThe supplemental air bag system
should be inspected by an autho-
rized NISSAN dealer if there is any
damage to the front end portion of
the vehicle.
c
If you need to dispose of a supple-
mental air bag or scrap the vehicle,
contact an authorized NISSAN dealer.
Correct supplemental air bag dis-
posal procedures are set forth in the
appropriate NISSAN Service Manual.
Incorrect disposal procedures could
cause personal injury.
Seats, restraints and supplemental air bag systems1-25
ZX
Page 45 of 286
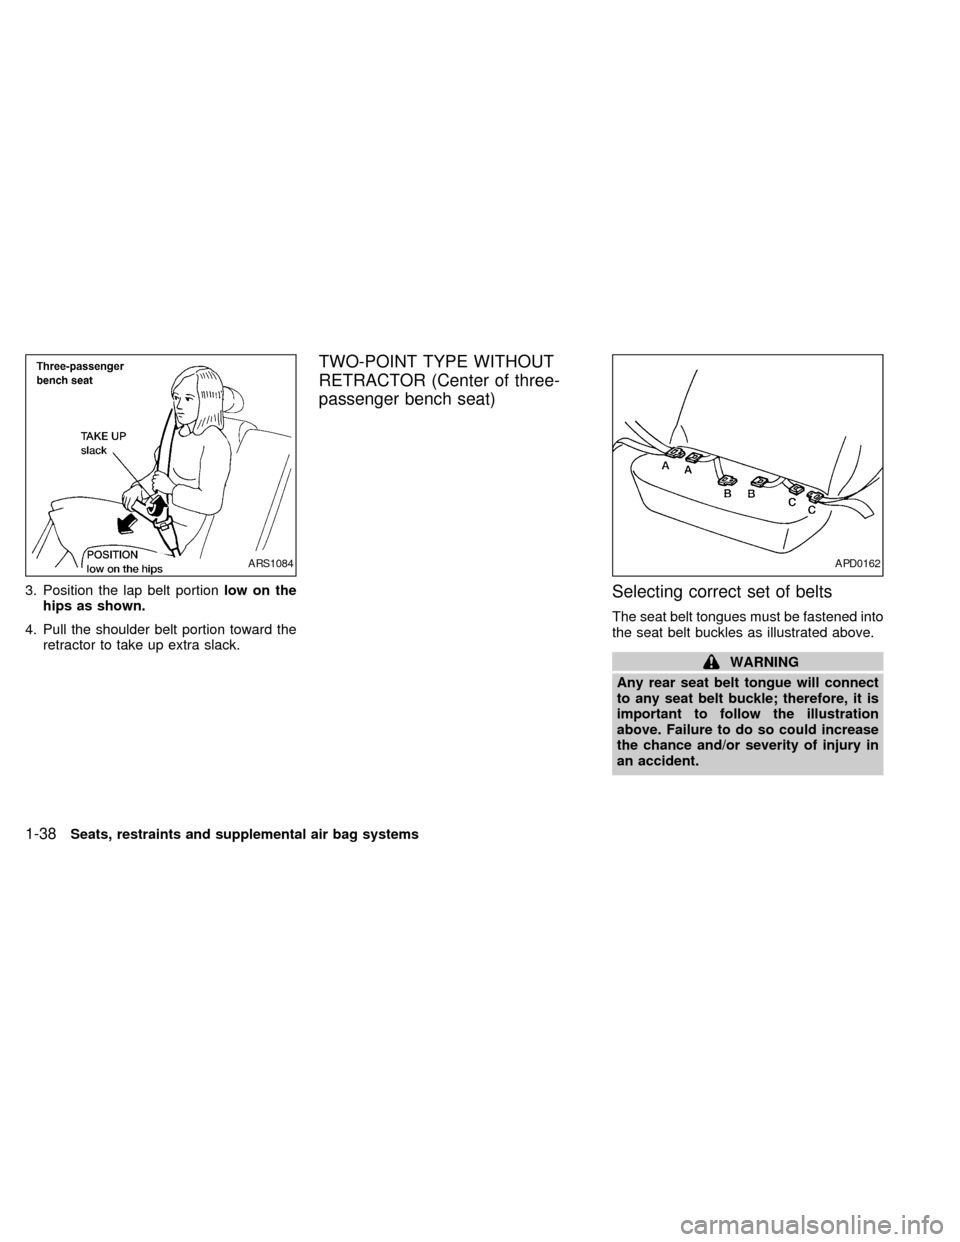
3. Position the lap belt portionlow on the
hips as shown.
4. Pull the shoulder belt portion toward the
retractor to take up extra slack.
TWO-POINT TYPE WITHOUT
RETRACTOR (Center of three-
passenger bench seat)
Selecting correct set of belts
The seat belt tongues must be fastened into
the seat belt buckles as illustrated above.
WARNING
Any rear seat belt tongue will connect
to any seat belt buckle; therefore, it is
important to follow the illustration
above. Failure to do so could increase
the chance and/or severity of injury in
an accident.
ARS1084APD0162
1-38Seats, restraints and supplemental air bag systems
ZX
Page 89 of 286
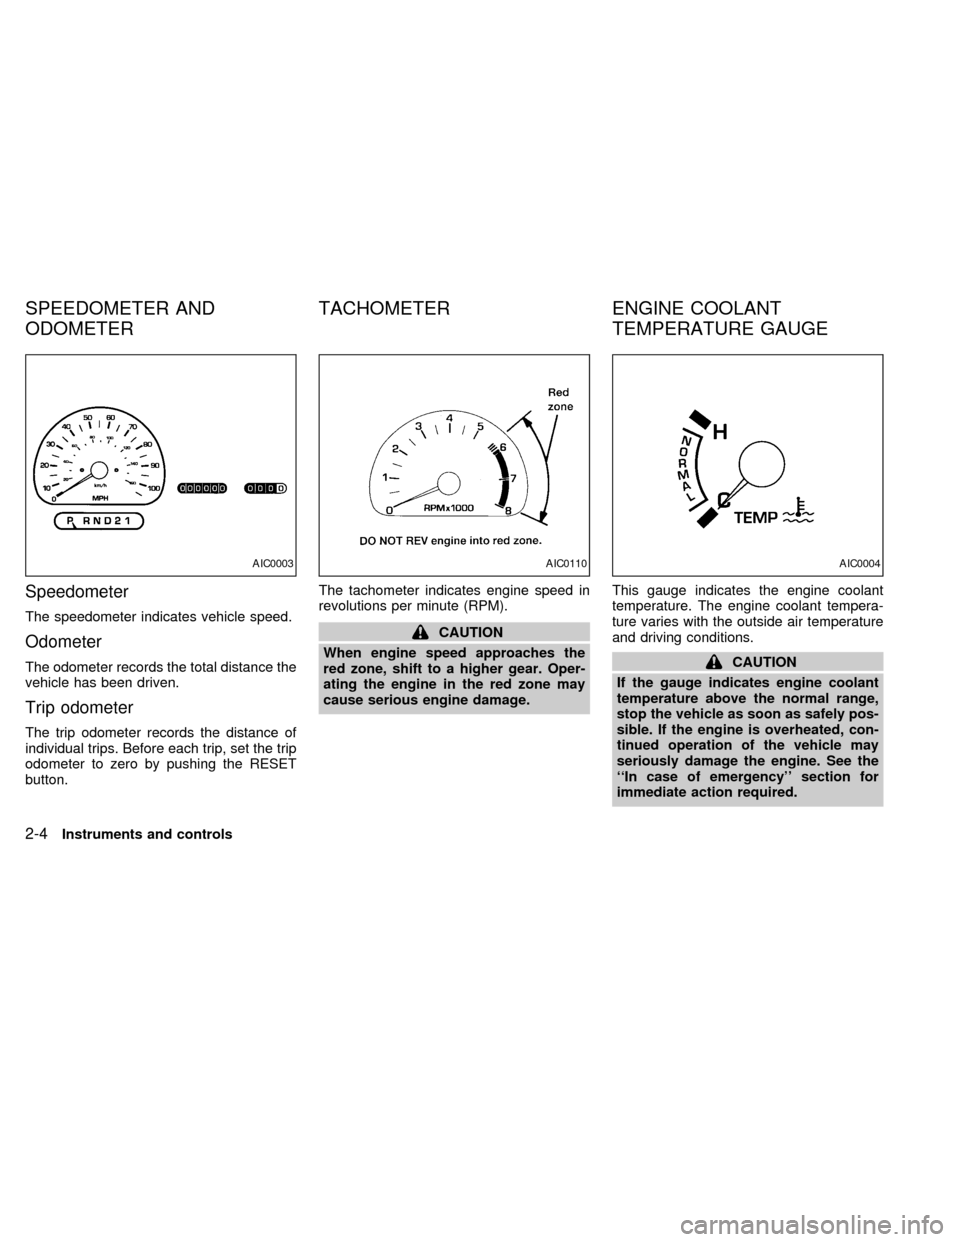
Speedometer
The speedometer indicates vehicle speed.
Odometer
The odometer records the total distance the
vehicle has been driven.
Trip odometer
The trip odometer records the distance of
individual trips. Before each trip, set the trip
odometer to zero by pushing the RESET
button.The tachometer indicates engine speed in
revolutions per minute (RPM).
CAUTION
When engine speed approaches the
red zone, shift to a higher gear. Oper-
ating the engine in the red zone may
cause serious engine damage.This gauge indicates the engine coolant
temperature. The engine coolant tempera-
ture varies with the outside air temperature
and driving conditions.
CAUTION
If the gauge indicates engine coolant
temperature above the normal range,
stop the vehicle as soon as safely pos-
sible. If the engine is overheated, con-
tinued operation of the vehicle may
seriously damage the engine. See the
``In case of emergency'' section for
immediate action required.
AIC0003AIC0110AIC0004
SPEEDOMETER AND
ODOMETERTACHOMETER ENGINE COOLANT
TEMPERATURE GAUGE
2-4Instruments and controls
ZX
Page 99 of 286

Push the headlight switch again to turn the
interior lights off.
DAYTIME RUNNING LIGHT
SYSTEM (Canada only)
The headlights automatically illuminate at a
reduced intensity when the engine is started
with the parking brake released. The day-
time running lights operate with the head-
light switch in the OFF position or in the
position. Turn the headlight switch to
theposition for full illumination when
driving at night.
If the parking brake is applied before the
engine is started, the daytime running lights
do not illuminate. The daytime running lights
illuminate once the parking brake is released.
The daytime running lights will remain on until
the ignition switch is turned OFF.
WARNING
When the daytime running light system
is active, tail lights on your vehicle will
not be on. It is necessary at dusk to
turn on your headlights. Failure to do
so could cause an accident injuring
yourself and others.The autolamp system allows the headlights
to be set so they turn on and off automati-
cally. The autolamp system can turn on the
headlights automatically when it is dark,
turn off the headlights when it is light, and
keep the headlights on for up to three
minutes after you turn the key to OFF.
To set the autolamp system:
1. Make sure the headlight switch is in the
AUTO1 or AUTO2 position.
2. Turn the ignition key to ON.
3. The autolamp system automatically turns
the headlights on and off.
Shut-off delay
The length of time the headlights stay on
after the ignition is turned to OFF depends
on whether the switch is in the AUTO1 or
AUTO2 position. If the switch is in the
AUTO1 position, then the headlights stay on
for less than 1 minute after the ignition is
turned OFF. If the switch is in the AUTO2
position, the headlights stay on approxi-
mately 3 minutes after the ignition is turned
OFF.
To turn the autolamp system off, turn the
switch to the OFF,
,orposition.AIC1058
AUTOLAMP SWITCH
(if so equipped)
2-14Instruments and controls
ZX
Page 107 of 286

Locking passenger's window
When the power window lock-out button is
pushed in, the passenger's window cannot
be opened or closed. Push the power win-
dow lock-out button again to cancel this
feature.
The passenger side switch opens or closes
the passenger window only. To open the
window, press the switch down. To close
the window, lift the switch up.The sunroof operates when the ignition key
is in the ON position, or for 15 minutes after
the ignition key is turned to the OFF posi-
tion. If the driver's or passenger's door is
opened during this 15 minute period, power
to the sunroof is cancelled.
NOTE:
If the battery is discharged or is discon-
nected, the sunroof may not operate cor-
rectly, and must be reset.
To reset a fully or partially open sunroof:
1. Push and hold the UP/CLOSE side of the
sunroof switch until the sunroof closes,and tilts up to the fully open position, then
release the switch.
2. Push and hold the DOWN/OPEN side of
the switch until the sunroof lowers com-
pletely. The sunroof is now reset and
should operate correctly.
To reset a fully or partially tilted, or closed
sunroof:
1. Push and hold the UP/CLOSE side of the
sunroof switch until the sunroof stops
tilting up, then release the switch.
2. Push and hold the DOWN/OPEN side of
the switch until the sunroof lowers com-
pletely. The sunroof is now reset and
should operate correctly.
Sliding the sunroof
To open the roof, push and hold the OPEN
side of the switch.
To close the roof, push and hold the CLOSE
side.
Tilting the sunroof
To tilt up, first close the sunroof, then push the
UP side of the switch. To close the sunroof,
push the DOWN side of the switch.
AIC1081AIC1066
SUNROOF (if so equipped)
2-22Instruments and controls
ZX
Page 127 of 286

The interior lights, the cargo light, the glove
box light, the stepwell lights near the sliding
doors and on the front doors, and the foot-
well lights near the driver's and front pas-
senger's feet illuminate when the front or
sliding doors are opened. Once the doors
are closed, these lights gradually dim to off
within 30 seconds or turn off immediately
when the key is turned to the ON position.
Battery saver
If the vehicle doors are not fully closed and
the interior lights remain illuminated, they
eventually turn off automatically to prevent
the battery from becoming discharged. If the
interior lights are left in the ON position, with
all doors closed, they will automatically turn
off after approximately 30 minutes. Lights
that illuminate when the front or sliding
doors are opened turn off after approxi-
mately 30 minutes. Lights that illuminate
when the back door is opened turn off after
approximately 60 minutes. Vanity mirror
lights are not part of the battery saver
system.
If the personal reading lights are left on after
the key is removed from the ignition, they
will automatically turn off after approxi-
mately 30 minutes.1. Pull the hood lock release handle
s1
located below the instrument panel; the
hood then springs up slightly.
2. Pull up on the lever
s2at the front of the
hood and raise the hood.3. Insert the support rod
s3into the slot on
the underside of the hood.
4. When closing the hood, reset the support
rod to its original position, lower the hood
to approximately 12 inches above the
latch and release it. This allows proper
engagement of the hood latch.
APD1064
ILLUMINATED ENTRY
SYSTEMHOOD RELEASE
3-12Pre-driving checks and adjustments
ZX
Page 136 of 286
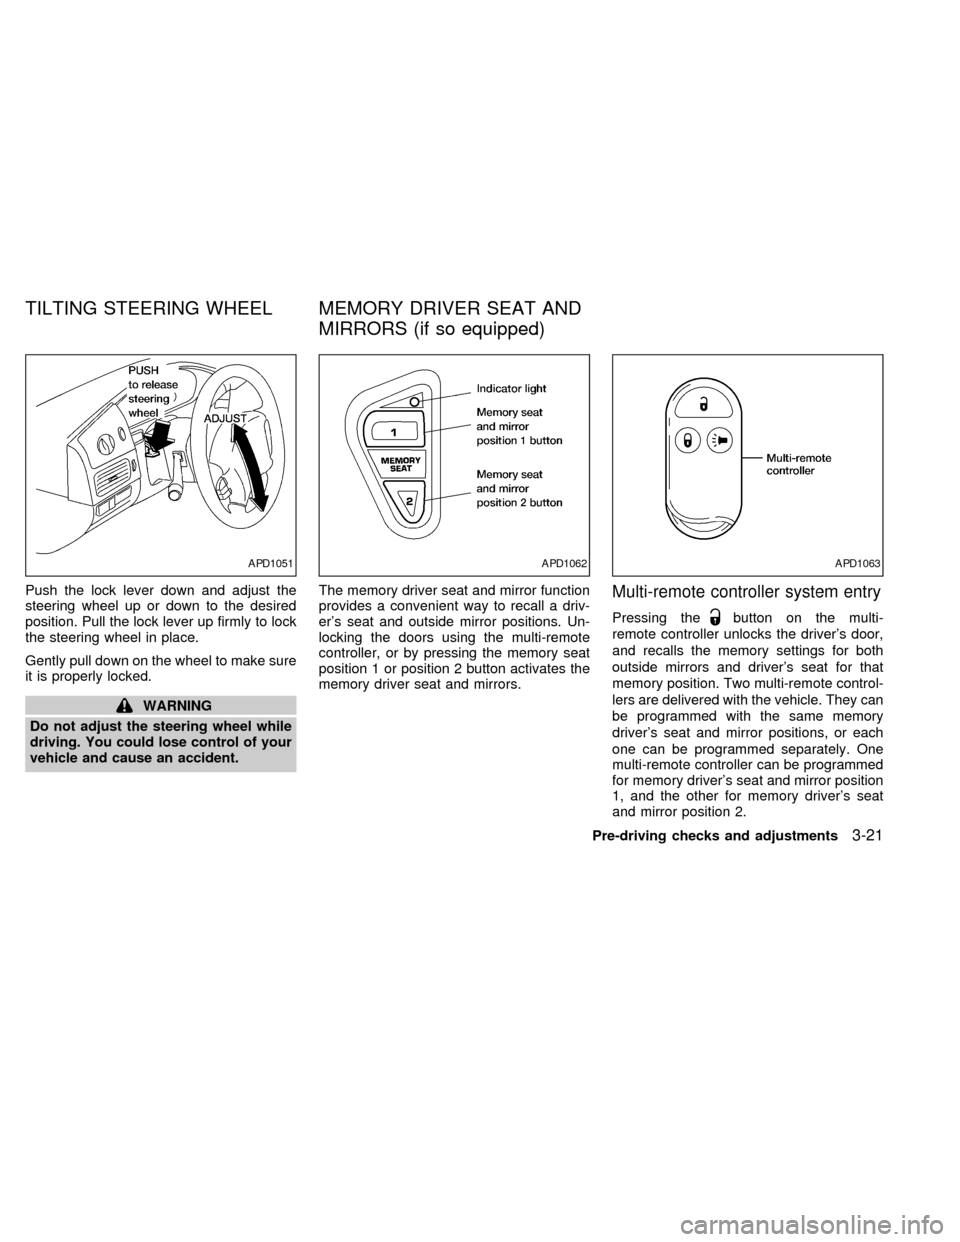
Push the lock lever down and adjust the
steering wheel up or down to the desired
position. Pull the lock lever up firmly to lock
the steering wheel in place.
Gently pull down on the wheel to make sure
it is properly locked.
WARNING
Do not adjust the steering wheel while
driving. You could lose control of your
vehicle and cause an accident.The memory driver seat and mirror function
provides a convenient way to recall a driv-
er's seat and outside mirror positions. Un-
locking the doors using the multi-remote
controller, or by pressing the memory seat
position 1 or position 2 button activates the
memory driver seat and mirrors.
Multi-remote controller system entry
Pressing thebutton on the multi-
remote controller unlocks the driver's door,
and recalls the memory settings for both
outside mirrors and driver's seat for that
memory position. Two multi-remote control-
lers are delivered with the vehicle. They can
be programmed with the same memory
driver's seat and mirror positions, or each
one can be programmed separately. One
multi-remote controller can be programmed
for memory driver's seat and mirror position
1, and the other for memory driver's seat
and mirror position 2.
APD1051APD1062APD1063
TILTING STEERING WHEEL MEMORY DRIVER SEAT AND
MIRRORS (if so equipped)
Pre-driving checks and adjustments3-21
ZX