1999 NISSAN QUEST turn signal
[x] Cancel search: turn signalPage 156 of 286
MINS is displayed then use the SEL
buttons to change the minutes.
The display will return to clock priority mode
in 10 seconds or press the RDS/CLK button
to return to the clock display.
Selecting the desired band
Push the AM or FM buttons to change to AM
or FM band reception.
The FM stereo indicator, ST illuminates during
FM stereo reception. When the stereo broad-
cast signal is weak, the radio automatically
changes from stereo to monaural reception.
TUNING
WARNING
The radio should not be tuned while
driving in order that full attention may
be given to the driving operation.
Auto set
Press the AUTO button while listening to the
radio to activate the auto set feature. When
AUTO is depressed for less than 5 seconds,
the display window momentarily indicates
AUTO ON, and the radio seeks the first six
strong stations for the respective band. Thefirst six strong stations are then stored in
order in memory buttons one through six.
Only stations in the selected band are set,
and the station seek begins from the last
frequency stored in memory button six. If
AM, FM, SCAN, TUNE, SEEK, AUTO or a
memory button is pushed while auto set is
operating, auto set is canceled and AUTO
OFF shows in the display window.
Auto load
Press the AUTO button for longer than 5
seconds while listening to the radio to acti-
vate the auto load feature. When AUTO is
depressed for longer than 5 seconds, the
display window momentarily indicates
AUTO LOAD, and the radio seeks the first
six strong stations for every band. The first
six strong stations are then stored in order
in memory buttons one through six for each
band (AM, FM1, and FM2).
Tune buttons
Use theorbuttons for manual
tuning. To move quickly through the chan-
nels, hold either of the tune buttons down
for more than 0.5 seconds.
SEEK tuning
Push the SEEKorbuttons to find the
next broadcast station. Pushing the
SEEKS up andbutton SEEKS down.
Pushing the button again continues the SEEK
function. Once the highest broadcast station
is reached, the radio continues in the SEEK
mode at the lowest station. Once the lowest
broadcast station is reached, the radio con-
tinues in the SEEK mode at the highest
station.
SCAN tuning
Push the SCAN tuning button, SCAN illumi-
nates in the display. SCAN tuning begins
from low to high frequencies and stops at
each broadcasting station for 5 seconds.
Pushing the button again during this 5 sec-
ond period stops SCAN tuning and remains
tuned to that station.
Heater, air conditioner and audio systems
4-17
ZX
Page 161 of 286

AM-FM RADIO WITH CASSETTE
PLAYER AND COMPACT DISC
PLAYER
RADIO OPERATIONTo turn the radio on, turn the ignition key to
ACC or ON. If you listen to the radio with the
engine not running, turn the key to the ACC
position.
Radio reception is affected by station signal
strength, distance from radio transmitter,buildings, bridges, mountains, and other
external influences. Intermittent changes in
reception quality normally are caused by
external influences.
Using a cellular phone in or near the
vehicle may influence radio reception
quality.
Push the VOL knob to turn the radio on.
Push the VOL knob once more to turn the
radio OFF.
The control buttons are illuminated when
the parking lamps or headlamps are on.
Only the text for the active controls will
illuminate for each specific type of media.
No bulbs or lights have malfunctioned. For
example when a cassette tape is being
played, SHUFFLE will not illuminate.
Turn the knob to raise or lower volume. If
the knob is set above a certain volume level
and the ignition is turned off, the volume will
come back on at a nominal listening level
when the ignition is turned back on.
Clock operation
The clock is on in the display regardless of
what mode, media, or function the radio is in
as long as the ignition is in ACC or ON.
AHA1058
4-22Heater, air conditioner and audio systems
ZX
Page 162 of 286
Clock set
Press the RDS/CLK button until SELECT
HOURS is displayed then use the SEL
buttons to change the hour, press
the RDS/CLK button again until SELECT
MINS is displayed then use the SEL
buttons to change the minutes.
The display will return to the previous radio
station, tape or CD that was being played
previous to setting the clock in 7 seconds or
you may press the RDS/CLK button until the
previous display appears.
Selecting the desired band
Push the AM buttons to change to AM band
or push the FM button to change to FM1 or
FM2 band reception.
The FM stereo indicator, ST illuminates
during FM stereo reception. When the ste-
reo broadcast signal is weak, the radio
automatically changes from stereo to mon-
aural reception.
TUNING
WARNING
The radio should not be tuned while
driving in order that full attention may
be given to the driving operation.
Auto set
Press the AUTO button while listening to the
radio to activate the auto set feature. When
AUTO is depressed for less than 5 seconds,
the display window momentarily indicates
AUTO ON, and the radio seeks the first six
strong stations for the respective band. The
first six strong stations are then stored in
order in memory buttons one through six.
Only stations in the selected band are set,
and the station seek begins from the last
frequency stored in memory button six. If
AM, FM, SCAN, TUNE, SEEK, AUTO or a
memory button is pushed while auto set is
operating, auto set is canceled and AUTO
OFF shows in the display window.
Auto load
Press the AUTO button for longer than 5
seconds while listening to the radio to acti-vate the auto load feature. When AUTO is
depressed for longer than 5 seconds, the
display window momentarily indicates
AUTO LOAD, and the radio seeks the first
six strong stations for every band. The first
six strong stations are then stored in order
in memory buttons one through six for each
band (AM, FM1, and FM2).
Tune buttons
Use theorbuttons for manual
tuning. To move quickly through the chan-
nels, hold either of the tune buttons down
for more than 0.5 seconds.
SEEK tuning
Push the SEEKorbuttons to find the
next broadcast station. Pushing the
SEEKS up andbutton SEEKS down.
Pushing the button again continues the SEEK
function. Once the highest broadcast station
is reached, the radio continues in the SEEK
mode at the lowest station. Once the lowest
broadcast station is reached, the radio con-
tinues in the SEEK mode at the highest
station.
Heater, air conditioner and audio systems4-23
ZX
Page 195 of 286
If you have a flat tire, follow the instructions
below:
Stopping the vehicle
1. Safely move the vehicle off the road and
away from traffic.
2. Turn on the hazard warning flashers.
3. Park on a level surface and apply the
parking brake. Move the gearshift lever
to the P (Park) position.
4. Turn off the engine.
5. Raise the hood to warn other traffic, and
to signal professional road assistance
personnel that you need assistance.
6. Have all passengers get out of the ve-
hicle and stand in a safe place, away
from traffic and clear of the vehicle.
WARNING
cMake sure the parking brake is se-
curely applied and the automatic
transmission is shifted into P (Park).
cNever change tires when the vehicle
is on a slope, ice or slippery areas.
This is hazardous.
cNever change tires if oncoming traf-
fic is close to your vehicle. Wait for
professional road assistance.
Getting the tools and spare tire
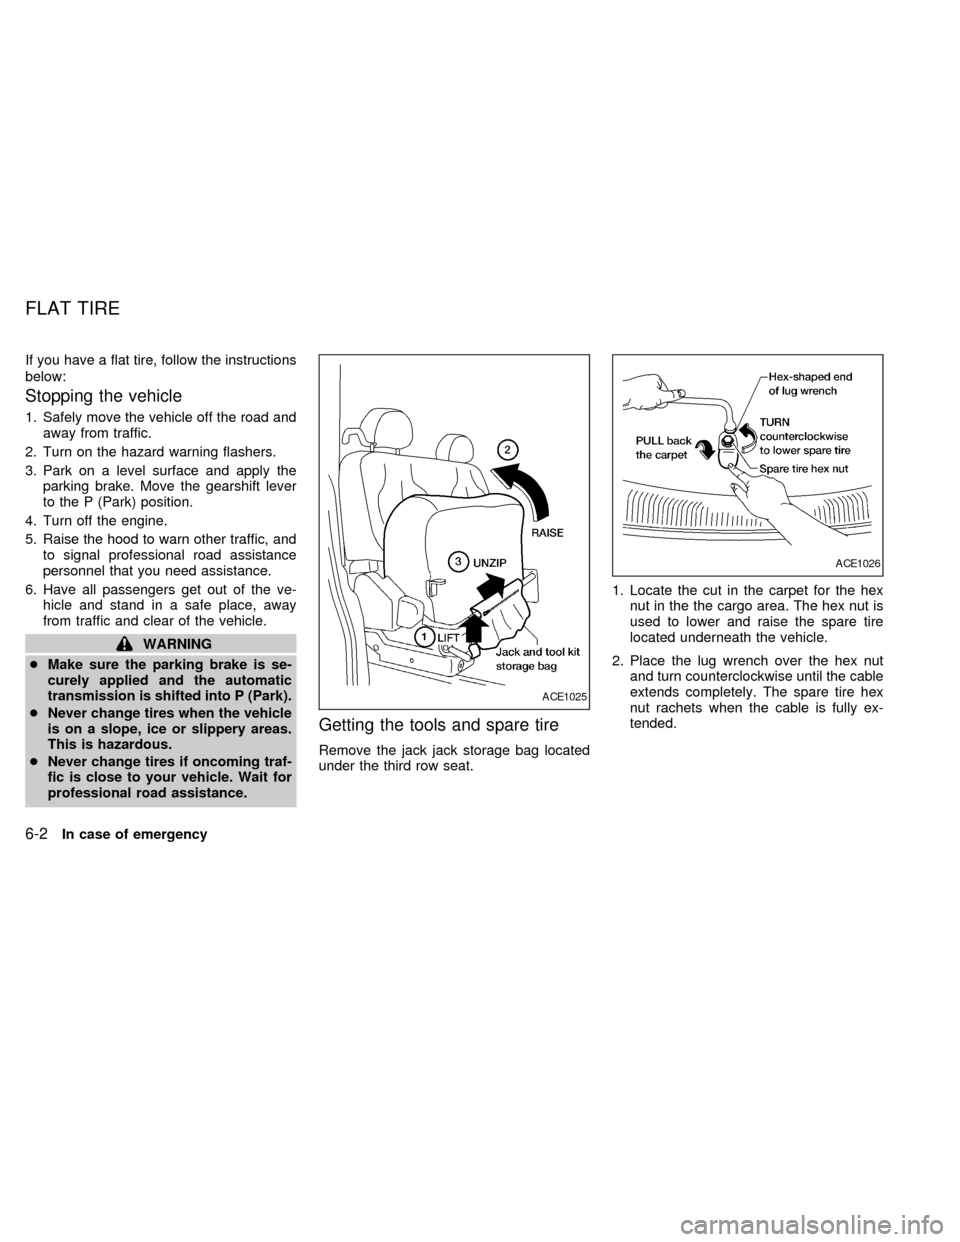
Remove the jack jack storage bag located
under the third row seat.1. Locate the cut in the carpet for the hex
nut in the the cargo area. The hex nut is
used to lower and raise the spare tire
located underneath the vehicle.
2. Place the lug wrench over the hex nut
and turn counterclockwise until the cable
extends completely. The spare tire hex
nut rachets when the cable is fully ex-
tended.
ACE1025
ACE1026
FLAT TIRE
6-2In case of emergency
ZX
Page 236 of 286
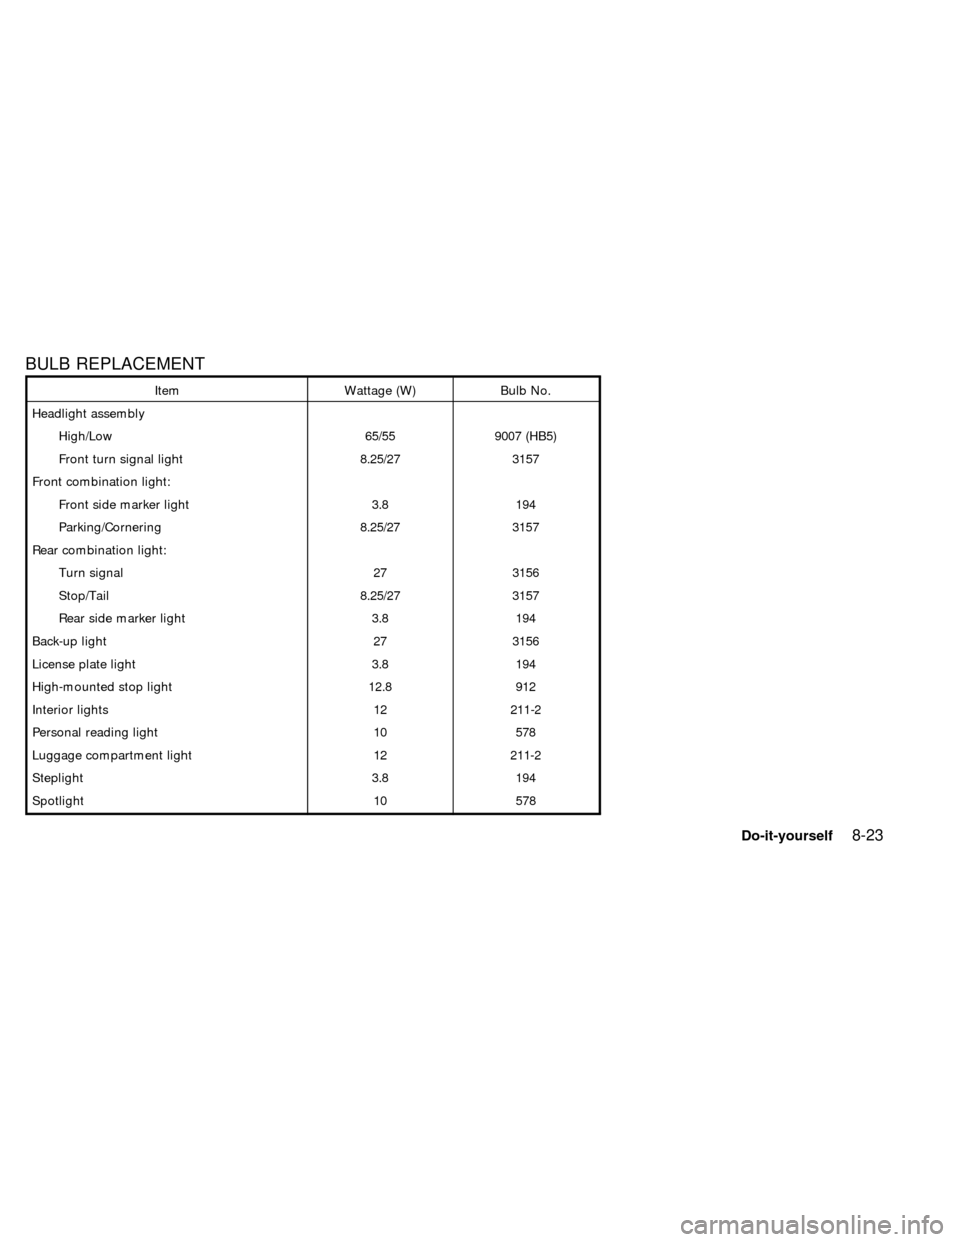
BULB REPLACEMENT
Item Wattage (W) Bulb No.
Headlight assembly
High/Low 65/55 9007 (HB5)
Front turn signal light 8.25/27 3157
Front combination light:
Front side marker light 3.8 194
Parking/Cornering 8.25/27 3157
Rear combination light:
Turn signal 27 3156
Stop/Tail 8.25/27 3157
Rear side marker light 3.8 194
Back-up light 27 3156
License plate light 3.8 194
High-mounted stop light 12.8 912
Interior lights 12 211-2
Personal reading light 10 578
Luggage compartment light 12 211-2
Steplight 3.8 194
Spotlight 10 578
Do-it-yourself8-23
ZX
Page 248 of 286

make sure no wheel nuts are missing, and
check for any loose wheel nuts. Tighten if
necessary.
Tire rotation*Ð Tires should be rotated
every 7,500 miles (12,000 km).
Wheel alignment and balanceÐIfthe
vehicle should pull to either side while driv-
ing on a straight and level road, or if you
detect uneven or abnormal tire wear, there
may be a need for a wheel alignment.
If the steering wheel or seat vibrates at
normal highway speeds, wheel balancing
may be needed.
Windshield wiper blades*Ð Check for
cracks or wear if they do not wipe properly.
Doors and hoodÐ Check that all doors
and the hood operate properly. Also ensure
that all latches lock securely. Lubricate
hinges, latches, rollers and links if neces-
sary. Make sure the secondary latch keeps
the hood from opening when the primary
latch is released.
When driving in areas using road salt or
other corrosive materials, check lubrication
frequently.INSIDE THE VEHICLE
The maintenance items listed here should
be checked on a regular basis, such as
when performing periodic maintenance,
cleaning the vehicle, etc.
Additional information on the following
items with an ``*'' is found in the ``Do-it-
yourself'' section of this manual.
Lights*Ð Make sure the headlights, stop
lights, tail lights, turn signal lights, and other
lights are all operating properly and installed
securely. Also check headlight aim.
Warning lights and buzzers/chimesÐ
Make sure all warning lights and
buzzers/chimes are operating properly.
Windshield wiper and washer*Ð Check
that the wipers and washer operate properly
and that the wipers do not streak.
Windshield defrosterÐ Check that the air
comes out of the defroster outlets properly
and in sufficient quantity when operating the
heater or air conditioner.
Steering wheelÐ Check for changes in
the steering conditions, such as excessive
freeplay, hard steering or strange noises.SeatsÐ Check seat position controls such
as seat adjusters, seatback recliner, etc. to
ensure they operate smoothly and all
latches lock securely in every position.
Check that the head restraints move up and
down smoothly and the locks hold securely
in all latched positions. Check that the seat
leg latches lock securely in every anchor
position for the folding down rear seat and
detachable rear seat (if so equipped).
Seat beltsÐ Check that all parts of the seat
belt system (e.g. buckles, anchors, adjust-
ers and retractors) operate properly and
smoothly, and are installed securely. Check
the belt webbing for cuts, fraying, wear or
damage.
Accelerator pedalÐ Check the pedal for
smooth operation and make sure the pedal
does not catch or require uneven effort.
Keep the floor mat away from the pedal.
BrakesÐ Check that the brakes do not pull
the vehicle to one side when applied.
Brake pedal and booster*Ð Check the
pedal for smooth operation and make sure it
has the proper distance under it when de-
pressed fully. Check the brake booster func-
Maintenance
9-3
ZX
Page 284 of 286

Seat belt extenders .............................. 1-40
Seat belt maintenance.......................... 1-40
Seat belts.............................................. 1-26
Three-point type with retractor .... 1-29, 1-32
Two-point type without retractor ........... 1-38
Seat belt warning light ................................. 2-7
Seat positions ............................................ 1-73
Seating arrangements ............................... 1-68
Seats
Five passenger seating ........................ 1-70
Five passenger seating with cargo
room...................................................... 1-71
Flexible seating....................................... 1-8
Integrated child safety seats ................ 1-61
Manual front seat adjustment ................. 1-3
Power support front seat ........................ 1-4
Seat positions ....................................... 1-73
Second row bench seat........................ 1-73
Second row bucket seats ..................... 1-77
Seven passenger seating ..................... 1-69
Sliding three-passenger seat................ 1-15
Three-passenger bench seat in fully
forward position .................................... 1-71
Three-passenger bench seat in storage
position ................................................. 1-69
Seats/floor mats ......................................... 1-68
Selector lever lock release .......................... 5-6
Self-adjusting brakes ................................. 8-19
Service manual order form ...................... 10-21
Seven passenger seating .......................... 1-69
Shifting
Automatic transmission .......................... 5-6Shift lock release ......................................... 5-6
Sliding three-passenger seat ..................... 1-15
Spark plug replacement............................. 8-12
Speedometer ............................................... 2-4
Spotlights (See map lights) ....................... 2-25
SRS warning label ..................................... 1-24
Starting
Before starting the engine ...................... 5-5
Jump starting................................. 6-8, 8-12
Precautions when starting and driving ... 5-2
Push starting......................................... 6-10
Starting the engine ................................. 5-8
Steering
Power steering fluid ...................... 10-2, 8-9
Tilting steering wheel............................ 3-21
Stop light .................................................... 8-23
Storage
Overhead storage compartment........... 2-20
Under seat storage tray.......................... 1-7
Storage compartment for garage door
transmitter .................................................. 2-25
Sun shade.................................................. 2-23
Sunroof ...................................................... 2-22
Supplemental restraint system
Information and warning labels ............ 1-24
Switch
Autolamp switch ................................... 2-14
Automatic power window switch .......... 2-21
Hazard warning flasher switch ............. 2-16
Headlight control switch ....................... 2-13
Ignition switch ......................................... 5-4
Overdrive switch ..................................... 5-7Rear window defogger switch .............. 2-13
Rear window wiper and washer
switches ................................................ 2-13
Turn signal switch................................. 2-15
Windshield wiper and washer switch ... 2-12
T
Tabletop seats ............................................. 1-7
Tachometer .................................................. 2-4
Theft warning ............................................. 2-10
Three way catalyst....................................... 5-2
Three-passenger bench seat..................... 1-37
Three-passenger bench seat in fully
forward position ......................................... 1-71
Three-passenger bench seat in storage
position....................................................... 1-69
Tilting steering wheel ................................. 3-21
Timing belt ................................................. 10-7
Tire
Flat tire.................................................... 6-2
Spare tire .............................................. 8-31
Tire chains ............................................ 8-29
Tire placard......................................... 10-11
Tire pressure .......................................... 5-6
Tire pressure ........................................ 8-27
Tire rotation .......................................... 8-29
Tool kit .................................................... 6-2
Types of tires ........................................ 8-28
Uniform tire quality grading ................ 10-18
Wheels and tires ......................... 10-8, 8-27
11-5
ZX
Page 285 of 286
Wheel/tire size ...................................... 10-8
Towing
Tow truck towing .................................. 6-12
Towing load/specification chart .......... 10-14
Trailer towing ...................................... 10-13
Transceiver
Integrated HomeLinkTUniversal
Transceiver (If so equipped) ................ 2-27
Transmission
Automatic transmission fluid (ATF) ........ 8-8
Driving with automatic transmission ....... 5-5
Selector lever lock release ..................... 5-6
Travel (See registering your vehicle in
another country)......................................... 10-9
Trip odometer .............................................. 2-4
Tuning............................................... 4-17, 4-23
Turn signal switch ...................................... 2-15
U
Under seat storage tray ............................... 1-7
Uniform tire quality grading ..................... 10-18
V
Vanity mirror .............................................. 3-24
Vehicle dimensions and weights ............... 10-8
Vehicle identification .................................. 10-9
Vehicle identification number (VIN) ........... 10-9
Vehicle identification number (VIN)
(chassis number) ....................................... 10-9Vehicle identification number (VIN) plate .. 10-9
Vehicle loading information ..................... 10-12
Vehicle recovery ........................................ 6-14
Ventilators .................................................... 4-2
W
Warning
Air bag warning light............................. 1-24
Hazard warning flasher switch ............. 2-16
Theft warning ........................................ 2-10
Warning labels (for SRS) ..................... 1-24
Warning/indicator lights and chimes ...... 2-6
Weights (See dimensions and weights) .... 10-8
Wheels and tires .............................. 10-8, 8-27
Wheel/tire size ........................................... 10-8
When traveling or registering your vehicle in
another country .......................................... 10-9
Window washer fluid.................................. 8-10
Windows
Locking passengers' windows .............. 2-22
Manual vent windows ........................... 2-23
Power vent windows............................. 2-23
Power windows..................................... 2-21
Windshield wiper and washer switch ........ 2-12
Wiper
Rear window wiper and washer
switches ................................................ 2-13
Windshield wiper and washer switch ... 2-12
Wiper blades......................................... 8-17
11-6
ZX