Page 390 of 2267
COMPONENT INSPECTION
Cooling fan relays-1, -2, -3
Check continuity between terminalsp3andp5.
Conditions Continuity
12V direct current supply between relay
terminals
p1andp2Ye s
No current supplyNo
If NG, replace cooling fan relay.
Cooling fan relay-2
Check continuity between terminalsp3andp4.
Conditions Continuity
No current supplyYe s
12V direct current supply between relay
terminals
p1andp2No
Cooling fan motors-1 and -2
1. Disconnect cooling fan motor harness connectors.
2. Supply cooling fan motor terminals with battery voltage and
check operation.
Terminals
(!)(@)
Cooling fan motor-1 and -2
p1p2
Cooling fan motor should operate.
If NG, replace cooling fan motor.
3 5
12
3 5
1 4 2
3 5
1 4 2
YEC391
Cooling fan relay 1
Cooling fan relay 3
Cooling fan relay 2
AEC781
FUSE
Cooling fan
motor-1 & -2
TROUBLE DIAGNOSIS 8CD20T
Cooling Fan (Overheat) (Cont'd)
EC-96
Page 391 of 2267
Needle Lift Sensor (NLS)
The needle lift sensor is built into the No. 1 nozzle. Its inductive
pick-up element senses the lifting of the injection nozzle needle
and thus the start of injection. The signal is evaluated by the
ECM and compared with the target timing. Deviations in timing,
for example caused by changes in fuel temperature, are sensed
by the ECM and corrected.
Malfunction is detected when ....Check Items
(Possible Cause)
lAn improper signal from the sensor is sent to ECM.lHarness or connectors
(The sensor circuit is open or shorted.)
lNeedle lift sensor
lAir in fuel line
lClogging No. 1 injection nozzle
DIAGNOSTIC TROUBLE CONFIRMATION
PROCEDURE
NOTE:
Before diagnostic trouble confirmation, be sure to check
battery voltage is above 9V.
1) Turn ignition switch to ªONº position and select
ªDATA MONITORº mode with CONSULT-II.
2) Start engine and run it for 2 seconds above 1,200
rpm.
NEF689 Nozzle holder
NozzleInductive
pick-up coli
TROUBLE DIAGNOSIS 9CD20T
EC-97
Page 395 of 2267
YEC807
BATTERY
Refer to EL-POWER.
: Detectable line for DTC
: Non-detectable line for DTC
INJECTION PUMP
(FUEL CUT SOLE-
NOID VALVE)
ENGINE
CONTROL
MODULE
RELAY
ECM
TROUBLE DIAGNOSIS 10CD20T
Fuel Cut Solenoid Valve (Cont'd)
EC-101
Page 408 of 2267
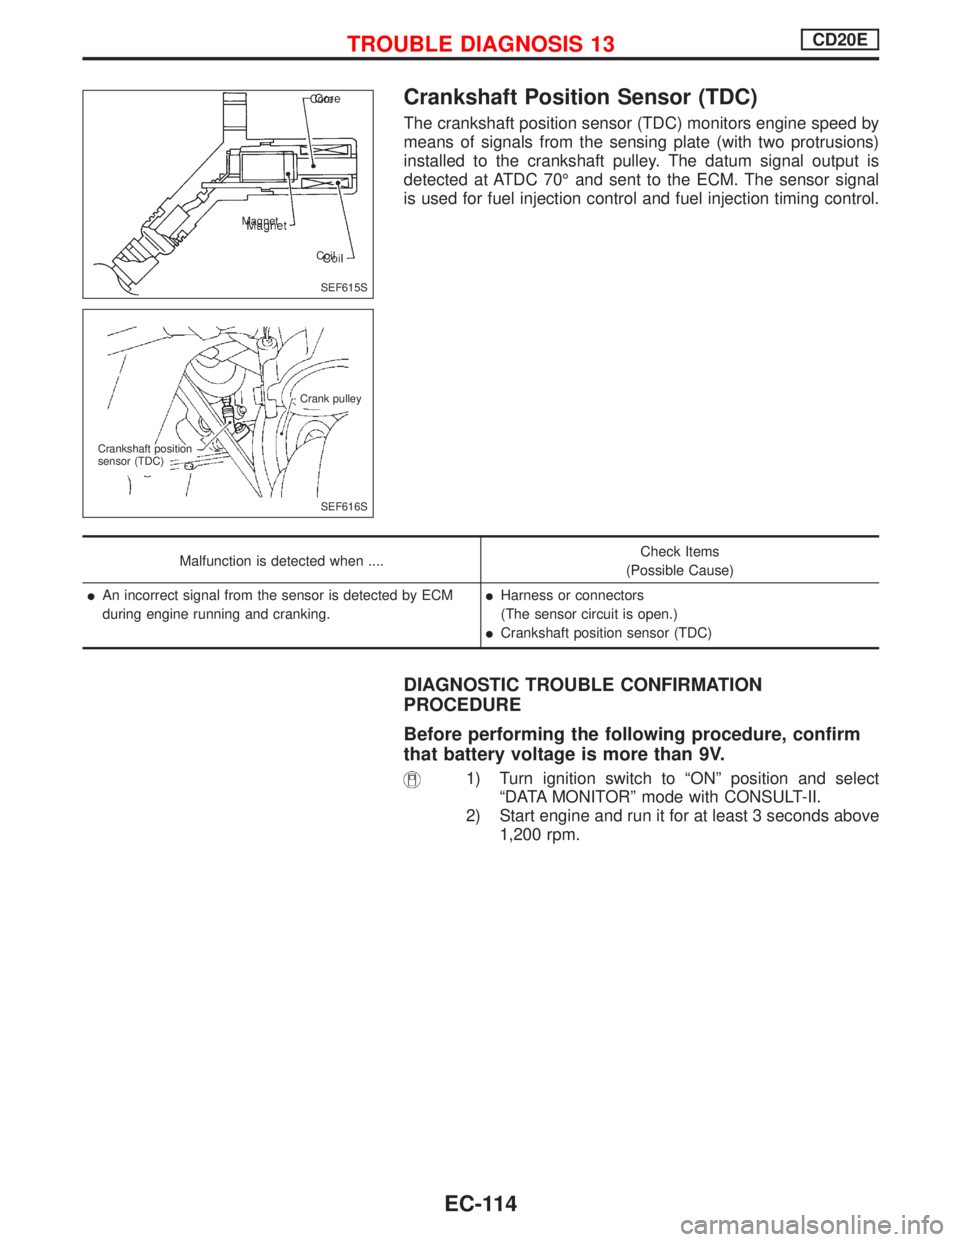
Crankshaft Position Sensor (TDC)
The crankshaft position sensor (TDC) monitors engine speed by
means of signals from the sensing plate (with two protrusions)
installed to the crankshaft pulley. The datum signal output is
detected at ATDC 70É and sent to the ECM. The sensor signal
is used for fuel injection control and fuel injection timing control.
Malfunction is detected when ....Check Items
(Possible Cause)
lAn incorrect signal from the sensor is detected by ECM
during engine running and cranking.lHarness or connectors
(The sensor circuit is open.)
lCrankshaft position sensor (TDC)
DIAGNOSTIC TROUBLE CONFIRMATION
PROCEDURE
Before performing the following procedure, confirm
that battery voltage is more than 9V.
1) Turn ignition switch to ªONº position and select
ªDATA MONITORº mode with CONSULT-II.
2) Start engine and run it for at least 3 seconds above
1,200 rpm.
SEF615S Core
Magnet
Coil
SEF616S Crank pulley
Crankshaft position
sensor (TDC)
TROUBLE DIAGNOSIS 13CD20E
EC-114
Page 415 of 2267
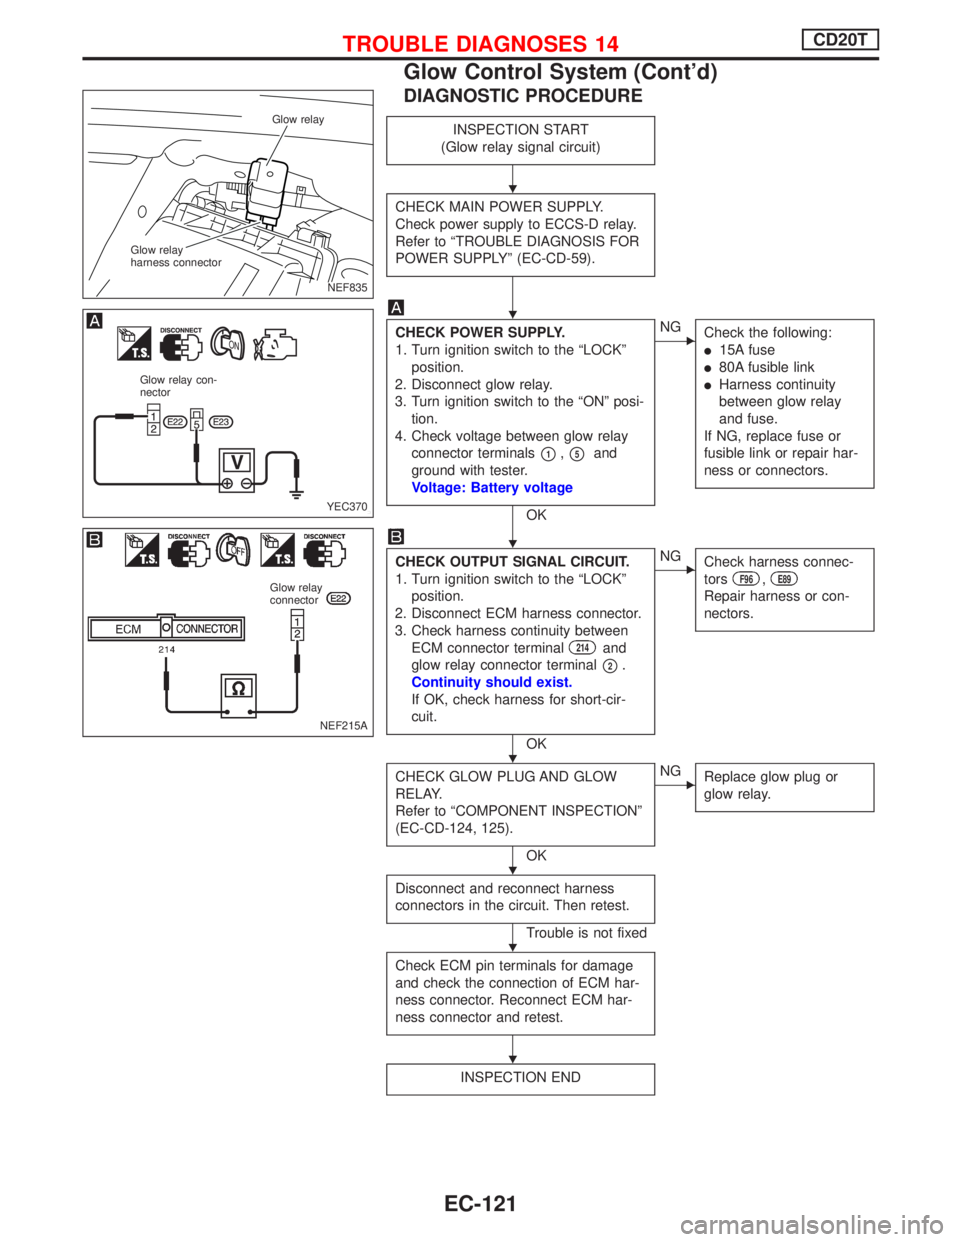
DIAGNOSTIC PROCEDURE
INSPECTION START
(Glow relay signal circuit)
CHECK MAIN POWER SUPPLY.
Check power supply to ECCS-D relay.
Refer to ªTROUBLE DIAGNOSIS FOR
POWER SUPPLYº (EC-CD-59).
CHECK POWER SUPPLY.
1. Turn ignition switch to the ªLOCKº
position.
2. Disconnect glow relay.
3. Turn ignition switch to the ªONº posi-
tion.
4. Check voltage between glow relay
connector terminals
p1,p5and
ground with tester.
Voltage: Battery voltage
OK
ENG
Check the following:
l15A fuse
l80A fusible link
lHarness continuity
between glow relay
and fuse.
If NG, replace fuse or
fusible link or repair har-
ness or connectors.
CHECK OUTPUT SIGNAL CIRCUIT.
1. Turn ignition switch to the ªLOCKº
position.
2. Disconnect ECM harness connector.
3. Check harness continuity between
ECM connector terminal
214and
glow relay connector terminal
p2.
Continuity should exist.
If OK, check harness for short-cir-
cuit.
OK
ENG
Check harness connec-
tors
F96,E89
Repair harness or con-
nectors.
CHECK GLOW PLUG AND GLOW
RELAY.
Refer to ªCOMPONENT INSPECTIONº
(EC-CD-124, 125).
OK
ENG
Replace glow plug or
glow relay.
Disconnect and reconnect harness
connectors in the circuit. Then retest.
Trouble is not fixed
Check ECM pin terminals for damage
and check the connection of ECM har-
ness connector. Reconnect ECM har-
ness connector and retest.
INSPECTION END
NEF835 Glow relay
Glow relay
harness connector
YEC370
Glow relay con-
nector
NEF215A
Glow relay
connector
H
H
H
H
H
H
H
TROUBLE DIAGNOSES 14CD20T
Glow Control System (Cont'd)
EC-121
Page 416 of 2267
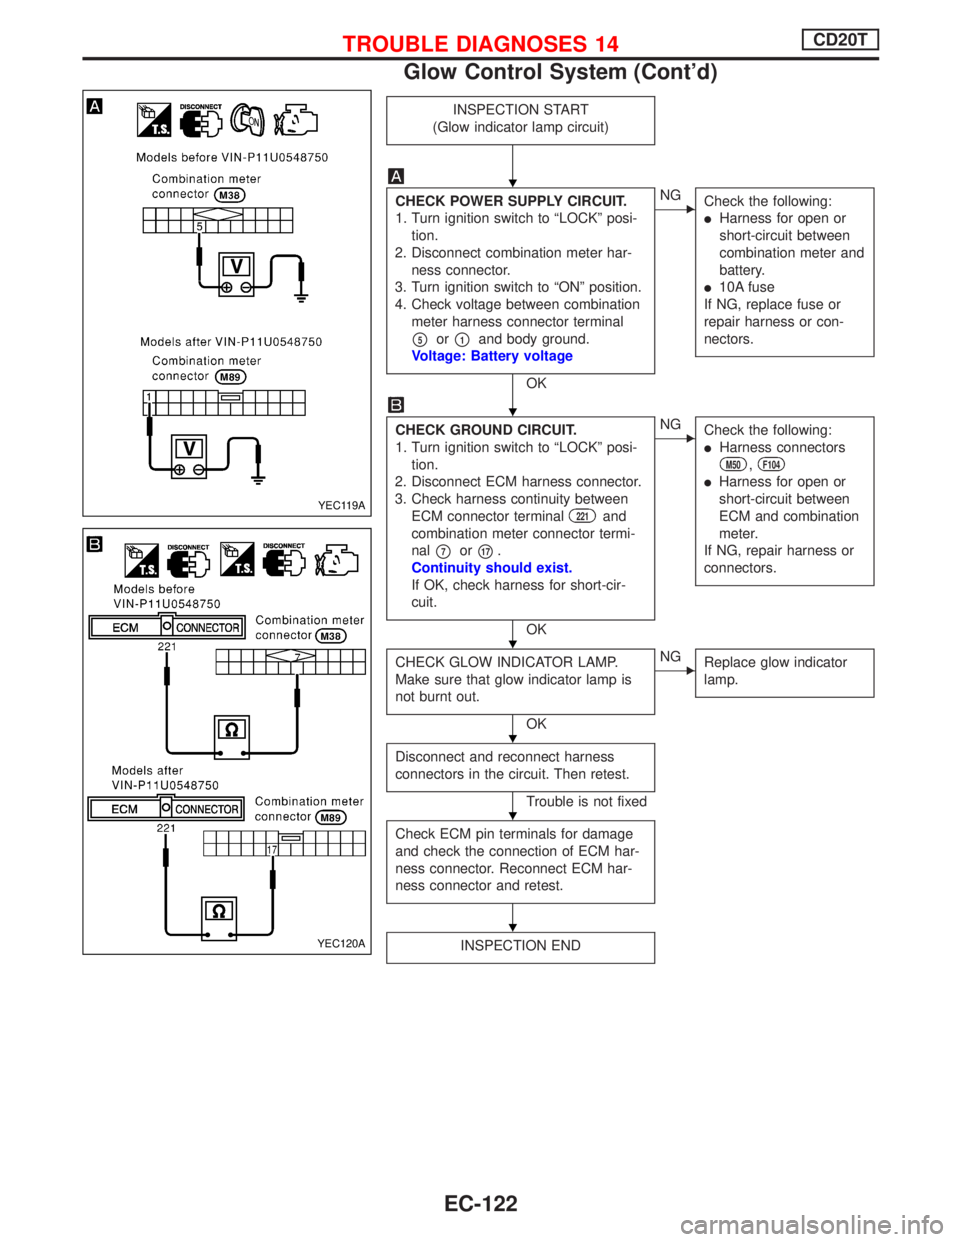
INSPECTION START
(Glow indicator lamp circuit)
CHECK POWER SUPPLY CIRCUIT.
1. Turn ignition switch to ªLOCKº posi-
tion.
2. Disconnect combination meter har-
ness connector.
3. Turn ignition switch to ªONº position.
4. Check voltage between combination
meter harness connector terminal
p5orp1and body ground.
Voltage: Battery voltage
OK
ENG
Check the following:
lHarness for open or
short-circuit between
combination meter and
battery.
l10A fuse
If NG, replace fuse or
repair harness or con-
nectors.
CHECK GROUND CIRCUIT.
1. Turn ignition switch to ªLOCKº posi-
tion.
2. Disconnect ECM harness connector.
3. Check harness continuity between
ECM connector terminal
221and
combination meter connector termi-
nal
p7orp17.
Continuity should exist.
If OK, check harness for short-cir-
cuit.
OK
ENG
Check the following:
lHarness connectors
M50,F104
lHarness for open or
short-circuit between
ECM and combination
meter.
If NG, repair harness or
connectors.
CHECK GLOW INDICATOR LAMP.
Make sure that glow indicator lamp is
not burnt out.
OK
ENG
Replace glow indicator
lamp.
Disconnect and reconnect harness
connectors in the circuit. Then retest.
Trouble is not fixed
Check ECM pin terminals for damage
and check the connection of ECM har-
ness connector. Reconnect ECM har-
ness connector and retest.
INSPECTION END
YEC119A
YEC120A
H
H
H
H
H
H
TROUBLE DIAGNOSES 14CD20T
Glow Control System (Cont'd)
EC-122
Page 417 of 2267
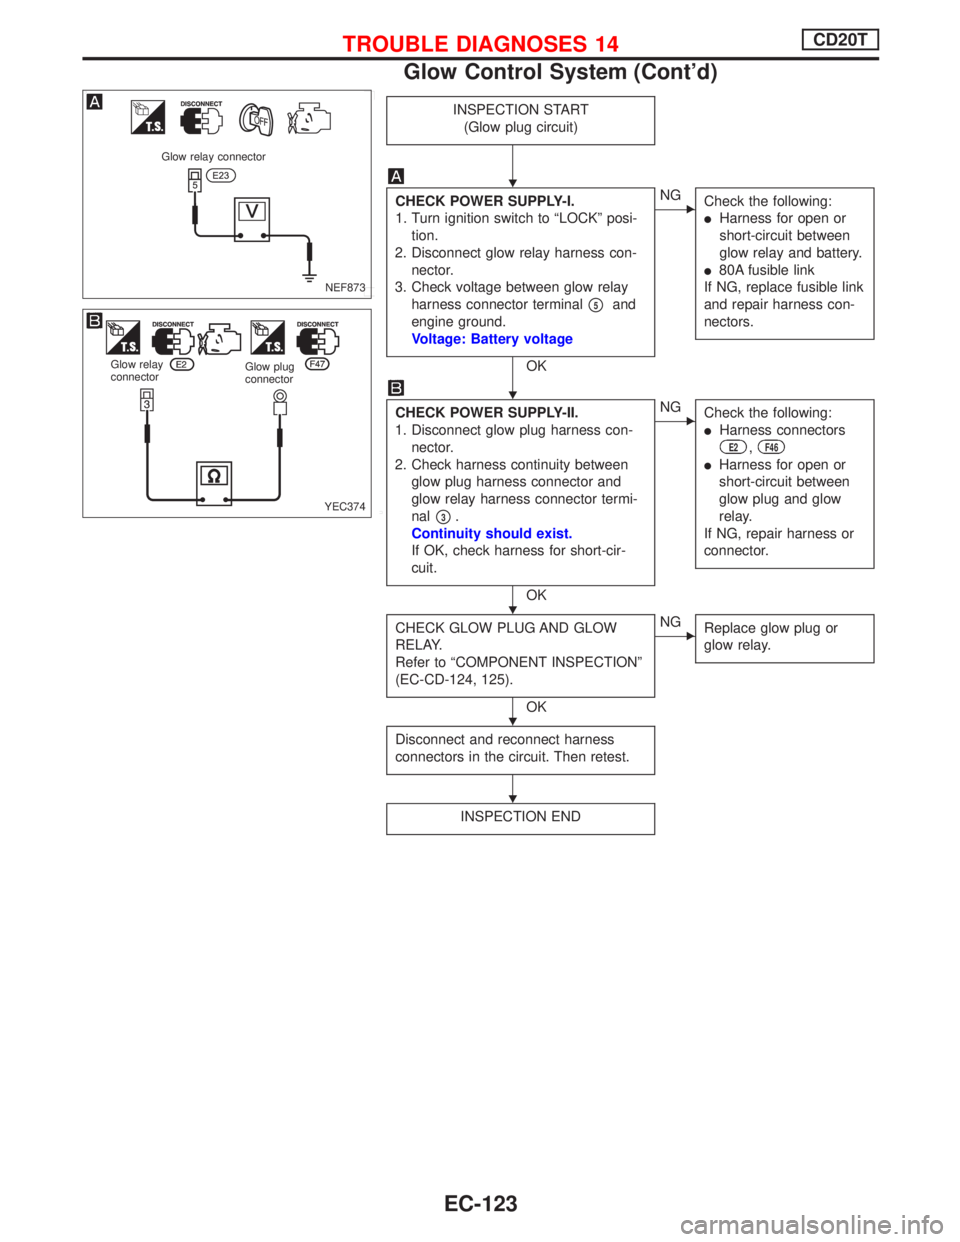
INSPECTION START
(Glow plug circuit)
CHECK POWER SUPPLY-I.
1. Turn ignition switch to ªLOCKº posi-
tion.
2. Disconnect glow relay harness con-
nector.
3. Check voltage between glow relay
harness connector terminal
p5and
engine ground.
Voltage: Battery voltage
OK
ENG
Check the following:
lHarness for open or
short-circuit between
glow relay and battery.
l80A fusible link
If NG, replace fusible link
and repair harness con-
nectors.
CHECK POWER SUPPLY-II.
1. Disconnect glow plug harness con-
nector.
2. Check harness continuity between
glow plug harness connector and
glow relay harness connector termi-
nal
p3.
Continuity should exist.
If OK, check harness for short-cir-
cuit.
OK
ENG
Check the following:
lHarness connectors
E2,F46
lHarness for open or
short-circuit between
glow plug and glow
relay.
If NG, repair harness or
connector.
CHECK GLOW PLUG AND GLOW
RELAY.
Refer to ªCOMPONENT INSPECTIONº
(EC-CD-124, 125).
OK
ENG
Replace glow plug or
glow relay.
Disconnect and reconnect harness
connectors in the circuit. Then retest.
INSPECTION END
NEF873
Glow relay connector
YEC374
Glow relay
connectorGlow plug
connector
H
H
H
H
H
TROUBLE DIAGNOSES 14CD20T
Glow Control System (Cont'd)
EC-123
Page 418 of 2267
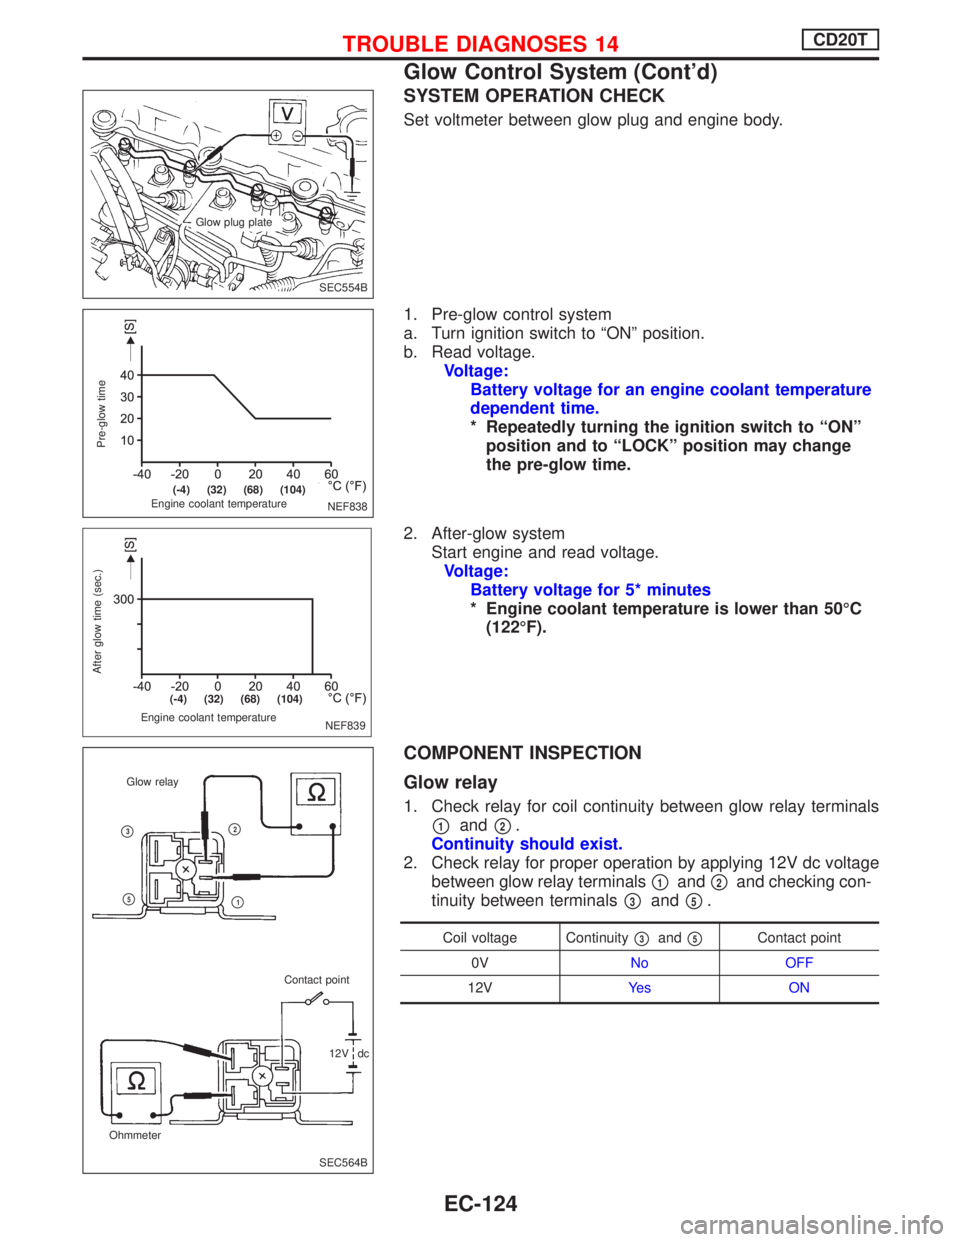
SYSTEM OPERATION CHECK
Set voltmeter between glow plug and engine body.
1. Pre-glow control system
a. Turn ignition switch to ªONº position.
b. Read voltage.
Voltage:
Battery voltage for an engine coolant temperature
dependent time.
* Repeatedly turning the ignition switch to ªONº
position and to ªLOCKº position may change
the pre-glow time.
2. After-glow system
Start engine and read voltage.
Voltage:
Battery voltage for 5* minutes
* Engine coolant temperature is lower than 50ÉC
(122ÉF).
COMPONENT INSPECTION
Glow relay
1. Check relay for coil continuity between glow relay terminals
p1andp2.
Continuity should exist.
2. Check relay for proper operation by applying 12V dc voltage
between glow relay terminals
p1andp2and checking con-
tinuity between terminals
p3andp5.
Coil voltage Continuityp3andp5Contact point
0VNo OFF
12VYe s O N
SEC554B Glow plug plate
NEF838
Pre-glow time
Engine coolant temperature
.(-4) (32) (68) (104)
NEF839 Engine coolant temperature
After glow time (sec.)
.(-4) (32) (68) (104)
SEC564B OhmmeterGlow relay
Contact point
12V dc
p2
p1
p3
p5
TROUBLE DIAGNOSES 14CD20T
Glow Control System (Cont'd)
EC-124