Page 9 of 274
Do not ride in a moving vehicle when the
seatback is reclined. This can be dan-
gerous. The shoulder belt will not be
against your body. In an accident you
could be thrown into it and receive neck
or other serious injuries. You could also
slide under the lap belt and receive se-
rious internal injuries.
For most effective protection when the
vehicle is in motion, the seat should be
upright. Always sit well back in the seat
and adjust the seat belt properly. See
ªSeat beltsº later in this section for pre-
cautions on seat belt usage.
FRONT MANUAL SEAT
ADJUSTMENTIDo not adjust the driver's seat while
driving. The seat may move suddenly
and could cause loss of control of the
vehicle.
IAfter adjustment, gently rock in the
seat to make sure it is securely
locked.
SSS0133
SEATS1-2
Seats, restraints and supplemental air bag systems
Z
01.1.22/R50-D/V5
X
Page 14 of 274

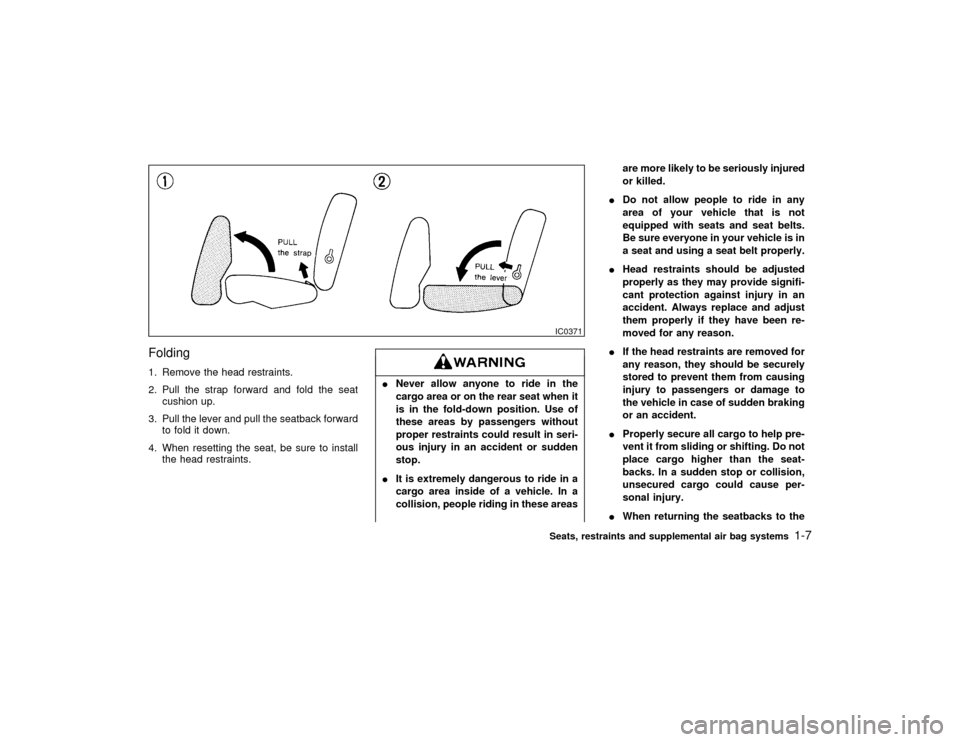
Folding1. Remove the head restraints.
2. Pull the strap forward and fold the seat
cushion up.
3. Pull the lever and pull the seatback forward
to fold it down.
4. When resetting the seat, be sure to install
the head restraints.
INever allow anyone to ride in the
cargo area or on the rear seat when it
is in the fold-down position. Use of
these areas by passengers without
proper restraints could result in seri-
ous injury in an accident or sudden
stop.
IIt is extremely dangerous to ride in a
cargo area inside of a vehicle. In a
collision, people riding in these areasare more likely to be seriously injured
or killed.
IDo not allow people to ride in any
area of your vehicle that is not
equipped with seats and seat belts.
Be sure everyone in your vehicle is in
a seat and using a seat belt properly.
IHead restraints should be adjusted
properly as they may provide signifi-
cant protection against injury in an
accident. Always replace and adjust
them properly if they have been re-
moved for any reason.
IIf the head restraints are removed for
any reason, they should be securely
stored to prevent them from causing
injury to passengers or damage to
the vehicle in case of sudden braking
or an accident.
IProperly secure all cargo to help pre-
vent it from sliding or shifting. Do not
place cargo higher than the seat-
backs. In a sudden stop or collision,
unsecured cargo could cause per-
sonal injury.
IWhen returning the seatbacks to the
IC0371Seats, restraints and supplemental air bag systems
1-7
Z
01.1.22/R50-D/V5
X
Page 15 of 274
upright position, be certain they are
completely secured in the latched
position.
Reclining (if so equipped)Pull the reclining lever and position the seat
back at the desired angle. Release the reclin-
ing lever after positioning the seat at the
desired angle.IDo not ride in a moving vehicle when
the seatback is reclined. This can be
dangerous. The shoulder belt will not
be against your body. In an accident
you could be thrown into it and re-
ceive neck or other serious injuries.You could also slide under the lap
belt and receive serious internal inju-
ries.
IFor most effective protection when
the vehicle is in motion, the seat
should be upright. Always sit well
back in the seat and adjust the seat
belt properly. See ªSeat beltsº later in
this section for precautions on seat
belt usage.
IAfter adjustment, check to be sure
the seat is securely locked.
IC0385
1-8
Seats, restraints and supplemental air bag systems
Z
01.1.22/R50-D/V5
X
Page 35 of 274
IAfter adjustment, release the button
and try to move the shoulder belt
anchor up and down to make sure it
securely fixed in position.
IThe shoulder belt anchor height
should be adjusted to the position
best for you.
Failure to do so may reduce the effec-
tiveness of the entire restraint system
and increase the chance or severity
of injury in an accident.
Seat belt hookWhen the rear seat belt is not in use, hook it at
the belt hook.
TWO-POINT TYPE SEAT BELT
WITHOUT RETRACTOR (Center of
rear seat)
Selecting correct set of seat beltsThe center seat belt buckle and tongue are
identified by the CENTER mark. The center
seat belt tongue can be fastened only into the
center seat belt buckle.
SPA0531
SPA0110
1-28
Seats, restraints and supplemental air bag systems
Z
01.1.22/R50-D/V5
X
Page 39 of 274

tioned to fit the child restraint, but as
upright as possible.
IAfter attaching the child restraint,
test it before you place the child in it.
Tilt it from side to side. Try to tug it
forward and check to see if the belt
holds the restraint in place. If the
restraint is not secure, tighten the
belt as necessary, or put the restraint
in another seat and test it again.
IFor a front facing child restraint, if the
seat position where it is installed has
a three-point type lap/shoulder belt,
check to make sure the shoulder belt
does not go in front of the child's face
or neck. If it does, put the shoulder
belt behind the child restraint. If you
must install a front facing child re-
straint in the front seat. See later in
ªChild restraintsº for installation on
front passenger seat.
IWhen your child restraint is not in
use, store it in the trunk or keep it
secured with a seat belt to prevent it
from being thrown around in case of
a sudden stop or accident.
Remember that a child restraint left in a
closed vehicle can become very hot.
Check the seating surface and buckles
before placing your child in the child
restraint.
INSTALLATION ON REAR SEAT
CENTER POSITION
Front facingWhen you install a child restraint in a rear
center seat, follow these steps:
1. Position the child restraint on the seat as
illustrated. The direction of the child re-
straint depends on the type of the child
restraint and the size of the child. Always
follow the restraint manufacturer's instruc-
tions.
SSS0104
1-32
Seats, restraints and supplemental air bag systems
Z
01.1.22/R50-D/V5
X
Page 40 of 274
2. Route the seat belt tongue through the child
restraint and insert it into the buckle until
you hear and feel the latch engage. Be sure
to follow the child restraint manufacturer's
instructions for belt routing.3. Remove all slack in the lap belt for a very
tight fit by pulling forcefully on the lap belt
adjustment.4. Before placing the child in the child re-
straint, use force to tilt the child restraint
from side to side, and tug it forward to make
sure that it is securely held in place.
5. If it is not secure, try to tighten the belt
again, or put the restraint in another seat.
6. Check to make sure the child restraint is
properly secured prior to each use.
SSS0029
SSS0105
SSS0031
Seats, restraints and supplemental air bag systems
1-33
Z
01.1.22/R50-D/V5
X
Page 42 of 274

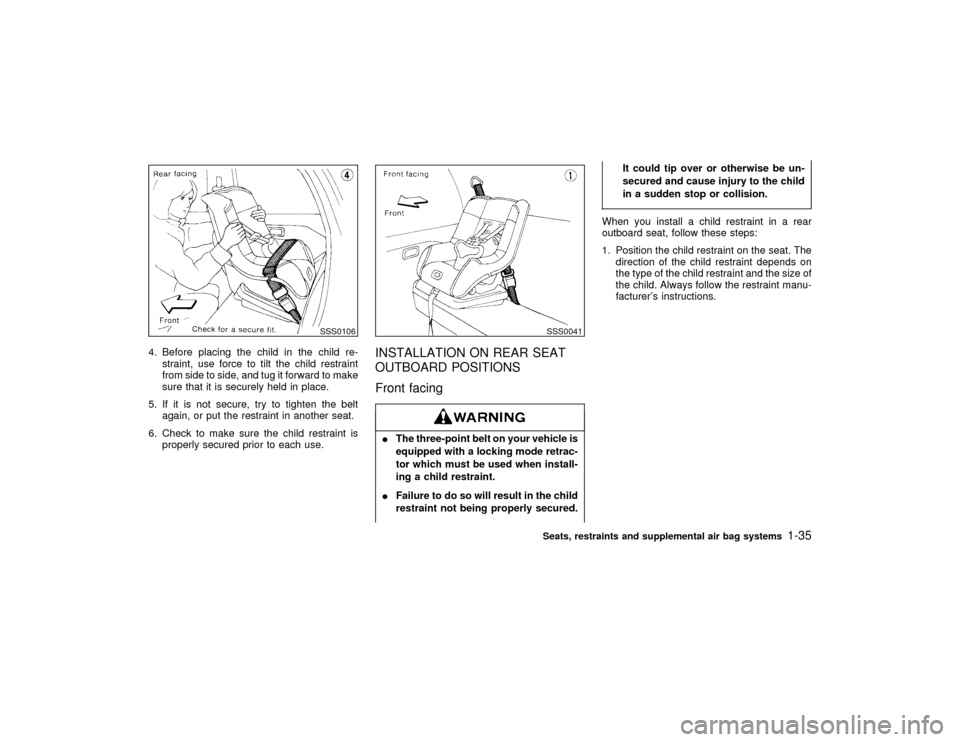
4. Before placing the child in the child re-
straint, use force to tilt the child restraint
from side to side, and tug it forward to make
sure that it is securely held in place.
5. If it is not secure, try to tighten the belt
again, or put the restraint in another seat.
6. Check to make sure the child restraint is
properly secured prior to each use.
INSTALLATION ON REAR SEAT
OUTBOARD POSITIONS
Front facingIThe three-point belt on your vehicle is
equipped with a locking mode retrac-
tor which must be used when install-
ing a child restraint.
IFailure to do so will result in the child
restraint not being properly secured.It could tip over or otherwise be un-
secured and cause injury to the child
in a sudden stop or collision.
When you install a child restraint in a rear
outboard seat, follow these steps:
1. Position the child restraint on the seat. The
direction of the child restraint depends on
the type of the child restraint and the size of
the child. Always follow the restraint manu-
facturer's instructions.
SSS0106
SSS0041Seats, restraints and supplemental air bag systems
1-35
Z
01.1.22/R50-D/V5
X
Page 44 of 274

5. Before placing the child in the child re-
straint, use force to tilt the child restraint
from side to side, and tug it forward to make
sure that it is securely held in place.
6. Check that the retractor is in the automatic
locking mode by trying to pull more belt out
of the retractor. If you cannot pull any more
belt webbing out of the retractor, the belt is
in the automatic locking mode.
7. Check to make sure that the child restraint
is properly secured prior to each use. If the
belt is not locked, repeat steps 3 through 6.
After the child restraint is removed and theseat belt is allowed to wind back into the
retractor, the automatic locking mode (child
restraint mode) is canceled; the seat belt only
locks during a sudden stop or impact.
Rear facingIThe three-point belt on your vehicle is
equipped with a locking mode retrac-
tor which must be used when install-
ing a child restraint.
IFailure to do so will result in the child
restraint not being properly secured.
It could tip over or otherwise be un-
secured and cause injury to the child
SSS0108
SSS0044
Seats, restraints and supplemental air bag systems
1-37
Z
01.1.22/R50-D/V5
X