1999 NISSAN MAXIMA clock
[x] Cancel search: clockPage 43 of 233

2 Instruments and controlsInstrument panel ....................................................... 2-2
Meters and gauges ................................................... 2-3
Speedometer and odometer ..................................... 2-4
Tachometer ............................................................... 2-4
Engine coolant temperature gauge ........................... 2-5
Fuel gauge ................................................................ 2-5
Warning/indicator lights and chimes ......................... 2-7
Checking bulbs.......................................................... 2-7
Warning lights ........................................................... 2-7
Indicator lights ........................................................... 2-9
Chimes .................................................................... 2-11
Security system ....................................................... 2-12
Theft warning (if so equipped) ................................ 2-12
Nissan Vehicle Immobilizer System ....................... 2-13
Windshield wiper and washer switch ...................... 2-15
Rear window and outside mirror (if so equipped)
defogger switch ....................................................... 2-16
Headlight and turn signal switch ............................. 2-17
Headlight switch ...................................................... 2-17
Turn signal switch ................................................... 2-18
Front fog light switch (if so equipped)..................... 2-18
Hazard warning flasher switch ................................ 2-19
Horn......................................................................... 2-19
Heated seats (if so equipped) ................................. 2-20Traction control system (TCS) cancel switch
(if so equipped) ....................................................... 2-21
Cigarette lighter and ashtray ................................... 2-21
Storage .................................................................... 2-22
Trays ....................................................................... 2-22
Cup holder............................................................... 2-24
Glove box ................................................................ 2-24
Console box ............................................................ 2-25
Windows .................................................................. 2-25
Power windows ....................................................... 2-25
Sunroof (if so equipped) ......................................... 2-26
Automatic sunroof ................................................... 2-26
Clock ....................................................................... 2-27
Adjusting the time ................................................... 2-27
Interior light ............................................................. 2-28
Ceiling ..................................................................... 2-28
Personal light .......................................................... 2-28
Vanity mirror light (if so equipped) .......................... 2-29
Trunk light ............................................................... 2-29
Integrated HomeLink
Universal Transceiver
(if so equipped) ....................................................... 2-30
Programming HomeLink........................................ 2-31
Canadian programming ........................................... 2-31
Z
01.1.22/A32-D/V5.0
X
Page 45 of 233

Windshield wiper/washer switch (P.2-15)
Instrument brightness control switch (P.2-17)
Meters/gauges (P.2-3)
Theft warning light (P.2-12) (if so equipped)
Cruise control main switch (P.5-14)
Headlight, fog light (if so equipped) and
turn signal switch (P.2-17)
Hood release handle (P.3-8)
Outside mirror remote control (P.3-13)
Fuse box cover (P.8-23)
Tilting steering wheel lock lever (P.3-12)
Driver supplemental air bag (P.1-6)
Ignition switch/steering lock (P.5-4)
Cruise control set switch (P.5-14)
Cigarette lighter (accessory) (P.2-21)Hazard warning flasher switch (P.2-19)
Ventilator (P.4-2)
Heater/air conditioner control (P.4-3)
Clock (P.2-27)
Radio/cassette player (P.4-13)/CD player (P.4-19)
Rear window and outside mirror (if so equipped) defogger switch (P.2-16)
Passenger supplemental air bag (P.1-6)
Glove box (P.2-24)
Ashtray (P.2-21)
Heated seat switch (P.2-20) (if so equipped)
SIC1064
See the page indicated in parentheses for operating details.
Traction control system (TCS) cancel switch (if so equipped) (P.2-21)
INSTRUMENT PANEL2-2
Instruments and controls
Z
01.1.22/A32-D/V5.0
X
Page 60 of 233

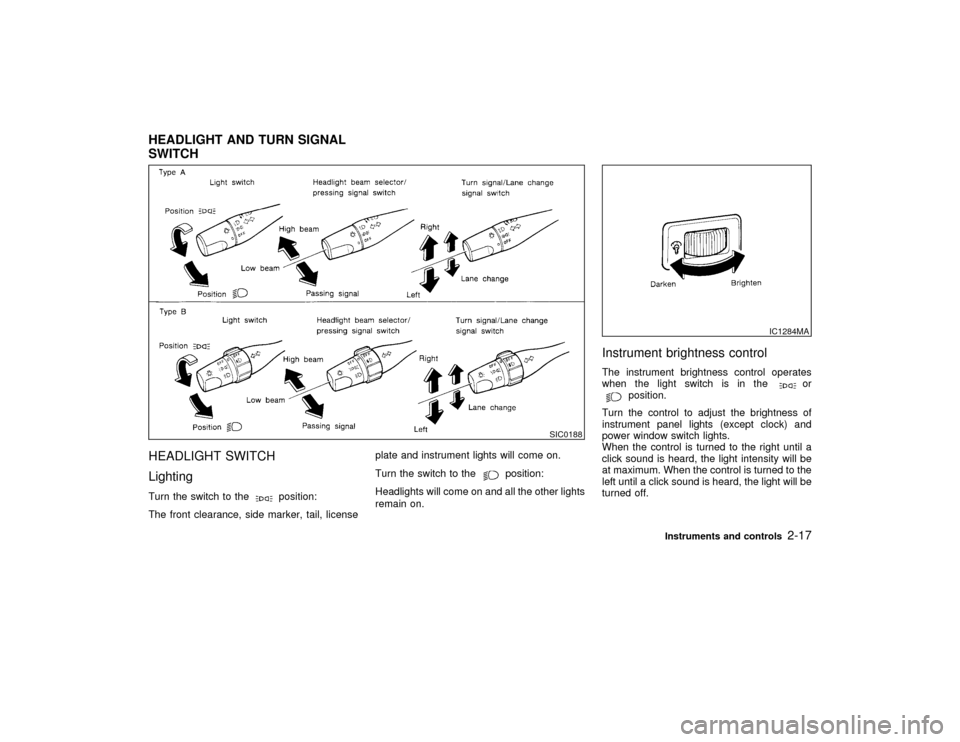
HEADLIGHT SWITCH
LightingTurn the switch to the
position:
The front clearance, side marker, tail, licenseplate and instrument lights will come on.
Turn the switch to the
position:
Headlights will come on and all the other lights
remain on.
Instrument brightness controlThe instrument brightness control operates
when the light switch is in the
or
position.
Turn the control to adjust the brightness of
instrument panel lights (except clock) and
power window switch lights.
When the control is turned to the right until a
click sound is heard, the light intensity will be
at maximum. When the control is turned to the
left until a click sound is heard, the light will be
turned off.
SIC0188
IC1284MA
HEADLIGHT AND TURN SIGNAL
SWITCH
Instruments and controls
2-17
Z
01.1.22/A32-D/V5.0
X
Page 70 of 233

down the sunroof, press and hold the
side.
Sun shadeOpen or close the sun shade by sliding it
backward or forward.
The shade will open automatically when the
sunroof is opened. However, it must be closed
manually.IIn an accident you could be thrown
from the vehicle through an open
sunroof. Always use seat belts and
child restraints.
IDo not allow anyone to stand up or
extend any portion of their body out
of the opening while the vehicle is in
motion or while the sunroof is
closing.IRemove water drops, snow, ice or
sand from the sunroof before open-
ing.IDo not place any heavy object on the
sunroof or surrounding area.
If the sunroof does not closeHave your NISSAN dealer check and repair
the sunroof.
The digital clock displays time when the igni-
tion key is in ACC or ON.
If the power supply is disconnected, the clock
will not indicate the correct time. Readjust the
time.
ADJUSTING THE TIMEPush theHbutton to adjust the hour.
Push theMbutton to adjust the minute.
SIC0910
CLOCK
Instruments and controls
2-27
Z
01.1.22/A32-D/V5.0
X
Page 87 of 233

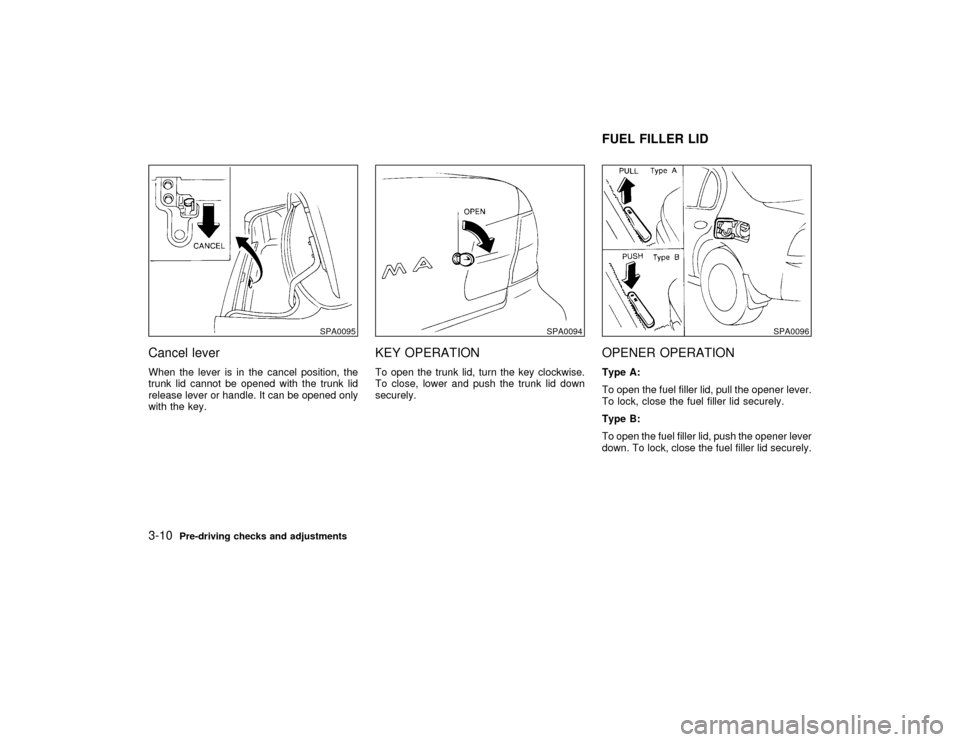
Cancel leverWhen the lever is in the cancel position, the
trunk lid cannot be opened with the trunk lid
release lever or handle. It can be opened only
with the key.
KEY OPERATIONTo open the trunk lid, turn the key clockwise.
To close, lower and push the trunk lid down
securely.
OPENER OPERATIONType A:
To open the fuel filler lid, pull the opener lever.
To lock, close the fuel filler lid securely.
Type B:
To open the fuel filler lid, push the opener lever
down. To lock, close the fuel filler lid securely.
SPA0095
SPA0094
SPA0096
FUEL FILLER LID
3-10
Pre-driving checks and adjustments
Z
01.1.22/A32-D/V5.0
X
Page 88 of 233

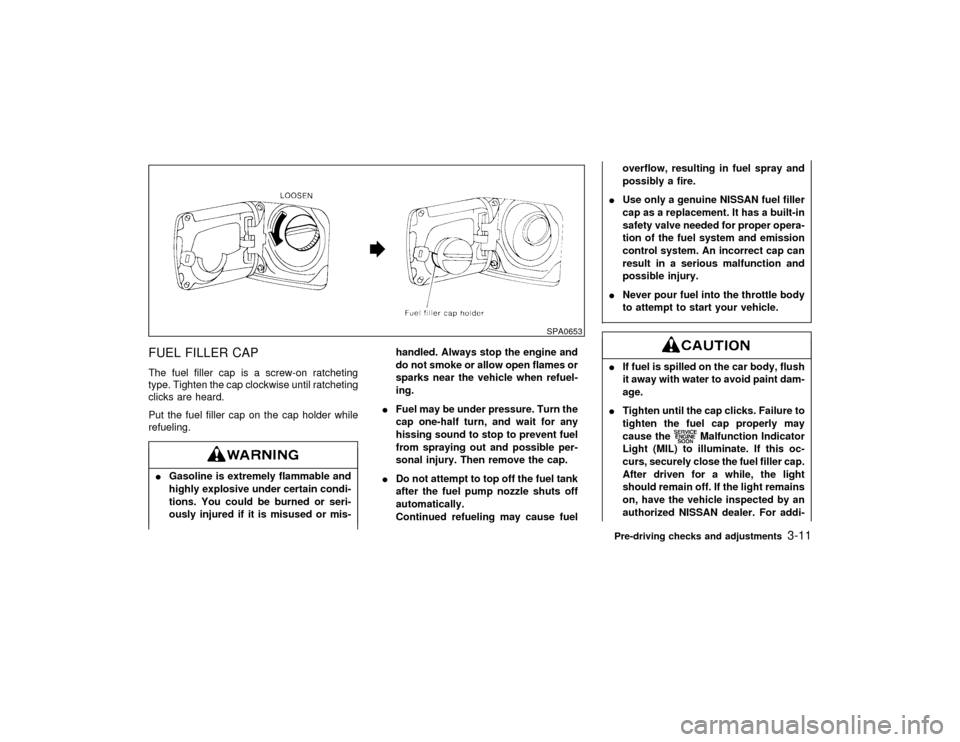
FUEL FILLER CAPThe fuel filler cap is a screw-on ratcheting
type. Tighten the cap clockwise until ratcheting
clicks are heard.
Put the fuel filler cap on the cap holder while
refueling.IGasoline is extremely flammable and
highly explosive under certain condi-
tions. You could be burned or seri-
ously injured if it is misused or mis-handled. Always stop the engine and
do not smoke or allow open flames or
sparks near the vehicle when refuel-
ing.
IFuel may be under pressure. Turn the
cap one-half turn, and wait for any
hissing sound to stop to prevent fuel
from spraying out and possible per-
sonal injury. Then remove the cap.
IDo not attempt to top off the fuel tank
after the fuel pump nozzle shuts off
automatically.
Continued refueling may cause fueloverflow, resulting in fuel spray and
possibly a fire.
IUse only a genuine NISSAN fuel filler
cap as a replacement. It has a built-in
safety valve needed for proper opera-
tion of the fuel system and emission
control system. An incorrect cap can
result in a serious malfunction and
possible injury.
INever pour fuel into the throttle body
to attempt to start your vehicle.
IIf fuel is spilled on the car body, flush
it away with water to avoid paint dam-
age.
ITighten until the cap clicks. Failure to
tighten the fuel cap properly may
cause the
Malfunction Indicator
Light (MIL) to illuminate. If this oc-
curs, securely close the fuel filler cap.
After driven for a while, the light
should remain off. If the light remains
on, have the vehicle inspected by an
authorized NISSAN dealer. For addi-
SPA0653
Pre-driving checks and adjustments
3-11
Z
01.1.22/A32-D/V5.0
X
Page 115 of 233

When the CD/CHG button is pushed with the
compact disc loaded but the tape or the radio
playing, the tape or radio will automatically be
turned off and the compact disc will start to
play.
FF (Fast Forward), REW
(Rewind):
When the(fast forward) or
(rewind)
button is pushed while the compact disc is
being played, the compact disc will play while
fast forwarding or rewinding. When the button
is released, the compact disc will return to
normal play speed.
APS (Automatic Program
Search) FF, APS REW:
When the(APS FF) button is pushed
while the compact disc is being played, the
program next to the present one will start to
play from its beginning. Push several times to
skip through programs. The compact disc will
advance the number of times the button is
pushed. (When the last program on the com-
pact disc is skipped through, the first program
will be played.) When the
(APS REW)
button is pushed, the program being played
returns to its beginning. Push several times to
skip back through programs. The compact disc
will go back the number of times the button is
pushed.
PROG (Program):
When the PROG button is pushed while the
compact disc is being played, the play pattern
will change as follows:
no mark: All the programs will be played
repeatedly in sequence.
1: Only one program (the one being played
when the PROG button is pushed) will be
repeated.
RANDOM: Programs will be played at random,
not following the sequence on the compact
disc. The same program may be repeated
twice.
When the compact disc is ejected, the
play pattern will automatically change to
no mark.
CD EJECT:
When the CD EJECT button is pushed with the
compact disc loaded, the compact disc will be
ejected.
When this button is pushed while the compact
disc is being played, the compact disc will
come out and the system will turn off.
If the compact disc comes out and is not
removed, it will be pulled back into the slotto protect it. (without 8 cm diameter com-
pact discs)
CD IN indicator:
CD IN indicator appears on the display when
the CD is loaded with the system on.
ANTENNA
Manual antennaThe manual antenna cannot be shortened, but
can be removed. When you need to remove
the antenna, turn the antenna rod counter-
clockwise.
To install the antenna rod, turn the antenna nut
clockwise. Tighten the antenna rod to specifi-
cation using a suitable tool, such as an open-
end wrench. The antenna rod tightening speci-
fication is 3.4 to 3.6 N×m (30 to 32 in-lb). Do not
use pliers to tighten the antenna as they can
leave marks on the antenna surface. The
antenna rod cannot be hand tightened to the
proper specification.Always properly tighten the antenna rod
during installation or the antenna rod
may bend or break during vehicle
4-24
Heater, air conditioner and audio systems
Z
01.1.22/A32-D/V5.0
X
Page 122 of 233

LOCK position, proceed as follows to remove
the key:
1. Move the selector lever into the P (Park)
position.
2. Turn the ignition key slightly in the ON
direction.
3. Turn the key toward the LOCK position.
4. Remove the key.
If the key is removed from the ignition switch,
the selector lever cannot be moved from P
(Park) position.The selector lever can be
moved if the ignition switch is in the ACC
position. This allows the vehicle to be
moved if the battery is discharged. The
selector lever can also be moved if the
ignition switch is in the ON position and the
foot brake pedal is depressed.
There is an OFF position in between LOCK
and ACC, although it does not show on the
lock cylinder. When the ignition is in OFF the
steering wheel is not locked.
In order for the steering wheel to be locked, it
must be turned about 1/6 of a turn counter-
clockwise from the straight up position.
To lock the steering wheel, remove the key.
To unlock the steering wheel, insert the key
and turn it gently while rotating the steer-ing wheel slightly right and left.
MANUAL TRANSMISSIONOn manual transmission models, to turn the
ignition key to LOCK from ACC or ON, turn the
key to OFF and press in the key release
button, then turn the key to LOCK.
In order for the steering wheel to be locked, it
must be turned about 1/6 of a turn counter-
clockwise from the straight up position.
To lock the steering wheel, remove the key.
To unlock the steering wheel, insert the key
and turn it gently while rotating the steer-
ing wheel slightly right and left.
SSD0021
Starting and driving
5-5
Z
01.1.22/A32-D/V5.0
X