1999 NISSAN FRONTIER fog light
[x] Cancel search: fog lightPage 43 of 247

2 Instruments and controls
Meters and gauges ................................................2-2
Speedometer and odometer ..................................2-3
Tachometer (if so equipped) ..................................2-5
Engine coolant temperature gauge ........................2-5
Fuel gauge .............................................................2-6
Warning/indicator lights and chimes ......................2-7
Theft warning (if so equipped) .............................2-13
Headlight and turn signal switch ..........................2-15
Daytime running light system (Canada only) .......2-15
Front fog light switch (if so equipped)..................2-16
Windshield wiper and washer switch ...................2-17
Instrument brightness control ...............................2-17Hazard warning flasher switch .............................2-18
Cigarette lighter (accessory) and ash tray ...........2-18
Power point (if so equipped) ................................2-19
Cup holder (if so equipped) .................................2-20
Dome light and cargo light ...................................2-21
Map lights (if so equipped)...................................2-21
Manual windows ...................................................2-22
Power windows (if so equipped) ..........................2-22
Automatic power window switch ..........................2-23
Rear sliding window (if so equipped) ...................2-23
Sunroof (if so equipped).......................................2-24
ZX
Page 58 of 247

Turn signal
Move the lever up or down to signal the
turning direction. When the turn is com-
pleted, the turn signal cancels automatically.
Lane change signal
To indicate a lane change, move the lever
up or down to the point where the indicator
light begins to flash, but the lever does not
latch.
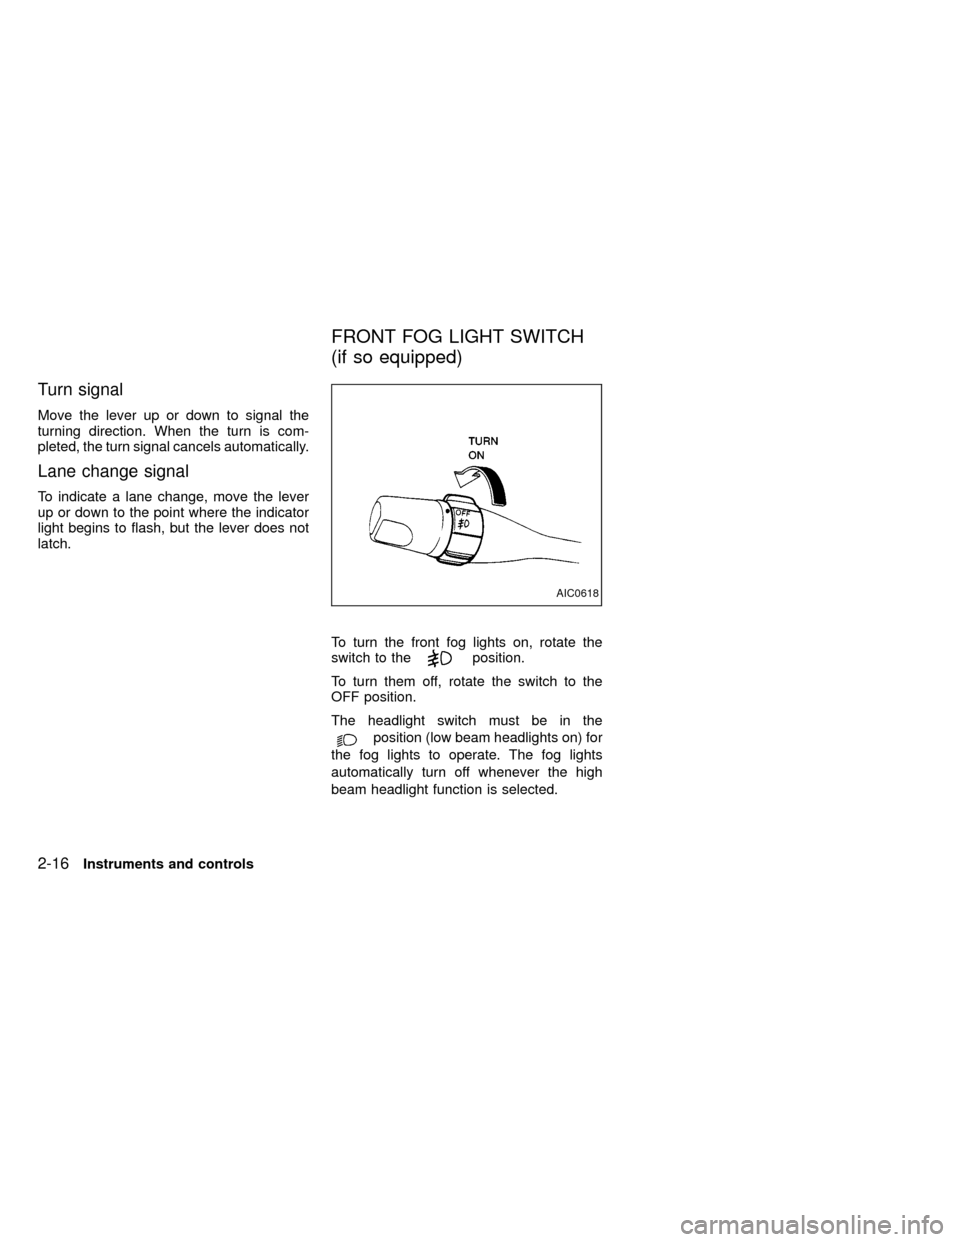
To turn the front fog lights on, rotate the
switch to the
position.
To turn them off, rotate the switch to the
OFF position.
The headlight switch must be in the
position (low beam headlights on) for
the fog lights to operate. The fog lights
automatically turn off whenever the high
beam headlight function is selected.
AIC0618
FRONT FOG LIGHT SWITCH
(if so equipped)
2-16Instruments and controls
ZX
Page 88 of 247

Ð Interior air is recirculated inside the
vehicle.
Move the air intake lever to the
position:
Iwhen driving on a dusty road.
Ito prevent traffic fumes from entering the
passenger compartment.
Ifor maximum cooling when using the air
conditioner.
Air conditioner switch
(if so equipped)
This switch is present only in vehicles
equipped with an air conditioner.
Start the engine, push the air conditioner
switch and move the fan control lever to the
desired speed. The indicator light comes on
when the air conditioner is operating.
HEATER OPERATION
Heating
This mode directs heated air from the foot
outlets. A small amount of air is also di-
rected from the defrost outlets.
1. Move the air intake lever to the
position for normal heating.
2. Turn the air control dial to theposition.
3. Move the fan control lever to the desired
speed.
4. Turn the temperature control dial clock-
wise until it stops or to the desired posi-
tion.
Ventilation
This mode directs outside air from the side
and center ventilators.
1. Move the air intake lever to the
position.
2. Turn the air control dial to the
position.
3. Move the fan control lever to the desired
speed.
4. Turn the temperature control dial to the
desired position.
Defrosting/defogging
This mode directs heated air from the
defrosting/defogging outlets.
1. Move the air intake lever to the
position.2. Turn the air control dial to the
position.
3. Move the fan control lever to the desired
speed.
4. Turn the temperature control dial clock-
wise until it stops or to the desired posi-
tion.
If it is difficult to defog the windshield,
push the air conditioner switch (if so
equipped) on. This dehumidifies the air,
which helps defog the windshield.
To quickly remove ice or fog from the
windows, move the fan control lever to 4
and the temperature control dial to the
full clockwise position.
Bi-level heating/cooling
This mode directs air from the side and
center ventilators and from the foot outlets.
1. Move the air intake lever to the
position.
2. Turn the air control dial to the
position.
3. Move the fan control lever to the desired
speed.
4-4Heater, air conditioner and audio systems
ZX
Page 89 of 247

4. Turn the temperature control dial to the
desired position.
Heating and defrosting/defogging
This mode directs heated air from the foot
outlets and defrosts/defogs the windshield.
1. Move the air intake lever to the
position.
2. Turn the air control dial to the
position.
3. Move the fan control lever to the desired
speed.
4. Turn the temperature control dial clock-
wise until it stops or to the desired posi-
tion.
If it is difficult to defog the windshield,
push the air conditioner switch (if so
equipped) on. This dehumidifies the air,
which helps defog the windshield.
Operating tips
Clear snow and ice from the wiper blades
and air inlet in front of the windshield. This
improves heater and defroster operation.
AIR CONDITIONER OPERATION
(if so equipped)
Start the engine, move the fan control lever
to the desired (one to four) position, and
push in the air conditioner switch to activate
the air conditioner. When the air conditioner
is on, cooling and dehumidifying functions
are added to the heater operation.
The air conditioner cooling function op-
erates only when the engine is running.
Cooling
This mode directs cool, dehumudified air
from the side and center ventilators.
1. Move the air intake lever to the
position.
2. Turn the air control dial to the
position.
3. Move the fan control lever to the desired
position.
4. Push in the air conditioner switch. The
indicator light comes on.
5. Turn the temperature control dial to the
desired position.
IFor quick cooling when the outside tem-
perature is high, move the air intake leverto the
position. Be sure to return
the air intake lever to theposition
for normal cooling.
Dehumidified heating
This mode directs heated, dehumidfied air
from the defrosting/defogging outlets.
1. Move the air intake lever to the
position.
2. Turn the air control dial to the
position.
3. Move the fan control lever to the desired
position.
4. Push in the air conditioner switch. The
indicator light comes on.
5. Turn the temperature control dial clock-
wise until it stops or to the desired posi-
tion.
Dehumidified defrosting/defogging
This mode directs heated, dehumidified air
from the defrosting/ defogging outlets.
1. Turn the air intake lever to the
po-
sition.
Heater, air conditioner and audio systems
4-5
ZX
Page 161 of 247

8 Do-it-yourself
Maintenance precautions .......................................8-2
Engine compartment check locations ....................8-3
Engine cooling system ...........................................8-5
Checking engine coolant level ...............................8-5
Changing engine coolant .......................................8-6
Engine oil ...............................................................8-9
Checking engine oil level .......................................8-9
Changing engine oil .............................................8-10
Changing engine oil filter .....................................8-12
Automatic transmission fluid (atf) .........................8-13
Temperature conditions for checking atf..............8-13
Power steering fluid..............................................8-14
Brake and clutch fluid ...........................................8-15
Window washer fluid ............................................8-15
Battery ..................................................................8-16
Jump starting ........................................................8-17
Drive belts ............................................................8-18Spark plug replacement .......................................8-19
Air cleaner housing filter ......................................8-21
Wiper blades ........................................................8-23
Parking brake check.............................................8-24
Brake pedal ..........................................................8-24
Brake booster .......................................................8-25
Clutch pedal .........................................................8-26
Fuses ....................................................................8-27
Light bulbs ............................................................8-28
Headlights ............................................................8-28
Bulb replacement .................................................8-29
Front fog light bulb replacement (if so
equipped) .............................................................8-31
Wheels and tires...................................................8-32
Four-wheel drive models ......................................8-35
Clutch housing .....................................................8-37
ZX
Page 189 of 247

BULB REPLACEMENT
Item Wattage (W) Bulb No.
Front combination light:
Turn signal light 27 1156
Parking light 3.8 194
Rear combination light:
Turn signal 27 3157
Stop/Tail 27/7 3157
Back-up 27 3156
Rear side marker light 3.4 158
License plate light type A 3.8 168
License plate light type B 5 217
Fog light 35 H3
Dome light 10 Ð
Dome and cargo light 10 Ð
Map light 8 Ð
High-mounted stop light 2.3 2723
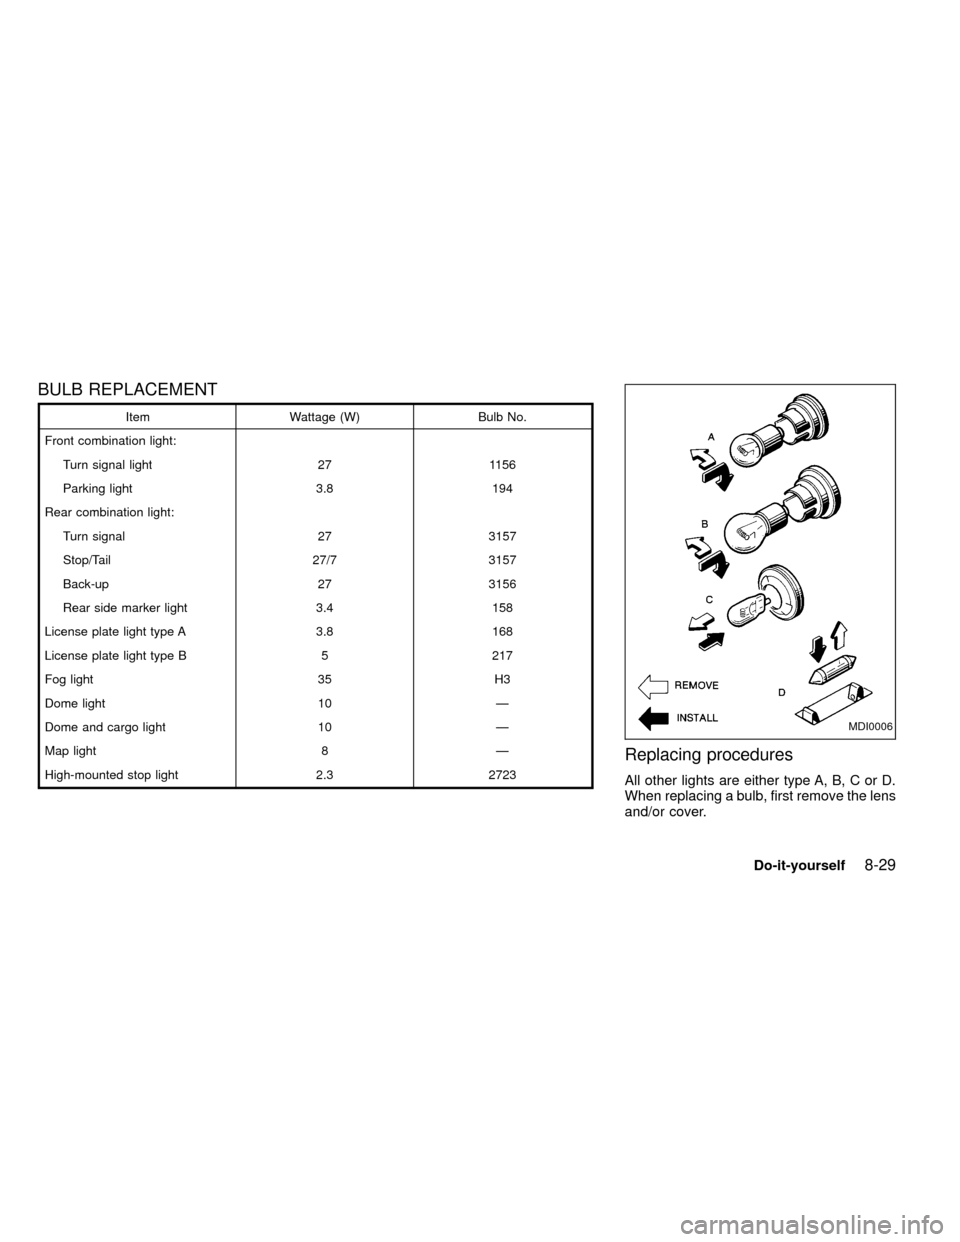
Replacing procedures
All other lights are either type A, B, C or D.
When replacing a bulb, first remove the lens
and/or cover.
MDI0006
Do-it-yourself8-29
ZX
Page 191 of 247

FRONT FOG LIGHT BULB RE-
PLACEMENT (if so equipped)
CAUTION
IHigh pressure halogen gas is sealed
inside the halogen bulb. The bulb
may break if the glass envelope is
scratched or the bulb is dropped.
IWhen handling the bulb, do not
touch the glass envelope.
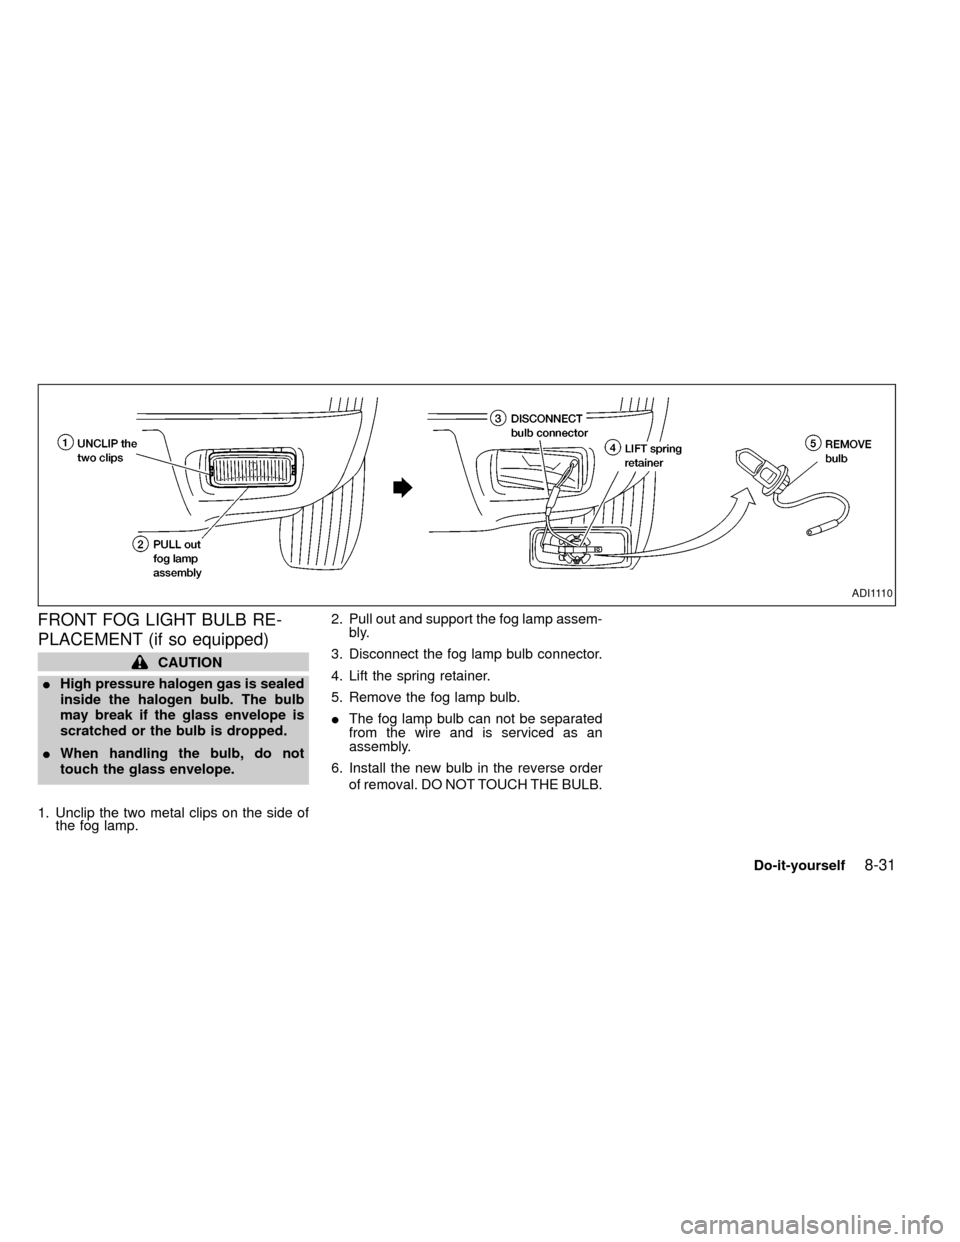
1. Unclip the two metal clips on the side of
the fog lamp.2. Pull out and support the fog lamp assem-
bly.
3. Disconnect the fog lamp bulb connector.
4. Lift the spring retainer.
5. Remove the fog lamp bulb.
IThe fog lamp bulb can not be separated
from the wire and is serviced as an
assembly.
6. Install the new bulb in the reverse order
of removal. DO NOT TOUCH THE BULB.
ADI1110
Do-it-yourself8-31
ZX