1999 NISSAN FRONTIER ESP
[x] Cancel search: ESPPage 20 of 247
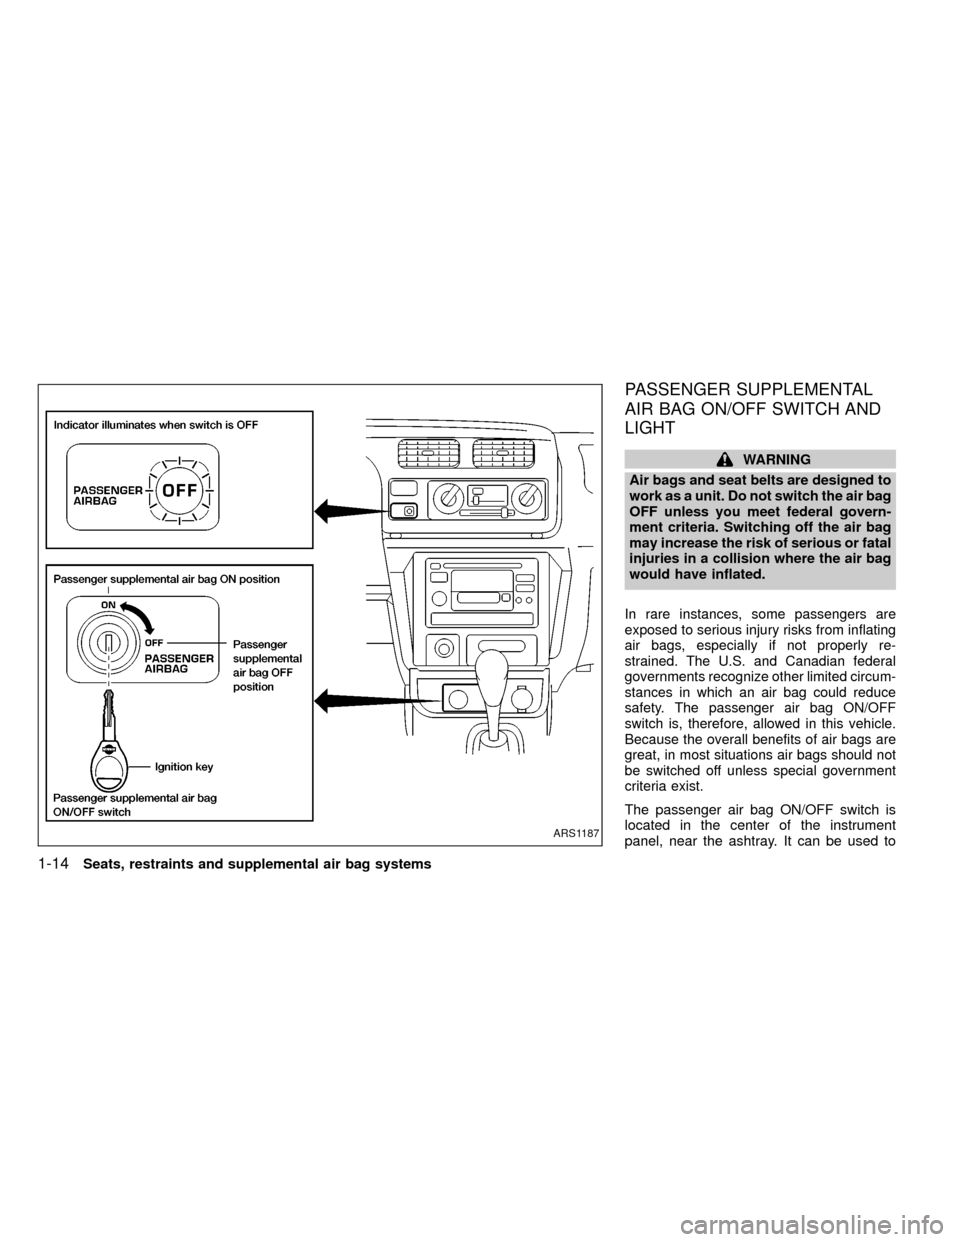
PASSENGER SUPPLEMENTAL
AIR BAG ON/OFF SWITCH AND
LIGHT
WARNING
Air bags and seat belts are designed to
work as a unit. Do not switch the air bag
OFF unless you meet federal govern-
ment criteria. Switching off the air bag
may increase the risk of serious or fatal
injuries in a collision where the air bag
would have inflated.
In rare instances, some passengers are
exposed to serious injury risks from inflating
air bags, especially if not properly re-
strained. The U.S. and Canadian federal
governments recognize other limited circum-
stances in which an air bag could reduce
safety. The passenger air bag ON/OFF
switch is, therefore, allowed in this vehicle.
Because the overall benefits of air bags are
great, in most situations air bags should not
be switched off unless special government
criteria exist.
The passenger air bag ON/OFF switch is
located in the center of the instrument
panel, near the ashtray. It can be used to
ARS1187
1-14Seats, restraints and supplemental air bag systems
ZX
Page 27 of 247
IDo not install a child restraint in the
center position of the front bench
seat. This position is not suitable for
child restraint installation.
I
Infants and children need special pro-
tection. The vehicle's seat belts may
not fit them properly. The shoulder
belt may come too close to the face or
neck. The lap belt may not fit over
their small hip bones. In an accident,
an improperly fitting seat belt could
cause serious or fatal injury. Always
use appropriate child restraints.
All U.S. states and Canadian provinces or
territories require the use of approved child
restraints for infants and small children. See
``Child restraints'' later in this section for
more information.
In addition, there are many types of child
restraints available for larger children which
should be used for maximum protection.
NISSAN recommends that all preteens
and children be restrained in the rear
seat if available. According to accident
statistics, children are safer when prop-
erly restrained in the rear seat than in the
front seat.This is especially important because
your vehicle has a supplemental re-
straint system (Supplemental air bag
system) for the front passenger (For pre-
cautions, see ``Supplemental restraint
system'' earlier in this section). Also, see
``Passenger air bag ON/OFF switch and
light'' earlier in this section.
Infants and small children
NISSAN recommends that infants and small
children be seated in child restraints that
comply with Federal Motor Vehicle Safety
Standards or Canadian Motor Vehicle
Safety Standards. You should choose a
child restraint which fits your vehicle and
always follow the manufacturer's instruc-
tions for installation and use.
Larger children
Children who are too large for child re-
straints should be seated and restrained by
the seat belts which are provided.
If the child's seating position has a shoulder
belt that fits close to the face or neck, the
use of a booster seat (commercially avail-
able) may help overcome this. The booster
seat should raise the child so the shoulder
belt is properly positioned across the top,middle portion of the shoulder and the lap
belt is low on the hips. The booster seat
should fit the vehicle seat and have a label
certifying that it complies with Federal Motor
Vehicle Safety Standards or Canadian Mo-
tor Vehicle Safety Standards. Once the child
has grown so the shoulder belt is no longer
on or near the face and neck, use the
shoulder belt without the booster seat.
WARNING
Never let a child stand or kneel on any
seat and do not allow a child in the
cargo areas while the vehicle is mov-
ing. The child could be seriously in-
jured or killed in an accident.
PREGNANT WOMEN
NISSAN recommends that pregnant women
use seat belts. Contact your doctor for spe-
cific recommendations. The lap belt should
be worn snug and positioned as low as
possible around the hips, not the waist.
INJURED PERSONS
NISSAN recommends that injured persons
use seat belts, depending on the injury.
Check with your doctor for specific recom-
mendations.
Seats, restraints and supplemental air bag systems
1-21
ZX
Page 90 of 247

2. Move the air control dial to the,
, or the position in between.
3. Move the fan control lever to the desired
position.
4. Push in the air conditioner switch. The
indicator light comes on.
5. Turn the temperature control dial to the
desired position.
Operating tips
IKeep windows and sunroof closed while
operating the air conditioner.
IAfter parking in the sun, drive for two or
three minutes with the windows open to
vent hot air from the passenger compart-
ment. Then, close the windows. This
allows the air conditioner to cool the
interior more quickly.
IThe air conditioning system should be
operated for about ten minutes at least
once a month, especially in winter. This
helps prevent damage to the system due
to lack of lubrication.
IIf the coolant temperature gauge ex-
ceeds the (hot) position, turn the air
conditioner off. Have your vehicle in-spected by a NISSAN dealer. See ``If
your vehicle overheats'' in the ``In case of
emergency'' section for additional infor-
mation.
4-6Heater, air conditioner and audio systems
ZX
Page 122 of 247
1. Apply the parking brake.
2.Automatic transmission:
Move the selector lever to P (Park) or N
(Neutral). P (Park) is preferred.
The shift lever cannot be moved out of
P (Park) and into any of the other gear
positions if the ignition key is turned
to OFF or if the key is removed from
the switch.
The starter is designed not to operate
if the selector lever is in one of the
driving positions.
Manual transmission:
Move the gearshift lever to N (Neutral),
and fully depress the clutch pedal to the
floor while starting the engine.
The starter is designed not to operate
unless the clutch pedal is fully de-
pressed.
3.With your foot off the accelerator
pedal,turn the ignition key to START.
Release the key when the engine starts.
If the engine starts, but fails to run, repeat
the above procedure.IIf the engine is very hard to start in
extremely cold or hot weather, depress
the accelerator pedal fully and hold it
to help start the engine.
IIn the summer, when restarting the
engine within 30 minutes after it has
been stopped, keep the accelerator
pedal fully depressed while starting.
CAUTION
Do not operate the starter for more than
15 seconds at a time. If the engine does
not start, turn the key off and wait 10
seconds before cranking again, other-
wise the starter could be damaged.
4.Warm-up
Always allow the engine to idle for at
least 30 seconds after starting. Drive at a
moderate speed for a short distance first,
especially in cold weather.
WARNING
IBe sure the parking brake is fully
released before driving. Failure to do
so can cause brake failure and lead
to an accident.
IDo not release the parking brake
from outside the vehicle.
IDo not use the gear shift in place of
the parking brake. When parking, be
sure the parking brake is fully en-
gaged.
I
Do not leave children unattended in a
vehicle. They could release the park-
ing brake and cause an accident.
STARTING THE ENGINE PARKING BRAKE OPERATION
5-14Starting and driving
ZX
Page 136 of 247
hill grade, place the gearshift lever in the
1st position.
Automatic transmission models:
Move the gearshift lever to the P (Park)
position.
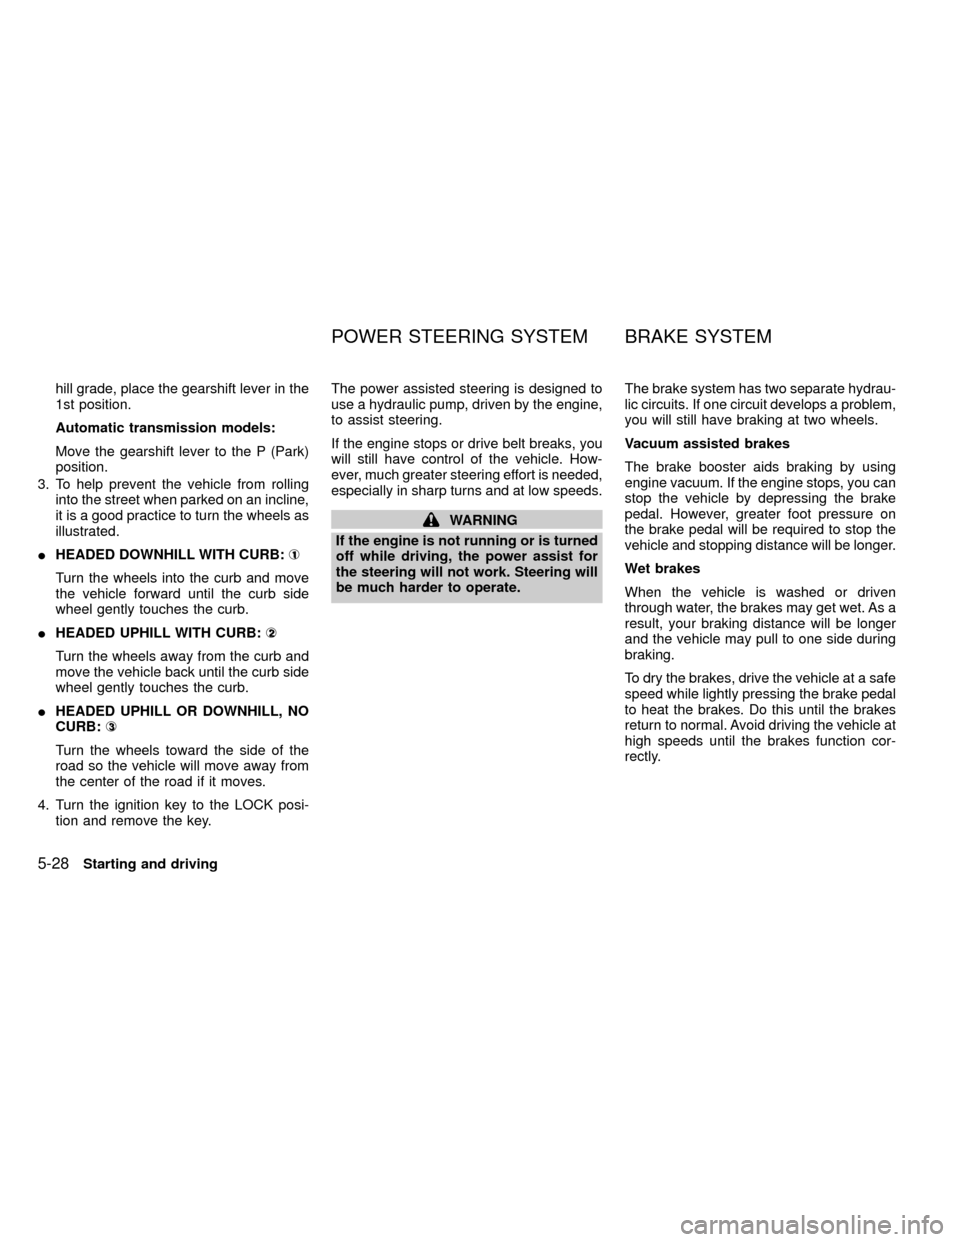
3. To help prevent the vehicle from rolling
into the street when parked on an incline,
it is a good practice to turn the wheels as
illustrated.
IHEADED DOWNHILL WITH CURB:À
1
Turn the wheels into the curb and move
the vehicle forward until the curb side
wheel gently touches the curb.
IHEADED UPHILL WITH CURB:Á
2
Turn the wheels away from the curb and
move the vehicle back until the curb side
wheel gently touches the curb.
IHEADED UPHILL OR DOWNHILL, NO
CURB:Â
3
Turn the wheels toward the side of the
road so the vehicle will move away from
the center of the road if it moves.
4. Turn the ignition key to the LOCK posi-
tion and remove the key.The power assisted steering is designed to
use a hydraulic pump, driven by the engine,
to assist steering.
If the engine stops or drive belt breaks, you
will still have control of the vehicle. How-
ever, much greater steering effort is needed,
especially in sharp turns and at low speeds.
WARNING
If the engine is not running or is turned
off while driving, the power assist for
the steering will not work. Steering will
be much harder to operate.The brake system has two separate hydrau-
lic circuits. If one circuit develops a problem,
you will still have braking at two wheels.
Vacuum assisted brakes
The brake booster aids braking by using
engine vacuum. If the engine stops, you can
stop the vehicle by depressing the brake
pedal. However, greater foot pressure on
the brake pedal will be required to stop the
vehicle and stopping distance will be longer.
Wet brakes
When the vehicle is washed or driven
through water, the brakes may get wet. As a
result, your braking distance will be longer
and the vehicle may pull to one side during
braking.
To dry the brakes, drive the vehicle at a safe
speed while lightly pressing the brake pedal
to heat the brakes. Do this until the brakes
return to normal. Avoid driving the vehicle at
high speeds until the brakes function cor-
rectly.
POWER STEERING SYSTEM BRAKE SYSTEM
5-28Starting and driving
ZX
Page 138 of 247
Using the system, 2WD Vehicles
(2 wheel rear ABS)
Depress the brake pedal and hold it down.
With the rear anti-lock brake system, the
front wheels can still lock. If this happens,
release the brake pedal slightly and then
reapply pressure.
WARNING
The anti-lock brake system is a sophis-
ticated device. But it cannot prevent
accidents resulting from careless or
dangerous driving techniques. It can
help maintain vehicle control under
some conditions, but remember that
the stopping distance on slippery sur-
faces will be longer than on normal
surfaces even with ABS. Stopping dis-
tances may also be longer on rough,
gravel, or snow covered roads, or if you
are using tire chains. Always maintain a
safe distance from the vehicle in front
of you. Ultimately, the responsibility for
safety of self and others rests in the
hands of the driver.Tire type and condition may also affect
braking effectiveness.
IWhen replacing tires, install the
specified size of tires on all four
wheels.
IWhen installing a spare tire, make
sure it is the proper size and type as
specified on the tire placard. See
``Tire placard'' in the ``Technical and
consumer information'' section.
Freeing a frozen door lock
To prevent a door lock from freezing, apply
de-icer or glycerin through the key hole. If
the lock becomes frozen, heat the key be-
fore inserting it in the key hole.
Anti-freeze
In the winter when it is anticipated that the
temperature will drop below 32ÉF (0ÉC),
check anti-freeze (ethylene glycol base) to
assure proper winter protection. For details,
see ``Engine cooling system'' in the ``Do-it-
yourself'' section of this manual.
Battery
If the battery is not fully charged during
extremely cold weather conditions, the bat-
tery fluid may freeze and damage the bat-
tery. To maintain maximum efficiency, the
battery should be checked regularly. For
details, see ``Battery'' in the ``Do-it-yourself''
section of this manual.
Draining of coolant water
If the vehicle is to be left outside without
anti-freeze, drain the cooling system by
opening the drain valves located under the
radiator and on the engine block. Refill
COLD WEATHER DRIVING
5-30Starting and driving
ZX
Page 145 of 247
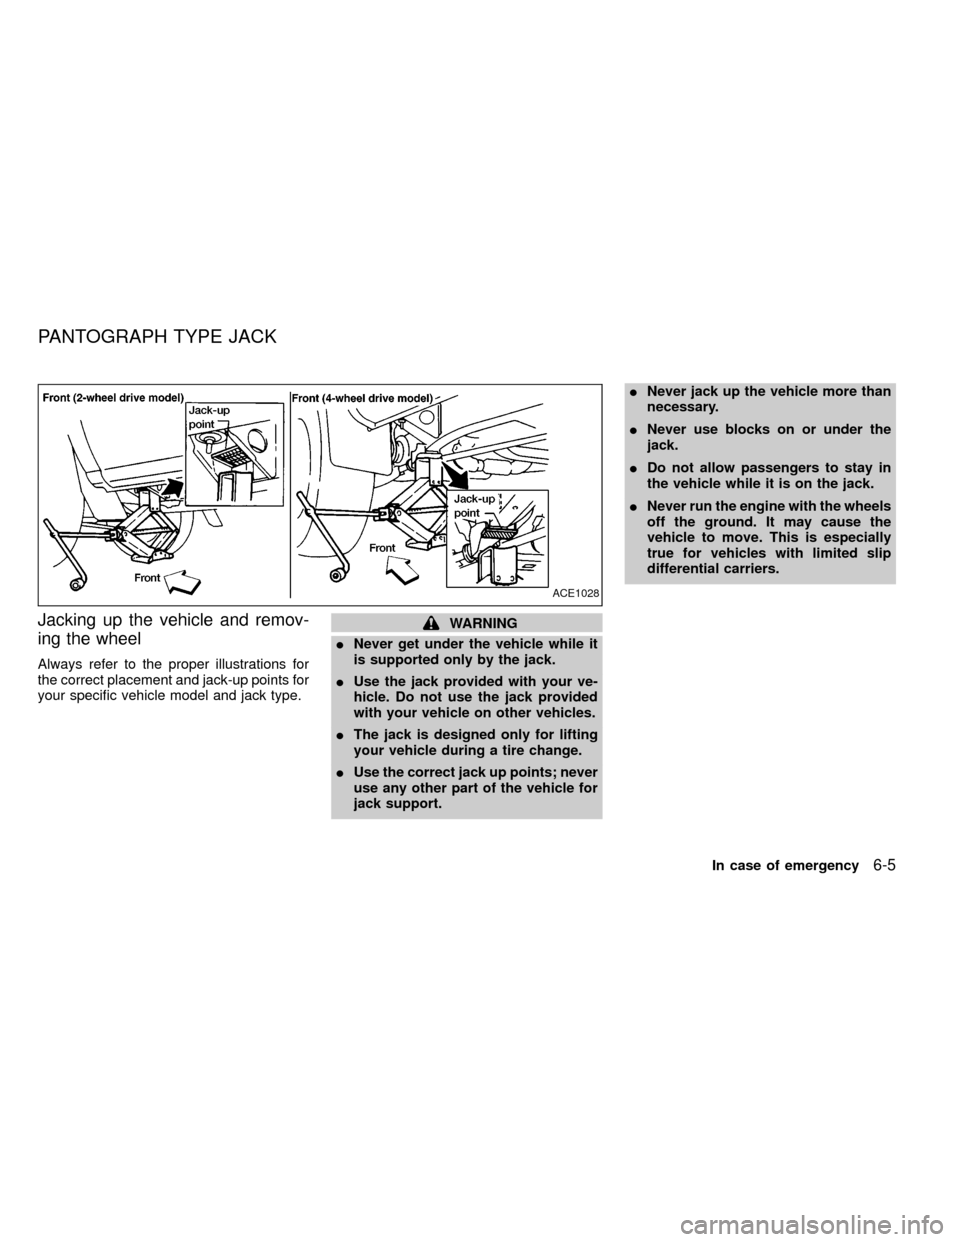
Jacking up the vehicle and remov-
ing the wheel
Always refer to the proper illustrations for
the correct placement and jack-up points for
your specific vehicle model and jack type.
WARNING
INever get under the vehicle while it
is supported only by the jack.
IUse the jack provided with your ve-
hicle. Do not use the jack provided
with your vehicle on other vehicles.
IThe jack is designed only for lifting
your vehicle during a tire change.
IUse the correct jack up points; never
use any other part of the vehicle for
jack support.INever jack up the vehicle more than
necessary.
INever use blocks on or under the
jack.
IDo not allow passengers to stay in
the vehicle while it is on the jack.
INever run the engine with the wheels
off the ground. It may cause the
vehicle to move. This is especially
true for vehicles with limited slip
differential carriers.
ACE1028
PANTOGRAPH TYPE JACK
In case of emergency6-5
ZX
Page 157 of 247
you in choosing the proper product.
IWax your vehicle only after a thorough
washing. Follow the instructions sup-
plied with the wax.
IDo not use a wax containing any abra-
sives, cutting compounds or cleaners
that may damage the vehicle finish.
IIf the surface does not polish easily, use
a ``road tar'' remover and wax again.
Machine compounding or aggressive pol-
ishing on a base coat/clear coat paint finish
may dull the finish or leave swirl marks.
Only apply black wax or black shoe polish to
the black urethane or polypropylene
bumper.
Removing spots
Remove tar and oil spots, industrial dust,
insects and tree sap as quickly as possible
from the surface of the paint to avoid per-
manent damage or staining. Special clean-
ing products are available at an authorized
NISSAN dealer or any automotive accesso-
ries store.
Underbody
In areas where road salt is used in winter, itis necessary to clean the underbody regu-
larly in order to prevent dirt and salt from
building up and causing corrosion on the
underbody and suspension. Before the win-
ter period and again in the spring, the
underseal must be checked and, if neces-
sary, retreated.
Cleaning glass
Use glass cleaner to remove smoke and
dust film from the glass surfaces. It is nor-
mal for glass to be coated with a film after
the vehicle is parked in the hot sun. Glass
cleaner and a soft cloth easily remove this
film.
CAUTION
When cleaning the inside of the win-
dow, do not use any sharp-edged tools
or abrasive cleaners or chlorine-based
disinfectant cleaners. They could dam-
age the electrical conductors, radio an-
tenna elements or rear window defog-
ger elements.
Cleaning aluminum alloy wheels
Wash regularly, especially during winter
months in areas where road salt is used.Salt could discolor the wheel if not removed.
Chrome parts
Clean all chrome parts regularly with a
non-abrasive chrome polish to maintain the
finish.
Cleaning interior
Occasionally remove loose dust from the
interior trim, plastic parts and seats using a
vacuum cleaner or soft brush. Wipe the
vinyl and leather surfaces with a clean, soft
cloth dampened in mild soap solution, then
wipe clean with a dry soft cloth. Before
using any fabric protector, read the manu-
facturer's recommendations. Some fabric
protectors contain chemicals that stain or
bleach the seat material.
CAUTION
INever use benzine, thinner or any
similar material.
INever use fabric protectors unless
recommended by the manufacturer.
Appearance and care
7-3
ZX